With all of the digital EQ’s out there that come pre-installed as plugins in our recording software, attention has dropped away from the superior sound of a warm analog equalizer snuggled in your rack between your compressor and preamp. It’s understandable. Why buy a hardware EQ when you have a free software option already? Well, there are plenty of reasons…
The following review may contain affiliate links which may earn us a small commission when you click on them, at no extra cost for you. As an Amazon Associate we earn from qualifying purchases.
Emulation is simply that… a game of pretend… a simulation of the real thing. Not the real thing…. Software can pretend to replicate the circuitry of hardware, but they’ll never actually be one of the best equalizers.
Does that mean software EQ’s suck? Not by a long shot. They are fantastic. But they lack what can’t be simulated accurately. They don’t feature the harmonic distortion transistors and tubes can offer. They dissociate you from the process of mixing, which can be very hands on.
Outboard equalizers aren’t nearly as sexy as a preamplifier or effects processor. They imply effort and technological sophistication instead of the feeling of instant results a compressor gives off.
I say to let everyone think that and feel that way. Meanwhile you’ll have a secret weapon in your signal path as a recording, mixing, and mastering engineer that gets you more results and more business than your competitors.
So let’s cut to the chase, glance at the options and point out what to look for, and then run through our recommendations for each type at various price levels.
In case needed, we have added a mini guide at the bottom of this article where we talk about EQ’s in general, including the types available, why the top studios prefer hardware options, and what you should consider before making a purchase.
Need more information in order to better understand the world of equalizers? We have got you covered! Visit of FAQs section
For our reviews – we have selected the best parametric and best graphic equalizers that you can readily find right now. We also make sure to include the top choices in each budget range so nobody is left out. You can maximize your returns on quality at any step with the right purchase and some practice.
Let’s do it!
Included in this guide
| Golden Age Project EQ73 | Best Entry-Level Equalizer | Buy on Amazon |
| Warm Audio EQP-WA | Best Bang for the Buck | Buy on Amazon |
| DBX 231s | Best Budget Pick | Buy on Amazon |
| Rane ME-60s | Best Graphic Equalizer | Buy on Amazon |
| A-Designs Hammer 2 | Best for High-End Applications | Buy on Amazon |
| API 5500 | Greatest Track Record | Buy on Amazon |
| Manley Labs Massive Passive | Best of the Best | Buy on Amazon |
Best Parametric Equalizers
We’ll start with the affordable options (and avoid the cheapest that are a waste of everyone’s time!) that are perfect for the home recording studio or smaller mixing and mastering project studio. Then we’ll take a peek at the big boys, which I recommend you take the time to check out to get a frame of reference.
These are most useful for broad and smooth changes to your sound but are also capable of precise adjustments. Musicians with less than stellar recording and mixing environments may prefer this style. They remain useful for the lifetime of your ownership for sure.
GOLDEN AGE PROJECT EQ73
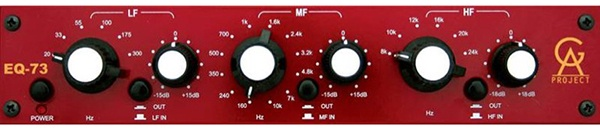
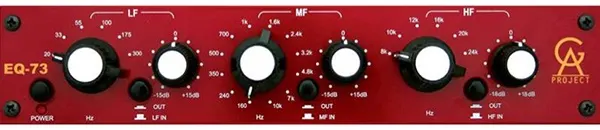
The Golden Age Project EQ73 derives its name from its goal of providing the same warmth and clarity that’s found in the classic Neve 1073 at a significantly lower price.
What’s nice here is that while this appears to be your basic three-band EQ, the outer bands are actually low and high-shelf filters. The middle band can reach from 100 Hz all the way to 10 kHz, which is all you need when combined with the shelves that can act as roll-offs too.
The knobs are stepped, meaning you can’t target frequencies between those labeled, but they are chosen specifically to offer the best equalization options. The shelves allow up to 15 dB in volume change while the middle band’s bell curve can adjust up to 18 dB. Each band has a bypass switch for full control.
The sound of this EQ can be described as warm and punchy, which could be alternately described as pleasing with smooth transitions. It is one solid channel of mono goodness, perfect for vocals, guitar, synth, and anything else really. This classic Neve sound has appeared on countless top albums over the decades.
The one thing you want to be aware of here is that the input and output of this unit is designed to be used with insert jacks. This mean the signal goes out of your preamp or interface, for instance, passes through this EQ, and then returns to the first piece of gear through a TRS cable.
Your options end up being using it with any gear or a mixer that has an insert jack or using a TRS to TS split cable. This way you can run it like normal or patch it into your patchbay. It’s not a big deal but be aware so you aren’t caught off guard and needing to order a cable or signal splitter later.
Specs:
- Style: Filter, Vintage
- Color: MultiColored
- Vintage Style electronics, with no integrated circuits in the signal path
- 3-band with a dual inductor based mid frequency band
- Stepped frequency selection
- A wide selection of frequencies
Pros:
- Great frequencies
- Works well with low-level input between in and out trannies
Cons:
- Enamel spray paint scratches easily
WARM AUDIO EQP-WA
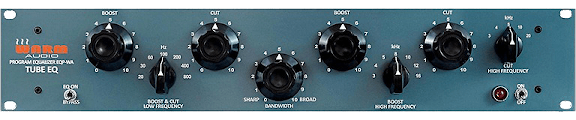
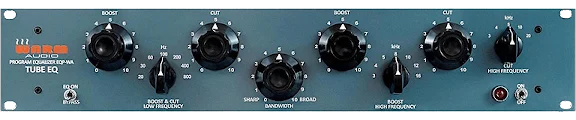
The Warm Audio EQP-WA is another modern equalizer made to replicate a classic sound at an affordable price. The model number refers to the Pultec EQP-1A sound that this fully discrete tube EQ offers. Two tubes equal warmth and that’s one reason this company calls themselves Warm Audio.
You can even bypass the entire EQ section but run through the tubes for adding warmness to your signal! The input and output on this mono beast are both balanced XLR.
What you’ll have noticed from the picture above is that you can both boost and cut at the same time to create a phase effect. You may or may not use it but the option is nice. To me, the real value is in the adjustable bandwidth of the Q curve, which many hardware EQ’s don’t tend to offer.
If you look closely you’ll see that this is a 3-band EQ. The low frequency boost and cut are combined while the high frequency boost and cut are separated from a high cut shelf. This is fantastic for boosting for presence while cutting elsewhere make room for harmonies or to kill off less pleasing frequencies like slight sibilance.
You really can’t go wrong with this option.
Specs:
- Tube Equalizer based on the classic “Pultec” EQP-1A
- CineMag input and output transformers
- Premium high voltage 12AX7 and 12AU7 tubes
- CineMag inductor EQ section
- EQ bypassable – signal still passes through tubes and transformers for warming effect
Pros:
- Good build quality
- Great performance
- Unique set of filters and frequencies
Cons:
- Very sensitive sensors
Best Graphic Equalizers
For those who wish to make precise changes to their tracks and have clean enough recordings for it to be useful will benefit from a graphic equalizer as well as the other style.
DBX 231S
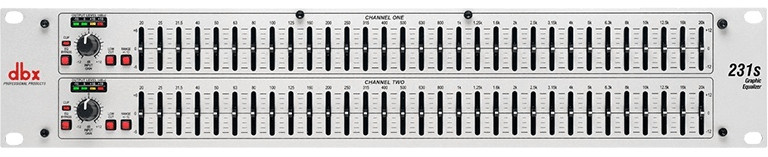
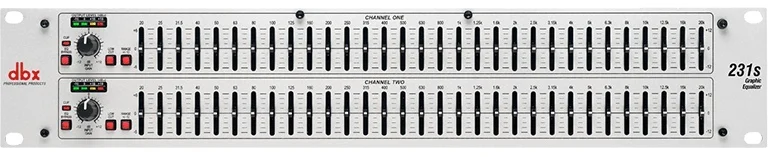
Ah yes, the trusty DBX 231s. DBX has been around forever and has specialized in affordable gear that is rugged enough for the road but performs well enough for the studio. Their compressors and EQ’s find their way into a ton of studios due to this performance to price ratio. It’s mid-level gear at entry level prices.
Not only is this bad boy a stereo equalizer, but both channels have 31 bands. Each band has a Q set at 1/3rd of an octave and can manage up to a 12 dB boost or cut. You can actually switch it to 6 dB if you want to get more detailed in your adjustments.
It also features an output meter that will let you know if you’re driving the gain too hard or not enough for your gain staging. You have your choice of XLR or TRS inputs and outputs too. Convenient!
Some folks have complained about self-noise in these units but that’s not been my experience. Of course, using a power conditioner, proper grounding of your rack, and correct gain staging are critical if you expect any piece of gear to perform at its best. Most of what I’ve heard is people dropping all of the sliders down and then cranking up the monitors to listen for noise.
Everything has a noise floor thats well below any problematic level with the right gain settings. I suspect a lot of the complaints come from well-meaning but not-so-knowledgable amateur users (usually people not using a preamplifier with their mics and compensating with the gain on the EQ) due to the low price point.
For anyone playing gigs or mixing live events, this is your rugged money-saver that you can beat up and not worry about. For budget studios, this will get the job done for mixing and mastering if you’re doing your part of the deal right. If you can spring for the Rane below, then by all means do it. If you can’t, you’ve found your winner right here.
Specs:
- Dual 31-band, 1/3-octave constant Q frequency bands
- Switchable boost/cut ranges of 6 or 12 dB
- Front panel bypass switch
- 12 dB input gain range
- 4-Segment LED ladders for monitoring output levels
- Inputs: ¼” TRS and female XLR (pin 2 Hot)
- Outputs: ¼” TRS and male XLR (pin 2 Hot)
Pros:
- Regarded as the Industry standard for mixing music
- High-level performance
- Good built quality
Cons:
- Resolution is inappropriate for noisy backgrounds
RANE ME-60S
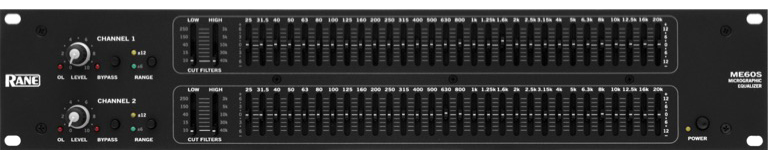
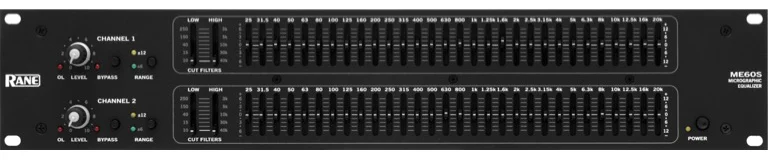
The Rane ME-60s is the update to their ME-60 model (and is two ME-30s units combined) that helped make quite the name for the company. Studio engineers discovered that these more affordable counterparts outperformed the “big boys” for a lot of tasks, of course based on preference. But that says a lot when very trained ears get excited about a piece of gear.
This EQ takes up 2 rack units to accommodate stereo (two mono’s actually) channels. With each of the 30 band’s average Q at 1/3rd octave, this makes for a nice piece for precision mixing and mastering, especially when there’s an imbalance in panned tracks that needs some fixing. With balanced XLR and TRS jacks, you can be assured your signal is staying protected from any noise, outside or inside the Rane.
The ME-60s, unlike its predecessor and the Daking above, features a constant-Q bandwidth design. Each band gives you up to 12 dB in boost or cutting, or you can drop it to 6 dB for more decisive work. It also features the convenience of low and high cut filters that reach fairly high and low.
It features a bypass if you want to impart its color to your signal without actually equalizing and input gain controls so you can drive it to your taste. There’s an overload LED indicator as well so you know if you’ve driven the signal too hard.
This is one of those options that sits right at the curve before you get diminished returns for higher spends. It’s great for the conscientious buyer looking for the best value for their money. If you don’t mind spending more for incrementally smaller gains, then proceed to the options below!
Specs:
- Constant-Q Bandwidth Design
- Overall Level Controls and Passive Bypass Switches
- 20 mm Filter Slide Controls with ±6 dB or ±12 dB Slide Range Switch
- Sweepable Low & High Cut Filters
- Infrasonic, Ultrasonic, & RFI Filters
Pros:
- Have a high resolution
- Provides a wide range of control system audio
Cons:
- Resolution is inappropriate for more noisy backgrounds.
Best EQ’s For Recording & Mixing
Any experienced engineer could use any of these for any task, but these are the ones we prefer specifically for broad sweeping recording and mixing tasks.
A-DESIGNS HAMMER 2
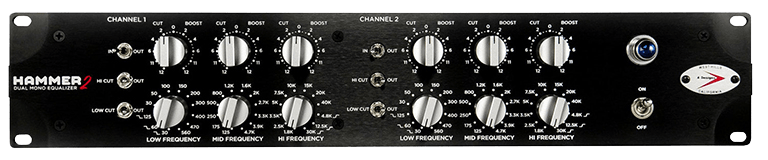
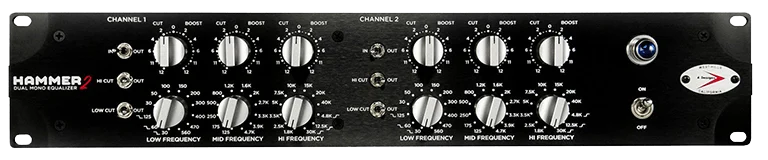
The A-Designs Hammer 2 is possibly the easiest to use EQ on the planet. The dual mono channels give you the leeway to work two separate tracks at once or one stereo track. You have three switches down the left side of each channel to engage or bypass the EQ, the high cut (at 8 kHz), and the low cut (at 84 Hz).
Like the Warm Audio EQ above, the Hammer 2 features three bands and two tubes to toss in the second order harmonics for a full, warm sound even in bypass mode.
If you’ve used any equalizers before, you’ve realized that you’re setting it up for a single moment in time but as soon as the notes and chords change your carefully crafted settings no longer make sense. That’s why broad Q’s can be beneficial. Not only does this include broadly set bandwidths that slightly crossover for a natural sound but they move along with the music to eradicate the problem altogether.
They call this “self-adjusting” or floating Q’s, which previously has only been found in the most modern and expensive plugins. This truly makes this EQ a set-and-forget model that makes it nearly impossible to not improve your mixes. It works like that on mono tracks, stereo tracks, or even the mix bus!
Not only are there plenty of frequency options with up to a 12 dB cut or boost, but with the tubes, almost non-existent noise floor, high and low cut filters, and the wide and floating Q’s this is one of the most attractive equalizers for recording and mixing in clean environments. You can faithfully commit to tape or computer and then route through your patchbay to make overarching changes to the mix fast and confidently.
Specs:
- Frequency Response-3 dB points @ 5 Hz and 40 kHz
- Noise Floor-94 dbm with 30 kHz bandwidth
- Boost and CutBoost: 12 dBCut: -12 dB
Pros:
- Sturdy, high quality device
- Easy to set up and use
Cons:
- Not budget friendly
API 5500


The API 5500 is one of the most coveted EQ’s in the game. It all started in 1967 with the 550 EQ console module found in all of the big studio mixing boards. It broke a lot of new ground with its op-amp gain stages, proportional (but non-variable) Q’s, and having almost twice the headroom of every other EQ even up to the present.
As the emphasis on consoles shifted to racks thanks to the decreasing financial barrier to entry, API made this studio standard available in this dual-mono option.
API flat out says that you can use this bad boy for tracking, mastering, and mixing. It’s ready to tackle anything. I’ve read that lots of engineers prefer a handful of these to use as their bus EQ’s.
Each channel features four bands, separated between Lo, Lo-Mid, Hi-Mid, and Hi. The boost and cut range starts at a 1 dB increment for a maximum of 12 dB cut or boost, but you can change that to a 0.5 dB or 0.25 dB increment for some seriously high resolution mixing.
You can take this level of precise action from 40 Hz all the way up to 20 kHz. The one lacking feature I’d like to have seen on here is an independent low and high cut or shelving, but you can take care of that at any point so it’s not a big deal. It would just be bonus points to an already perfect machine rather than having to give up a couple bands to get it done.
Specs:
- Follows the traditional API550B equalizer design
- 2 Range Gain Switch to Change Gain Step
- It also functions as 550B, 550D, or 550M
- Peak/Shelving Switch on High & Low Section
- Hardwire bypass function
Pros:
- Excellent user interface
- Great performance
- Popular choice
Cons:
- Quality competitors at this price point
MANLEY LABS MASSIVE PASSIVE
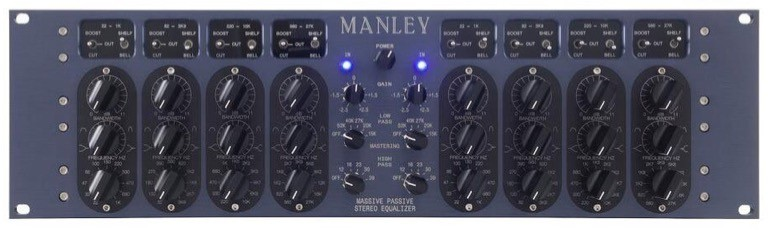
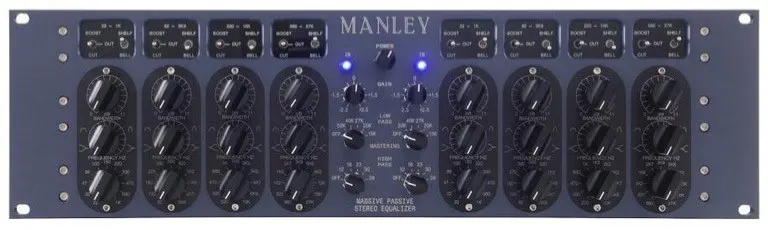
What to say in what order? The Manley Labs Massive Passive is exactly what it says, a passive stereo equalizer with 4 bands per channel and high and low pass filters. What does passive imply? It means the electronic components inside of it don’t require electricity to energize them. They simply impart the sonic qualities to the signal running through them.
In other words, the inductors, capacitors, and resistors in this beast perform their work in a completely transparent fashion without any extra coloration, which is what you need in the mastering stage. What it also means is that you’re extracting energy from your signal in order to impart these characteristics to the signal.
What happens is that a boost to any frequency is actually a cut to all others (and remember at the start of this article we said that cutting is always preferable to boosting!).
That means you’ll need a very powerful amplifier that’s cleaner than any you’ve ever experienced. The amp in the Massive Passive features 6 tubes to pull this off while improving harmonics, stereo depth, and the sense of “pleasantness” that can be heard simply by running through it in bypass mode.
Another interesting feature is that each band works in a serial fashion instead of in parallel like other EQ’s. With each band having the possibility of completely crossing over each other, you may boost the same frequency twice. Instead of those two boosts being summed together at once, you’ll have the first boost applied alone and then the second boost applied separately. It’s not that different but it should be mentioned.
Each band can be switched between boost and cut modes as well as your typical bell shaped Q or turned into a shelf! So if you don’t want to run a complete cut, you can shape a roll-off with the shelf switch and the bandwidth knob.
You have 44 frequency options at around an average 1/4th octave bandwidth that can be adjusted. This is a mastering equalizer, so you know it has nearly zero noise (invisible with proper gain staging) and huge headroom to make your initial push in the loudness wars.
If you’re here hunting for a mastering EQ, this is it, no questions asked.
Specs:
- Two-channels
- Four-band equalizer
- Additional high-pass and low-pass filters
Pros:
- Designed to be a fundamentally different EQ
- HF boosts without sibilance problems
- Simply great sound
Cons:
- Can ‘thud’ when changing settings
Honorable Mentions for Best Equalizer
There are more worthy options out there for you to investigate but we had to trim it to our top favorites. If you want to see a bit more, check out these below.

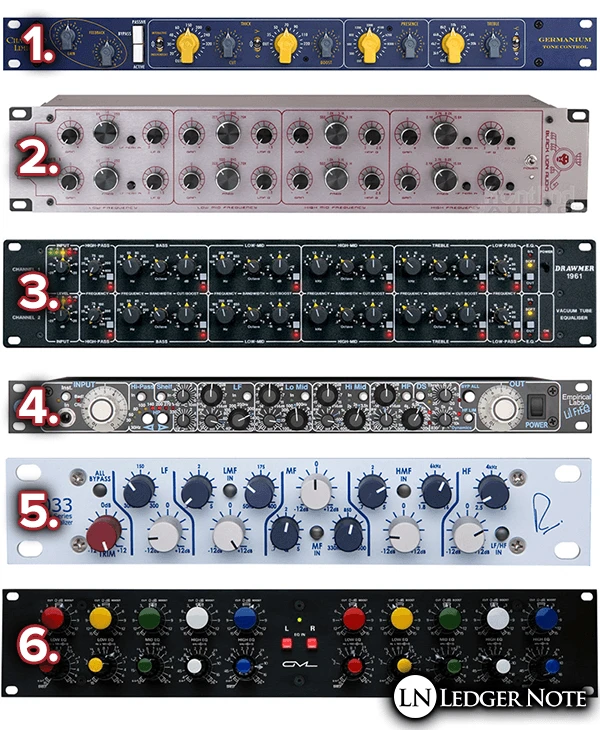
Each is numbered above and can be mapped to the list of links if you want to learn more:
- Chandler Limited’s Germanium Tone Control
- Black Lion Audio’s AM/CHA1
- Drawmer’s 1961 Vacuum Tube EQ
- Empirical Labs’ Lil Freq
- The Portico 5033
- The GML 8200
Those are all fine choices at varying price points. Having read this far, you’ll understand how each is used and can shine on all of the possible applications.
These are the Best Equalizers Out There
There are as many benefits to performing some (or all!) of your equalization outboard as there is to applying compression.
From cleaning up your signal before it turns digital to imparting some analog warmth during the recording phase, to juicing up each track during the mixing phase, and even equalizing your buses, master output, and mastering… there’s always a use for one of the best studio equalizers.
FAQs
What Are Studio Equalizers?
Equalizers are a type of circuitry used as a controllable filter through which an audio signal is passed. In our case we’re talking about music in live venues and recording studios.
This filter is designed to control the volume of specific frequency ranges, either boosting them (increasing the amplitude) or cutting them (reducing the amplitude).
What Types of Equalizers Exist?
You have two main types of equalizers these days:
- Hardware – rackmount, desktop, & 500 series
- Software – VST & AU plugins for DAW’s
Of those two main categories there are two sub-types:
- Parametric
- Graphic
The two have significant differences in how you use them but can both be used to achieve the effect you seek.
Parametric EQ’s tend have far fewer bands (frequency ranges) you can control, but these bands can me moved up and down the frequency spectrum. Their bandwidth (or Q) can be adjusted to encompass a broader group of frequencies or made to be thin for laser-like precision.
The Q is sinusoidal like a bell curve without rigid boundaries. You center frequency and the bandwidth, and then boost or cut.

Graphic EQ’s typically offer 15 or 31 bands per channel, far greater than the 3 to 5 you find on parametric equalizers. These bands, on the other hand, are static not only in the spectrum but in their bandwidth. Your choice is only to boost or cut.
Your consolation prize is that you can make many changes at once without having to bounce the track for a second pass. The Q on each band is typically 1/3rd of an octave although options with fewer bands will set the Q to 2/3rds of an octave.
If you’re here, you know how to use an equalizer so we’ll cut it short there and move on.
Why Are Outboard Analog EQ’s Desirable?
Besides the fact that clients are wow’d by the visual impact of a ton of gear with knobs, sliders, switches, and lights all over them (this is incredibly important for gaining and retaining studio business)…
And besides the fact that it’s far more enjoyable to mix with your hands as well as your ears (plugins tend to make you mix with your eyes, which is really bad), there are actual sonic quality reasons to go with outboard EQ’s over software versions.
You’ll see talk about transistors and vacuum tubes. You’ll hear subjective jargon words like “warmth, fullness, color” and others. It’s all true. What it boils down to is the saturation. The active electronics impart a very subtle and pleasing harmonic distortion to the signal.
This ends up boosting the harmonics above the normal range you expect to hear which creates a sense of fullness. When an entire song has each track featuring this warmth, you get an extremely full sound.
It’s hard to explain. You’ve likely noticed that modern digital mixes sound extremely crystalline, to the point where you can “see” through the gaps in the stereo field.
Analog mixes (and even more so with recordings captured on tape first) aren’t “see through” like this because this harmonic distortion basically fills the gaps. Listen to old recordings from the early 70’s or before, or check out any newer record that intentionally recorded on tape and was mixed outboard and you’ll hear what I’m talking about.


Stream a few samples of the newer John Mayer album, Battle Studies, here and you’ll hear it immediately.
What To Consider When Making a Decision
The decision on which EQ to pick if you’re only going to grab one seems tricky, but you can guide yourself along by asking:
- What will I be using it for?
- What is my work environment like?
By this I mean, do you intend on using it most heavily for live performances, recording, mixing, or mastering? “All of them” is an acceptable answer as well, which is why we have the second question too.
Let’s start with live performances. You don’t necessarily want or need a lot of bands with tight Q’s because that type of laser precision won’t help in a bar, stadium, or auditorium. You want wide curves that allow you to quickly create a pleasing sound.
The same goes for recording if you’re in a garage or a room with very little acoustic treatment. You want broad actions that vastly improve the overall sound versus digging into specifically tight frequency ranges. Mixing results captured in these environments should be considered the same.
For the above applications I suggest a parametric EQ with 3 to 5 bands.
If you’re recording in a very controlled acoustic environment that is capable of capturing a dry, natural signal then you may prefer a graphic equalizer. When mixing clean results like these in an equally treated mix room you’ll be in a position to make very precise decisions about which frequencies to adjust.
For the above uses I recommend a graphic EQ with 15 to 31 bands.
A mastering engineer is going to be working in an impeccable mix room, but can’t control the quality of the material sent in for mastering. Sometimes they will need to make precise fixes, but mostly they are adjusting broad swaths of the frequency spectrum to unify the feel of the songs across an album. This type of work will benefit from both types of equalizers.