
There are countless occupations that ask for you to put your best voice forward. From singers, actors, and radio personalities, to teachers, salesmen, and almost any other professional… it’s not only what you say but how you say it. The key is preparation through vocal warm up exercises.
Confidence and trust arises out of consistent daily practice and pre-performance warm up routines. Knowing your material is only one part of the equation.
You want to also know that your voice is up to the task, and that’s something you shouldn’t just have faith in. You need to know your voice intimately and become acquainted with its various nuances so you can adjust your approach on the fly.
Knowing why to warm up gets you to do it. Doing it daily builds trust in your abilities (and extends them). Trust gets your mind out of the way.
By mastering control over your voice, you will remove the psychological barriers that also affect your performance. Then and only then can you be free to fully unleash the beast!
So let’s talk about the why, then we’ll move on to the how and also toss you a few tips on vocal maintenance and some magical techniques that will improve your voice immediately. We’ll show you a few of the best trainings books with CD’s along the way. Let’s do it!
There are activities we take for granted such as breathing and walking. For some reason we tend to place talking into that same category and naturally extend that to singing as well.
There’s a reason professional athletes practice running and breathing techniques. Meditators practice breathing and walking. And professional singers and speakers should most definitely be actively working with their voices.
Vocal Warm Up Philosophy
Your voice is your path to perfection. It is the road you’ve chosen to travel. It is your purpose in life. It’s a source of income, joy, and expression for you and those who enjoy your talent. That’s the foundational reason you should be actively practicing daily and warming up before each performance.
But it goes far beyond those reasons.
Why do we use vocal warm up exercises?
Not a single athlete is going to walk onto the field without having warmed up their muscles by stretching immediately before. It doesn’t matter how many years of weight lifting or yoga they’ve done.
Immediately before their performance they have to reinforce and remind their bodies of their abilities or they risk losing the game or at worst an injury.
Your voice is controlled by a complex series of organs in your body that are all controlled by muscles. Your lungs, vocal cords, larynx, throat, tongue, jaw, and lips all play a part in how your voice sounds.
The first and foremost reason for warming up is to get your brain ready to control all of those various body parts in unison. This is some complex motor activity that has to be coordinated.
Shooting a three-pointer in basketball is simple. Getting that tiny ball to fly through the air and pass through that small hoop is a whole ‘nother story. That’s your analogous goal.

So, you’re training your brain’s muscle memory to coordinate complex movements together, but you’re also preparing each individual link in this vocal chain for your performance. Warming up increases blood flow to each region, limbering them up so they can react immediately to your commands.
Warming up helps relax each segment by decreasing muscle tension. The goal is to achieve this across your thorax, larynx, vocal tract, and upper airway articulators. With all of those limbered up, you’ll be able to maximize awesomeness.
Can We Perform Too Many Voice Warm Ups?
This is a common question with multiple variations. And the answer is “yes.” You can warm up for too long and too strenuously.
Think of a power lifter attempting to increase his or her bench press max. They can’t jump straight to 350 lbs of weight. They have to warm up their muscles but if they do too much at the lower weights, by the time they work up to their max attempt, they’ll have spent all of their energy and they’ll fail.
This analogy goes for singing or speaking as well. The worst case scenario is that you completely lose your voice and can’t even make a peep when you go out on the stage or get in front of the mic!


Sometimes, you’ll see a professional perform far more voice warm ups than you think is necessary. Remember that they are pros and likely have a reason. They may find that today they are encountering that one issue that they know how to work through.
Perhaps they are very familiar with the maximal clarity and power of their voice and haven’t reach it yet. They’ll know how to balance the ferocity of their warm ups so they don’t over-do it. So don’t just emulate someone else. Always adjust your warm ups for your own body!
A Note About Vocal Injuries
If you’re finding that your warm up times are becoming increasingly longer, take this as a warning sign that you might be working your way up to an injury. Also, if you begin to notice that you want to perform less and less warm ups out of fear of tiring your voice out or of possible injury, then there is a chance that you’re headed in that direction.


Of course, if you have a cold, flu, nasal congestion, or allergy issues that might explain the phenomena then you should have less concern. But if it’s unexplainable then take a moment to analyze yourself and see if you can notice any other oddities that imply an impending injury.
Personalize your approach to vocal warm ups for singing
Voice actors, broadcast personalities, radio DJ’s, and other speakers will all have their own style of warming up their voices. And each of them will have a routine that is unique from another of the same type of professional. The same goes for singers as a whole and each individual singer.
We’re going to list off and explain a lot of exercises below. You should pick and choose those that provide the best results and ignore those that provide no results for you. Each of us is unique and different, so there’s definitely no one-size-fits-all list of best vocal warm ups.
A general daily outline that does tend to work for all singers and vocalists looks something like this:
- Short, Gentle Morning Warm Ups
- Full Warm Ups Prior to Practice
- Vocal Practice Session / Performance
- Full Warm Downs Before Bed
Other suggestions include performing your early morning warm ups in the shower to take advantage of the warm higher moisture content of the air. Many singers say that the first warm up should include a psychological aspect of increasing awareness by paying attention to kinesthetic feedback.
This means that you should see what surprises your voice is trying to sling at you on that day. Eventually you can catalog them all mentally and know how to deal with them.


Many singers suggest starting at the bottom of your register and working up from these lowest comfortable notes up to your high end of your range. It is often said that your practice range should start small and slowly widen out to the most extreme ends of your range.
It’s important to mention that “vocalizes” should not be included in your warm ups. These are specifically targeted practices that should only occur after a full warm up.
These vocalizes include smoothing your register transitions and bridges, correcting bodily techniques, increasing range, working with vowels, etc. Isolate these strenuous activities from your warm up sessions.
Consider Consulting a Voice Specialist
As a professional performer with a lot of your life hinging on warming up correctly and avoiding injuries, you should consider consulting a voice specialist to help you create a warm up routine designed specifically for you.
A voice specialist might include a typical singing teacher, your choir director at church, a voice coach, a speech pathologist, or a speech therapist. Your access and affordability can guide your decision.
What a voice specialist can do for you and your warm up routine is:
- Introduce you to a large number of warm up activities that all target differing components of your organic voice system. They will be able to identify which aspects will provide you with the greatest benefit.
- Design a routine for you in a specific order of difficulty to ease you up to full capacity in order to avoid too much vocal stress or injury.
- They can guide you through the routine and provide feedback on what you’re doing right and wrong.
Of course, it’s not critical in the early stages of your career to worry about these details. It’s only after you’ve reached a state of diminishing returns that you should consider reaching for more progress with professional help.
The real reason to consult a professional is to make sure you’re not sabotaging yourself and to quickly accelerate yourself beyond your competitors.
How to Warm Up Your Voice for Singing
Thank you for your patience in exploring the philosophy of why we perform these warm ups. Now let’s talk about specific voice exercises we can perform.
Remember, practice each and find which provide the greatest benefit to you, then play around with the order until you find the fastest and most effective order for you personally. While the following options don’t represent all of the exercises available, they are the most common that you’ll encounter.
Also Remember, these aren’t just singing warm ups, they are vocal warm up exercises for all voice professionals in any industry, not just music.
As you work through these exercises and want to explore more, check out this book coming out of the Berklee College of Music called Vocal Workouts for the Contemporary Singer by Anne Peckham.


Relax the Breath
Your breathing should be calm and controlled with no sense of exasperation. Being able to obtain and release a full lung expansion’s worth of air is the foundation to clarity in your voice.
Breath Relaxation: When breathing, there shouldn’t be any tension or forcefulness. An entire inhalation should come effortlessly. Achieve this by making sure there’s no tension in your shoulders and trapezius muscles.
By allowing your shoulders to relax, held back and sitting low, you help your chest remain open and the cavity enlarged. The more space your chest creates, the more capacity your lungs will have to hold air.


Make sure you’re breathing from your diaphragm and not your upper chest. Your stomach should be expanding more than your chest is lifting. Focus on your body, allowing your mind to act as a biofeedback system.
Don’t allow tension to slowly reintroduce itself in your neck, chest, or shoulders. Keep your inhalation and exhalations slow and controlled. You can hold a hand on your stomach to remind you to breathe low at the diaphragm, and make a snake hiss sound as you exhale to remind you to not exhale too fast and hard.
The Lessac Call: Your goal here is to gain awareness and control over how much air you’re exhaling at once and also where your voice resonates in your head and face. This level of awareness is critical in controlling every other process related to singing.
Start by naturally calling out common phrases such as “hello” and “hey,” stretching their length to allow for resonation. Don’t worry about the pitch yet. Just let it come naturally.
Place your hand in front of your mouth and measure how much air is coming out. Play with the shape of your mouth and see if it affects how much air you have to force out of your lungs to achieve this. The less, the better.
Once you master your normal pitch, you can play with higher and lower pitches until you learn how to use your lung’s air most efficiently. Try other phrases and syllables until you’re in control of all possible variants.
Extending the Breath’s Worth: Breaking up phrases as you sing in order to gasp in other breath of air is bad, especially when unplanned in the song. The more value you can extract out of each breath, the less of a chance you’ll be caught in a situation where you don’t have enough air left to finish off a phrase.
By controlling the muscles that form the valve of the airflow from your lungs you can control the force of air while using less, much like placing your thumb over the tip of a garden hose. The way to practice this is to simply practice singing the same set of phrases and hold them for increasingly longer periods of time while maintaining their quality.
Don’t lock your muscles or create tension though. It is critical that you remain relaxed. Tension will ruin your resonation, projection, and stamina.
Strengthen The Breath
Remaining relaxed is one way to extend the value of your breath, but you can equally gain as much through strengthening the muscles as well. You don’t need to be able to blow up a hot water bottle like a Strongman, though.


Breath Support Strength: The goal here is to learn how to use more air while maintaining relaxation to support the deeper portions of your vocal range. Take a slow and full inhalation and then exhale sharply by quickly contracting and flexing your abdominal muscles.
This creates a fast burst of air. It helps to focus on the phrase “huh” or any other phrase that resembles syllables you’d actually sing.
Focus on abdominal control while keeping your larynx and throat relaxed and completely open for clarity. You don’t want your upper airway to tighten and become tense at all. You’re learning to support your breath through your abdomen.
Low-Flow Laughing: The aim here is similar to that above. It’s helpful to focus on the typical laughing phrase “ha ha ha.”
You’re again using your abdomen here to create quick bursts of air to produce these low register phrases. As you master the low end you can slowly move the pitch upwards to gain more efficiency higher up.
Make sure you’re keeping your posture correct with your shoulders held low and back with your chest out and chin level. Place your hand in front of your mouth and try to reduce how much air you’re exhaling with each “ha” while maintaining power and clarity. You want to reduce the breeze you feel as much as possible.
Straw Vocalizing: This is exactly what it sounds like. Take a long, yawning inhalation to full lung capacity and then place a straw in your mouth. Practice exhaling through the straw first.
If you feel too much pressure build up, you’ll know that you’re not controlling your exhalations. Reduce the forcefulness until you can exhale relaxedly through the thin straw’s airway. Don’t inhale through the straw though. Don’t pass out!


Eventually you can begin working in various vowels and syllables, vocalizing them on the exhalation through the restricted airflow of the straw. Once you’re comfortable, you can begin varying the pitch as well.
Reduce Muscle Tension
Jaw Release: Before you perform or record in the studio, you want to remove all of the muscle tension in your jaw or you won’t annunciate your words clearly. What you want to do is use your palms or heel of your hand just below the cheekbone where it meets the jaw.
This is where tension lies in your jaw. Massage this area up and down without too much force, allowing your jaw to open and move left and right as you massage.
Yawn Emulation: Open your jaw widely as if you are yawning, allowing your jaw and tongue to relaxedly sit at their lowest points. Make sure your shoulder and chin posture is still intact as you inhale and exhale slowly, vocalizing if you choose, varying pitches as you do so. Repeat as many times as needed.
Lung & Throat Work
Gentle Humming: Begin by inhaling through your nose and producing a long, low hum on the exhalation keeping your mouth closed. Vary the pitches and intensities, focusing on allowing the reverberation in your throat to relax and massage it.
Don’t use the vocal fry technique which does more harm than good. Repeat the process with your mouth open and practice making sure your nasal passage stays open for clarity.
Pitch Gliding: Keeping your shoulders back and down, chin down, and chest out, inhale with a slow yawn. On the exhalation, start vocalizing with various vowels each time starting in the higher portion of your range. This should be your upper chest voice.
Glide this pitch down to your lower chest voice in one breath. Work through each vowel. Once comfortable, repeat the process from your head voice down to your upper chest voice. You should be covering about two octaves each time with smooth glides.
Resonance Focus: Your focus here is to understand how to feel and control resonance inside of your mouth while stretching your vocal folds. Make a mouth as if you are whistling, drinking from a straw, or sucking up a noodle of spaghetti.
When exhaling through this shape, make the sound of a kazoo buzzing using the sound of “woo.” After holding this steady at a lower pitch a few times to stretch the vocal folds, try it at higher and lower pitches to gain control and notice the resonance.
Mouth Buzzing & Trilling
Lip Buzzing: Allow your lips to meet each other in a relaxed position as if you aren’t speaking at all. Exhale and allow your lips to “buzz” as if you are making the sound of an airplane engine. Keep your tongue relaxed with no tension.
After your lips have plenty of blood flow and are warm, you can introduce pitches into your buzzing. When doing this effectively, you should notice a tickling in your mouth and nose. Don’t push harder than is comfortable.
Tongue Trill: Allow your tongue to be relaxed while placing it behind your front upper teeth. As you exhale, allow your tongue to flap up and down rapidly like you’re rolling the R or L syllable.
This increases blood flow to the tongue and massages the muscles. You can work the pitch of your trill up and down, but don’t extend beyond your comfortable range or trill too hard.
Articulation & Clarity
Articulation Flexibility: Articulation refers to how clearly you pronounce the words you’re speaking. The last thing you want to do is become tongue tied while performing. Find short phrases you can repeat over and over at various pitches, such as “bujuga” and “pukuka” that are difficult to say quickly.
You’re training your brain and mouth to be able to handle transitions between difficult syllables.


You can also practice with classic warm up tongue twisters such as “Peter Piper picked a peck of pickled peppers” and “She sells sea shells by the sea shore.”
There are other phrases you can work with for clarity such as “The rain in Spain falls mainly on the plain” and “Sounds abound when the mouth is round.”
These are the most common voice exercises you’ll encounter as you investigate these warm up methods. You can invent your own or visit a voice specialist who can guide you through more.
Vocal Hygiene
It goes without saying that if you really want to perform at your peak, no amount of warming up or practice will help if you’re damaging your voice with poor vocal hygiene. Use the following practices to make sure you’re voice is performance ready.
Don’t Smoke: It should go without saying that your entire respiratory system, from your mouth to your lungs and your heart, are affected by smoking. Inhaling hot tobacco smoke or even cool vaporized smoke can cause inflammation and swelling.
There’s a lot of damage that’s irreversible. The best approach to smoking is to never start and to quit immediately if you’re already a smoking vocalist.
Stop Violent Throat Clearing: Everyone has to clear their throat from time to time, but there’s a proper way to do it. Some of us even clear our throats every few minutes habitually. This places a lot of wear and tear on your vocal cords and folds, slamming them back and forth roughly like the vocal fry does.
If you must clear your throat, do so from the top and front of the throat using the “he-” sound like in the word hello. Don’t go deep with a lot of scratchiness. Drinking plenty of fluids daily keeps your throats mucus thin and less likely to require clearing.
Drink Plenty of Water: Your entire body, including your voice production system, requires lots of hydration to function properly. Make sure you’re drinking at least 8 glasses of water daily, spread throughout the day, adjusting for your own bodily needs.
Limit Vocal Loudness: Don’t be tempted to scream across rooms or be forced to speak beyond a comfort level in noisy environments. This will lead to hoarseness which can compound itself if not given enough time to heal.
Have periods of the day where you don’t speak at all, treating them as rest periods. If you contract an illness that’s affecting your voice, don’t try to work through it. Accept that you’ll have to rest if you want your voice to be repaired as quickly as possible.
These are the basics but there are also other techniques you can use such as placing a humidifier in your room when you sleep to combat dryness from throughout the day.


You can also use a small portable humidifier for your desk at work or at home.
5 Vocal Exercises to Improve Singing Immediately
Warm up routines and practice are one thing but there are a handful of fundamentals that should be doing. If you aren’t, applying the following five techniques can immediately improve the quality of your singing.


Check out the book above too for more exercises that are more specific than your typical warm ups.
Open Jaw Vowels: Almost all of us have one or two vowels that we allow our jaws and tongues to close and get in the way of coming out clearly. Work through each vowel and pay attention to your jaw and tongue.
The general culprits are E and U. See if your jaw closes further than it should or if your tongue begins taking up too much space in your mouth. Practice all of the vowels while keeping your jaw open and your tongue lower than you normally would.
You’ll notice an immediate sense of clarity and annunciation. If you need to, you can place a bottle cap between your teeth to keep your jaw open.
Voice Projection: Some people struggle to be heard because of their habitual speaking and singing patterns. Make sure that you’re always maintaining full breath of air at all opportunities when vocalizing. That’s the first step to proper projection.
The second is psychological but helps you push your voice out naturally without extra strain. The method is to visualize your voice beginning just out in front of your teeth as opposed to inside of your mouth or throat. Envision it localized there in space and you’ll find yourself becoming much more clear and confident.
Chin Low, Chest Flexed: We all tend to lift our chins and tilt our heads back when we sing, especially as we move into higher frequency notes. What you want to do is keep your chin level or slightly below level with the ground and maintain a slight bit of flex in your chest muscles.
This helps remind you to keep your chin together with your chest. Keep it firmly in place and you’ll find you have more power behind your exhalations without having to strain for it. Now you can choose how and when to use that power and naturally extend the worth of each inhalation.
Vibrato Visualization: Any singer worth their value needs to have full mastery over vibrato. Figuring out how to produce is hard for some of us while it comes naturally for others.
A method to help is to imagine a weight on your chest when you want to begin the vibrato and start envisioning the air and sounds swirling in a circle in your mouth, as if that’s what happens when the wavy vibrato comes out. Mind over matter!
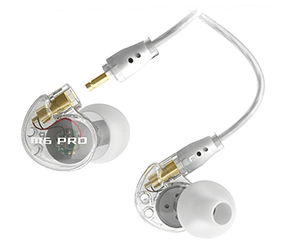
Use In-Ear Monitors: So many performers sing too loudly because they can’t hear themselves over the instrumentation of the band. The problem is that the best vocal sound comes from a natural and relaxed volume level.
To remove the temptation to monitor yourself by becoming louder, use a set of high quality in-ear monitors. You can feed in only your voice and let other sounds pass in or you can have the sound person send in a full mix into your ears, allowing you to use more of an ear-plug style of monitor.
Hearing yourself is critical. That is the biofeedback system you need to perform at your best. Hearing anything too loud for too long will damage your hearing permanently.

These are the easiest, quickest fixes to enhancing the quality of your singing almost immediately if you aren’t already doing it. Some of these tips require a bit of practice to master but provide immediate benefit. Others are a one-time solution! Use them up your skill and gain an edge over other singers!
Use These Vocal Warm Up Exercises Each Time
Knowing why you should perform vocal warm up exercises is the first step to actually doing it. You have to be convinced it’s worth your time, which you should be if you’re a serious vocalist working on your craft.
Beyond that, knowing exactly how to warm up requires reading the routine above and customizing it for your own personal needs. You can always enlist the help of a singing coach or vocal specialist to help you establish a voice warm up routine for yourself.
If you’re recording vocals at home, read our guide to make sure you’re capturing the full clarity and beauty of your voice. And remember, always practice good vocal hygiene!