

What in the world is headroom in audio? Why should we care? Even if we did care, how the heck do we use it?
These are the three most common questions surrounding this mysterious topic. Most people who are trying to record a song aren’t interested in perfection, so they just hit the ‘record’ button and go.
Even those who do care about quality find that they can get it good enough without worrying about these intricate details. But if you’re a professional, there’s no wiggle room.
You, your team, you’re studio engineers, and your listeners all are demanding the highest quality reasonably possible each step of the way. And to pull that off, you’d better know about headroom!
Everyone knows about the noise floor. It’s that most quiet region of your audio tracks where all you hear is the hiss and hum of electrical noise and whatever ambient sound you have going on in the room.
We all mute those regions when we are putting songs together. But there is an opposite of the ‘noise floor’ as well. You could call it a distortion ceiling.
And guess what this ‘distortion ceiling’ is related to… You guessed right! Headroom.
Let’s get this underway. The goal here is to keep this discussion as simple as possible. I will reference the more technical aspects for those who want to go down that rabbit hole, but it’s not necessary even for professionals. So let’s keep it casual.
What is Headroom in Audio?
This term comes from the engineers who designed analog and digital audio systems. It was then used in a similar manner by studio professionals to refer to a conceptually similar aspect of recording but slightly different. Let’s get a little backstory in that will make things more clear.
Dynamic Range = Distortion Ceiling – Noise Floor
So we were talking about a noise floor and a distortion ceiling. If you record too quietly you’ll have to normalize the audio to reach a standard volume level when you release your song.
As you turn up your mix you’re also turning up the noise that was hiding down in the noise floor. So obviously you want to record louder so this doesn’t happen to your songs.
So you crank up the preamplifier and the gain and try again. This time you went too far and hit the hard distortion ceiling resulting in what is known as clipping.
I’d rather have a consistent background noise than clipping in my songs, but both suck and if you’re to be taken seriously you’d better feature neither in your album.
The distance between the noise floor and the distortion ceiling is called the dynamic range.
The dynamic range is all of the available space for the combined amplitudes of all of your tracks (the voltage of the electrical signal in analog recordings and the amount of data bits in digital audio).
In the real world, just think of this as your combined volumes at any given moment of a song and remember that there’s a maximum amount you can have before you start clipping.
So, the equation I typed above basically tells you that you have a certain amount of useable space that sounds clear enough to be useful. This is the distance between the noise floor and the distortion ceiling and it’s called the dynamic range.
The Full Resolution Sweet Spot
Now here’s where people get confused, and it gets even worse because you have to start converting between analog recording levels and that of digital. Let me set the story straight for you.
The first thing people start doing to avoid the noise floor is to record as hot as possible, meaning they try to crank the input up to a volume that’s as high as it can be without clipping. And of course they end up clipping somewhere and keeping it because they fell in love with that vocal take or the guitar solo, etc.
People do this to try to minimize any possible noise in the recordings. So they close mic and turn up the preamp’s input volume. These are all mistakes because you’re completely eating up your headroom.
The truth is that there is a sweet spot and it’s not remotely all the way up at the ceiling. Let me just go ahead and state the sweet spots and then we’ll discuss why we use these figures and why they are different.
The full resolution sweet spots for recording are:
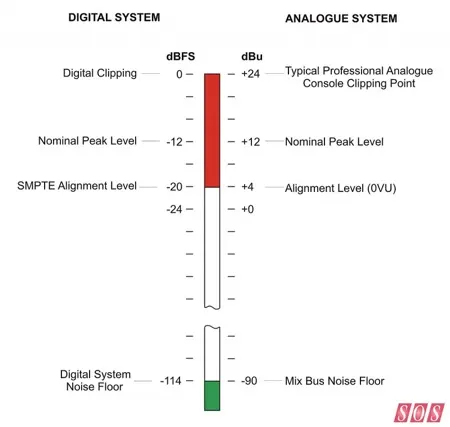
- Analog: 0dB
- Digital: -18dB
In order to keep this simple, we’re not going to talk about the various scales of decibel units. We’ll just call it analog or digital. It all started with analog recordings and you can’t escape it. Any time you use a microphone you’re starting analog. Unless you plan on sticking a voltage meter in between every step of your signal path, you need to understand gain staging.
‘Gain staging‘ simply means “Keep your volumes near the sweet spot in each step of the recording chain.” That means for your microphone, your preamplifier, your compressor, your equalizer, and especially at your analog-to-digital converters, you want to be hanging in right around 0dB.
So how do you pull that off? You look at your meter in your digital audio workstation and try to get it bouncing at an average volume of -18dB. That’s because 0db analog equals -18dB digital. It’s a long story having to do with voltage units and full scale units. Just remember that 0dB analog = -18dB digital.

That’s your sweet spot where you’re using every bit of resolution available. Yes, you can record hotter but you’re wasting your headroom! So if you’re nailing it on the digital side, you’re doing fine on the analog side. This is why every piece of outboard gear has gain settings, so you can adjust it and keep yourself in the safe, sweet zone.
And Finally… Headroom
So you’re coming in at an average of 0dB analog and -18dB digital. Perfect. But you still have 18dB left on each mixer channel… that is your headroom. Headroom is the space between the sweet spot and the distortion ceiling.
You don’t want to or need to fill up that space during the recording or mixing stages of the recording process. You want to save it for the mastering engineer. You’ll learn why in a second.
Why Do We Care About Headroom in Audio?
Even in simple language that’s still quite the story to explain what headroom is. The question becomes why do we care and why does it exist?
The main reason is because all instruments before the digital age of synthesizers (and even most of them are pressure sensitive now) change in volume as you play them. You want this to occur because it allows you to control the emotional impact of your performance and a lot of other reasons.
The main point is that you want as much of your performance to be recorded at the sweet spot, meaning you want your average recording volume to be at that sweet spot for full resolution recording.
This means that you’ll have quieter parts below the -18dB digital and louder parts above. You can’t predict just how loud you might perform at any moment. So if you’re trying to record as hot as possible you’re going to clip eventually.
By averaging your volume at the sweet spot, you’re not only achieving the highest quality for the most amount of time on your recording, but you’re giving yourself a solid 18dB of safety margin so that you don’t clip and distort.
If you’re a crazily dynamic performer who needs 30dB of safety margin, you’re not going to try to average lower or try not to play naturally. You’re going to use a compressor so that you don’t peak out across the ceiling. It’s not negotiable.
You want to average at the sweet spot and this gives you about 18dB of buffer zone. If 18dB isn’t accommodating enough for your loud transients, then you’ll use a compressor.
To reiterate, the answer is that we care about headroom because it’s a safety margin against clipping and it means that we’re recording closer to the sweet spot that gives us the best quality by using as much of the resolution our digital system will allow.
How Should We Use Headroom in Audio Effectively?
We already talked about “how” to properly record to preserve headroom and nail the sweet spot. But let’s talk about how we then use this headroom to maintain the high quality we are shooting for in the final master.
More confusion comes regarding this topic when amateurs load up MP3’s or wave files ripped off of master recordings such as a CD release or iTunes download. Not only is there no headroom but the waveforms are smashed to smithereens!
But yet, it sounds fantastic. That’s because the team behind the song saved their headroom until the final stage where it’s meant to be used, which is the mastering stage.
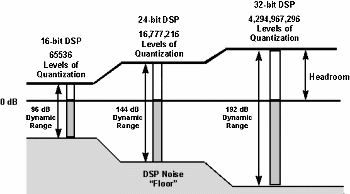
This amateur won’t know if he’s using 16-bit, 24-bit, or 32-bit DSP systems, which provide different amounts of headroom too. No wonder this is all confusing.
Think about it like this. You’ve recorded every single instrument at the sweet spot so that you capture every nuance of the sound with minimal noise.
This is what makes a recording “high quality.” By having the fullest resolution sound possible, you can then make all of proper mixing choices because you can hear the tiniest detail.
But if you take every instrument and play them at the same time, your master channel is going to peak out and clip. So you have to turn down various sounds during the mixing stage and balance them so that they play well together without clipping.
As a matter of fact, you’re going to mix with -18dBFS as your target too. Yes, you’re turning down certain tracks but you aren’t losing quality because those nuances are already in the recording. Now they just playback more quietly.
The Benefits of Good Headroom in Audio
After the mixing engineer is done spit-shining and polishing your song, he’s got to pass it off to the mastering engineer. These days, every song on a record might be recorded in a different location with different equipment and mixed by a different mixer.
The mastering engineer’s job is to fix the tonal balance of all of the songs so that they sound unified, and then ultimately to push the volumes up to the current standard for a professional release.
The mastering engineer is the only person who should eat up all of the headroom in audio, and really that only happens for pop music. Lots of genres still preserve and appreciate dynamics and breathing, such as classical music.
But the point is, he or she now has the space to work with to apply additional compression across the entire track, cut or boost on the equalizer, and any number of other activities.
And finally, he will normalize the tracks so that the loudest peak across the whole album hits the ceiling without crossing it, and all songs are playing at the same average volume that is comparable to all other professional releases.