
The number one thing that screams “amateur recording” to even the most casual music listener is popping in a CD or loading up some MP3’s and having to crank up the volume twice or even three times as far as commercial music.
Then when they forget to turn it back down and destroy their subwoofers and ear drums, guess who they’re going to blame? Not the current song, but the one that made them reach for the volume knob in the first place. No other music makes them do that. Why yours?
This is the quintessential issue to solve before you ever share your recordings with anyone else. Before you worry about the quality of the tracking, the clarity and balance of the mixing, or even the color of Sharpie you used to write on the burnt disc…
See, the human ears and mind will overlook a lot of other issues as long as those issues are consistent.
All of your mixes can have the same glaring bass problem in the low-end. All of your vocals might be in dire need of de-essing. But it’s okay, because it’s the same consistent problem across the board and those can be dealt with by the listener in a lot of ways.
But what they can’t do is go back in time and slap you for not leveling your songs to the same average volume levels. And that’s what we’re here to talk about today…
And you thought the preamble was over! Nope, there’s one thing you need to have in your head before you start or you’ll wander aimlessly.
Matching Song Levels: Target Volume
It’s one thing to say “Let’s boost all the volumes and level them so they match.” It’s another to do it, because you need a target to aim at or you’ll end up doing more harm than good.
The Loudness Wars
The great thing is there are industry standards arising that tell all mixing and mastering engineers to aim for the same levels.
You’ve probably heard of the Loudness Wars (Turn Me Up is a great resource to learn why it’s bad and to join the fight against it.) The quick version of the story is that radio stations started compressing and limiting the crap out of songs so they could output a louder volume to you.
The limits set on them were based on maximum amplitude, whereas we perceive loudness based on the average volume. By compressing, they could crank up the average volume while still staying under the max amplitude limit.
This was done to grab your attention as you flicked through stations trying to find something to hear. Soon, TV commercials were doing the same thing (stupidly, because we all now mute commercials, change the channel, or fast forward them.
This is one way you can harm yourself, as mentioned above). Now pretty much all pop music is mixed and mastered in this way, with zero dynamics and fluctuations. They’ve robbed themselves of one of the main tools for expressing emotion and letting the song breathe.
You can see the abuse on the consumer (loss of quality and therefore enjoyment) in the race for loudness and attention. Too much loudness damages hearing and causes listening fatigue, which unfairly harms competitors as well as customers. This abuse led to government regulations.
The CALM Act
There are tons of versions across the world and are all similar, so let’s look at the United States CALM Act.
Long story short: commercials need to play at the same average volume that the shows they accompany play at (AKA “stop destroying our hearing and making us reach for the remote every 10 minutes”). This came into effect December 13, 2012.
Now check this out. It basically rules that every radio station and television station needs to adopt an average volume and stick to it and even suggests targets.
However, it doesn’t say that all stations have to match each other. They only have to remain consistent within themselves, which is what I was telling you before. Consistency is everything.
The Federal Communications Commission hired some people and after a bunch of whatever, they decided -24 LKFS was the perfect target.
“But wait a second, we work in dBFS… how does this LKFS relate to decibels?”
- LKFS means Loudness, K-Scale, Below Full Scale.
- dBFL means Decibels Below Full Scale.
The key difference to note is Loudness versus Decibels. Decibels is a measurement of amplitude, mainly the height of the peaks at any given moment.
Loudness, on the other hand, is a measure of the average (or if you want to get technical, the root mean square) and has less to do with the peaks than where the “weight” of the song or commercial rides.
The Targeted Volume
Okay. The backstory is done. Now you’re going to hate me because there’s no conversion rate between LKFS and dBFL. But by using all of the data in the ATSC A/85 standard report, you can follow these suggestions and be fine…
Note: Remember, this is not for mixing, but just for this aspect of mastering. Also, keep in mind that the VU meters on your analog gear is showing dBu. Zero on your VU meters is about -18dB digital. 0dBV = -18dBFS. This means when recording you want to dance around -18dB in the DAW and only boost later in this mastering stage.
Otherwise you’re pushing your analog gear too hot. VU has 6-7dB of headroom and after that you’re heading into distortion realm. This is confusing. We cover headroom here to help clarify.
In your DAW, try to ride the average peak decibels of your song around -10dB. You’ll have peaks jumping over that limit, but you want them few and far in between (these being the ones you’ll compress or limit).
This will leave you 10 decibels of headroom for peaks and to float the average up and down for dynamic effect before you start clipping. Of course, this suggestion can change based on the genre of music (classical versus heavy metal at the extremes).
Remember, the goal is consistency across your album or set of songs. Anything in this range will achieve that and still be loud enough to compete without destroying your quality.
How to Match Your Song’s Levels
Let me say that lots of people call this mastering and think this is all there is to it. I’m making sure to point out that this is only one aspect of mastering, because it’s one of those pet peeves in the industry.
I want you to know that I know the difference, and if you don’t know the difference now you know. Mastering includes far more than just matching volumes. It’s about creating a unified experience across the frequency and emotional spectrum as well.
Everything needs to have a common sonic footprint, a tonal balance, across your whole album unless you want it to sound like a random compilation mixtape.
So here’s how we get this done.
You don’t need mastering plugins. You don’t need batch processors. There’s no tricks and no shortcuts and there doesn’t need to be because it’s dead simple.
Normalization & Limiting
First up, look at this image so you can get a conception of the overall idea here:
This is a picture from Propellerhead and their DAW called Reason. In your digital audio workstation, you’ll find a feature called normalization. If you need one still, check out our list of the best DAW’s for each genre and industry.
What this does is raise the volume of the track until the highest amplitude hits 0dB. Anything above that is clipping. That’s your absolute maximum limit in digital recordings.
The leftmost portion of the image above shows a mixed track with some kicks and snares poking out. It’s normalized with a limiter set at -6dB. The middle image shows those peaks chopped off (technically here it looks like they compressed lower than -6dB with a very high ratio, but that’s besides the point).
So what’s been done is no peak goes over -6dB (instead of 0dB as before) providing 6dB of headroom. Now you can normalize again and add that 6dB to your average volume, which is where loudness is perceived.
Preparing the Multitrack
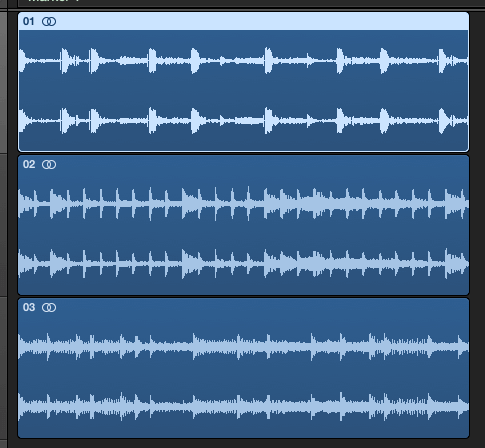
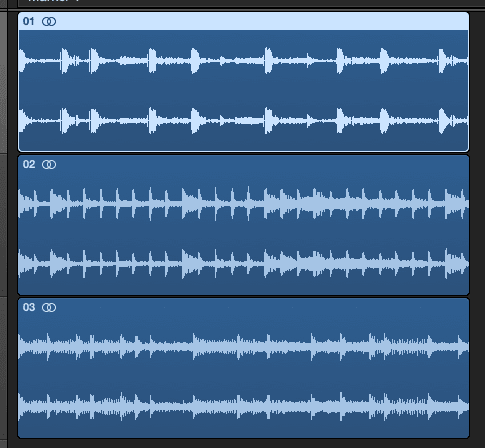
Open up your DAW, in my case I’m going to use Logic Pro. Lay out each of your songs on a separate track. In my example I’m only going to show three short segments to save space, but you can extend this to as many full songs as you need. The process remains the same.
Note: You don’t have to use normalization. It literally turns up the volume. I personally only use it when I’ve been sent a mix that’s so low in volume that the fader can’t go any higher. And then I might slap a gain plugin on the track versus normalizing. I prefer non-destructive editing whenever possible.
Here are my three segments before any normalization, volume adjustments, limiting, etc. It’s just the raw audio files:
You’ve got your tracks laid out and ready to go. The first thing I do is place a limiter on the master track. All of the individual songs will then be run through that limiter before bouncing and re-rendering.
I’m not worried about compression, EQ, or anything else. I’m not doing a full-on mastering job here, just leveling and balancing out the volumes at a high enough level to seem reasonable to my listeners.
Note: If you can’t place plugins on your master track, then create a bus to act as a surrogate and output all of your tracks through the bus and then the master. It’s the same concept. Don’t use a send to the bus. Make sure you’re outputting, as seen below.
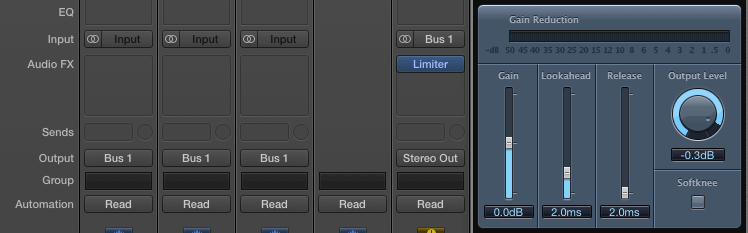
From left to right, you’re looking at my three tracks, the master out, and then the bus. On the right you see my limiter plugin I enabled on the bus.
I’m keeping the release as fast as possible and I turned off the softknee since I want an immediate attack as well. The output level here is your threshold where you’re blocking any waveform from passing.
I put it at -0.3dB, just a hair beneath the true limit so I know I’m not going to get any clipping even if something slips through the algorithm (not likely but you I play it safe so I don’t have to perform work twice!).
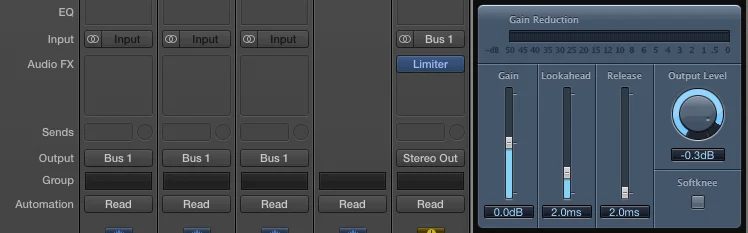
So now, on my first track, I’m going to solo it so it plays alone and start pushing up the fader till I see some gain reduction on the limiter. The meter will bounce, showing me the peaks that are getting chopped off.
I’m going to listen as I do this (never mix or master with your eyes!), but I’m also going to watch that meter until it’s bouncing too much. I know what my waveforms look like so I’ll have a good idea of what I’m chopping. I can also hear this.
I’ll get the first track nailed in to a decent volume without destroying its dynamics. Then I’ll start switching back and forth between the first and second track until I make them match in volume. Then move to the 3rd track. It’s that easy!
Once I’m done matching the levels, I’ll bounce each track individually again and I’m done. In the picture below, I’ve brought them back into the multi-track so you can compare the results against the original:
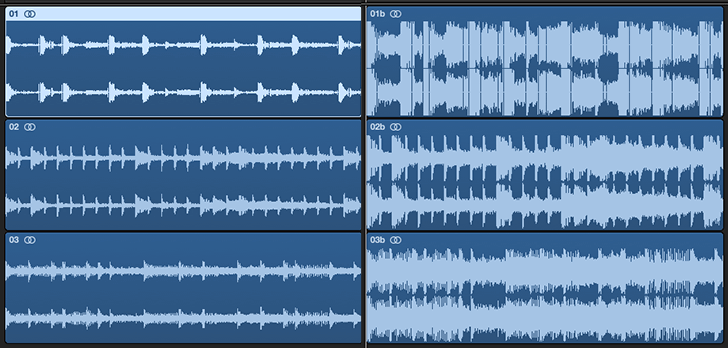
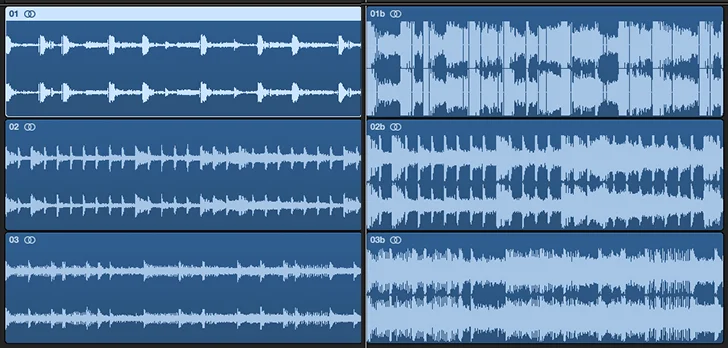
Not bad! I gained at least 10db of loudness out of this, bringing it up to the industry standards. Visually, you can tell these weren’t mixed yet. The image above is only as an example. My point is, don’t try to replicate what you see visually other than the volume boost. Use your ears!
Matching Song Levels is a Piece of Cake!
Now, when I pass out my mixtape to the homies and they slide the CD in in the car, the audio will start at a comparable volume as their other CD’s and radio stations. Better yet, when the first song is over and the second starts, it will be playing at the same average loudness as well.
This mixtape may not have grade-A tracking, world-class mixing, and professional mastering, but by god, it plays at the expected volume and does so across the board!
The other aspects rely on skill, practice, and money. But matching the levels of your home recordings shows that you care enough to pay attention to the details that benefit your listener.
It may not be noticed by them, but the absence of matching song levels and volume boosting would definitely be noticed and your CD would get filed right into the trash bin. Now we have a chance of gaining fans!