When it comes to turning off your listeners, I don't know what's worse: having an anemic, powerless low-end or having a muddy, overpowering mess with no clarity. Unfortunately, these are two of the most common problems with amateur mixes.
These two scenarios and could doom the reception of the best song ever written before it even hits the first chorus, so what's it likely to do to average songs? And guess who'll be to blame and who's reputation will be at stake?
Yours, as the mixer. So let's get to the bottom of this pronto so we can save face, make hits, and make bank.
While any studio-head can apply these tips while mixing bass and kick drums, there are a few factors that will increase your chance of a successful low-end balance. First, we're assuming you have a monitoring set-up that can allow you to hear these frequencies clearly.
This means you either have a acoustically treated mix room equipped with a subwoofer or you have powered mixing headphones with large enough woofers to reach the low frequencies (we explored the differences previously).
It's important to be able to hear what you're doing at the low-end, otherwise it's just guess work guided by visual cues from the DAW.
Now that that's out of the way, let's talk about refining a crystal clear, powerful low-end that contributes to a song instead of ruining it's chances for greatness.
Before you start making changes to your tracks, we need to make sure we understand the proper relationship between kick and bass. This will help establish a final destination so we aren't tweaking forever.
The Purpose & Relationship of the Bass & Kick Drum
The bass guitar and the kick drum are among the two most important instruments in music. Even if they aren't present, some other instrument will be playing their roles, because without the fundamentals, you're building your song on sand and the tide is coming in.
Throughout history and even more so in the current musical culture, these two key segments of a song's instrumentation have been used to establish drive and and reiterate the chordal roots.
On the Bass We Build Chords
Bass lines are generally build on the roots of chords, no matter the inversions, chord changes, key, or genre. A sustained bass note drives the root home for a length that allows harmony to be achieved in the long or short note-lengths of the higher frequency instruments.
Without the root, you don't have a 3rd or a 5th. Without the root, you loose sense of the chord changes. Only because the listeners' ears lock into the bass' tones and rhythms can we even build the rest of the song.
The Kick Drum Highlights the Rhythm
Whereas the bass has a smooth build and swell with sustained length, the kick drum features a short punchy attack. Of course this is generalized, but traditionally these are the roles of each.
While the snares and high-hats tend to lock in the rhythm, the kick drum helps drive home the strong notes or lands on weak notes to establish syncopation and a sense of driving forward through the song.
It is so strongly felt that any change in it's rhythmic pattern needs to be considered carefully, let alone have perfect timing the entire time.
Together We Groove
Together, bass and kicks build the musical sense that allows for the lead instruments to be melodic, harmonic, and interestingly rhythmic. This is why we must take special care with these instruments.
They must have volume and punch without clashing or interrupting other frequency ranges, volume especially since we love to feel the low-end as much as we hear it.
The Problem & Challenge of Mixing Kick & Bass
Despite the differences described above, kick and bass are very similar, especially in that they essentially share the same fundamental frequency range. This is the problem.
The challenge is allowing both to co-exist in their natural environment while not butting heads and getting in the way of the rest of the instrumentation.
Fortunately, the fundamental range is not the only portion that helps define the sound of both instruments. The kick drum features an attack and decay, while the bass features a nice set of overtones that helps us distinguish which notes are being played.
The goal for all mix artists is to let the bass and kick co-exist in the low-end clearly where the bass's overtones don't interfere with the kick drum's attack, and having neither the overtones or the attack interrupting the higher frequency instruments.
This challenge is amplified when we remember that we shouldn't be panning either of these instruments at all. They need to live right up the center so both speakers can share the burden of thumping them out and to keep the listener anchored to the stereo field.
So what are we to do about this conundrum?
Tips for Balancing the Low-End in a Mix
By making an important choice before starting the mix, we can apply the tips below to turn a disaster into a masterpiece.
Choose If the bass or kick Will be Lower or Higher
You can't even start before you decide which instrument is going to be the lowest frequency. Traditionally, the kick drum bangs out the lower portion of the low-end while the bass hums along higher.
But in recent pop music, largely in techno and drum & bass electronic music, the bass will be the lower of the two. Both options are legit and you'll need to make this choice first.
This really should be decided by the songwriter and performers before the tracks even hit your hands. This helps them choose the right kicks and the right bass tone to use which makes your job much easier and less destructive to the overall sound.
If they want a lower bass, hopefully their notes are sustained for a longer duration with less variation, because the overtones will be needed for these changes to be heard.
Think of 80's pop bass lines and how many notes they cram into a bass line, and then notice that without the bass is always the higher of the two with a lot of overtone and distortion, almost sounding synthetic at times.
The EQ Ranges of the Kick and Bass
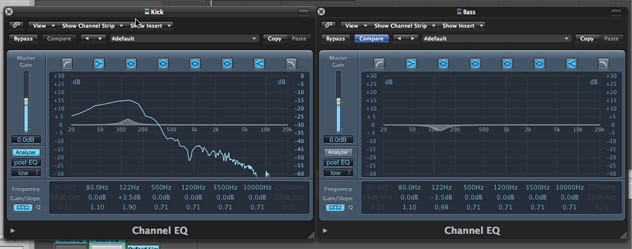
The kick drum fundamentally will sit below 20 Hz to 100 Hz and a little beyond. This is the bulk of the kick drum's sound, but the noticeable part that helps us latch on to it is the attack.
The attack can be a fairly broad spectrum sound that will range from 100 Hz up to as far as 15 KHz. The attack strikes first and quickly falls into the decay. Reference the image below:
The triple-axis image above shows the attack and decay of a kick drum. Vertically you're reading the decibel range (the loudness), while from left to right you're viewing time in milliseconds. From front to back, you're starting at 16 KHz all the way down to 20 Hz.
To interpret the graph for you, basically the attack of the kick encompasses that full frequency range but the upper end quickly dissipates within about 100 milliseconds. The decay is sustained at a lessening volume over as long as one full second.
The bass guitar will reach as low as 31 Hz and even a bit lower while it's overtones can reach as far as 20 KHz (essentially the same range as the kick drum!). And here you see the conundrum. A kick takes up the entire low-end and leaves no real room for the bass.
It's so "bad" that we can't even carve out a spot for the bass. They literally have to share that part of the spectrum, and you have to make them both sound as clear as water.
Artists and listeners will accept no excuses and no reasoning. You'd be totally screwed if you weren't about to read some world-class tips to get this done painlessly (after some practice of course).
Get Some clarity when Mixing Kick & Bass with EQ
Before you do anything else, you need some clarity. You can't compress or balance the kick and bass against each other or all of the other instruments until you can hear them correctly. Get your equalizater and get ready to boost and cut like a mad man.
High-Pass Everything Else
Funny enough, the first tip and usually your first step will be to slap a high-pass filter on everything but the bass and kick. You'll choose a threshold, probably around 80-120 Hz, that makes it so no other instrument sounds off below the threshold.
You can use a sharp cut-off or severe shelf but I wouldn't recommend it due to the artifacts it can create. Just let the volumes roll off with a wide Q.
If you go too tight, you'll actually produce a volume bump just above the threshold. Now, nothing exists in the low-end but the bass and the kick.
You can consider applying a low-pass to the kick to keep the attack from dominating too much of the higher frequencies. Let the snare have some of the action, jeez!
Roll Off the Higher of the Two
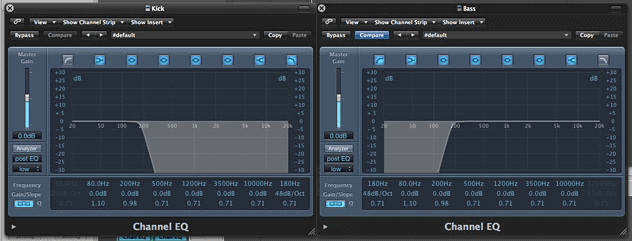
Select the channel of whichever instrument you chose to be the higher frequency of the two and apply a high-pass filter to it at a threshold of around 50 Hz. Let's say you're EQing the bass here.
You're going to use a fairly aggressive roll off on it so that the kick drum can dominate around 40 Hz and lower. The kick now will handle the sub-bass energies that you can literally feel in your chest. Choose one or the other, but not both.
Let's clear up any possible misunderstanding here. You can have both producing sub-bass thumps, but this will require the bass and kick to dance around each other rhythmically, never landing on the same beats.
This works great for genres like techno, rap, and reggae. Even then a lot of mixers will still make the decision to assign just one of the two this task.
Sweep a Tight EQ Boost to Find the Sweet Spots
On both the bass and the kick drum, take a tight Q with a 6 db boost and sweep it up and down the frequency range. It helps to loop and solo each instrument as you do this.
In this way, you can identify where the fundamentals lie, where the overtones are at, and where the attack of the kick drum sounds best. For instance, take a look at the frequency chart below:
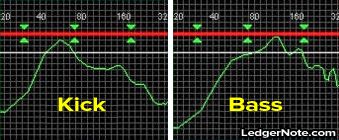
The picture above is a good example of where the sweet spots lie. You can see that kick's fundamental range lies around 40 Hz to 60 Hz, while that of the bass resides further up around 110 Hz - 130 Hz.
The bass also quickly rolls off at about 50 Hz so the kick can breathe. You can also visually spot some of the signatures of the attack of the kick and the harmonics of the bass.
Boost & Cut with Tight Q's at the Sweet Spot
Now that you know where these sweet spots are, you can carve out some space for each instrument inside of each other. For instance, in our scenario above you could take a tightly Q'd parametric EQ and boost the kick centered around 50 Hz, maybe no more than 2 db.
This will bring out some of the character. At the same time, too much of a boost could create a weird boomy or boxy sounding kick. So instead of boosting 5 db, for example, we can jump over to the bass and apply a slight 2 or 3 db cut at the same 50 Hz spot. This will look something like this:
Do the same for the bass' sweet spots, boosting itself and cutting the region slightly on the kick. This is mainly applied at the fundamental frequencies, but can also be done in the first overtone harmonics of the bass to help liven that up, depending on the decay of the kick. Which brings us to our next set of tips.
Tame Your Volumes With Compression
Now that your bass and kick aren't fighting each other to be heard, you're ready to caress the amplitudes of both in isolation so they jive well together even better. Remember, as you go about this, don't forget to disengage the solo button and make sure you aren't moving backwards.
Consider Trimming the Length of the Kick's Decay
The kick is mainly detected in the attack and felt in the bulk. But the bulk can linger longer than you intended and still get in the way of the bass. You may not have to or even want to trim the decay length down depending on the sparseness of of the song.
But in most mixes, you'll achieve a better mix by chopping down the kick's decay to about 250 ms to 300 ms. Anything more than that can start to sound like a muddy reverb. You can achieve this with a gate (a type of compressor).
Compress Both the kick and bass Aggressively
Now that you have your clarity together, you'll want to balance their relative volumes. Compression comes in handy here, but remember, it can and will effect your equalization work if you apply it post-equalization. This isn't bad, just use your ears and follow our bass compression guide.
You may want to apply compression before you start EQing sweet spots. It's up to you, but you'll likely have to do some tweaking if you compress after you EQ. Not a big deal.
When I say compress aggressively, I don't mean for you to turn your compressor into a limiter. Don't drop the threshold to -60 db and set a 100:1 ratio. For instance, if you compress too hard on a kick, you won't have a kick. You'll have a square sine wave.
On the kick, set a slower attack on the compressor so that the attack of the kick can slip through unaffected. If you want to reduce the attack some, you can set up a second compressor. Apply a longer release to help trim the decay length.
On the bass, you'll be okay setting a lower threshold and higher ratio with a short attack and release. You'll want the volume of the bass to be very consistent to provide stability for the mix and the listener.
Remember, you're taking volume away and should be able to read how much on the meter or by calculating it from your ratio. As the bass climbs above your threshold, the input will be reduced to the output of the ratio. So if you're ratio is 5:1, then for every 5 db going in only one will come out.
That's 4 db reduction. You'll need to compensate for this volume drop using the Gain knob. You're basically turning up the compressed signal with a sub-fader here. Don't assume you need to boost by the same amount you reduced, because you won't. Use your ears!
Side-Chain the Compressor to Duck the Bass
Even though the bass and kick sound clearer, they still occupy the same region on the frequency spectrum. Depending on the tracks you were delivered and the choices made before you, you won't be able to achieve full on perfection just using EQ and standard compression.
Fear not. You have another trick up your sleeve, and that's to side-chain the compressor to duck the bass when the kick fires.
Here's what you do. Slap another compressor on the bass track and bus the kick drum into it. What's going to happen is you're going to compress the bass, as you'd expect, but only when the kick drum comes into play.
If and only if the kick drum bus is sending a signal will the compressor act upon the bass, and you'll design it using the threshold, ratio, attack, and release settings.
The point of this is to automatically reduce the volume of the bass only when the kick drum hits, and just slightly enough that you gain clarity in the kick drum without effecting the bass too much.
The listener shouldn't even notice the change in volume because the kick drum is coming in and fleshing out those frequency regions.
You can get away with 2 or 3 db, but be careful going any more aggressive than that. The bass "ducks" out of the way like it's dodging a bullet, just long enough for the kick to pop off, and then the bass rises back up in volume smoothly.
This should be a last resort, but can save your mix, the song, your job, and even your soul (for real, though).
Achieve The Final Balance With the Faders
Now that you've tamed these wild beasts with your compressor, you're ready to make sure their volumes balance against each other and then together against the rest of the song. You've made it to the easy part. It's all downhill from here.
Remember, Bass and Kick Are Relative
If you're following along in order, you're at a point where you're ready to un-solo the two tracks and bring them into the rest of the song.
As you begin to bring up the faders on the other instruments, you'll find it's easier to change the volume of just the bass and kick once you're too deep into the mix than to try to adjust everything else together. You can lock the bass and kick drum tracks together and move them in unison to adjust their volume against the rest of the song.
But what if you after you bring up the volume of the rest of the instruments that you find the bass would sit better a bit quieter in comparison to the kick, or vice versa?
Remember, the way you perceive either is based on the other. Before you start dropping volumes on the bass, see if you can't just increase the volume of the kick.
Maybe if you want the bass louder, but with too much volume it affects other instruments? Try dropping the kick's volume a tad. Keep their relation in mind and you can solve a myriad of issues in ways you'd not have considered otherwise.
Anchor the Snare to the Low-End
The best way to keep your kick and bass volumes at a balanced level versus the rest of the song is to bring up the snare's fader and find its appropriate volume compared to the low-end. Once you anchor this in, bring up the rest of the instruments using the snare as the anchor and guide.
This should leave you with a full low-end, mid-range, and high-end so you don't have a bottom or top heavy mix. The snare, kick, and bass are the glue and drivers of your mix and song.
If You Lose Clarity, Blame It On The Rest
At this point, if you bring up the rest of your instruments and suddenly your low-end is sounding muddy and unclear, it's likely an issue with some other instrument.
Remember that although we applied a high-pass to the rest of the instruments, their fundamentals can get in the way of the attack and overtones of the kick and bass, respectively.
Remember the old boost and cut EQ technique? You can apply it here to help, but at a much slighter decibel range. Also, you'll have leeway to pan the offending instruments some as well. But don't pan the low-end!
You'll want to cut from the offending instrument, not the low-end. But don't cut too much in volume, and use a tighter Q. If you cut too hard and wide in their fundamentals, they are going to sound horrible. You may find that the instruments sound pretty crappy solo'd.
They might sound tinny and thin, but as long as they sound good in the full mix, who cares. You don't want to star cutting from your low-end or you'll lose the fullness and balance of the mix. It's literally your foundation.
If You Must Have Stereo Width, Use the Chorus Effect
One final trick for those who desire some stereo width on their kick or bass is to use the stereo chorus effect. What chorus does is split your signal into two separate hard panned signals that are then inversely manipulated by an oscillator.
A small, varying amount of delay will be added as well as a slight pitch shifting. The result is that the instrument is then stretched, as opposed to panning, across the entire stereo field.
The key to doing this properly is to place the chorus on an auxiliary bus where you can also add an equalizer and ultimately control the volume with a fader.
You must use the EQ to roll-off most of the bass frequencies so the chorus only applies to the upper harmonics around 400 Hz and above, or you end up with the same distortion and phase issue problems that you get from panning these instruments.
You'll have to test for the proper cut off frequency, but that's a good starting place. We talk more about mixing bass in stereo here if you want to go into more depth.
Who Knew Mixing Bass and Kick Was So Easy?
Knowledge is power, and having the right tools for the job (like the best studio subwoofer you can get your hands on) makes life so much more easier.
Understanding how to apply EQ to all of your tracks using high-pass and low-pass filters and parametric equalization for cuts and boosts can quickly bring clarity to your low-end.
After that, some compression can bring the bass and kick into balance with one another, and then using anchoring based around the snare you can achieve balance with the rest of the mix.
That wasn't so bad, was it? Apply these tricks and methods for mixing kick and bass to your songs going forward and you'll be wowing your listeners and clients in no time at all.
Jared H.
 Jared has surpassed his 20th year in the music industry. He acts as owner, editor, lead author, and web designer of LedgerNote, as well as co-author on all articles. He has released 4 independent albums and merchandise to global sales. He has also mixed, mastered, & recorded for countless independent artists. Learn more about Jared & The LN Team here.