

Bass traps in particular, but the entirety of the acoustic treatment rabbit hole, are extremely interesting. If you look around online you'll see just how many people are completely obsessed with the topic.
That was me for the longest time. The thrill is over once you finish your own build, but the benefits last forever. And let me tell you, it's impossible to over-emphasize how much a difference even the slightest amount of acoustic treatment makes.
Let's jump straight in. We'll cover exactly what these are, how they work, where and how to install them, how you can build them on the cheap, where you can buy them, and then a "super secret" trick from experienced mix engineers that blow traditional bass traps out of the water.
What is a Bass Trap?
A bass trap is a type of acoustic treatment panel that helps reduce problems in the low-end of the frequency response of a room.
These are a sub-set of acoustic treatment designed specifically to target the bass frequencies, because the others aren't capable. The reason is that the others aren't thick enough, dense enough, and aren't placed in the strategic positions in the room to target bass.
The specific issues that these traps solve is that, due to the wavelength of lower frequency sounds, they pass through other panels and remain unaffected. This leads to a build up of lower frequencies in the room, causing recordings to sound muddy and boomy.
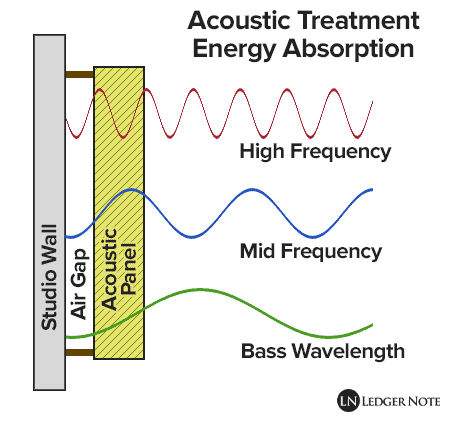
If you look at the image above, you can see how a less thick and less dense panel covers less "length" on a bass sound wave. An increase in thickness and density is the signature characteristic of a bass trap, created to combat this problem.
How do Bass Traps Work?
These work just like any other absorption panel works. They're created from high-density insulation that is compacted into rectangles (instead of soft and fluffy). When sound waves enter the panels, they vibrate all of the countless fiberglass fibers.
When sound waves pass by and vibrate the fibers due to friction, they have to use up some of their energy. For a sound wave, losing energy means losing volume. The sound energy is translated into physical vibrations which is then dissipated into the room as tiny amounts of heat.
To get a little more technical, bass traps have a higher gas flow resistivity, meaning they provide more resistance to the flow of air (which is what sound waves are) because they have more fibers crammed in to a smaller area due to being denser and thicker.
Why Do I Need Bass Traps & Other Panels?
The goal of acoustic treatment is to first flatten the frequency response to remove as much influence from the room as possible. After that, if needed, the response can be tuned to reduce dips and peaks further.
Regular acoustic treatment panels are typically thinner (2 inches in thickness) and are positioned in specific places in your room to stop reflections in the mid-range and upper frequencies. They're placed in the first reflection zones mainly and then are scattered throughout the room in general.
These are called absorption panels. They're sometimes called broadband panels because they cover most of the frequency band from bottom to top, but they don't reach very deep into the bass region, which is why we also need bass traps (4 inches in thickness).
Cloud panels exist for the same reason but help stop reflections between the floor and ceiling. There are also diffusors that, instead of absorbing the energy from sound waves, they scatter that energy so it's too weak to make as much of an impact.
There's also Helmholtz resonators that are tuned to vibrate at a certain frequency to improve dips in the room's response. These are your main types of panels and all provide a benefit when combined together.
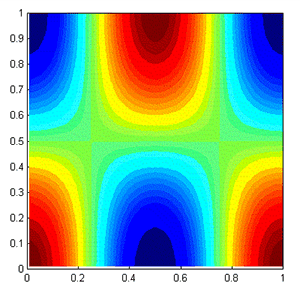
The goal is to stop reflections, stop resonances from room modes (dips and peaks in various frequencies at weird spots in the room), stop flutter echoes, reverb, phase cancellation, and other problems.
What's important to realize is cheap foam panels don't do much for you at all besides stop high frequency reflections. They aren't dense enough to handle even low-mid frequencies, let alone any bass. You need real panels. I'll explain the difference deeply below.
Where Do I Install Bass Traps?
Now we're getting down to the nitty gritty. To understand where to install these panels, you need to understand where and why bass builds up in the room. Because the bass wavelengths are so long they pass through the thinner and less dense panels scattered about the room.
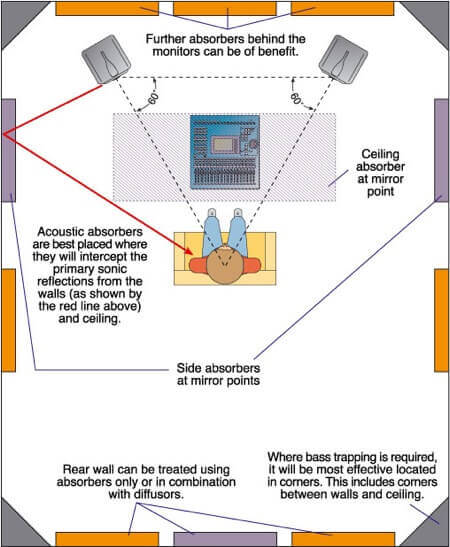
Keeping the discussion very basic, bass waves survive and build up in the longest distances in the rooms due to their longer wavelengths. This means that the distances between corner to corner and the front wall and back wall are the biggest culprits.
The question that's always asked is "if I only have one bass trap, where should I put it?" What people are trying to ask is which areas in the room are the highest priority places to put these bass-targeting panels first. The priority is:
- Floor-to-ceiling corners
- Center of front wall
- Center of back wall
- All other corners
By corner, we mean any 90-degree angle where one wall meets another. That can be the front wall meeting the ceiling or a side wall or the floor, for instance. The floor-to-ceiling corners (the four corners of the room) are the highest priority.
[STRADDLING PICTURE]
Typically, you'll build four separate 4 inch thick panels of denser rigid fiberglass in the shape of a rectangle, because this is the shape the insulation is manufactured in. You'd hang them so they straddle the corners like pictured above.
This creates a gap behind the panel where the bass wave has a chance to bounce against the wall and pass back through your trap a second time! It's the most efficient way to use these traps, especially when you're on a budget. We hang all panels with a gap behind them for this reason.
But stay tuned, because below I'm going to show you the elite way of building these, called a Superchunk, if you have the budget for it. You'll need a lot more insulation to pull it off, but you'll get an exponentially better result (and it looks better).
How to Build a Bass Trap
There's four easy steps that take a lot of time and space to do-it-yourself, but you'll save a lot of money if you can make it happen.
1) Order Some Owens-Corning 705 Rigid Fiberglass
First, you'll first need to find a place to order some Owens-Corning rigid fiberglass panels (there's a link to their 703 panels on Amazon below so you can get an idea of the price).

For bass traps you want their 705 panels (denser!) but they're more rare on Amazon and way more expensive and sold in lower quantities. So I recommend going to a local Lowes or Home Depot and letting them order it for you.
I recommend ordering 2 inch thick panels if available. You can get the 1 inch thick ones but you'll need to stack four of them together (instead of two) because you want a total thickness of 4 inches.
It's easiest to keep them in the exact shape they come in, though you'll find they're easy to cut. I literally used a dull butterknife to cut some of these in half when I did my entire DIY build. You can use a marker to draw lines across them so you have a guide.
2) Build Wooden Frames
Your next step is to build wooden frames to set the panels into. I advise using very light wood because they insulation is already kind of heavy. Your next question is whether you want this frame exposed visually when you hang them.
I kept mine exposed and it was a pain in the rear to staple the fabric inside perfectly so it looked tucked in but still wrapped around the insulation. I'm going to fully wrap mine soon, so I recommend you do that from the start.
3) Wrap Your Panels in Fabric
You want a fire-resistant fabric that's still breathable to air, and wrap your rectangles like a present and wrapping paper. You can staple the fabric to the back of the frame, and cut another rectangle piece for the sole purpose of covering the back. The point is to keep insulation fibers from floating around in the air.
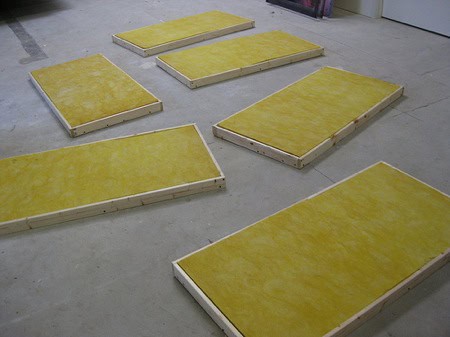
To reiterate, your main concern here is simple but threefold. You want to ask yourself what color fabric you want, you want to make sure it's fire-resistant, and finally if you want to expose the frame or not. I suggest wrapping it completely, having done the opposite before as seen below.
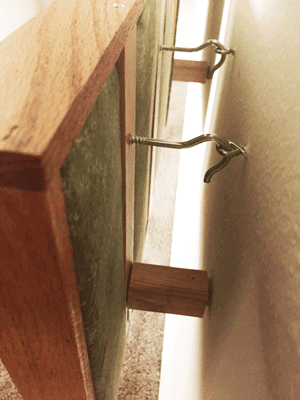
4) Mounting Your Traps to the Wall
Hanging them is a challenge and nobody has "the right way." Some people have used metal cables and eye-hooks in the wall. I invented my own method as seen below that worked out okay:
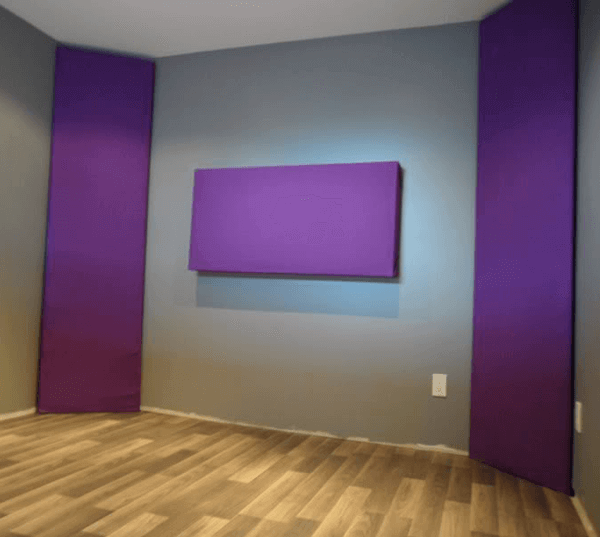
For the sake of completion, here's what they all looked like when it was said in done, in an apartment about a decade ago:

I plan on wrapping those in dark grey fabric and building even more soon. Try to think ahead and look at a lot of pictures of recording studios online to see different designs, because it's hard to undo or start over. It's a lot easier to get it right the first time!
Superchunks - The Best DIY Bass Trap Possible
The panels I showed you above are critical for building front wall and back wall traps and even bass clouds. But when it comes to your four main corners there's an elite method that is far more effective at absorbing bass waves, and that's called the Superchunk. It looks like this:
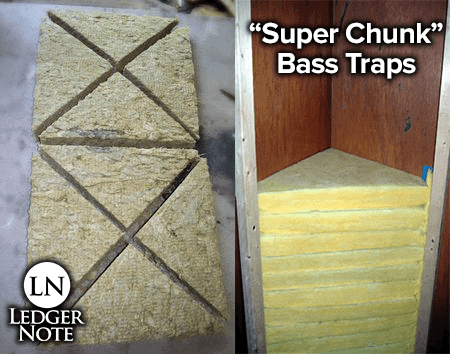
As you can see, you can take a single Owens-Corning 705 panel, cut it in half, and then cut each half into fourths diagonally. You're left with perfect triangles that can be stacked in a corner. So instead of having a sizable gap of air, you fill that entire pocket of air with more fiberglass!
Having the sound waves bounce against the wall and pass back through a straddled rectangle panel is nice, but this is nicer. Remember, when it comes to bass waves, thickness is a big deal, and this is thick. It also will cover the corner from floor to ceiling rather than just one section.
My recommendation is to take every stack of about 10 triangles and wrap them in thin fabric tightly, then stack them in the corner. From there, create a platform above them for the next batch of 10 triangles (or 20, whatever seems right for you).
This keeps the bottom of the stack from being overly compressed by the weight above, and helps keep the whole Superchunk more stable. In the image above you can see a wooden frame built out in front of the stack to keep it tucked in the corner.
You can either staple fabric to this frame, or create an entirely frame that attaches to this one. This secondary frame would be wrapped in fabric and exists to look pretty and give you access to the insides of the Superchunk. That's it!
Where You Can Buy Bass Traps
There are a handful of quality companies out there now that sell pre-made traps. Just be aware that it's fairly expensive to have them pre-built and then to ship them. Shipping them is a huge cost because they're large and heavy, eating up a lot of space in the trucks.
There are others but their prices are way too inflated and they bully people in the industry forums so I'm not going to mention them. You know what they say about karma...
That's All She Wrote on Bass Traps
Whether you're treating a mastering room for mixing, a home theater, a recording studio, or even a big gymnasium, you'll find that these tedious but wonderful panels make all the difference.
The core reason, especially when recording and mixing music, is that when there's too much low-end in a room, you have to use an equalizer to remove it, and you end up having to reduce in volume parts of the instrument or vocals you recorded too. It's better to not let it slip into the recording at all.
And that's what a bass trap is for. And you don't need just one, but at least six if not many more. And that's not even counting the u003ca href=u0022https://ledgernote.com/columns/studio-recording/acoustic-treatment-guide-for-panels-and-foam/u0022u003eother types of absorption panelsu003c/au003e you'll need. Like I said at the start, it's quite the adventure and one that is easy to become obsessed with. It's super fun and even more rewarding once you're finished. So get to it and send me some pictures when you're done!
Jared H.
 Jared has surpassed his 20th year in the music industry. He acts as owner, editor, lead author, and web designer of LedgerNote, as well as co-author on all articles. He has released 4 independent albums and merchandise to global sales. He has also mixed, mastered, & recorded for countless independent artists. Learn more about Jared & The LN Team here.