
Phase cancellation is almost a mystical matter in studio engineering and recording. Many choose to flat out ignore it just to avoid learning what it is, why it occurs, and how to fix it. Don't be one of these people.
I'm going to break it down in simple language and show you exactly how to hear it, how to spot it with plugins if you can't hear it well, and how to resolve any wave cancellation issues arising. The result is a sharper stereo image full of the frequencies you want while suffering no spikes in the ones you don't want.
I promise, understanding and fixing these problems is not hard, and getting a full understanding will give you a competitive edge at most and at least will make your music sound much better. Here's two concepts you need to know before we start:
Frequencies: Sound waves cycle a certain number of times per second, which is called Hertz (Hz). The number of cycles is how a frequency is defined, such as 750 Hz. That would be 750 cycles per second. Every frequency has a different wavelength, and thus phase issues tend to occur is some frequencies and not others.
Phase: Sound wave cycles begin at a specific time. When two identical cycles begin at the same time, they are "in phase." If one is delayed enough that the wave forms are inverted (at 180 degrees), this is called "out of phase." Usually you'll be somewhere in between 0 degrees and 180 degrees. See below for a visual aid.
What is Phase Cancellation?
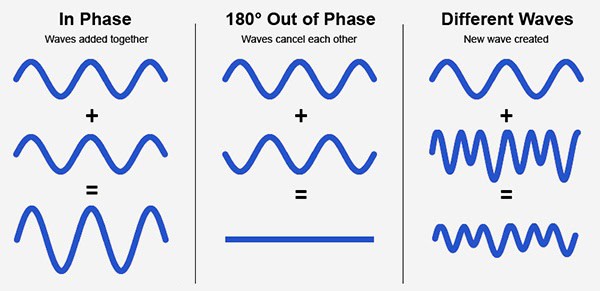
Phase cancellation is when two or more audio wave forms clash with each other, resulting in deconstructive interference. This causes a reduction of volume in the specific frequencies where the problem is occurring. The opposite can occur as well, causing a boost in amplitude.
This can happen at various intensities depending on just how out of phase any two recordings may be and how similar the amplitudes and wave forms are. It's hard to understand when using physics and music industry jargon, so I'll keep it real simple.
When two waves meet each other and both peaks of a frequency coincide with each other, the resulting amplitude for that frequency can be at most twice as loud. The same can happen with the troughs of a wave. When a peak and a trough (the high point and low point of a wave) meet, they can even completely cancel each other.
How Does Phase Cancelling Occur?
Since wave forms are so complex with various timbre and frequency ranges coming from various instruments, you'd think this would be pretty rare, and you're right. There's often only two times you need to really listen for it, and a third that's easily solvable.
The biggest culprit is recordings of the same source of audio, such as using two microphones to create a stereo recording of an acoustic guitar, for instance. This arises from poor microphone placement techniques. The second is when you double a track and pan them to create stereo width. The third is due to room acoustics.
Poor Miking Technique in Stereo Recording
One way frequency cancellation occurs is due to bad miking technique. This causes the sound waves from the instrument to reach each microphone at different times, highly increasing the possibility for a full silencing of a signal if not a severe disruption in the audio quality.
It can still happen if your microphones pick up the exact same sounds at the same distance, leading to two tracks that are perfectly in phase. This causes the volume boosts, where as perfectly out-of-phase recordings can mute each other. Anything in between can happen too.
When performing stereo recording you want the tracks to be perfectly in phase. Frequency boosts are fine since they're meant to be identical tracks. It's when they're out of phase that you can hear the cancellation occuring.
Doubling of Instruments & Hard Panning
The other main activity that causes wave cancellation is when you take a mono recording (one channel) and double it to make a fake stereo recording. This is often done in mixing when the provided tracks are insufficient to create an exciting mix.
An example would be having one backing vocal track doubled and panned in opposite directions. Many people use this technique, unaware that it's called the Haas Method, based on the Haas Effect that we've covered here.
Because the wave forms of this doubled track are identical, you won't even hear the result of panning without adding in a delay on either side. At the wrong amount of panning, you'll start to get phase issues.
Many mixing engineers fail to detect it when they're using near-field monitors or headphones because the wave forms never meet in the air before reaching their ears. Later, the music is played back in a car, home stereo, or in a club and the problem becomes obvious.
Comb Filtering From Room Acoustics
Then there's harsh sounding problem called comb filtering. Comb filtering arises from sounds reflecting off of the walls of your studio room and arriving at the microphone in phase with the original source audio.
This causes steep notches to occur in the wave form that visually look like the teeth of a comb (and thus the name). The peaks and troughs of the wave are increased in amplitude at opposite polarities, creating the big teeth of its namesake.
How to Prevent Phase Cancellation at the Source
Fortunately, all three sources of audio phase issues are pretty simple to solve. I'll break down how to keep these problems out of your recordings or mix from the start. Then we'll talk about fixing them once it's too late.
X-Y Technique & The 3:1 Rule with Spaced Pairs
First let's deal with microphone placement when recording. When recording a single sound source, you typically want to use one of two miking techniques. The X-Y technique uses two mics situated as closely as possible to one another but aimed exactly 90 degrees apart.
This allows the sound waves to arrive at the same moment, but since the mics are aimed in different directions you'll get slightly different recordings, like bass frequencies to the left and high frequencies to the right on guitar or piano. This provides the difference that lets your ears experience them as stereo, but without any cancellation issues.
Sometimes you won't use the X-Y technique because you want a wider stereo image or you're recording a large ensemble like a choir or bluegrass group. In these cases you need to apply the 3-to-1 rule when using the Spaced Pairs (two or more mics spread apart).
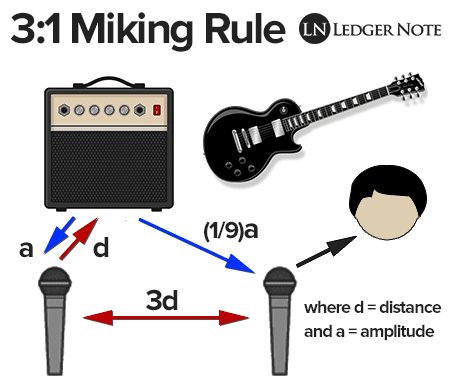
The 3:1 rule says to make sure each microphone is three times as far apart from each other as they are close to the sound source. We won't get into the physics behind the distances, but it works perfectly for combatting phase issues.
Defeat Comb Filtering With Acoustic Treatment
If you're picking up comb filtering, which is kind of the opposite of phase cancellation, this means your microphones are recording reflections from the walls perfectly in phase. The first thing to do would be to move your microphone away from the wall a bit more. That will stop it but your results will sound bad, still.
What you really need is acoustic treatment, which is a type of paneling mounted on your walls that absorbs sound waves and converts them to heat. This stops them from bouncing back at your microphone.
You'll also end up with much clearer and less muddy recordings. It's easily the best investment you can make, followed by a great preamplifier. It's not fun or exciting (to most people) but it truly makes the biggest difference, even with low quality recording equipment.
Identifying Phase Issues
So you've either recorded a performance with multiple mics to create a stereo track or you've doubled and panned an instrument to create stereo width. But you aren't sure if you have phase issues because you can't hear them. They may still be there though less extreme. Here's how you detect it.
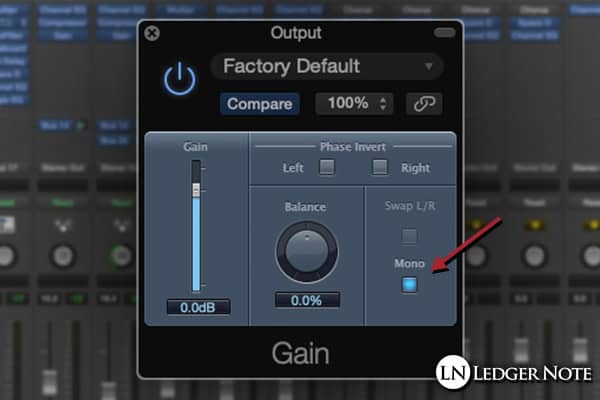
First off, never bounce your two recordings or doubled tracks into one or you'll be stuck with the problem. Keep the tracks separate, but output them together to a single auxiliary bus. From there you can solo just those tracks and then drop them from stereo to mono.
If you need help doing that, check our mixing in mono article, but the quick version is you'll find most gain plugins have a mono button or you can find a directional mixer plugin that will allow this as well. By forcing both tracks to become one centered channel, you'll hear any obvious phase issues.
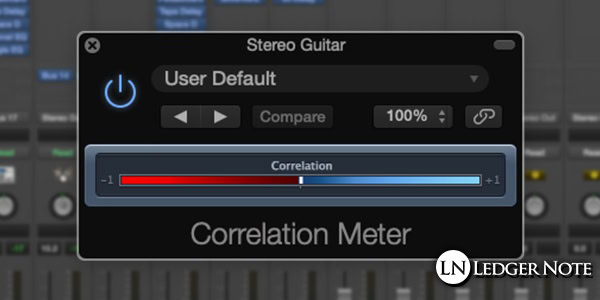
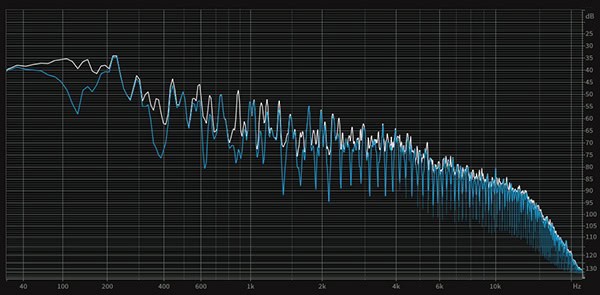
If you can't hear it, pop back out of mono (back to stereo) and apply a phase correlation meter plugin. Since the tracks are summed together into one mono signal, this plugin can detect and show you how "in phase" or "out of phase" the tracks are.
+1 is in phase, -1 is out of phase, and 0 is as wide of a stereo image as possible without phase issues. Phase correlation plugins only work on stereo tracks, but it'll work just fine on an auxiliary bus as long as you aren't still summing to mono.
How To Fix Out of Phase Audio In the Mix
You don't need to worry about being slammed up against +1 all of the time, but you want to stay above 75% to the right. If you're not and the meter is dancing to the left side by any amount, then you have phase cancellation occurring. Let's fix it.
1) Delay a Panned Side
The first thing to do is choose either the left panned or right panned track and add a delay to it. As little as 3 milliseconds to 5 ms can do the trick, or you can try up to 15 ms or more. Any more than that on a true stereo recording will create a true, hearable delay, but it's fine and desirable on doubled tracks.
2) Detune With a Pitch Shift
If you find that fixed it some but there's still problems, albeit to a lesser degree, choose a side and detune it by a few cents. You can use a pitch shift plugin for this. Increase the detuning to as much as 10 cents or more if needed as long as it doesn't sound horrible. This will change the timbre enough to solve the rest of the problem.
3) Polarity Flip With a Phase Invert
If you're still having problems, you can go for the nuclear option which is to invert the phase of one of the tracks. This can solve the problem entirely when combined with the first two methods and even let you back off on them a bit. It doesn't always work though and can lead to the opposite problem of comb filtering. Save it for last.
Phase Cancellation Be Gone!
That's it. There was a lot of long-winded explanation so we knew what we were talking about, but the actual solving of the problem is fairly simple: Delay, Detune, & Phase Invert. Anything else would be uncivilized!
You see, it's not that bad. And since so many studio engineers are avoiding learning about phase cancellation, you can get a leg up on them all. If anything, your current clients will appreciate it and your own music will improve. Have fun and mix well!
Jared H.
 Jared has surpassed his 20th year in the music industry. He acts as owner, editor, lead author, and web designer of LedgerNote, as well as co-author on all articles. He has released 4 independent albums and merchandise to global sales. He has also mixed, mastered, & recorded for countless independent artists. Learn more about Jared & The LN Team here.