
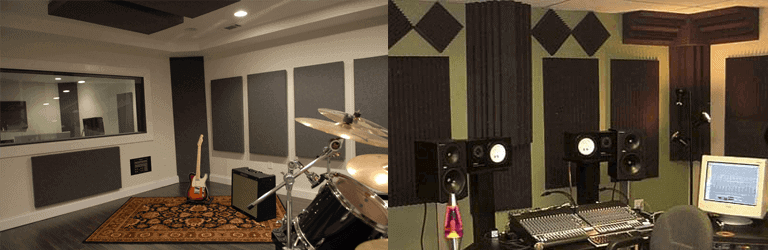
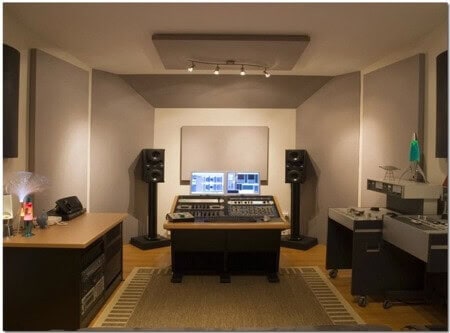
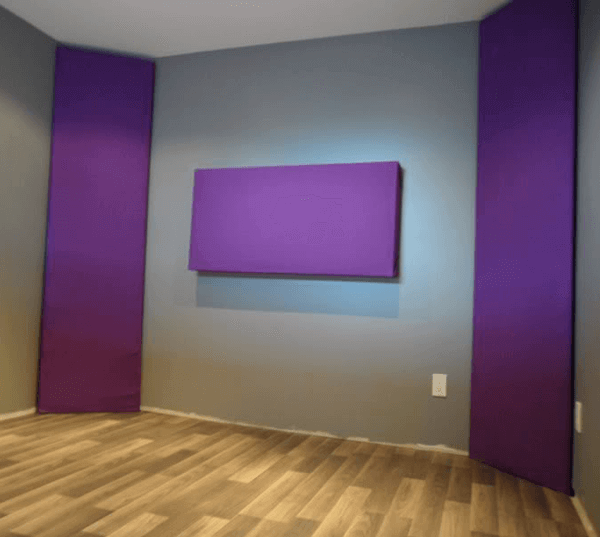
The reason every major studio has these "boxes" hanging on the walls, or the walls themselves are made of cloth covering "something firm but soft," is the same reason why their recordings and mixes come out pristine and beautiful, while amateur works sound like they were recorded in a small closet or a bathroom (most of the time they are!).
The reason is that they are controlling their acoustic environment. That means they understand the importance of sound dampening, deadening, absorbing, reflecting, diffusing, and so on. They know when and where each is needed, and they know not to go overboard with it.
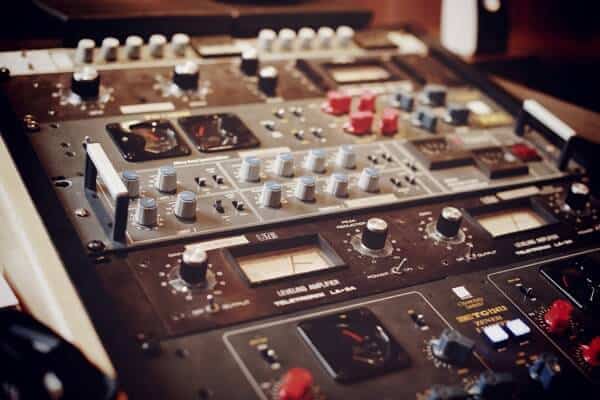
You're here seeking the same solutions. People get real caught up with what those of us in the recording studio industry call G.A.S., which stands for Gear Acquisition Syndrome.
They buy the best pieces of recording equipment possible. They learn to use them masterfully. They score the top plugins available. And at the end of the day, their recordings sound like crap.
That's because most people get addicted to the "fun" part, which is plugging in cables; twisting knobs on mixers, preamps, and compressors; playing their instrument; and day-dreaming about all of the compliments they'll receive for their awesome song.
While they have the most killer signal chain in their city, state, or nation, they don't realize that a recording's quality is limited by it's acoustic environment.
The only way to get around the acoustics of your environment is to record in the vacuum of deep space (there's no medium to even carry the soundwaves!), or to treat your walls with acoustic panels or acoustic foam.
Get ready to learn the what, when, where, why, and how's, and the if's, and's, and but's. Just so you know, this is highly addictive stuff. Once you crack open this can of worms, you'll never get enough! All you need to know and more is coming straight at you in the LedgerNote Acoustic Treatment Guide, in 3... 2... 1...
Prepare for your adventure through the following topics:
- What Exactly is Acoustic Treatment?
- Why Do We Use Sound Attenuation?
- Who is Sound Treatment For & When Do We Use It?
- What are the Types of Acoustic Panels?
- Where and How Do We Apply These Acoustic Wall Panels?
- What Results Can You Expect From Sound Treatment?
- Trusted Vendors With High-Quality Products
- Do-It-Yourself Acoustic Panels
- Acoustic Treatment Resources
Let's go! Grab a hard or soft beverage, turn on your favorite record, and let's discuss it!
What Exactly is Acoustic Treatment?
To summarize the entire topic in one sentence, music studio acoustic treatment is the amazing result of acoustical engineering designed to dampen and diffuse sound waves inside of a room to minimize constructive and deconstructive interference, thereby increasing the clarity of the mental imaging of the sound field. That's a whopper. Let's break it down to easier to understand chunks throughout this guide.
Note: A common misconception during these discussions is that treatment includes soundproofing a room. It does NOT! That's an entirely separate discussion that needs to take place before your studio building and room is even constructed. For 99% of us, it's far too late for that.
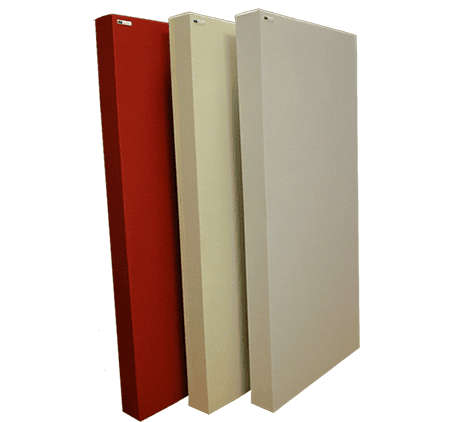
What is this acoustic wall covering made out of? This answer depends on the type of paneling we're talking about, but the three possible answers are generally:
- High Density Insulation
- High Density Foam
- Wood
When we're talking about professional quality acoustic wall treatment, the "active ingredient" for lack of a better term is high density insulation (commonly known as rigid fiberglass). If we're talking about consumer-level egg crate material, then the main and only component is high density foam.
Other types of panels are made entirely from wood. Often times you'll see wood or aluminum used as framing for wall panels as well, but in this case that's only to provide stability, a means to mount the panel, and to provide an aesthetically pleasing look.
You'll notice that all absorption panels are open on the front and back, and will be covered with a medium-weave cloth material. This is so that sound waves can pass into the panel, but insulation fibers can't escape. For sound absorbing foam, it doesn't need to be covered in cloth.
How Do Acoustical Treatments Work?
Again, it matters on the type of panel. For the type that are designed for absorbing, deadening, and dampening (all synonyms for the same activity performed by the panel), what happens is that the sound wave passes into and through the panel.
Remember, this type of panel is made out of either insulation or foam and packed together at a high density. This means there are more fibers packed together in one square inch than there would be in a non-acoustic insulation or foam. Insulation and foam that's meant to maintain warmth in your house or to cushion the contents of a package you ship in the mail will not be this dense.
So, sound passes into and through the main material and is disrupted on it's journey. It encounters the material and is "slowed down." The amplitude of the sound wave is decreased, which means that energy is taken out of the wave and placed into the material.
We know from our schooling and studies on the conservation of energy that energy can't be destroyed, only changed from one form to another. The energy that is sucked out of the sound wave (thereby making it quieter) is converted into heat when the wave encounters the insulation or foam and vibrates it. Which leads us to this word of caution:
Caution: The insulation, cloth, and foam used in your acoustical treatments should be fire-rated to reduce the risk of a tiny flame burning down your entire studio. Fire-rated does not mean fire-proof, but that it is resistant to flashover (quick ignition), flame spread, and smoking. This can be achieved through the application of flame-retardant sprays. Please keep this in mind for safety reasons, and if used in non-residential (commercial) settings, it is likely legally required. Please consult your local area's building codes for more information.
Wooden panels that are meant to be sound diffusors (also called deflectors) do not absorb or dampen sound, but "break up" the sound wave by scattering it in as many directions as possible.
These diffusors creates a highly randomized, omni-directional spread of sound, which reduces the amplitude of any given wave and reduces it's ability to interfere with the primary sound wave coming from the speaker monitors or instrument.
So now we know how these things work, but the question becomes why? Why should we even be concerned with sound waves?
Why Do We Use Sound Attenuation?
Here's the reality... when recording or listening, we need to be in an isolated environment. In terms of dealing with sound wave reflections, being outdoors in an open field (or better yet floating in the sky) would be fantastic.
There's nothing for sound to bounce around off of except the ground. However, that doesn't solve the isolation problem, unless you're purposefully looking to record chirping birds and crickets and big gusts of wind.
The second best option then is to record inside a room. Most of the time that means we're in a cube or a rectangle. Don't get all clever and start thinking about spherical rooms! That'd be an acoustical nightmare due to the focal point created. But box-based rooms also create "focal points" and have a host of other problems. That's why we use sound treatment.
The question then becomes...
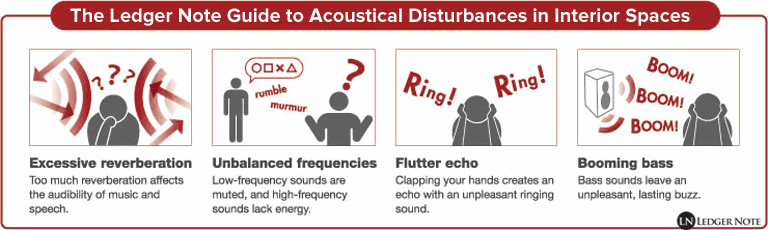
What Are the Acoustic Problems We Are Combatting?
Well I'm glad you asked! Remember the guys I talked about in the introduction who spend thousands to get the world's flattest, most pristine preamplifier in existence, but don't treat their rooms? Or the guys who scored the industry's most coveted microphone ever, only to record with it in between their summer and winter clothes in their closet?
There's zero point in having nice equipment if what they are recording sounds like a hot mess, and that's what acoustic treatment solves.
These problems can be broken into a core set of categories:
- Standing Waves
- Modal Ringing
- Reverb Times
The goal of solving all of these issues is to provide clarity in the stereo imaging when listening and isolation of the source when recording. That's it. Sounds simple, but there's a lot of science to it.
Fortunately some geniuses already worked all that out and we can now simplify it again into general panel placement suggestions that make life easy for us knuckleheads.
Let's look at each type of acoustical problem so we can understand exactly why each is harmful to our professions and hobbies.
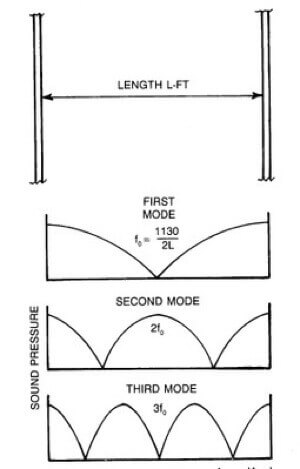
Standing Waves
Standing waves are exactly what they sound like... they are static nodes where it seems like the sound waves aren't moving at all, but chilling in one spot. There are two ways to understand this that all of us have encountered.
Remember that one time when you were drinking a cup of coffee and when you put it down, one magical drop literally jumped out of the mug and landed on whatever important documents you were working on? That's because when you put the mug down, you created a set of waves that spread out from the center of the mug and moved outwards.
Because the mug is so small, those waves of liquid bounced off the edges of the mug and came back towards the center. When that circular pressure front met back in the dead center where it began, it exploded and blooped out that mystical droplet.
Now change that from liquid waves to sound waves, and from a coffee mug to your studio room. That's what standing waves are, except they don't turn into a coffee drop. They keep on keeping on because your speakers are still pumping, versus just blasting out one note and turning them off (like putting your coffee cup down once).
Another way you've experienced standing waves is when you've found that weird spot in a room where suddenly one frequency gets a lot louder than the others. The Griffith Observatory in Los Angeles, California exploited this phenomenon in their Wormhole Stairway exhibit.
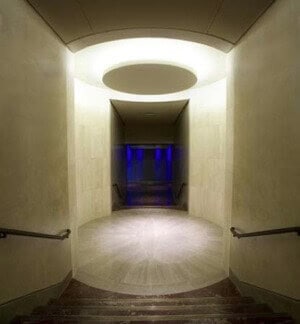
You walk down this hallway and stop in the center of a cylindrical room with the perfectly sculpted ceiling and suddenly every sound is amplified by an enormous amount. I remember rubbing my hands together and getting my mind blown, and then hearing the rustling of my clothing as I put my arms down. Of course I then started making fart noises and what not.
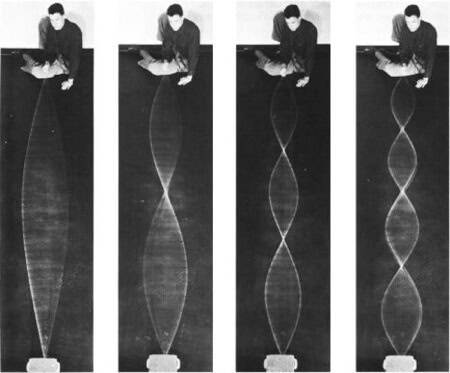
One of the best ways of visualizing standing waves is through Cymatics, the study of visible sound (helped out with a liquid or granule substrate). Depending on the frequency and amplitude, you'll see the various harmonics and number of standing waves that appear. Get ready to have your mind blown:
The quick video above just shows the standing waves on a two-dimensional vibrating plate. Imagine how complex it gets in a three-dimensional room!
The static nodes of standing waves are bad news, especially if one happens to appear right in your mix position or where you decided to set up the singer's mic stand, for instance.
Modal Ringing
Modal ringing refers to room modes, of which three types exist:
- Axial
- Tangential
- Oblique
Room modes occur all over the place in your room and are very much like standing waves. If you want to be technical about it, they are standing waves.
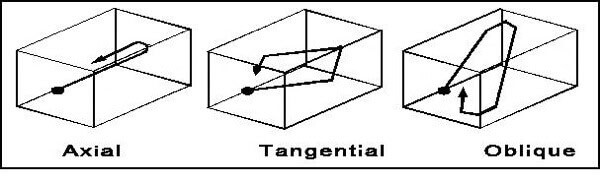
Axial modes are your typical and most strong type of room mode, while tangential and oblique modes are far more plentiful but less problematic singularly. However, add up every small instance all over the room and that's a ton of modal ringing that only further disrupts your prime sound wave.
They not only occur at every frequency in the spectrum of human hearing, but occur in differing dimensions, as pictured below:
What you end up with is first, second, third, and more reflections constructively and destructively interfering with one another. What happens is you get boosts and dips at various frequencies, destroying the beautiful flat frequency response you were hoping to capture.
When it's spread across the entire spectrum, you end up with the problem of comb filtering, which thankfully can be almost entirely solved with an absorption panel at the first reflection point that reduces energy and introduces dissimilarities in phase.
So basically, if you let sound bounce around your room in full force, you're filling up your space with octaves of harmonics as those waves keep pinging around your room looking for surfaces to deposit their energy into. These countless reflections bring us to the next type of acoustical problem you're likely experiencing...
Reverb Times
If you walk around in life making a loud clap in every room you enter you'll look like an idiot, but you'll get a real good idea of how many rooms have feature the problem of long reverb times and flutter echoes.
The smaller the room is and the more reflective surfaces it has, such as a bathroom full of tile, granite countertops, and shower surrounds, the more you'll hear these long reverb times.
In a small room your hand clap doesn't stop immediately after the sound. It slowly fades away, and if you're standing in the right spot, you might hear a higher frequency grow in loudness and disappear after the rest of the frequencies do. That's long reverb times while standing in a room mode, which creates flutter echoes too.
Think about how people stand on the edge of the Grand Canyon and start yodeling or whatever it is they do (I've never been). You might yell "Yo!" and then wait a second, only to hear someone who sounds just like you yell it right back. That's a delay.
It's an exaggerated version, but explains a problem that is experienced in larger rooms where the reflections have to travel across a larger volume of space, so they don't quite become reverbs. They are echoes.
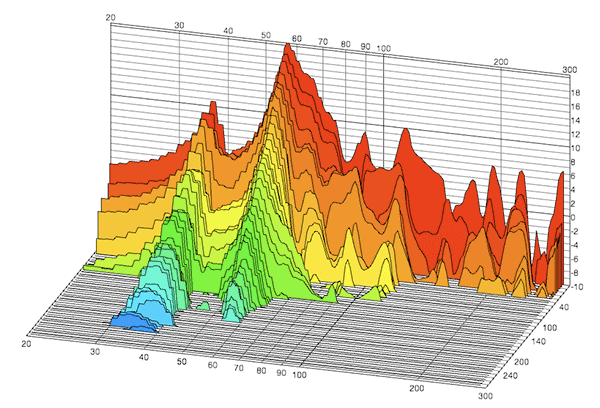
Take a look at this 3D waterfall graph created with the FuzzMeasure software. The normal frequency response is graphed with amplitude vertically, frequency horizontally, and then the length of time of the reverb tail is the 3rd dimension coming out towards you.
That's a quick overview of the main types of problems anyone involved in capturing or creating sound encounters when working indoors. Who all needs acoustic treatment and for what applications?
Who is Sound Treatment For & When Do We Use It?
Sound treatment is for any one who is involved with critical listening for enjoyment or with creating a product or service who's end result is critical listening for enjoyment.
Consider these types of professionals and hobbyists:
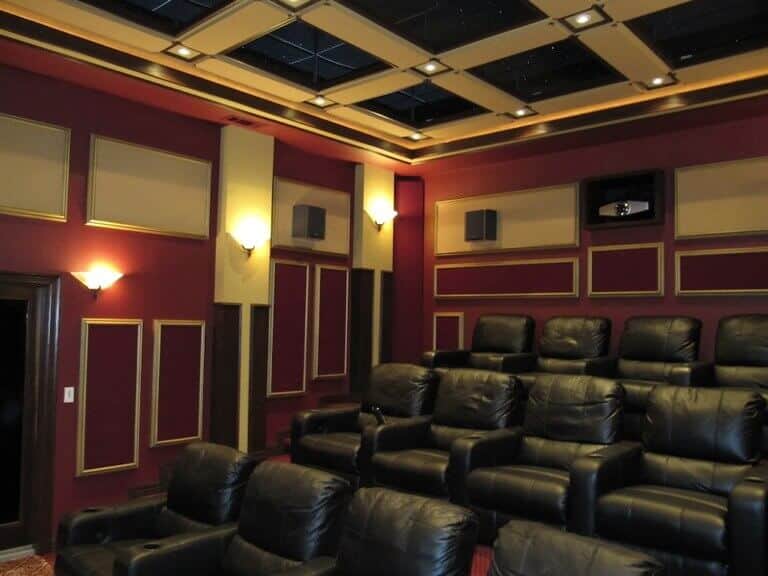
- Home Theater Enthusiasts
- Professional Movie Theaters
- Large Concert Halls
- Gymnasiums for Sports
- All Recording Studio Applications
- Auditoriums for Symposiums
- And on and on...
What's interesting is most everyone has encountered acoustic treatment in their lives more times than they realize, but never knew what it was for! You know those thick curtains hanging on the sides of movie theaters?
You know the soft walls in the college lecture hall? You know those colorful rectangles all along the upper walls of the school gymnasium? Yep, it's all for sound absorption and diffusion.
Why Exactly Do We worry about absorption and diffusion?
Remember our discussion on standing waves, room modes, and reverb times? Those are the problems we want to cure, but why do we care? What are the actual practical reasons that someone would go through the trouble?
There are two phases of the consumption of sound that require acoustic treatment:
- Recording
- Playback
Here's the logic behind it all...
For Signal Processing
When recording, you want to capture the most pure version of whatever it is you're recording. The best thing you can do pre-processing is to have a dry and "true" version of the instrument that's being recorded through a microphone.
By "true" we mean the most accurate version of the frequency response coming off the instrument, not one that's being butchered by the acoustical problems we discussed before.
If you really know what you're doing and want to commit to effects right then and there, you still want a pure signal. If you are going to record to the computer and then apply signal processing effects, you still want to start with a pure signal.
It opens up every possibility in mixing and ensures that your end result will sound great, instead of a muddy and blurry version of your art.
For Mixing and Mastering
Now that you've recorded the crystalline versions of your songs, voice overs, podcasts, or whatever you're doing, you're ready to make it better. The pure, raw product is never the best, but if that product is the product of a horrible acoustic environment, you're placing bandaids instead of polishing a masterpiece.
Imagine recording a 15 tracks of guitar, drums, bass, vocals, and percussion in a crappy room. You're taking the problems of the room and multiplying it by 15!
Now imagine playing back the recording into the same crappy room through crappy monitors. You're now hearing a doubly worse version, because the horrid version being played back is bouncing around your room and suffering all of the acoustic problems.

Mixing and mastering engineers need to be able to hear the most accurate version of whatever is sent to them. That's why they use all of these treatment options. They need to be able to hear the precision, scalpel style surgery they are performing on the tracks so they can get it perfect in a neutral, flat, treated environment.
If their room has too much of a bass response, they are going to mix in less bass. If their room has too little high-end, they will compensate by EQing in far too much high-end. If you can't hear what you're doing, you're just making educated guesses and they will be way off the mark.
So why are mixers and the like trying to create a super neutral, flat response version of a song?
For Listening and Playback
Mixers want to control the acoustics of their studio rooms to provide the best version of a song possible because they can't control the acoustics of the millions of listeners out there! Plain and simple, the better you do during recording, mixing, and mastering, the more damage control you're doing before it reaches the masses.
If you mixed the most amazingly mixed record ever, and all of the magazines, websites, and television shows kept going on and on praising how out-of-this-world it sounded, you can bet a ton of people are going to buy it and listen to it, or at least illegally bootleg it (grumble grumble).
But guess what happens when they peel the plastic off the jewel case or load the mp3's onto their iPods? They press play... but where and on what system?
They are going to listen to your magical album in their bathrooms, cars, earphones while jogging, on 25 year old boom-boxes, over the radio waves, on cruddy computer speakers, etc. They'll turn it on in the living room and then go to the kitchen.
They aren't even listening in the same room! You'll have a handful of audiophiles that are listening in the perfect sweet spot in their acoustically treated listening rooms. But 99.9% won't have the environment to make the proper judgement, but guess what? They are going to judge and tell their friends.
Providing a neutral recording reduces the ability of the listener to destroy their listening experience. This goes for music, movies, radio shows, television, and any recorded medium. It also goes for live events such as concerts.
You want the listeners to hear the violins alone, not the violins mixed in with the first and second reflections in the middle of a room mode that's boosting the bass while producing high frequency comb filtering!
Intermission
We've spoken in very generalized terms. You know what acoustic treatment is, what it's made out of, what it does, what problems it combats, and who and when it should be used.
Next we're going to get specific about the types of panels and foam, how to apply them in your studio, what kind of results you can expect, where you can buy them, and even how to build them yourself! Go grab a beverage refill, take a leak, stretch, and come back, cause it's about to get REAL!
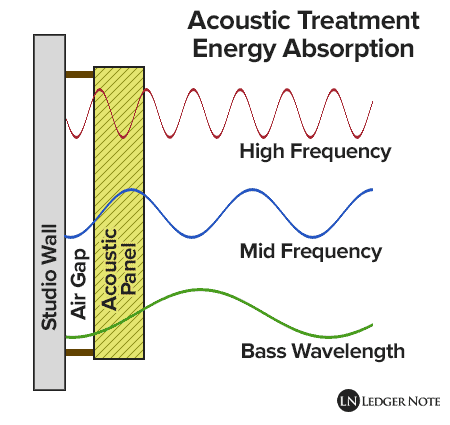
...Okay, you're back! Refresher, this is what absorption and diffusion does:

It's all about removing energy and distributing it evenly across the spectrum. Different types of panels get this done on different ranges across the frequency spectrum.
What are the Types of Acoustic Panels and Foam?
As you would assume from the various types of problems that arise in a room, there are various types of treatment designed to handle each problem. You'll see variations on each, but they generally fall into the following categories:
- Reflection Panels
- Bass Traps
- Clouds
- Diffusor Panels
This goes for professional paneling and hobbyist foam. In this section you'll learn what each type accomplishes and why foam doesn't cut it for professionals, but is a convenient and cost effective option for consumer level hobbyists.
The only foam that's actually worth it are foam monitor isolation pads, and that's for decoupling structures and absorbing physical vibrations, not sound wave vibrations.
Reflection Panels
Reflection panels are a type of absorber, which take the energy out of a sound wave and transform it to heat. This reduces and can even eliminate (though that's not always the goal, which you'll learn about in the diffusor section), mid range to high frequency reflections.
These will take care of all of the reverbs and echoes in a room, and help tame most of the various types of room modes that occur. While they can help, and help even more with proper mounting, they won't reach down effectively into the bass response of the room. For that you need...
Bass Traps
Bass traps are traditionally just like your typical reflection panel, only thicker and made with a more dense rigid fiberglass. This is needed because bass wavelengths are much longer than higher and midrange frequency wavelengths and carry much more energy.
What I will show you is an awesome "revolution" in bass traps that the industry is calling Super Chunks. There are two prime locations that bass trapping is needed, which we'll discuss later, and one of those is the corners of your room. Super chunks are designed to pack the entire corner full of treatment and is extremely effective.
You will also see very thick bass traps being used as portable walls for makeshift recording booths for vocalists or to surround a guitarists amplifier, for example. These are called Gobo's and are just absorbers being used creatively.
There is one last type of absorber needed to handle vertically oriented reflections and modes.
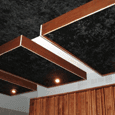
Clouds
Clouds don't perform any distinct absorption that other types of reflection panels do, but it's helpful to think of them as unique. They are reflection panels that hang from the ceiling to help stop reflections bouncing from floor to ceiling. This is needed especially because most studios will have hardwood floors instead of carpeting or rugs.
There are many types of acoustic clouds, including drop ceiling tiles. If you notice as you go about your daily life, you'll see all types of "designer" clouds hanging from ceilings. They may look like decoration or to help hide light fixtures and diffuse the light around, but don't be fooled! They are clouds! You'll see them in fancy restaurants, business lobby's, hotel atriums, and more.
Diffusor Panels
Not everything is about absorption! If you were to line every wall, the ceiling, and the floor in acoustic treatment, you'd not only confuse your ears (they might even pop or you'd feel disoriented) but you'd have the most unnatural recording ever.
We might be used to hearing 100% direct injected or synthesizer based pop songs, but it'd sound crazy for a live band. Nowhere in reality have we ever stepped foot in a location that didn't have some reflections going on.
This is why you see absorber panels only on strategic spots on the wall, so some reflection can still occur. But you don't want high energy reflections all tightly focused around specific frequencies. This is where diffusors (sometimes spelled diffusers) come into play.
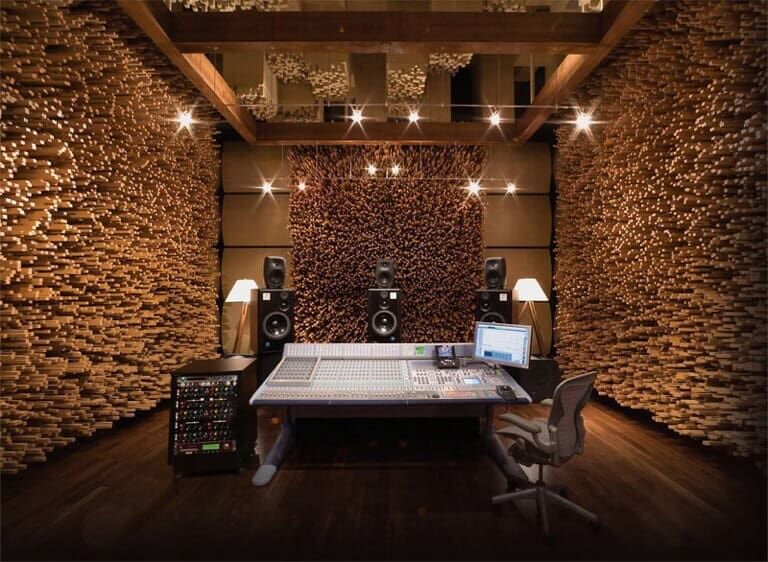
They are like a prism that busts light apart into the colors of the rainbow. They scatter sound waves, taking all of the energy and spreading it out in different directions and frequencies. This way, you'll still have some live reflections but not damaging ones.
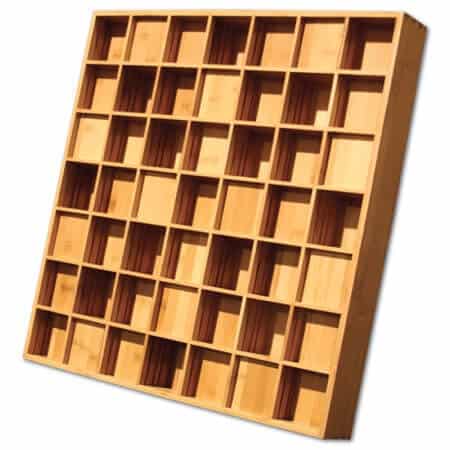
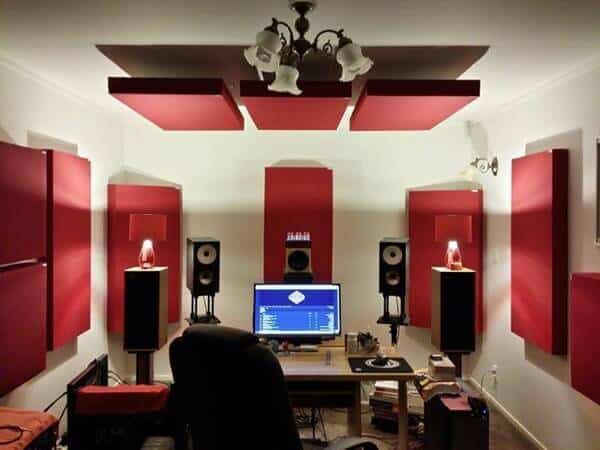
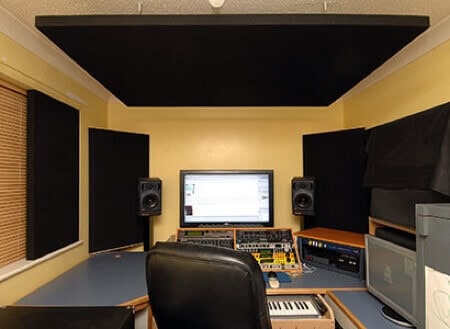
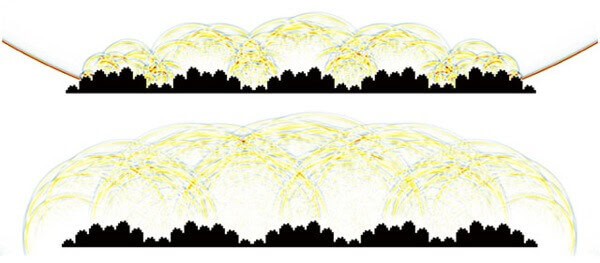
There are countless styles of diffusors. There are ones like pictured above (and way above in the studio entirely using only diffusors and no absorbers) that rely on randomization to scatter and break apart sound waves.
There are also some that are simply curved plywood (with the back packed with insulation to keep it from resonating). Some people even just fill up bookshelves with different sized books in their studio! The goal is the same, no matter the design: reduce spikes and dips in any one frequency.
Where and How Do We Apply These Acoustic Wall Panels?
Now we know what these panels do and what types handle which problem. But we know from our discussion on wavelengths, reflections, standing waves, flutter echoes, and the rest, that this is a science.
If you start slapping treatment all over the place willy-nilly, you'll get results. But they might be negative results, doing more damage than good.
Here are some considerations once you've acquired or built acoustic treatment and are ready to mount them:
- This is a science! There is a right way and a right place to mount your panels.
- If you're doing this for pleasure listening, mixing, or mastering, read this to set up a proper mix position. Seriously, read this before you start hanging panels.
- Symmetry is bad and typical rooms are built symmetrical. This causes huge axial modes!
We can overcome all three of these challenges by using our brains and ears as we mount our wall panels. While there are certainly pieces of software you can use to calculate positions, the best way to approach your panel placement is by using your ears.
If you're absolutely determined to measure everything, you'll want to use an omnidirectional microphone and a pink noise (full spectrum) signal to capture the influence of the room on this signal. You can take measurements as you continually hang more panels.
But in all honestly there's no need to go that in-depth. With these general guidelines, you can get 95% of the way there... the rest is diminished returns, but if you have the energy, time, and resources and the determination, I say go for it!
Note: We're going to look at this from the viewpoint of a mixer who wants to create a "sweet spot" in the room that has the flattest frequency response possible. If you follow these guidelines, this will be a great spot to record from as well. If you're recording entire bands spread around the room, this is still one of the most advantageous methods to start from, and then fill in more wall space with more panels later.
I'm going to tell you where to place the panels on your walls. Please read this part in it's entirety before you begin, because I haven't told you how to hang the panels yet (setting up proper air gaps!). Also, please continue to the Do-It-Yourself discussion below for examples on how to physically mount the panels or foam to your wall. We'll get there!
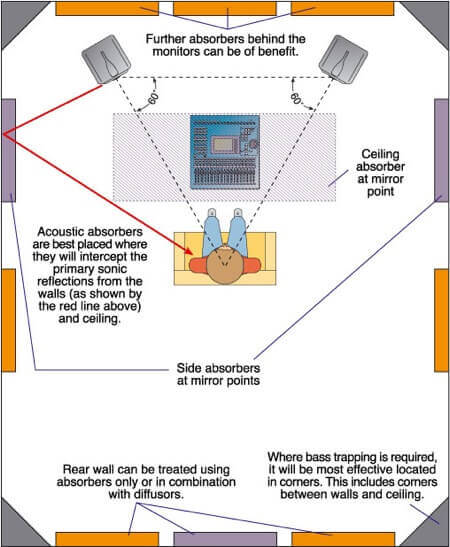
Above is a general preview and guideline to give you an idea of the discussion to come, but not all rooms are the same so make sure you read so you know why we choose each spot so you can customize it to your specific situation.
Dealing With Early Reflections
The first problem to tackle is early reflections. If you take care of these, you're stopping a lot of other problems from developing because there's less sound bouncing around the room. Take a look at this image:
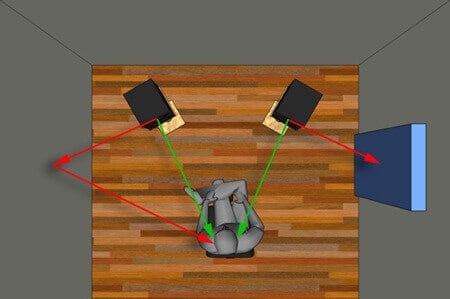
What you're looking at is a single reflection panel placed in the first reflection zone on the right to compare what happens without one on the left. The red arrows represent unwanted sound waves moving and bouncing in directions and areas that are harmful to us perceiving clarity in the stereo field.
Take care to note that the panel completely stops the first reflections, but only in the mid-range and high frequency range.
As pictured, the person is seated in a proper listening position at the peak of an equilateral triangle, where his head and ears are in alignment with the monitors. While seated in this future sweet spot, have another person take a mirror and sweep it up, down, left, and right on the wall.
Anywhere you can see the respective monitor (right monitor for the right wall and left for left) is the first reflection zone. Kill it with a reflection panel!
In the same vein, find the second reflection zone. The second reflection zone is where the opposite monitor bounces sound off the wall (where the left monitor hits the right wall and right monitor hits the left wall). Again, sweep the mirror around and find this spot. Kill it with another reflection panel!
After having done this, you should take a break and listen to your favorite album that you're most familiar with. You're already going to get your mind blown. You've never heard such clarity!
You've only dealt with the first and second early reflections on the side walls. Don't worry about a third. Unless you're sitting very, very far from your monitors, it doesn't exist or is already covered by the second panel.
Now you want to use the exact same process to deal with the first reflection zone on the ceiling for both monitors. You can handle this with two reflection panels spaced together to form one large cloud.
You'll likely want to create one more cloud further behind you as well (on the ceiling of course) especially if you're on a hardwood, tiled, or linoleum floor. Carpet will zap some high frequencies out, but if you want to dip lower, go ahead and hang a second cloud.
Bass Traps in the Front Wall and Corners
At this point, your room sounds really frickin' good compared to how it was before. If you didn't know any better, you'd stop right here and be very happy. But you'd be producing anemic, thin sounding mixes that lack bass. That's because you've not done any bass trapping and your room is still a booming, muddy mess.
Bass wavelengths are much longer than mid-range waves and a whole lot longer than high frequency waves. Knowing this and how standing waves form, it becomes obvious that the main problematic areas are going to be in the corners of your room and the front and back walls in the long-direction of the room (you are oriented down the long direction, right?).
You have options in dealing with these trouble areas. You can use bass trap panels that are just thicker and denser reflection panels or you can combine in super chunks, as we mentioned before. I'm a fan of super chunks myself and will explain how to do both set-ups.
The bass trap discussion usually goes something like this: "I've only got one bass trap panel. Where should I put it?" or some variation. "I've only enough insulation to create two super chunks... should I put them in the front corners or back?"
The first place you should mount a bass trap absorption panel is on the front wall centered vertically and horizontally. This should cover the area that's at the height of your ears and will help kill off bass, mid-range, and high frequency axial modes, reverbs, echoes, etc.
It's the most beneficial spot for taming your rooms bass response too. Now, whether you're using bass traps or super chunks, the second most beneficial spot to cover are the front corners (behind your monitors in the direction you're facing).
Super chunks are rigid fiberglass insulation cut into right triangles that should fit snugly into any 90-degree room corner. They are stacked from floor to ceiling, filling the entire gap. Bass be gone! If you have bass trap panels, hang them centered vertically straddling the corners.
There will be an air gap behind them, which is not only fine but beneficial because the bass waves will pass through, lose some energy, and bounce back through for a second time. If you have enough panels or insulation, hit the back corners of the room.
If you still have enough panels, double stack them in the front corners and then the back. That's the order to follow to receive the most benefit. After this point, you can consider trapping the ceiling and floor corners as well, but it's not always necessary.
Don't be afraid to add more and more bass traps to your room. It takes a lot to tame the bass response. You won't ever achieve a perfectly flat frequency response. What you're going for is to minimize any peaks and dips. Instead of having a plus-or-minus 30 decibel rollercoaster (which is insane but how most un-treated rooms are!), you're wanting to squeeze that down to 4 and 8 decibels of movement.
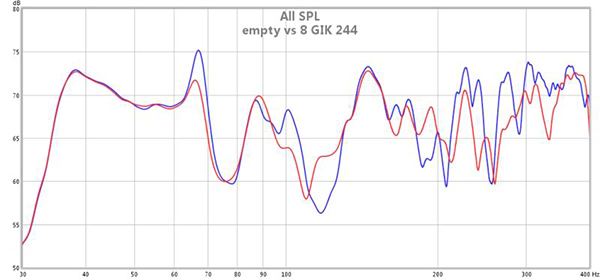
The curve above is showing the extreme bottom of the spectrum (where humans stop hearing bass and begin feeling it's vibration instead) all the up to 400 Hz, which I would start calling the top of the bass range and bottom of the mid range. 500 Hz is still in the bass region. There's some cross over for sure.
However, notice the consistency in the red line that was measured in the same room after it was treated, compared to the purple-lined untreated version. One is going to sound much tighter, and the other is going to cause you to add way too much sub-bass and not enough upper bass.
Unfortunately for this room and pretty much any other, eight GIK 244 panels aren't going to be enough for a flawless bass response. But they're a great start.
What About The Diffusion Panels?
The danger in chasing the ultimately treated room is that it starts to sound dead and unnatural. The cure for this is diffusion, where instead of absorbing sound waves, you scatter them to make them weaker and more even across the spectrum.
So where do you mount these bad boys?
The first place and most popular is behind the mix position. In the same place you mounted the front wall's bass trap, you'll mount a diffusor. If you have the panels, more reflection panels or bass traps on either side of the diffusor will only help.
So now, any sound that passes by your ears and moves along to the back wall will either be absorbed or spread out all around you instead of bouncing right back into your ears, which would produce a blurry echo (unless you like hearing a song-wide delay, you weirdo!).
This will keep a natural reverb time alive in the room too, which is better than no reverb time. A wee bit is normal.
The reason we place a diffusor on the back wall is that it breaks up "late reflections," those with the longest amount of time to return back to us. So you can figure at this point that anywhere else in the room is fair game for more diffusing since the early reflections are covered.
The size of your room will guide you on how many more too add. If the room is very small, such as an extra bedroom, go for more absorption and bass trapping. If you're in a large room such as a full basement, diffusion will help out a ton.
Note: Don't panic when you start looking at diffusors to buy or build. You'll see stepped diffusors, fractal diffusors, quadratic diffusors, two-dimensional diffusors, primitive-root diffusors, and on and on based on various mathematic approaches. Quadratic is going to be the best bang for your buck, followed by fractal. Quadratic wins due to a completely randomized pattern, while others are tiled or follow a vertical pattern.
A Word of Caution About Sound Absorbing Foam
Notice that in all of my examples above I keep talking about panels instead of foam. That's because I don't use foam. I have used foam in one of the past iterations of my vocal booth and my mixing room. I was happy enough with the vocals after equalizing out more of the bass. And that's the point I'm going to make.
If you've decided that you'd rather use foam versions of everything or thin plastic injection molded diffusors, just know that not all acoustic foam is equal. Some is your run of the mill packing foam being peddled off as acoustic foam.
Some has research and development behind it to make it denser and less porous, etc. Make sure you're purchasing from a trusted vendor (I've listed many below). Don't hit up eBay or some random third world manufacturer who doesn't even have a brand or company name.
You're not going to get what you're thinking you're going to get. Acoustic treatment is the absolute last place to skimp out on and try to cut corners.
My main problem with acoustic foam is the bass traps. They generally don't have the density or the thickness to effectively dive deeper than 125 Hz. Check out the graph below:
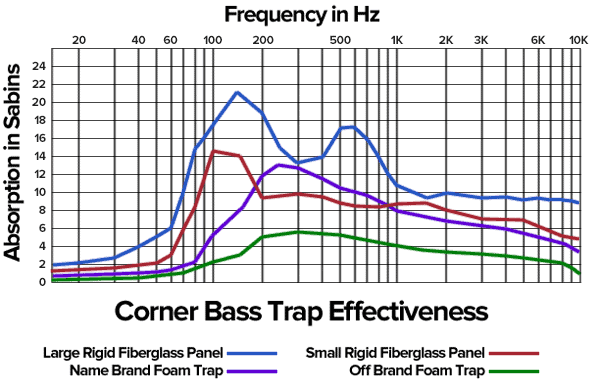
The blue line is a bass trap. The red line is an absorption panel. Even the standard fiberglass panel out performs the name brand's corner trap (this is Auralex's LENRD, by the way, and doesn't do bad at all!). Name brand foam performs well, just not at as low of a frequency as we'd prefer... don't even get me started on the fake off brand foam.
Is trusted, name brand acoustic foam worth it? Yes, because it's cost effective and easy to mount. But you can't manage an air gap and they don't perform well in the bass region even when they say they do.
However, they definitely are way better than having no bass traps at all. So if you're going the foam route as a hobbyist or a professional on a budget, go for it. But when you can afford it, I'd toss the foam bass traps and slap in some super chunks.
Mount With Air Gaps for More Bass Control
This is totally optional and depends on your situation. Without going into the mathematics of it all (that you'll find in the book Master Handbook of Acoustics in the resources below), the way it works is that as your panels become thicker, they can absorb longer wavelengths. This means that they can reach deeper into the bass spectrum.
But also if you leave an air gap behind your panels, you can make your thinner absorption panels pull double duty and start absorbing some of the upper range of the bass spectrum. The basic reason is because as sound pressure waves reach a static boundary (the wall) they lose velocity as the pressure increases against the boundary, and where there's no velocity there's no energy to be removed.
This isn't a problem for mid-range to high frequencies, but bass sound waves are long. For a trap to be positioned along the wavelengths where there's enough velocity to absorb, they either have to be very thick (like super chunks and bass traps) or position off of the wall.
There's all of this math that says the most effective distance off of the wall is 1/4 of the wavelength, but then we're talking several feet (a meter), and that's just absurd for any typical indoor room. However, there's a way to maximize your bass absorption when a panel is against a flat wall.
The Air Gap Rule of Thumb: Mount your absorption panels with an air gap that is the equal width as the thickness of the rigid fiberglass used.
Don't worry about this too much because unless you're creating a 3 foot air gap, or better yet a 3 foot thick panel backed up against the wall, you're not reaching the lower end of the bass spectrum anyways. That's what bass traps are for. This just helps with the 125 Hz and up range. You can kill two birds with one stone as you tackle your middle and high frequencies.
However, if your room is very small, you may not feel like you can even give up those extra 2 inches. You don't have to, really. Don't sweat it too hard. Your bass traps will carry you where you need to be.
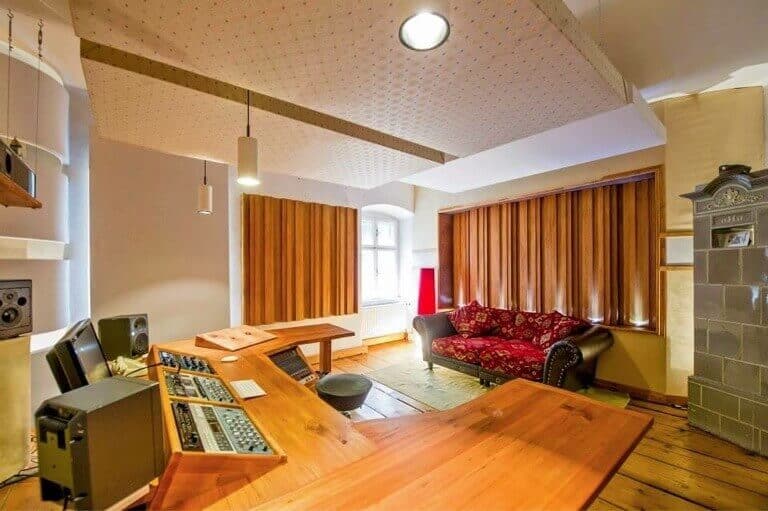
When you're all done, you might have a room that looks like this:
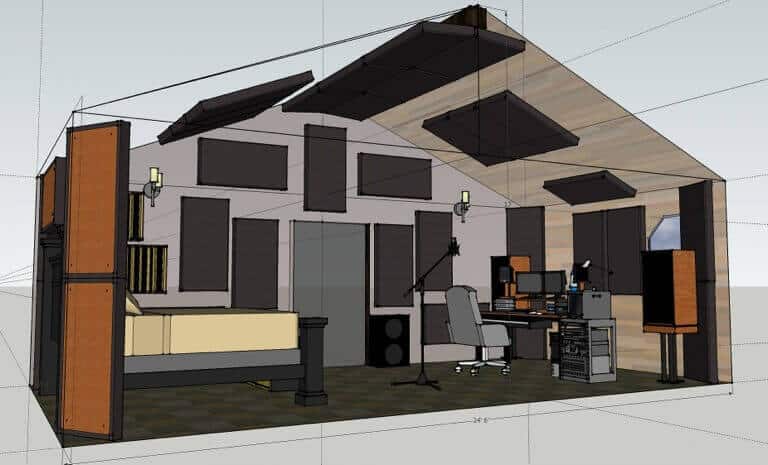
You know that bad boy sounds good. REAL GOOD.
What Results Can You Expect From Sound Treatment?
Of course, everyone wants to know the kind of results they can expect. Let's forgo the entire scientific, mathematical, electronically measured, computer generated graphs since we've already shared several of them above. By looking at those, you've without a doubt agreed that this stuff works.
But what does it sound like? What does it look like in terms of mental imaging? Is it really a world of a difference? Yes. Yes it is.
Here's a before and after picture to help you understand how the "visual" clarity is affected in the stereo field:

The sad reality is that most of us have never heard a song in an acoustically treated environment. "But what about when we use headphones?" True, that's as direct and clear as it gets, but you can't form a clear mental image of the stereo field because you're inside of it instead of having it out in front of you.
When it's out front, you can grasp panning from left to right, frequency from top to bottom, and volume from front to back. It's a literal three dimensional experience, and most of us have no clue how beautiful it can be.
Jumping out of the abstract world of the mind and back to reality for a second, the pragmatic results that you'll receive from treating your recording and mixing room is manifold. You'll record and provide clearer, more neutral stems to send to your mixer.
As a mixer, you'll be able to hear what you're changing and if it's even an appropriate change before you ship it off to the mastering engineer. As the mastering guy, you'll polish that piece of gold into a diamond.
This is only possible if in every step along the way, everyone is working in a solid environment. And to be quite frank, this is the main difference between an amateur hobbyist recording and a professional release.
It's like the difference between making your morning coffee with filtered tap water or going out back to the creek and scooping up some muddy, bacterial, feces infested water, with maybe a crawdad or two to chew on.
People don't even realize they're drinking trash because everyone's been doing it their whole lives. They don't know any better. But now you have a frame of reference. Now you're accountable!
Trusted Acoustic Treatment Vendors
What's the point of all of this knowledge and goodness if you don't know where to purchase treatment panels that do what they say they do and look good while doing it? Check out everyone in the list below before making a decision.
Some may have a certain appearance that you prefer, room kits that you'd rather order than piecemealing it out, or more incognito traps like plant stands that double as bass traps, for example.
You can purchase directly from the manufacturers at their websites, except for where indicated, in which I provide a link to Amazon where you can order from the comfort and convenience of your home.
- GIK Acoustics
- Auralex (Foam) - Purchase online at Amazon
- Acoustimac
- Primacoustic - Purchase online at Amazon
Perhaps you like to be a little more involved in your projects and would enjoy making your own acoustic panels? Let's discuss the general concept, and then you can get as creative as you want with it, customizing every aspect perfectly for your room's size, shape, and color scheme.
Do-It-Yourself Acoustic Panels
DIY acoustic panels are some of the most fun things to make, although it can be time consuming. It's going to require your to have a large space that you don't mind operating some wood working tools and allowing the dust and insulation fibers to float around.
A garage, driveway, and back porch work fine. You can do it indoors if you're confident with your vacuuming abilities! It's a simple procedure that's really just three steps:
- Order Rigid Fiberglass
- Build Wooden Frames
- Cover in Fabric
- Mount Your Panels
That's it but during each step you need to anticipate the next step. We'll explain it all, no worries. Read the entire process before starting!
1) Find Some Owens-Corning Rigid Fiberglass
This is the tricky part. Unless you get lucky like I did and find a business trashing some cubicle walls that had Owens-Corning 703 in them, you'll have to order some.
Owens-Corning is often stocked in stores like Lowe's and Home Depot, but they usually don't carry 703 or 705, which is the high density insulation we want. Again, when we say rigid fiberglass, we're talking about the same thing.
| Material @ 2 inches | 125 Hz | 250 Hz | 500 Hz | 1000 Hz | 2000 Hz | 4000 Hz |
|---|---|---|---|---|---|---|
| Owens-Corning 703 | 0.17 | 0.86 | 1.14 | 1.07 | 1.02 | 0.98 |
| Owens-Corning 705-FRK | 0.60 | 0.50 | 0.63 | 0.82 | 0.45 | 0.34 |
| Acoustic Foam | 0.11 | 0.30 | 0.91 | 1.05 | 0.99 | 1.00 |
Not only does 703 and 705 have the best absorption coefficients of all of our options out there, it also comes in economical and convenient sizes for shipping and building. At 2 feet by 4 feet, they are already in perfect sizes for reflection panels and bass traps.
They come in varieties of 1 inch thick up to 4 inches thick. You can buy 2 inch thick sheets for reflection panels and double stack them for bass traps to keep things convenient. Then you can bulk order one pallet's worth.
If you refer to the table above, you'll see that 703 is the clear winner for middle to upper range frequencies but does drop off in effectiveness below 250 Hz. This is where 705 comes in to be used in your bass traps and super chunks. Use 703 for reflection panels and 705 for bass traps!Double up to 4 inches thick for much better absorption.

When you hear the words rigid fiberglass, you may imagine something stiff. And while OC-703 is stiff, that's just in relation to normal fluffy insulation.
You can bend this stuff easily and you can cut through it with a butter knife. It's very easy to work with, and for that very same reason it's important that you use a breathing mask to make sure you're not inhaling insulation fibers. I would consider wearing a long-sleeve shirt and long pants when you begin working with it, or you'll itch for a couple of days.
2) Build Wooden Panel Frames
If you're a metal worker you can build aluminum frames or whatever you want, but most of us will be opting for wood. Before you just go buy a ton of wood, you need to be looking at your room and considering what types of panels you're going to build, how thick they will be, and how many you'll be framing.
Also, because the insulation comes in a 2 foot by 4 foot configuration, you can stick with that format as it happens to be a great size for absorption panels and looks great. But you can also cut it into differing sizes if you want to build smaller panels to fit unique areas on your walls. Don't be afraid to customize this stuff however you want.
But have a plan so you can build all of your frames at once. If you have access to wood working tools, you don't need me to tell you how to build the frames, build a jig for easy 90 degree angles, etc.
If you don't have the tools and the skills, if you come very prepared, you can buy the wood at a lumber shop (or any typical home improvement store) and have them cut the pieces to size. Buying 8-foot sections and having them cut down will save you the most money, but make sure those long boards aren't warped horribly.
While you're there, you can purchase 90 degree brackets that screw on the interior side of the frames to hold them together. If you're a wood worker, you can shoot nails, screw, use wood glue, biscuit join, etc. The possibilities are endless. You just want straight, squared frames.
Before you slide your insulation into the frames, you want to anticipate and question how you intend on covering these panels with fabric.
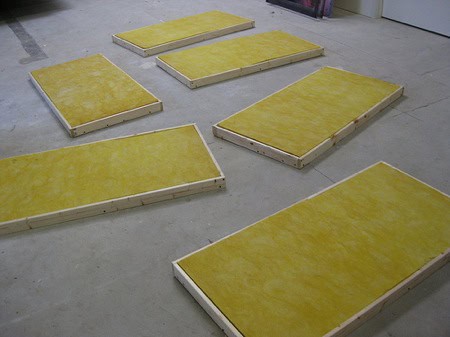
3) Cover Your Panels in Fabric
So... There's a series of questions you'll want to consider. The main one is what color of fabric do you want to use? That'll likely be based on having these panels act as a sense of balance and decoration in your room. Should they blend into the wall as the same color or stand out by using an analogous or complimentary color for the fabric? That's your choice!
The second question is whether or not you want your frames to be visible. If you do, then you may consider staining your wooden frames first to bring them to a color you enjoy.

If you'd prefer for the frames not to be visible, then there's no need to anticipate how you're going to create a nice flushed front surface like in the image above. The way that I did my own (before ultimately wrapping over the entire thing and covering the frames anyways) was to lay the cloth inside of the empty frames and tuck it against the sides as if the insulation was in there. Then I stapled the cloth to the inside of the frame just to hold it in place.
At this point you can take any type of trim, thin strips, or scrap wood and staple it into the frames but over the fabric. What this does is add more staples through the fabric to hold it in place and also squeezes it into place to create that flushed surface. If you do it thin enough, you won't have to worry about cutting that first piece of insulation to accommodate these extra pieces of wood.
For the backside, you can just lay the fabric over the rigid fiberglass and tuck it in on the sides. You can also consider adding another strip of wood across the corners to hold in the fiberglass, which also gives you a surface to attach hanging materials to as well.
If you're going to wrap the entire panel in cloth and don't care to show the frames, just wrap it like a birthday present and staple the fabric into the frames on the back. Pull it nice and tight so it looks good!
4) Mount Your Panels to the Wall
There are an infinite number of ways to mount your panels to the wall, but will be limited by the way you build your frames. Having a strip of wood across the back to hold in the treatment also gives you a surface to mount from if you want to use hooks or brackets.
Otherwise, you may use wire like when hanging a picture, and use two eye-hooks on either side of the frame to attach the wire. Also, you'll need to determine how thick your drywall is and whether or not you feel you should use anchors.
Before you get started though, there's one critical question that will change the entire mounting game... are you going to leave an air gap? It's almost pointless to discuss how to achieve this. There's no best way. You just have to get creative.
You might find some brackets at a hardware store that could help you mount and leave a three inch air gap. But what if you don't want 3 inches? Here's one way I've seen it achieved:
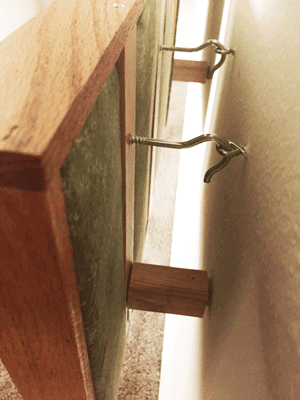
The example above includes two long hooks attached to eye-hooks screwed into the wall. Both of these are configured to measure the perfect amount for the air gap, and then a spacer was cut from wood, leaving enough space to add a felt pad to protect the wall.
None of this hardware is visible from the room unless you go stick your head against the wall and look for it. Some studios will install lighting behind their panels for a cool visual and mood effect too!
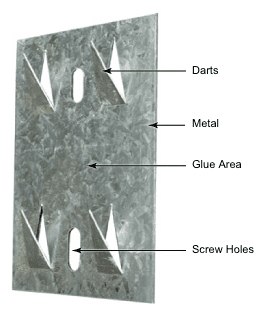
Again, you'll just have to get clever and figure out how you're going to mount them. If you choose to not use an air gap, there are options such as plates with darts on them to simply impale the insulation and allow it to hang by it's own weight:
Mounting may very well be the most involved portion of building acoustic treatment. You'll want to bust out a tape measure and a pencil and do some mathematics so that not only are you placing your panels in the right reflection zones and creating symmetry, but so that they are spaced in an aesthetically pleasing fashion across your walls.
Lastly, I want to share with you some resources to point you in the right direction if you choose to investigate this entire science of acoustics deeper.
Acoustic Treatment Resources
If this interests you to the point where you'd like to dig into the the science of waves (which is horizontally applicable to optics, fluid dynamics, thermodynamics, and the like), or to take your acoustic treatment placement to the next level, here are some resources to get you started:
- Master Handbook of Acoustics - Everest & Pohlmann
- Home Recording Studio: Build it Like the Pros - Rod Gervals
- Gearslutz Acoustics Forum (with sub-forums!)
Conclusion!
That's it! It's finally the end of the article, but hopefully not the end of your journey into the world of acoustic treatment. If you're a completionist and curious fellow or lady, you'll be thrilled as you open this can of worms.
It goes on and on and is genuinely fun, but remember that good enough is good enough. It's like working on a mix... you can always continue tweaking perfection, but it's already perfect. You're just switching the flavor. Same goes for balancing the acoustics of your room.
Regardless if you buy a room kit and slap it up or start measuring your room with each and every step as you build your own acoustic treatment, you'll notice an immediate and world-shattering difference. You think you enjoy listening to and recording music now? Wait till you get those panels on the wall (in the right spots of course!). Enjoy your new audio reality!
Jared H.
 Jared has surpassed his 20th year in the music industry. He acts as owner, editor, lead author, and web designer of LedgerNote, as well as co-author on all articles. He has released 4 independent albums and merchandise to global sales. He has also mixed, mastered, & recorded for countless independent artists. Learn more about Jared & The LN Team here.