
Imagine this scenario: you have a bluegrass band that has four members and they want to record live with all four members. So you make them stand at the four points of a square facing each other so they can jive off each other's energy.
You go for close miking on each band member to isolate each sound the best you can for mixing purposes. They slayed it! You go to the computer to play the tracks back in solo only to find that the mandolin track includes the banjo, stand-up bass, and acoustic guitar.
You look at the switches on the mandolin microphone and realize it was clicked down to supercardioid mode. Now you have to embarrassingly admit your mistake and have the band replay, this time with less energy and enthusiasm...
Call it what you will:
- Pickup Patterns
- Polar Patterns
- Directionality
They all mean the same thing and the only reason you should be familiar with each is because the person you're talking to might use any one of them at any time. Now that you know the terms, you need to know exactly what they are referring to.
Get ready to learn all about microphone pickup patterns. This isn't a complicated topic, but there are a lot of strange terminology you might not have heard of.
However, they all play off of each other with different prefixes so you won't find it hard to remember them all if you can remember one. Let's explain what each term from the list above is talking about, and then we'll give you a visual example of each type of pickup pattern. After that, it'll click and you'll never forget.
Directionality: What are Microphone Pickup Patterns?
The directionality of a microphone refers to its capacity to record from various directions. One microphone may be most sensitive to sound coming from the front while another might be sensitive to sounds coming from front and the back.
Some microphones can record sounds at equal volumes from all directions. You can see how this could really destroy a recording if you aren't aware of the directionality property of each microphone you're using.
Fortunately, there are only three main types of directionality in which all pickup patterns will fall:
- Unidirectional
- Bidirectional
- Omnidirectional
Don't freak! All you need to do is yank the prefix off of the word "directional" and it'll become obvious from which direction each type of directionality above records. These prefixes are all from Latin and you've likely encountered at least two of them and know what they mean. But for sake of completion let me explain them.
Uni- means "one." So a unidirectional microphone will record sounds from one direction (in front of it). Bi- means "two." This means that a bidirectional microphone will pick up sounds from two directions (always opposite directions). Omni- means "all" or "every." It follows then that an omnidirectional microphone will record sounds from all directions with equal sensitivity.
Again, all microphone pickup patterns will fall into one of the above categories. But they will vary in sensitivity, so it is useful for the recording engineer to be familiar with the conventional polar pattern graphs that correspond to each pickup pattern.
Polar Patterns Show Microphone Pickup Patterns
While directionality and polar patterns generally refer to the same concept, a polar pattern is a visual graph that provides more detail than a choice of three Latin prefixes. It is a bird's eye view polar graph, meaning it shows 360 degrees of a circle and includes concentric circles around it.
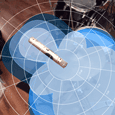
The further out you go from the center, the stronger the sensitivity of the diaphragm is in that direction. That was probably confusing, but check out this picture and you'll see what I'm talking about:
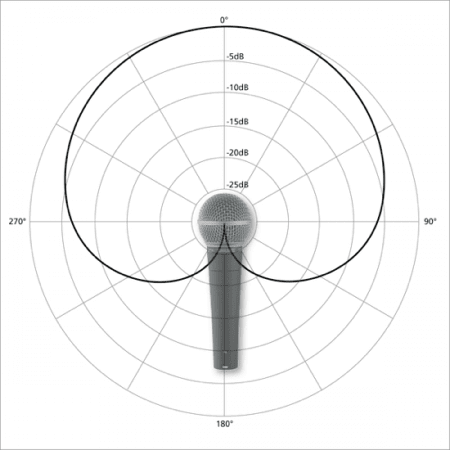
What you see above is a cardioid polar pattern emanating from what looks like a Shure SM58 dynamic microphone. The cardioid polar pattern is overlaid on a polar graph featuring concentric circles that represent 5 decibels in sensitivity as you move outward.
The dark black cardioid pattern reaches 0dB at zero degrees. This means that directly in front of the microphone the sensitivity is the strongest, while directly behind the mic it records nothing.
You'll notice that at 90 degrees and 270 degrees the microphone is still capable of recording sounds. The sensitivity is less at those angles, though, and is increasingly less as you move behind the mic. At exactly 180 degrees (perfectly behind the mic) no sound will be recorded.
Here are a few more examples for you to explore to help burn in the idea:
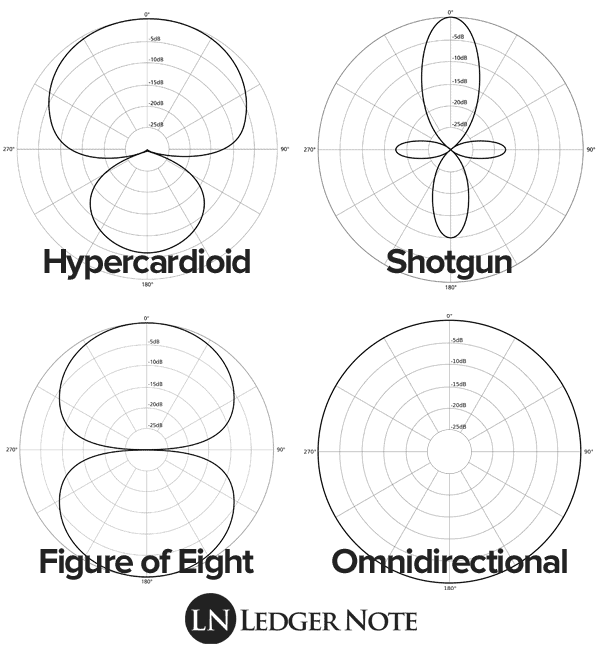
Hopefully now you get the idea. If not, I have failed. Regardless, we continue.
In my mind, when you take the concept of directionality and combine it with the specificity of polar patterns, you arrive at the final overview, which is the pickup pattern.
The 6 Microphone Pickup Patterns
These various terms all explain this same idea in different manners and levels of detail. Some will argue that the differences I'm pointing out in the terms aren't even real, but I do think it helps build the concept in a linear manner.
Ultimately, by slowly introducing you to increasing levels of detail, you have been prepared to witness and understand the full three-dimensional graphics of the pickup patterns.
There's no need to dig into and show each pickup pattern, nor can you even really list them all. You can, on the other hand, list the most common, as I have done so in the table below:
| Pickup Pattern | Symbol |
| Cardioid | |
| Hypercardioid | |
| Figure of Eight | |
| Halfcardioid | |
| Omnidirectional | |
| Supercardioid |
The symbols above may be found on the box, documentation, or engraved on the microphone's casing itself. This should help you quickly identify the pickup pattern of whatever microphone you're using at the time.
With that said, let's take a close look at some of the 3D pickup pattern images so we can really understand how this functions in real life. By reading through the uses, notes, and general ideas behind each of the following patterns, you can understand all of the others as well.
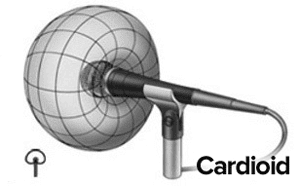
Cardioid
Cardioid shares the same origin and refers to the term "heart" to explain it's shape on the polar graph. They are unidirectional, being most sensitive from the front but have a wide "listening" angle to accommodate the movement the vocalist or instrumentalist.
In most environments but especially in a controlled acoustic environment, it does a fantastic job of isolating the source and blocking out unwanted sounds.
Uses and things to know:
- This pattern should be used to capture a single source situated in front of the microphone, especially when ambient sounds should not be included in the signal.
- This is your general use pickup pattern, perfect for handheld mic's, live performance, and studio recording.
- There are many types of cardioid pickup patterns, including supercardioid, halfcardioid, and hypercardioid.
Figure of Eight
Typically only found in large diaphragm condensers and ribbon microphones, the figure of eight polar pattern will record sounds from the front and back but reject sounds from the side. It is of a bidirectional directionality and isn't often used in studio recording.
It could be used to record two vocalists standing face to face but you're better off using two cardioids. However, this is perfect for a live television discussion where lapel microphones might cause issues.
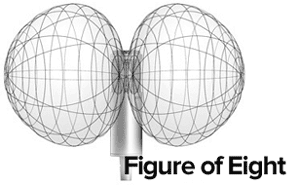
Uses and things to know:
- Any application where you're tempted to use one of these, explore using two cardioids in isolation instead first.
- These have more use in live situations than in the recording studio, but even then separating sources into their own mic's is preferable.
Omnidirectional
An omnidirectional microphone accepts sound from every direction and therefore doesn't require being pointed anywhere. You can set and forget it. In a recording studio environment, these work well for groups or choirs.
The problem is that they are monophonic instead of stereo. They work well for lapel microphones where the source is very close to the mic, but in general they will only be a nuisance due to their inability to be aimed away from unwanted ambient noise.
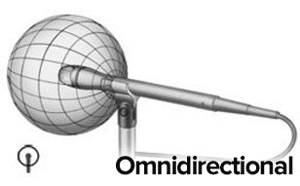
Uses and things to know:
- Unless the mic is close to the source where gain can be lowered, you'll likely encounter feedback and other unwanted noises sneaking in from every direction.
- These can work fantastically to record ambient sound in a forest, in the middle of a wrestling or football arena, etc. They have great application for sound engineers outside of the recording studio.
Supercardioid
The difference between this pickup pattern and that of cardioid is that it has an even more narrow focus of sensitivity. However, the consequence of this is that it will also pick up some sound from directly behind the microphone. They pick up much less ambient sound in the signal unless it comes from directly behind.
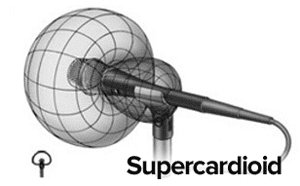
Uses and things to know:
- To deal with the sound coming from behind, you can turn up the gain so that the source in front is much louder in the signal than any ambience.
- Place your stage monitors or other sounds around 105 degrees and 255 degrees in the dead zone off to the sides to avoid feedback in high gain situations such as live performance.
The examples above should allow you to work through the rest of the pickup patterns logically now. However, there are a few special cases I want to point out to you that you'll encounter.
Special Cases in Mic Pickup Patterns
There are situations that you'll find that can't be neatly packed into one of the three types of directionality or into one pickup pattern. Here's the two you're most likely to deal with...
Variable Directionality
Some of the best studio microphones with switches on the back that allow you to change directionality and polar patterns. You might be able to switch from a cardioid pattern over to a shotgun or omnidirectional pattern. In my mind, these aren't preferable to use in a studio environment.
A jack-of-all-trades mic will be the master of none, while a dedicated microphone will have research and development behind it to make sure it performs under the conditions it was designed for as well as possible.
Some video camera microphones will have these types of variable directionality switches on them in order to narrow your sensitivity during zooms. Some will even alter themselves automatically as you zoom in to the desired source.
In your adventures, you'll hear of or work with X-Y microphones and stereo pairs. These are almost always cardioid microphones meant to capture one source but provide a stereo spread.
This works well for piano, acoustic guitar, and other stringed instruments that perform as leads in a sparse mix. They are created to not suffer from phase issues that you might deal with if you can't properly set up your own pair of microphones.
The Proximity Effect
While I'll only mention this in passing here so you're aware of it, you can read our full exploration of the microphone proximity effect for deeper information.
What you'll want to know here is that all cardioid-type pickup patterns will exhibit what is called the proximity effect. This means that the effect occurs at an increasingly greater strength the closer the microphone gets to the source.
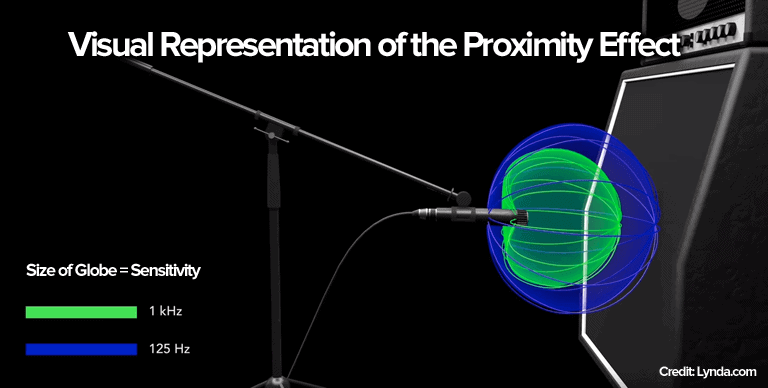
The effect is that there is an increased sensitivity in bass frequencies. Cardioid-type microphones are the preferable option for close miking, but people take that too literally at times without knowing about this effect.
Vocalists and radio personalities will take advantage of this effect by "eating the mic." This gives them a bassier, warmer tone to their voice. Combine this with heavy compression and you get that "radio DJ" sound.
That's All She Wrote on Microphone Pickup Patterns
If you read closely in order to gain an even basic understanding of microphone pickup patterns (there's no need to explore it any deeper than this!) then you now are ready to deal with any live or studio situation that might pop up.
It serves you well to be aware of all of the options and terms associated with all of this, but the reality is that 99% of the time as a recording engineer in a studio, you're going to be using a regular cardioid polar pattern in a unidirectional microphone (or two in a stereo pair or an X-Y mic pair).
As a live stage engineer or sound engineer for movies and television, you'll definitely end up dealing with other options. Know about microphone pickup patterns so you can take advantage of any job opportunity that pops up and do a good job!
Jared H.
 Jared has surpassed his 20th year in the music industry. He acts as owner, editor, lead author, and web designer of LedgerNote, as well as co-author on all articles. He has released 4 independent albums and merchandise to global sales. He has also mixed, mastered, & recorded for countless independent artists. Learn more about Jared & The LN Team here.