
There are three main aspects when it comes to setting up a listening room properly. Each one is critical. If even one of them is off by a remotely significant degree, you'll suffer the effects across the whole setup. Those three are:
- The position of your speaker monitors in the room
- The position of your head in the room
- The acoustic environment of the room itself
We will only lightly cover the third aspect concerning acoustic treatment since we've explored it in extreme depth in a previous feature. What we will spend our time discussing here is understanding the shape of your room and how that should effect your choice how to setup your listening room.
In this article, you'll learn to determine the best orientation for your mixing room based on the shape, which will then allow you to calculate the proper location for your listening seat and from there the placement of your speakers.
The goal is to seat yourself in the least acoustically destructive spot possible and to reduce the need for massive amounts of acoustic treatment. You will still need some and we'll explain the most critical areas of your room for that as well.
During this discussion, we have to make some basic assumptions about your room that will cover the case for probably 95% of the readers out there. The others can still apply the principles discussed here to make vast improvements to their enjoyment of music and movies and the ability to produce better mixes.
Our assumption is that your room has parallel walls, a flat floor, and a flat ceiling. Essentially, your room is the shape of a square box or a rectangle box.
We'll also speak as if you're mixing in stereo and not surround sound. There's only really one item that changes for surround sound and we'll point it out. So don't worry if that's your goal! With this in mind, let's continue.
Listening Room Setup: You & Your Speaker Position
Before you just slap your desk against the wall and roll your computer chair up to it while your speaker monitors are off to the side sitting on some old college textbooks, there are some principals you need to understand and keep in mind if you want to hear an accurate version of what you're listening to.
Maintain Room Symmetry
The first aspect you want to consider is the shape of your room. Is it a square or a rectangle? If it is a square, then all you want to do is make sure that you are facing a flat wall and not turning yourself and your mix desk into a corner. You want to maintain symmetry for yourself in the room.
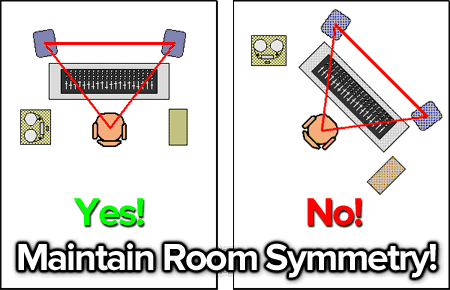
For those of you in rectangular shaped rooms, your goal is to situate yourself and your desk in the room so that you are pointing down the long direction. Whichever walls are the longest are those that should be on your lefthand and righthand sides, because you too will be maintaining symmetry in the room.
Maintain symmetry by facing down the long length of your rectangle room. If your room is square shaped, choose a wall to face. Do not face into a corner.
The reason for this orientation is to place yourself in a spot that is most minimally affected by one of the room modes. These natural resonances occur due to sound bouncing back and forth across its own wavelength, causing peaks and dips in the volume of certain frequencies.
The larger your room is, the less you'll deal with this problem, which is why you see many large recording studio getting away with much less acoustic treatment than a small one can.
By facing down the long direction, you're giving the sound waves a longer path to travel. This spreads out the peaks and nulls, providing a larger sweet spot for your to place your mix position within.
While very few of us will have the choice to actually build or reframe a room, some will be able to and should follow the room measurement ratios deemed most optimal at reducing room modes. Calculated by L.W. Sepmeyer in 1965, they are:
| Height | Width | Length |
| 1.00 | 1.14 | 1.39 |
| 1.00 | 1.28 | 1.54 |
| 1.00 | 1.60 | 2.33 |
One thing to consider, as pointed out by Ethan Winer, is to make sure you don't consider your tile ceiling or exposed beams as the top surface during your calculations. Use the true ceiling as far as sound waves, not the decorative one.
Avoid the Halfway Bass Null
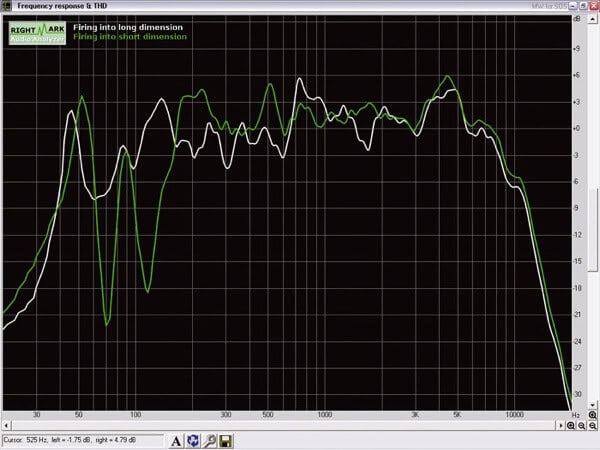
It just so happens, because of science and stuff, that bass frequencies experience a horrible null right at the halfway mark between two parallel surfaces. This means that at 50% of the height, length, or width of a room you will hear far less bass than is actually in the signal.
If you tried to mix at this spot, you'd mix in way too much bass to compensate. This follows that the absolute worst spot for your head to be situated in is the dead middle of the room. It's like a super vacuum that eats all bass alive.
You can see in these problematic bass nulls in this measurement by the Sound on Sound team where they simply measured the long direction and the short dimension of an untreated room. Notice how they disappear just by orienting yourself in the room properly:
Now, don't take this too literally. You do want to have your head halfway between the side walls. Remember, that's the direction we are maintaining symmetry with!
What you don't want to do is be halfway down the long length of the room, nor have your chair at a height where it leaves your head and ears halfway up the height of the room. That's not likely to happen but check for it.
Check also that your monitors don't land in these nulls either. It's unlikely if you follow the next rule, but it could happen. Be vigilant!
The 38 Percent Rule
The math has been done by those who came before us and cared far more than we ever will, and they have told us that the best position to put your head is at the 38% mark down the long length of the room. This is the spot with the flattest frequency response.
The front wall that you are facing is at 0% and then you being to measure towards the back of the room. Find the total length of your room and convert it to feet or meters then multiply it by 0.38.
That's where your head should be. You can even duct tape an X on the floor or hang a tennis ball from some fishing line so you can assure yourself that you're ready to mix each time you sit down.
Now here's the only change for your surround sound mix position:
For surround sound listening rooms: place your head at the 62% mark (which is just 38% from the back of the room instead of the front). This gives you space to properly set up a 5.1 surround system and keeps you in the sweet spot while you aren't burning your eyes out sitting too close to your big television.
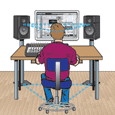
Here's what it looks like for a typical stereo mixing environment:
Now take a look at the speakers in the picture above, because we are about to discuss how to set them up properly within your now tweaked orientation and seating sweet spot.
Form an Equilateral Triangle With Your Head & Speakers
Don't feel like you need to bust out a protractor or your old geometry text book your monitors used to sit on. You can eyeball this and get most of the way and then use a measuring tape if you want to get real specific with it.
What you want to do is make it so that your head is the peak of an equilateral triangle formed with your two speakers as the base, seated on the corner points.
An equilateral triangle is a triangle where each of the three sides measure the same length. This results in each angle being 60 degrees each.

What you want to do is sit at your desk with your head in your new magical mix position and then draw two imaginary lines coming off the back of your head that pass through your ears. They should be pointing 30 degrees to the right and left of your nose.
These are the lines that the center of your woofers and tweeters will lay on. You want your monitors to lay on these lines with their faces pointed right at you perpendicularly with the imaginary lines. Again, just refer to the picture above if that's confusing. I'm sure I worded it all crazy like.
Your speakers can exist anywhere along these lines, but don't push them so far back that they are against the wall. This will create more bass issues and the whole point is to avoid these problems. I think following the 38% rule again is perfect here.
Measure the distance between the front wall and the sweet spot your head hovers in and then place your speakers at 38 percent. This will keep your speakers out of any big nulls and peaks.
The final thing to remember about setting up your speakers is that your tweeters should be:
- Level with your ears
- Not halfway up the height of the room
If you make sure this is true then your listening experience is already going to be greatly enhanced from what it was before. You'll hear clarity and have a tighter stereo image than you've ever heard. But we aren't done yet!
Covering the Acoustic Treatment Basics
I'd say that at this point you are 50% of the way to perfect clarity. That's not bad considering before hand you were likely at 25% or less! The tips we're about to cover will take you to 80%.
Going all the way to 100% will require you to study our acoustic treatment feature to push beyond treating just these first reflection points. It's not hard at all and is extremely fun once you start hearing the results.
The concept to understand here are first reflections, followed by second reflections, etc. If you do this right, you'll cover the first and second reflections with one treatment panel.
When sound comes out of the speaker, it travels a direct line straight into your ear. Except it doesn't. It travels every possible line forward and bounces off of everything in your room and then back into your ear.
That's what creates fuzzy stereo images, reverbs and delays, and all of these room nodes we're trying to avoid. Now we're going to kill the strongest ones at their source... the first reflection points.
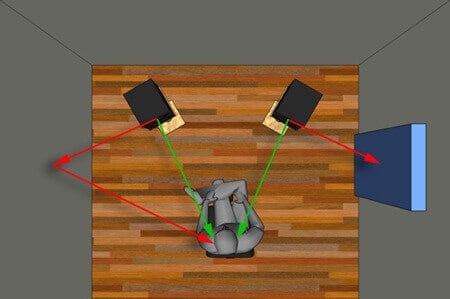
The green arrows are the short, direct paths the sound travels to your ears. You want those, but you don't want the red arrows, which represent the path the sound travels to the first reflection zones on the side walls.
You'll notice on the right wall that an acoustic treatment absorption panel stops the delayed sound dead in its tracks. This stops nulls and peaks from forming, improves mental imaging of the stereo field, and rids the room of unwanted flutters, decays, and echoes.
Now extrapolate the red arrows to the ceiling, front wall, back wall, and the floor. They bounce everywhere and lose strength, but there are the few points where they bounce directly back into your ears at the strongest amplitudes. You want to find those and treat them with absorption panels or diffusion.
Again, we can't explore this in full depth as it's such a huge topic, but I'll state a few things to put you on the right track (or go read the feature if you have time). Acoustic foam is cheap in terms of financial expense and actual effectiveness.
It won't reach into the bass region of the frequency spectrum unless you spend big money with the trusted companies that are creating very thick and dense foam traps.
Go ahead and buy or build with rigid fiberglass, which is high density insulation compressed into sheets. Any company selling acoustic treatment that's not using foam is using this, and in my opinion it's the only way to go.
Cover the first reflections on the side walls and ceiling first. Do this by doing some math using the calculation I'll provide, or better yet have a friend or family member move a mirror along the sidewalls.
Anywhere you can see either of your speakers through the mirror is a reflection zone and should be acoustically treated.
The math formula for calculating the center of the side wall reflection zone is:
(y times x2) divided by (x1 plus x2) = the distance from the 38% line to the center of the first reflection zone.
Or, you know, you can just eyeball it since you're room is likely one of normal size.
If you only purchase absorption panels, place them on the front and back walls as well as the side walls. Otherwise, if you pick up some bass traps, use them for the front and back walls and then move the extra absorption panels to the side walls for extra control.
You are now at 80% good to go. You can stay here, learn the nuances of the bass response of your room, and produce awesome mixes.
Or you can go to 100% by installing lots of bass traps in the corners of your room. Remember, there are wall-to-wall corners, but also floor-to-wall and wall-to-ceiling corners too! Investigate the bass trapping method that's being called Super Chunks if you want to really tame the bass response in your room and hit 100%.
Your Listening Room Setup is Everything
That's it. You can literally enhance your listening enjoyment or the quality of your mixes by just facing yourself down the long direction of your room, placing your head at the 38% mark, and setting up your speakers in an equilateral triangle with your head. Whodathunkit?
You'll experience much more clarity and sharpness in imaging this way. Toss some acoustic treatment up on your first reflection points and you won't believe your ears. I'm not exaggerating at all. Get into some serious bass trapping and you'll never want to leave your mix position at all.
And that, my friends, is how to setup a listening room quickly and effectively. It's not rocket surgery!
Jared H.
 Jared has surpassed his 20th year in the music industry. He acts as owner, editor, lead author, and web designer of LedgerNote, as well as co-author on all articles. He has released 4 independent albums and merchandise to global sales. He has also mixed, mastered, & recorded for countless independent artists. Learn more about Jared & The LN Team here.