

The first time I grabbed a guitar, 50 years of guitar gods from Jimi Hendrix to Jack White riffed, soloed, and whammy barred their way through my head.
But the cavalcade of axe men quickly disappeared, replaced by a flood of doubtful thoughts. I was confused. I was intimidated.
I wondered if my age and my “real world” responsibilities were too much to overcome. The players I’d admired for decades made it look so effortless; in my hands, it felt like nothing more than a clunky block of wood with strings on it.
I looked at tablature and went cross-eyed like I was trying to read heiroglyphics. That all changed when I stumbled upon a system I like to call “the Fool’s Gold” for guitar newbies like myself.
It’s a system that essentially boils the art of guitar playing down to its simplest form; one that will impress virtually everyone that watches you play.
This stripped-down method allowed me to jump into an intermediate level of guitar playing after only a few days. This is what this post is all about – its goal: to get you to that level efficiently and fast. It's something you can achieve.
If you follow the rules of thumb laid out in this article, you'll be jamming in no time.
These tricks and trips won't turn you into the second coming of Eddie van Halen, but it will transform you into someone that can whip out a guitar and immediately play thousands of the world’s most recognizable and popular songs on your first try.
As a guitar player, there is nothing more exciting that being the musical ringleader at a party or social gathering; the person that leads friends and family into singing along to a series of songs.
This system moves you toward that goal. You’ll feel completely in control of the fun with every new song you start. In a way, it may even make you feel like a rock star...
Learn the Guitar – Beginner Resources
One of the struggles beginning guitarists have when they start learning how to play guitar stems from not fully grasping that the sum is greater than their parts. I’ve found that learning about these elements as soon as you possibly can will provide the groundwork for efficiently learning about the instrument.
Some of these items include:
- The differences in types of acoustic guitars and electric guitar types
- Guitar strings and how to change them
- The art of tuning your guitar (Fender has a great, free iPhone app)
- General guitar maintenance and care
- Guitar gear, from amplifiers to picks and pedals
- The best beginner guitars for easy learning
These are essential elements that you’ll need to wrap your head around if you want to play on a consistent basis. However, I realize that when taken as one collective group, it can look as overwhelming as picking up your guitar without any prior knowledge, if not more so.
Because of this, let’s not worry about this info for now. Bookmark the articles, and return to them later – they’re not going anywhere.
Instead, let's dig a little deeper into learning how to play guitar. Specifically, let's focus on the stuff you need to realize before you even pick up your axe in the first place. These actions behind the realizations will make it easier for you ease into playing because they won't catch you by surprise when they happen.
Experiencing something that’s a known part of the process will make it a lot easier to work with as opposed to having the unexpected occur.
Setting Realistic Expectations
On their first album, Radiohead recorded a song titled “Anyone Can Play Guitar." Even these young kids (pretty much babies) are fingerpicking Classical:
While this sentiment is true, it should be noted that not everyone may have the fortitude to learn. However, I’ve learned that having realistic expectations heading into the learning process will give you the resolve needed to turn yourself into a bona fide player.
Essentially, there are three basic principles you must accept before you even attempt to get from point A to point B (or chord A to chord B, if you will):
Clumsiness is Part of the Deal
You’re going to feel awkward the first few times you pick up a guitar. You will futz around the fretboard and weirdly pluck the strings. Things won’t come easy. However, this is perfectly fine, if not scientific. Your brain is simply not hardwired to instantly make the movements required to play guitar.
You learned how to type, so you KNOW you can learn the guitar!
You need to develop the proper muscle memory to get your fingers to fly, and this takes time. Just like learning how to type requires you to start with hunting and pecking until you can build up speed, playing guitar requires you to move slowly at first until your brain can figure things out and wire the neural pathways needed.
Expect Some Sore Fingers
Learning to play guitar is quite literally a painful experience. That’s because you’re going to be subjecting your fingers to pressure and movements that they aren’t used to feeling and doing. During the first month of play, you can expect your fingertips to hurt.
This will eventually subside, as your body will figure things out and start developing protective calluses (even Wikipedia uses guitar finger calluses as an example).
During this process, don’t be afraid to take a day off if the pain gets too arduous – even though the concept of “playing until your fingers bleed” may sound cool, it’s not recommended.
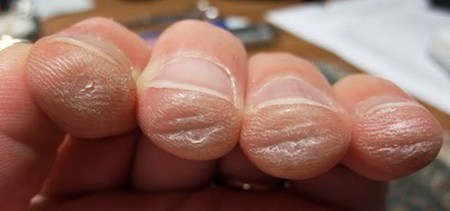
Your fingers' muscles will also be sore as you put them through the paces of unusual movement. This too will subside as you build up your muscle memory. It’s important that you work through this pain unless its excruciating – think of it as “feeling the burn” like you would if you’re exercising.
Daily Practice is a Must
Rome wasn't built in a day. Likewise, competent guitar playing isn't something that instantly happens. Picking up the axe and working on it for at least 10 minutes a day is a necessity.
Doing so will not only help you build up your calluses quicker, but it will also help you feel more comfortable with the instrument in your hands.
Pro-Tip: Practicing in 10 to 15 minute spurts five times a day is actually better than practicing for an hour once a day, because repetition with breaks is a huge part of how our brains learn.
We're now ready to actually begin strumming and picking this crazy instrument.
How to Strum the Guitar
Telling you that you need to learn how to strum a guitar almost seems like a bit of a no-brainer. After all, doing so is the only way you’re going to get music out of your axe.
But as I found out when I started trying to play, if you don’t know the proper way to strum you’re essentially just jumbling and fumbling around on your instrument hoping that a good sound pops out, and probably cringing at the disjointed noise that leaps out more often than not.
Practicing correct technique matters. Don't train your hands and brain to do the wrong thing!
The key to unlocking great strumming is the pick.
How to Hold & Handle the Pick
Remember, you’re not going to grab your axe and become the second coming of Andres Segovia, Charo, or whatever classic guitar playing virtuoso whose fingers doubled as picks.
You’re going to need that little triangular piece of plastic to be your friend. As you may guess, this courtship is not just about picking one up and brushing it up and down on the strings.

The most efficient way to hold a pick is to stick it out in front of you, point it to the left, and squeeze it between your thumb and index finger. This technique works if you’re right-handed. If you’re a lefty, you’ll want to point the pick to the right.
It doesn’t matter how you specifically grip the pick; you can adjust that to your comfort level, just as long as its wedged between your two digits. Feel free to experiment with different grips until you find what works best for you. You'll automatically course-correct as your hands reposition the slipping pick until finally your brain realizes what works the best.
Once you’ve figured out how to hold the pick, you can start working on the angle that the pick is going to be forming when it hits the strings.
This is a matter of preference, as there are multiple angles you can deploy to get the job done, but I personally recommend having the pick angled slightly away from the string on the upstroke and the downstroke, which means you'll be slightly rotating your wrist as you strum.
Some people will angle the pick downward toward the floor while some prefer the pick angled parallel toward the strings or even upward. Again, there is no right or wrong angle here. It’s another instance that boils down to personal preference.
Experiment with a few different angles and go with what feels best for you. You'll find that too sharp of an angle won't work since it'll snag on the strings if you push the pick too deep past the strings.
Relax & Strum the Strings
As you strum, it’s important for you to do so in a relaxed fashion. If you get too tense or uptight, your motion isn’t going to be as fluid as it needs to be. This includes your wrist, forearm, and even in holding the pick.
If you feel yourself getting tense as you strum, simply stop, take a calming breath, and resume. If you get frustrated, take an actual break for a bit. The key here is to not force anything, but to be relaxed and let time do its work with you.
When you start out, your strumming pattern will strictly stick to a rhythmic up and down pattern with no syncopation.
As you gain proficiency and start learning basic songs (including a few songs I’ll mention later on), you’ll start discovering a few creative patterns that will help you pick up on slightly more complex tunes.
One other thing to consider when you’re learning to strum. Using a metronome is a very effective tool to help you establish the rhythm that is essential for proper guitar strumming. Doing so will help you map the important link of muscle memory much more efficiently.
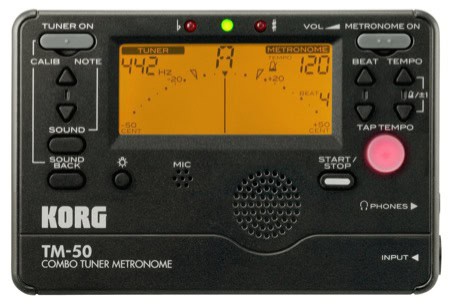
The reason for this is that it trains you to know what sounds and feels right – the worst thing you could do when you start out is “teach” yourself poor practice mechanics (and especially horrible timing). If you do pick one up, get a digital one with a tuner built in like the one above.
It can travel with you and not be broken like the old school metronomes that swing the clock hand back and forth with zero other features than accidentally hypnotizing yourself.
Here's a solid browser-based metronome if you know you'll be practicing at home. You can choose the BPM's and time signature, then choose how many bars you want to run at once before it stops automatically for you to take a break.
I don't recommend browser-based tuners though. They need you to tune by ear and as a beginner it's going to be a near impossibility.
What’s a Capo & How is it Used?
A capo is one of those fancy words that you may encounter when you’re learning how to play guitar, and it may confuse you a bit. However, there’s nothing to worry about here.
A capo, which is an Italian word meaning “head,” is a common device that clamps onto a guitar neck, thus shortening the length of the strings.
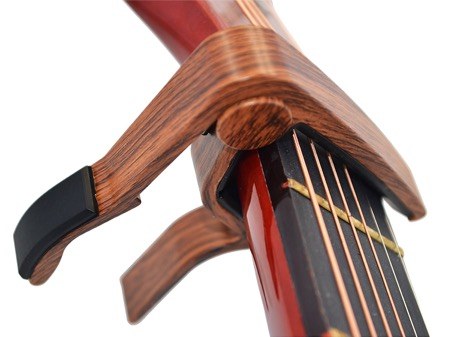
You can click on the image above to see a ton of capos. They're all cheap and do the same thing... you just have to choose a color, basically.
The purpose of the capo is to raise the pitch of the strings, which allows acoustic and electric guitarists alike to play songs in different keys.
Typically, you can expect the strummed strings on a capo-fitted guitar to come out with a more droning, robustly resonate tone than normal. But once you add in chords you'll be back in familiar territory.
While this is one of the cool tricks that make up the Fool’s Gold process, it’s not necessarily something you need to worry about until you get comfortable with strumming techniques.
Beginning Guitar Chords
If there is one thing you need to pick out of the Fool’s Gold guitar playing strategy, it’s the fine art of learning and mastering beginning guitar chords. There are only three chords that make up this basic list, and they serve as the foundation for literally hundreds of popular songs.
Once you get comfortable with strumming and can rotate in a capo, you’ll ratchet this song total up into the thousands. Once you go beyond these three basic chords, there’s no telling what you’ll be able to achieve.
The G, C, & D Chords – Your First Three
Do you think I'm blowing hot smoke here? Check out this quote.
Cheap Trick guitarist Rick Nielsen once famously described his band as “Four great guys, three great chords.”
That pretty much sums up the collective power of the G, C, and D chords, a holy trinity that form the 1, 4, and 5 chords of G-Major. Indeed, there are more pop songs that rock the irresistible 1-4-5 progression than there are atoms in the universe. Okay, that may be a bit of an exaggeration, but you get the point.
There's a handful of ways you can form various chords but the ones below are the easiest, beginner versions.
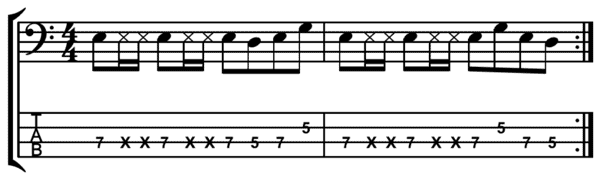
How to Read Guitar Chord Charts
The way you read guitar chord charts is to count your fingers, where your index finger is #1, middle finger is #2, ring finger is #3, and pinky is #4. You'll place your fingers between the frets as shown, closer to one nearer the bottom of the picture.
Your thumb can be used to mute strings designated by an X or you can simply dodge them while strumming. Strings marked with an O are to be strummed openly.
The pictures represent the lowest five frets on the neck of the guitar, which means they're closest to the headstock. They're called "low" because of their pitch.
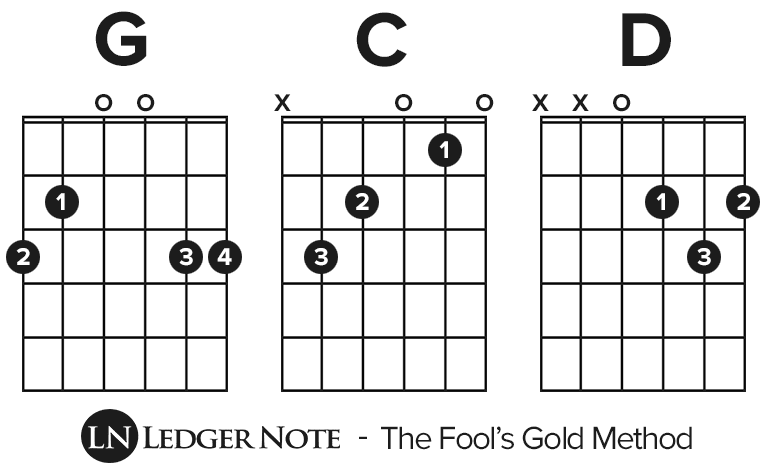
Like the written sequence suggests, you’ll want to play the chords in the order of G, C, and D when you first start out. Once you get the hang of using these chords, you can add an extra cadence to expand the sound a little.
For instance, you could either mix in a second C chord at the end of the G-C-D sequence, which would make it G-C-D-C, adding a fun little wrinkle. One key component to riffing on these chords: you must be proactive with your hands if you want them to work.
It’s important that your hands are moving in place to meet the next chord in the sequence and have them in place and ready to go before the next chord is strummed. If you try to do it at the same time, you’re not going to get the sound you’re hoping to achieve.
Be prepared to take things slowly as you learn. As you begin to build up speed, you'll also encounter what are known as "ghost notes;" notes that are fleeting due to a proper lack of strum mechanics, but actually sound great. Nobody can avoid them, but only minimize the amount of time they ring out. Some artists use them to great effect.
These ghost notes are the sound your fingers releasing the previous chord and allowing the strings to ring freely before you clamp down on the next chord formation. Don't let that discourage you, it's normal.
Eventually, you'll pick up speed and these ghost notes will be minimal. If anything, they may drop in the occasional cool sound effect.
Once you’ve mastered this simple sequence of chords, you’re going to be on your way to playing a ton of songs on the guitar, from your favorite songs from your favorite bands to your own compositions.
And if you feel comfortable whipping out the capo, you can manipulate these chords to take on the sound of other chords, which could give you access to thousands upon thousands of other tunes.
The A, E, & F Chords – The World is Yours
After you've mastered the G, C, and D chords, it's time to take over the world with your trusty axe. By learning the A, E, and F chords, practically any song you can think of are ready to be replicated by your fingertips – even the weird, esoteric Frank Zappa kind of stuff.
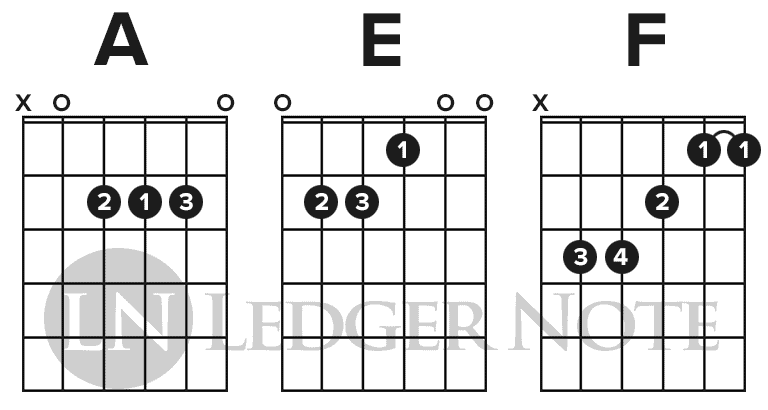
The reason for this is because these other three chords are minor. Together with the three major chords, they open up a wide array of chord progressions that you’ll eventually learn to mix and match as if it was second nature. Doing so will showcase the power of your brain and how it works in conjunction with muscle memory.
You’ll be able to try and pick these up on your own at a later time. For now, we’re going to put them on the shelf so they don’t interfere with your focus on the Fool’s Gold. You’ll get to those chords soon enough, I promise, and will know how to deal with them once you're there.
“G-C-D” Songs to Practice in G-Major
The foundation of good ol’ fashioned, four on the floor rock ‘n’ roll was built on the magic power of the three major chords. Indeed, it’s not much of an exaggeration to state that there are a bajillion songs out there that contain the straightforward I-IV-V progression.
When you mix them up a bit, you’ll open your repertoire up to about a quadra-bajillion more tunes. Here’s a handful of genuine rock nuggets to get you going in G-Major so there's no need for a capo yet.
These are songs everyone should know, so your listeners should be fairly impressed the nanosecond they’re recognized as you bust them out. We've tried to include songs that aren't already listed online that you can still readily find tablature for:
- Brown Eyed Girl - Van Morrison
- Ring of Fire - Johnny Cash
- Blue on Black - Kenny Wayne Shepard
- Sweet Home Alabama - Lynyrd Skynyrd
- Werewolves of London - Warren Zevon
- I Fought the Law - The Bobby Fuller Four
- Wonderful Tonight - Eric Clapton
- Amazing Grace
Some of these strictly follow the I-IV-V chord progression, some are that progression in reverse, and others mix it up more. But they all only include the G chord, C chord, and D chord.
Now, you can play any I-IV-V song in any other key in G-Major without a capo and you can still sing along if you can transpose the key for the vocals. It's real simple to lock into the new key in order to sing along. Your ears will latch on and like magic you'll pull it off since you know the melody so well.
We could list songs all day (and have more below!), especially if we assume you have a capo. What you can do is search for more online. There are tons of lists and discussions out there to keep you going. Don't forget that you can use YouTube or Spotify to play along as well.
“G-C-D” Songs to Play in Any Key
Once you're ready to start working with a capo, you can try some of these songs, which still only involve our three main "Fool's Gold" chords, but in different keys. All you need is a capo and you can use the exact same chords!
- Bad Moon Rising - Creedence Clearwater Revival - D Major
- La Bamba - Richie Valens - C Major
- Wild Thing - The Troggs - A Major
- Johnny B. Goode - Chuck Berry - B-flat Major
- Three Little Birds - Bob Marley - A Major
- Man of Constant Sorrow - Dick Burnett - F Major
- Louie Louie - The Kingsmen - B-flat Major
- Big Yellow Taxi - Joni Mitchell - E Major
- Cecilia - Simon & Garfunkel - F Major
And since you're working on three more chords, let's list a batch of songs to keep you growing in your repertoire.
More Easy Songs to Play and Expand Your Horizons
Once you’ve mastered those three essential chords and added in A, E, and F, you’re ready to take your burgeoning guitar skills to the proverbial next level. You may be surprised to see the sheer wealth of songs that are out there waiting for you. In fact, you may find them to be just as easy, if not easier.
What's for certain, you'll find a few tunes that you'll simply be itching to play. All it takes is those few extra chords. Here's a list for you to peruse.
- Leaving on a Jet Plane - John Denver
- Knocking on Heaven's Door - Bob Dylan
- Good Riddance - Green Day
- Mother - Pink Floyd
- In the Air Tonight - Phil Collins
- Shine - Collective Soul
- Horse With No Name - America
"Horse With No Name" by America will introduce you to chord inversions and the D chord, but it's even easier than the rest since it's only two chords the entire time. You only have to move two fingers back and forth one string each. It's a piece of cake!
Remember, even if you’re brimming with confidence, you’re still not going to be Eddie Van Halen (yet), even if you’ve mastered chord progression. Keep things simple, and slowly build up from there. Keep in mind, some of rock’s best songs were written around simplicity!
Recommended Gear to Get You Rolling
Earlier we discussed picking up a decent digital tuner & metronome combo. We also suggested you scoop up a capo while you're at it. But that's not all you're going to need.
As a beginner I don't recommend breaking the bank over anything too nice, but there are a few items you'll have to have around regardless.
You will need at least two packs of strings around. It's a guarantee that you're going to break at least one string while tuning up. We've all done it by going an octave too high and then the thinnest strings snap.
Even if someone else tunes the guitar for you, you'll eventually break a string. Having an extra set around means you'll be ready no matter which string pops.

It's likely that you're going to lose picks. They'll come out of your pocket, get dropped, get lost in your house or at a friend's place, etc.
You'll want to go ahead and pick up a pack of 10. These D'Addario's are medium thickness which will let you get an idea of whether you want to go with thinner or thicker picks over time.

Lastly, if you don't already have access to a guitar you'll need one! Again, I don't recommend going too expensive until you know you're fully committed. But you don't want shoddy quality either because that makes learning even harder. My favorite travel and practice guitar is the Martin Backpacker:

It comes with a strap, which you'll want due to the shape of the body, even as you practice while seated. You also get a nice travel bag with pockets for strings, picks, tablature, etc.
Learn to Play the Guitar with Proper Technique
Finally, let's reiterate... proper technique is king when you learn how to play guitar. I can't reiterate it enough... It's so much easier to learn the correct technique upfront than to have to unlearn bad technique and then relearn the right way.
Keep the Tempo Slow
It’s so important to keep things slow when you’re first starting out. Once you’ve built up a proper road map between your brain and your muscle memory, your speed will increase organically. Until it does, don’t rush.
It's harder to unlearn bad technique than to learn good technique!
This is where a metronome really comes into the discussion. You can measure exactly how fast you're practicing and increase the speed in increments once you master it at a slower BPM (beats per minute).
Get a Strap and Play Standing Up
You’ll also won’t want to take your technique completely sitting down. If you have dreams of the big time, or even playing in your local coffee house, you need to learn to play standing up.
It takes a different set of skills and confidence level to pull this off, as easy things like being to see your fret hand becomes harder.
Don't Strangle the Fretboard
And as I mentioned before, don’t inadvertently try to strangle your fretboard. Avoid what some call the “left handed death grip” (or right-handed death grip if you play it left hand like David Bowie) because you’ll lose accuracy on hitting the notes you want to hit.
The best way to avoid the grip is to keep your thumb on the side of the fretboard, not on the top. This will keep your hand nice and relaxed, which will only help your guitar playing.
Take Regular Breaks
Finally, don’t forget to give yourself a break. This is especially important at the beginning when your arms, hands, and fingers aren't used to the movement and pressure exertions that come with guitar playing.
Again, "playing 'til your fingers bleed" may sound cool, but it's really an awful thing to do. Also, the more repetitions you can cram in the better, so shorter periods of practice several times a day is better than one long one.
More Resources
Before we wrap this up, let me show you your ultimate destination. Check out Andy McKee playing his song Drifting:
You can and will be that good if you're willing to put in the time. That's all it takes!
In the meantime you need tabs and chord charts to practice from. Check out Ultimate Guitar. It is the place to go for tablature and has a thriving community of guitarists you can learn from.
JustinGuitar is a site by a guy named Justin who I've personally watched go from a fledgling YouTuber to an all monster in the community. He has more lessons than you could ever need.
If you get stuck trying to figure out a chord someone mentions but doesn't show how to use it, check out ChordBook and they'll show you in a heart beat.
And That's How to Play the Guitar!
That's it. Our Fool's Gold Method has all you need to immediately jump out of the beginner's bracket. The two resources above can take you the rest of the way. When you're ready to get a better guitar, check our guide the best acoustic guitars for all budgets.
Eventually you may consider personal guitar lessons with a teacher, even if for just 6 months or so. This way you can have your technique observed and adjusted and then be sent back on your merry way.
All the best, and good luck learning to play guitar!
Jared H.
 Jared has surpassed his 20th year in the music industry. He acts as owner, editor, lead author, and web designer of LedgerNote, as well as co-author on all articles. He has released 4 independent albums and merchandise to global sales. He has also mixed, mastered, & recorded for countless independent artists. Learn more about Jared & The LN Team here.