

Forget about the tall tales, the marketing schemes, and the urban legends. Nobody wants their fingertips raw and wounded from playing guitar.
Mainly because that means you have to stop playing until you heal.
As a beginner, it's bad enough to need to restrict your practice time because your fingertips are tender and squishy. You might only play for 30 minutes but the next day your fingers are bruised and possibly have been cut shallowly.
And god forbid you don't practice for a few days and end up starting the process over again. The solution to all of these woes is to build guitar calluses and to then care for them.
But there are also tips and tricks to help you out before you get to that point too. We're going to cover the three stages of developing calluses, caring for your fingertips, and then how to deal with calluses peeling off.
Let's start with the obvious and define exactly what a callus is for the newcomers and then we'll jump into the meat of the discussion.
What are Guitar Calluses?
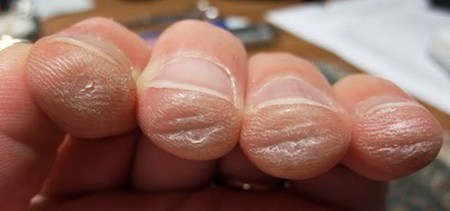
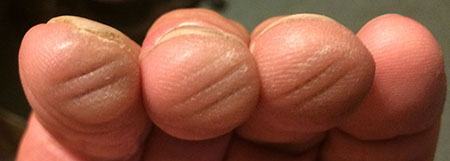
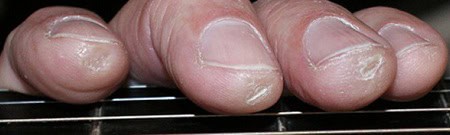
A guitar callus is a thick pad of skin that develops on the fingertips of a guitarist's non-strumming hand from their constant manipulation of the fretboard and strings.
This toughened area of skin develops over time as the body's protective measures kick in in response to repeated and consistent friction and pressure to a portion of skin. Calluses serve to desensitize your fingers from pain.
So basically your neck hand's fingers realize you're not going to stop making them suffer against these guitar strings, so they start growing armor to defend themselves. Unfortunately this takes a bit of time and persistence.
You have to push through the period of pain to earn these little badges of honor. It's totally worth it and something guitarists have dealt with since the beginning, but we've also developed quite a few tricks to help get past this initial hurdle too. Let's discuss this time period first.
How to Build Calluses for Guitar Fast
Let's preface this by saying that yes, there are ways to hasten growing calluses but it will always take commitment to the process. There's no shortcut around that, and nothing can replace having to do the actual work. Here are the methods to toughening up your fingertips fast:
Shorter, Frequent Practice Sessions - Of course, the tried and true method of developing calluses is to continue practicing the guitar or bass regularly. You're far better off playing for 10 minutes at a time several times a day than going for a long 2 hour burst and then not playing again for days.
More frequent sessions of less duration are not only better for learning but will accelerate the rate at which you grow calluses. Long sessions before you have solid calluses are how you end up with blisters instead.
Spend Time With an Acoustic Guitar - This may be your goal already, but many strictly play electric guitar. Most people will have the action of their electric guitar adjusted and use light strings and be all dainty about it because it makes it easier to play.
But an acoustic with steel strings requires more force and usually have higher action too. If you tolerate this long enough while avoiding the smooth nylon strings of a classical guitar, you'll grow your thick skin pads faster.
Start With Medium or Heavy Strings - When you're absolutely new, you have two choices. You can try to avoid the soreness of pressing down a heavier string by using light gauge strings, but then you risk cutting your fingers since you don't have the protective skin layer built up yet.
You're better off pressing and rubbing against thicker gauge strings with their ridges and bumps, which will quicken the rate of growing calluses. We give our suggestions on string gauges and brands in our Guitar Strings Guide.
Keep Your Fingernails Trimmed - You'll often see guitarists chewing their fingernails on their left hands to a visually uncomfortable level of shortness. The reason they'll tell you is so their fingernails don't scratch their fretboard, but the main reason is that it stops you from playing as well.
If your fingernails are hitting the strings on the neck, then they're relieving pressure and friction from your fingertips. This will slow down the process of growing good calluses and can lead to ugly situations when you try to slide and end up tearing off a piece of a nail.
Use nail trimmers though, don't chew your fingernails. It's easy to overdo it and be left with a different kind of finger pain, like ingrown nails, infections, or exposing the sensitive nail bed.
Reduce the Pain - If you do this, you need to make sure you're still paying attention to your fingertips in case you're doing some real damage and don't realize it. But the idea is that through some home remedies like witch hazel and medicine you can block out some of the pain.
I don't think this is the greatest idea, but your mileage may vary. Some suggest that a 30 second apple cider vinegar soak can help before and after your practice session. Others will use a topical anesthetic like toothache creams, while others will take an aspirin.
Rub Your Fingers During Down Time - A big trick guitarists will use is to try to emulate pressing your fingers into a guitar string throughout the day. Some will press their fingers onto the edge of an old credit card and rub their fingers across the raised numbers and letters on the front.
Some will press their thumbnail into their fingertips one at a time. Others even seek solutions from the weight-lifting and rock-climbing communities, which have the same concerns as guitarists when it comes to callus-building.
Create a Fake Callus - This can delay your ability to grow a real callus, but if you're in a pickle and need a quick fix you can create a thin yet thick enough layer of material over your fingertips to simulate having a callus.
Options are painting on a thin layer of super glue (and letting it dry!) or using products like liquid bandaids. It's fast, but it's not genuine. Only do this if you must because it'll slow down your real progress. Clean your strings and fretboard afterwards, too. There will be dried flakes spread about.
Dry Your Fingertips with Rubbing Alcohol - Master guitarist Eric Clapton suggests that beginners help dry out the skin of their fingertips by using cotton balls and rubbing alcohol or alcohol wipes.
By applying a layer of this rubbing alcohol a few times a day, it'll help evaporate out moisture and hasten the growth of a dry, thick layer of skin.
These are the best and most sensible tips you'll find, but there are others out there. Some people say they just tap their fingertips on any hard surface they can find through out the day, but this doesn't really mimic a string pushing into the skin, which is a big part of it too.
It can help in creating thicker pads, though. If you do the above you'll get to where you need to be soon enough without digging into obsession or tricks that are a little too whacky.
How Long Does it Take to Develop Calluses for Guitar?
To be frank, this is the question everyone wants the answer to because they want to grow calluses faster. Of course, the answer varies depending on person and activity levels.
If you start to extend the length of your practice sessions as your calluses become thicker, they'll become thicker faster. So it can definitely depend on how hard you ramp up your playing levels.
But in general, you can expect a timeline that goes something like this:
The First Week: The unavoidable tenderness will be present and all you can do is wait. Make sure you're practicing for at least 15 minutes a day (or better yet, 5 minutes per session 3 times a day). This is when you need to be patient but persistent.
You can study music theory or practice changing strings and tuning in the meantime. You might even do some ear training or just rhythm exercises with your strumming hand.
The Second Week: The deep, throbbing pains will be gone as well as the sharp pains on the lighter strings. You'll be able to see and feel the change in your fingertips by now. You'll still feel your fingertip meat being smashed against bone but it'll be tolerable now.
After One Month: At this point, if you've done as you should, you'll be good to go. You're at the point where you may not even think about this issue any more. What you may experience is a layer of skin peeling off the top, but it's only going to reveal the new, harder callus growing beneath the top layer.
Just let it peel and don't pick at it. It'll come off and you'll be left with healthy looking fingertips that are well protected from friction and pressure.
So realistically you should expect at least three weeks before you have any decent calluses developing. By a month you'll be in good shape if you exposed your fingers to consistent practice. Otherwise it can take longer.
But if you do everything right (mentioned above) and avoid all of the bad (mentioned below), you might have fully developed calluses in three weeks time, but be good enough to not notice any real pain within two weeks.
How to Care for your Guitar Finger Calluses
You've finally done it! Despite the annoyances, you persisted, and through your infinite patience you now have some of the best guitar finger calluses on the planet. Now what?
How do you care for and maintain these bad boys so they can do their job of protecting you from pain and sensitivity? You've finally earned the right to play for hours upon hours at a time. Let's teach you how to keep that right:
Don't Press Down Too Hard on the Strings - We all tend to think 'more is better' and that extends to guitar. Beginners have a bad habit of pushing down the strings into the frets far harder than necessary.
All this leads to is ensuring that your hands will tire sooner, you end up with tendonitis and carpal tunnel syndrome, and the possibility of cutting and tearing off your hard earned calluses. All of that means you have to stop playing until your fingers heal, which means you'll be losing your calluses in the meantime.
Relax and form your chords with only the amount of pressure required to sound good, and no more, especially so you're not affecting your tone too. If your fingertips hurt after you have calluses then you're pushing down way too hard.
Don't Pick at, Bite, or Shave Down Your Calluses - Another thing we all tend to do is pick at imperfections in our skin, usually on our faces but you'll find that you'll do it on your fingers too. As you go about your daily life you'll notice your calluses frequently.
All of this attention drawn to them makes you feel like messing with them. You may come to think they're ugly and feel like you should groom them. Don't do it. Just leave them alone. They're your friends.
The only time you should file your calluses is if a rough edge develops and is catching on the strings. This can lead to tears, so take care of that but nothing more.
If you do file, consider using a pumice stone instead of an actual file, emery board, or nail file, and definitely don't use any electric trimmers or those cheese grater looking things women use on the heels of their feet!

Don't Play Right After Having Wet Hands - If you laid in the tub for an extended amount of time, worked in the rain, washed the dishes, or went swimming, you may notice that your calluses became soft along with your other fingertips taking on the appearance of raisins.
This can even happen after applying hand lotion. The worst thing you can do is immediately pick up your guitar. Your calluses will quickly get shredded and begin peeling in layers.
Even after drying you'll face the repercussions of this if you already damaged them. Just wait till they're fully dry before practicing again.
Build Them Over Your Entire Fingertip - Don't accept the calluses that grow over a small surface area of your fingertip. You want them to widen and eventually cover more and more surface area so you can do bends and chords from every angle.
To help them grow wider, at the end of each practice session you can spend a couple of minutes pushing various regions of your fingertips into the strings. You can do the same throughout the day with the credit card trick, too.
At this point, all you really need to do is keep using your calluses and not destroy them. Eventually, you will encounter an episode where an entire callus tries to peel off instead of the top layer flaking over time. But we know how to deal with that too.
What to Do if a Callus Starts Peeling Off
If the disaster of a peeled or torn off callus happens, there are things you can do to repair the damage or at least reduce pain in the meantime while you keep playing.
It's not as uncommon as you'd think, so definitely know the options so this event doesn't interfere with any gigs, practice, or recording studio trips.
We mentioned some things you should avoid while developing your first set of calluses, but they're good things if you need to keep your skills together but are having pain.
For instance, if you play a steel string acoustic you can swap over to nylon strings, which are smoother and require less pressure to press down. You can also use lighter gauge strings on electric until you're ready to switch back to your preferred size.
You can also detune your strings a whole step if you're just going to practice chicken picking or finger picking, etc. So instead of having EADGbe, you can drop them down to DGCFad. This will reduce the tension of the strings and the amount of pressure required to push them down to the frets.
At this point, you're skilled enough and have practiced for long enough that you aren't at risk of losing your skills by not using them. So what you can do is decrease the amount of time you're playing and practicing.
This'll be a good break for your fingers in general too. Another option is to break up your sessions into smaller but more frequent sessions even further.
If a callus begins to peel off but isn't torn all the way, you can press it back down into place and use super glue or a liquid bandaid ointment to hold it in place. You can repeat this process until finally there's no choice but for it to drop off, but you'll have developed a new pad layer beneath that one in the meantime.
Otherwise, don't rip it off. If you choose to remove it, use scissors to create a clean cut and prevent injury to the rest of the fingertip and additional discomfort.
If one tears all the way off in a solid chunk, you can place it back on and use the superglue trick, and then use an actual bandaid over it. Yeah, it'll reduce your ability to feel what you're doing on the guitar, but it can actually heal into place too.
Otherwise you're out of commission for a while. It's only one finger and you know what you're doing when you play, so it shouldn't get in your way too bad. Just take it easy until it's healed enough to return to your normal level of activity.
Conclusion: Guitar Calluses Take Persistence
Your current situation is leading to you wanting to know how to get past the initial pain of playing guitar, but eventually you'll also need to know how to maintain that painless playing.
For that reason we've not only taught you how to develop calluses for guitar playing, but how to take care of your fingertips after you've built up your thick pads of skin.
But knowledge isn't everything. We can only point the way. You'll have to do the hard work yourself. Be persistent in your practice and being patient as you grow your guitar calluses.
Jared H.
 Jared has surpassed his 20th year in the music industry. He acts as owner, editor, lead author, and web designer of LedgerNote, as well as co-author on all articles. He has released 4 independent albums and merchandise to global sales. He has also mixed, mastered, & recorded for countless independent artists. Learn more about Jared & The LN Team here.