

Guitar maintenance is one of the most important, but also the most overlooked parts of guitar ownership. A properly maintained guitar will give you the best performance possible, no matter how cheap or expensive it is.
On the other hand, lack of maintenance can severely limit what that guitar can give you. What many guitar players don't realize is just how complex this instrument really is.
Any guitar is only as good as the sum of its components, and the state of said components. If one element drops out of sync, the whole concept falls apart.
This is why general guitar maintenance and care is something you should get familiar with the moment you acquire a guitar. Not only will you get the best possible performance out of your instrument, but you will also expand its lifetime.
Today we are going to go through the basics of guitar care and maintenance so you, too, can reap the immediate and long-term benefits. Not only will your instrument appreciate it, but your skills at playing will improve as well.
We will start from simple things that you can do pretty much anywhere and anytime while later on, we will move to more complex stuff. Either way, by the time you are done reading this short guide, you should have a good idea of how your guitar works and what is necessary to keep it in optimal condition.
Just a quick note before we get started. Some of these procedures might be overwhelming for beginners.
If that is the case for you, it is recommended that you find someone who is experienced and have them walk you through the process. None of this is too complicated, but there are some tricks and procedures that require prior experience.
With that said, let's dig right in. You've likely scored the best acoustic guitar or electric you could manage. This is how you take care of it so it lasts a lifetime.
Cleaning the Body & Strings
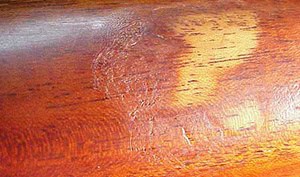
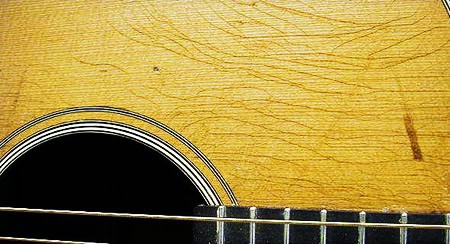
One of the most basic actions you can take to prolong the life of your guitar is to simply clean it. When we play, depending on the environment we are in, chances are that some sweating will be included.
Over time, sweat and our skin's natural oils tend to build up on various parts of the guitar. The most impacted areas are the fretboard, strings and the bridge.
Body
Since a large portion of your forearm usually gets in contact with the body of the guitar, it is easier to just clean the whole thing.
Not cleaning the guitar and leaving all that grime on can damage both the hardware and the finish of your instruments. Metal components such as frets and saddles on electric guitars will corrode over time.
The best time to clean your guitar is when you're changing the strings. This way you have full access to the bridge and the fretboard. In most cases, a damp microfiber cloth and a bit of elbow grease are all it takes to remove any dirt or grime from your instrument.
We recommend microfiber since it won't damage the finish. There are a number of polishes and chemical cleaners on the market, but you have to be extremely careful when using them.
The problem is that various guitars are treated with a range of different finishes. For example, if you use a petroleum based cleaner on a nitrocellulose finish, you are most likely going to permanently damage it.
If you do choose to get into cleaners and polishes, make sure that you get the right one for your guitar.
Strings
Cleaning the strings is much more straight forward. Take that same microfiber cloth and drip some rubbing alcohol on it. Make sure that the alcohol doesn't get in contact with anything else but the string. The best way to do this is to release the tension on the strings and lift them up as you clean them.
However, if the strings are corroded, which is easy to determine by their color, it's time to change them out. Chances are that they have lost a good portion of their tonal properties at this point, and cleaning them won't do you much good.
There is a lot you can do to decrease the frequency of the need for cleaning or changing strings, which we've explored in depth in out Guitar Strings Guide.
Maintaining Proper Humidity
Guitars are made of wood and wood reacts to humidity. Even so, most guitar players completely ignore this fact. It is also worth mentioning that acoustic guitars are much more susceptible to the changes in humidity than electric guitars. Even so, the results are more or less similar.
Even the finish can crack from poor humidity control, but bowing in the wood is the main problem. Then comes a tiny wood crack that eventually propagates into a monstrosity. It's best to simply observe the humidity in your case.
Cause
The issue of humidity is pretty complex. If the air is too dry, it will suck all of the moisture out of your guitar. However, if the humidity too high, this will make the wood on your guitar expand.
Here's where things get really complicated. The effects of harmful humidity set in very slowly and are extremely hard to recognize unless you are looking for them. This is one of the biggest keys to proper guitar maintenance, especially during long-term storage.
Effects
It all starts with your guitar losing some of its tonal properties. Up next comes the change in the action of the guitar where you might experience some fret buzz.
The worst possible scenario is to have the tonewood on your instrument deform either inwards or outwards depending on whether its high or low humidity.
The idea is to hit that sweet spot where the relative humidity is neither too high nor is it too low. Luckily for us, that 'sweet spot' is actually anywhere from 30% to 70% relative humidity for most guitars. With that said, trying to narrow that range to 40% to 60% is highly recommended.
Ways To Combat Humidity
The next logical question is how does one control the humidity of their guitar? The answer comes in form of guitar humidifiers.
There are several types out there, but the most practical and efficient ones are the guitar case humidifiers... ones that actually moderate the humidity versus the kind that ask you to put a soaked sponge in your case.
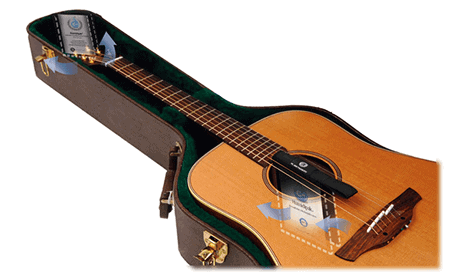
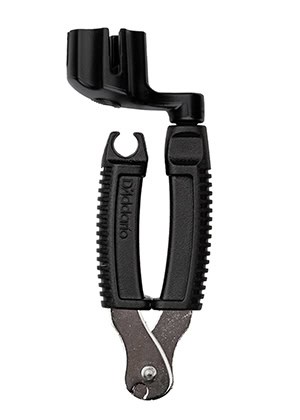
By having your guitar in a closed space such as a case, the humidifier can control the ambient humidity much more easily. Having one of these devices, like the D'Addario Two-Way Humidification System, is recommended whether you have an electric, but especially if you have an acoustic guitar.
The reason why control of humidity is so important is that you can't revert the negative effects after they occur. People have had their extremely expensive guitars rendered useless simply because of humidity.
Fortunately for us, humidifiers are neither expensive nor hard to find. All you have to do is be aware of the impact this phenomenon has on your instrument.
Condition Your Fingerboard
As we have mentioned earlier, fingerboards are one of the prime locations for grime buildup on your guitar. Cleaning and conditioning of the fingerboard not only keep it clean, but it ensures that it's kept in the best possible condition in terms of performance.
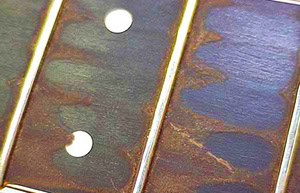
There are generally two ways we would recommend that you go about cleaning your fretboard during your guitar maintenance routine. It's quick and makes a huge visual difference.
Preparation
Before we get into different methods of cleaning a fretboard, we have to talk about the prep work that is pretty much necessary. The first step is to remove the strings.
One pretty important thing to remember is to remove two or three strings at a time. Removing all six strings at the same time may cause the neck to distort due to the sudden release of tension.
Next, you will want to tape off all of the areas which are right next to the fretboard. That means taping of the nut and the headstock as well as the portion after the highest fret on the board.
This step is more important for our first method of cleaning than it is for the second one. However, it doesn't hurt to be super vigilant.
Standard Way
The most standard way of cleaning a fretboard is to use #0000 steel wool, called "super fine steel wool." A lot of people wince at a mention of steel wool coming anywhere close to their guitar, but this stuff is almost as soft as a cotton cloth (and as inexpensive).
The fine strains of steel wool are just abrasive enough to remove the grime and not damage the fretboard itself.
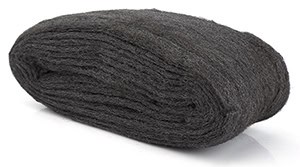
What you want to do with steel wool is to buff the board following the direction of the grain in the wood. In other words, go from the nut towards the bridge of the guitar. You don't need to press too hard on the board, simply lightly buff it until the dirt is gone.
Now that the board is clean, you will want to condition it. This requires the use of mineral oils, which are available for this specific use.
Apply a generous amount of mineral oil to your board, spread it out so that every portion of the wood is covered and leave it be for a few minutes. After that time has passed, remove the excess oil with some paper towels.
Gorgomyte
Gorgomyte is a material designed specifically for cleaning guitar fingerboards. It is much less intrusive compared to steel wool and actually contains the necessary oils as a part of its design. Gorgomyte usually comes in a single section which you then cut into smaller pieces.
To condition the fretboard, all you have to do is buff the board with Gorgomyte. It might take few patches to get the job done, but the results are more or less the same compared to the standard method.
Word Of Caution: This method works for rosewood fingerboards which are generally untreated. Maple fingerboards often come with a nitro lacquer applied, where the application of steel wool can damage the finish. On a similar note, using Gorgomyte on unfinished maple fretboard is definitely not recommended.
Now that your guitar is clean, let's look at getting you set up again. Guitar maintenance isn't just about cleanliness but making sure you're getting the best performance from your instrument.
Re-String the Right Way
Strings are expendable components which need to be replaced periodically. The best way to know when its time to swap the strings is when they change color.
Additionally, any time you are going to a studio to record music, you will want to go with a fresh set of strings. Restringing your guitar the right way means different things for different types of guitar.
Acoustic Guitars
The first step in restringing an acoustic guitar is to remove the old strings.
The best way to do this is to grip the neck of the guitar with one hand while unwinding the tuning peg for the selected string with your other hand. Gripping prevents the string from flying off since they sometimes like to snap as you unwind them.
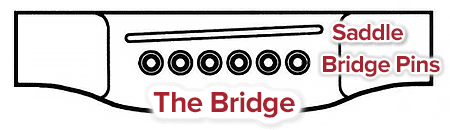
When the string is loose, take a pair of wire cutters and cut the string right above the sound hole. Next step is to remove the bridge pin that holds the ball end of the string.
Once that is done, remove the rest of the old string. Apply this process to all six strings. Many string winders will feature a tool to pop out the bridge pin, which can be a pain at times otherwise.
Now it's time to put a new set of strings on. First thing first, you should take the ball end of the strings and put on the bridge. Once that is done, insert the bridge pin until you hear it pop. This indicates that the string is sitting flush inside the bridge.
Once all of your strings are anchored at the bridge, it's time to secure them in their individual tuning machines. Push the end of the string through the peg so that you leave some slack in the string. Bend the excess portion of the string gently and start winding the peg as you apply tension to the string.
The key here is to have the string layer down as you wind it and to have two or three layers before you reach optimal tension. This stops slippage. Repeat the process for all six strings and remove the excess with wire cutters.
Electric Guitars
The process for electric guitars is more or less the same. The only real difference is that there are no bridge pins to worry about. Instead, the string is inserted through the bottom of the bridge which is accessed on the back of the guitar.
The ball end of the string is caught inside the bridge, which anchors it. This process applies to most bridge designs, except for the Floyd Rose type tremolo bridge.
Changing the strings on a Floyd Rose is extremely complex and requires a lot of caution. If you have a guitar that has a Floyd Rose bridge, we strongly suggest that you refer to your user manual for proper restringing procedure.
Assessing the Neck Alignment
The strings on your guitar are constantly under tension. This tension, while necessary to produce tone, has an effect on the neck. Changes in the neck alignment can be a result of many different things, which is something we won't get into at the moment.
What we do want to talk about is how to assess the neck alignment and determine whether or not any corrections need to be applied
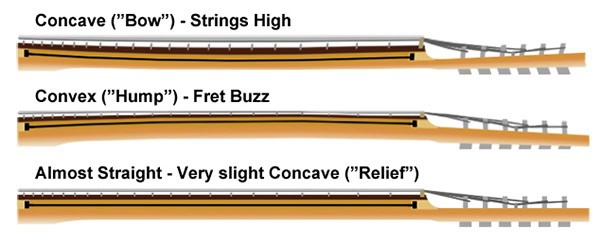
Visual Inspection
The simplest way of doing this is by picking up the guitar and looking down the neck from the bridge end towards the headstock. You want to have the fretboard at eye level.
What you are looking for are any abnormalities in the height of the frets. Looking at the edge of the fretboard can be deceiving, although a more significant warping of the neck will be more obvious from this view, resulting in a deformed fretboard.
Straightedge Inspection
A different way of assessing the neck alignment is to use the strings on your guitar. All you have to do is press the 1st and 14th fret on the sixth string and see if the 6th fret is touching the string.
If there is an obvious dip at this fret, your neck is most likely bending inwards. Repeat the same process on the 1st, or high E string to determine if there is any lateral warping.
Tweaking the Truss Rod
In case that your neck is bending either inwards or outwards, the only real solution to this problem is to adjust the truss rod. A truss rod is a metal rod that goes all the way through your neck.
Most guitars have a single truss rod that is accessed at the headstock, while some guitars feature an access point at the other end as well.
Adjusting the truss rod is a very delicate operation. It is extremely easy to snap the rod and thus ruin the guitar for good. However, since it is a necessary part of maintaining any guitar, you should know how to do it properly.
Assessing The Problem
The first thing you need to determine is how your neck is bending. Is it higher in the middle and lower on the ends? Or is it dipping in the middle towards the back?
This is important because knowing that information will tell you exactly how to adjust the truss rod. Once you determine the nature of the bend, it's time to get to work.
Adjust The Truss Rod
In order to access the truss rod, you need to remove the strings. Next, remove the plate that covers the truss rod at the headstock.
Different brands of guitars will require different tools to adjust the truss rod. The most common ones will be either a screwdriver or a hex key. It is important that you use the right gauge tool and seat the tool all the way into the slot.
Otherwise, you are running a risk of wearing out the socket on the truss rod, which is extremely difficult to repair later on. A truss rod can be adjusted in two ways.
You can either turn it clockwise or counterclockwise. If the middle of your neck is higher than both of its ends, turn the truss rod counterclockwise. If the neck is dipping in the middle, you will need to turn the truss rod clockwise.
Attention: The absolute most important thing to remember is to apply adjustments in very small increments.
We're talking a couple of minutes of angle at a time. Adjust the rod and check for effect. If you deem it needs more correction, keep going until your neck is near flat.
Keep in mind that most guitars prefer a slight relief in the neck, so it might not be a good idea to go for a perfectly flat neck. If you are unsure whether your guitar belongs to this category, check your user manual or contact the manufacturer.
Lastly, if your neck needs adjustment but the truss rod won't turn, don't force it. At this point, it is best to take the instrument to a professional luthier and let them deal with it. If you decide to force it, chances are the rod will snap and then you're in real trouble.
Nut Filing or Boosting
A nut is a fairly simple component that plays a major role in how playable your guitar is going to be. This little piece of bone or synthetic material determines the height of the string.
Sometimes, you will need to make adjustments to the nut in order to properly set your action. These adjustments will come in form of boosting or filing a nut.
In other words, you are either lowering or elevating the strings. The main thing to keep in mind while performing any of these two tasks is that you have a pretty small margin of error to work with. With that said, let's talk about the proper ways of adjusting the nut.
Nut Filing
In order to lower the string height, you will have to get some nut files. A lot of times, this is something you should let a luthier do rather than making it a part of your guitar maintenance routine. You won't do it often at all and it has to be just right, not to mention how precise of work it is.
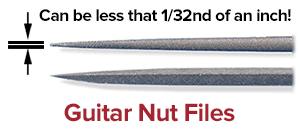
These are sold in packs which are designed for specific string gauges. Using this method removes most of the guesswork.
Before you start filing the nut, your guitar needs to be 95% set up. That means that the neck is straight, bridge fully adjusted as well as the saddles and strings installed.
Set the guitar on a flat surface so that the neck is fully supported. You want the guitar to not move at all, if possible. Start from the low E string and remove the string from the nut. Take the adequate nut file and start filing the slot under a slight angle towards the headstock.
The key is to remove small amounts of material and check if the string height is good enough. If you overdo it, you will have to replace the nut.
To check if the height of the strings is correct, put the string back into the slot and press down at the third fret. What you are looking for is any room between the string and the first fret.
If there is too much space, keep filing. You generally want a very small gap between the string and that first fret.
Once you have done this for the low E string, repeat the process for the rest of the strings. Anyways, you can learn all there is to know about nut files here, but really it's probably best to offload this responsibility to a professional.
Nut Boosting
Boosting a nut often times requires adding material to the base of the nut. For this, you will have to remove the nut from the guitar.
Due to the nature of this process, and the fact that it's extremely easy to make a mistake, we strongly suggest that you leave this type of repair to professionals. Very few guitar players in general attempt to boost a nut, no matter how experienced they are.
Bridge Adjustments
Making adjustments to the bridge of the guitar is necessary in order to get a good intonation.
Improper intonation is easy to recognize. Tune the guitar with a decent guitar tuner and play a chord. If the guitar sounds out of tune, check every string again. What usually happens is that your tuner shows perfect tuning while the guitar still sounds out of tune.
Recognizing The Problem
To be completely sure, there is one simple method you can use. Plug the guitar into your tuner and make sure that the string you are checking is in tune. We will take low E as an example.
Play an open string and check the tuner. It will show you the E string is in tune. Now press the 12th fret on that string and check what the tuner is showing you. This an octave so it should be the same note.
Making Adjustments
If it reads E, intonation on that string is fine. However, if it reads half a step or more, up or down, you will have to adjust the saddles. If the reading on the 12th fret is too high, you have to lengthen the string by moving the saddle back.
Similarly, if the reading on 12th fret is lower than your target key, you will have to shorten the string by moving the saddle forward.
Once you make an adjustment, the open string will be out of tune. That means that you have to bring it back to the desired tune before checking if everything is done properly.
Make sure to always apply small adjustments and check your work frequently. Different guitars come with a different bridge and saddle designs. Most common type of saddle will have a screw in the back which is used for these types of adjustment.
Long-Term Guitar Storage
If for whatever reason you know you won't be playing your guitar for an extended period of time, the best thing you can do is pack for long term storage. This is a process that will ensure no damage is done to your instrument while it is tucked away somewhere.
Here are the necessary steps you should take.
Get A Hard Case
The best way to store your guitar for longer periods of time is to use a hard case. This creates a controlled environment for your instrument, which you can setup in a way that ensures long-term protection.
On top of that, a hard case protects the guitar from any physical damage that can occur.
Release Tension
Before storing your guitar for good, detune every string about a full step. Doing so releases the tension on the neck while still keeping it somewhat supported.
Some guitarists like to remove the strings completely, as that only leaves the neck under the pressure of the truss rod.
Get A Humidifier
Humidity is a real concern for long-term guitar storage, even if you use a hard case. Depending on where you live and the ambient conditions of the storage place you plan on using, chances are that humidity won't be optimal.
A humidifier eliminates this risk and keeps your guitar safe from any kind of damage.
Inspect The Guitar Occasionally
Checking up on your guitar from time to time is a good way to notice any potential problems before they become serious issues. You can do this once every month if possible.
Other than that, expect the guitar to need a complete setup and intonation job once you decide to pull it out of storage for use.
Conclusion - Guitar Maintenance is No Joke!
Maintenance and care are absolutely necessary for the health of your guitar. It is as important to your enjoyment as learning how to play guitar in general.
Most of the tasks we have talked about today take a little bit of time and effort to perform. Ignoring your guitar can only lead to poor performance and even damage to the instrument.
Depending on how experienced you are, some of the repairs in this guide might require additional research.
However, learning everything you need to take care of your guitar is an investment of time that is guaranteed to pay off in the long run. Taking guitar maintenance seriously will save you tons of money, time, and stress over the lifetime of your instrument.
Jared H.
 Jared has surpassed his 20th year in the music industry. He acts as owner, editor, lead author, and web designer of LedgerNote, as well as co-author on all articles. He has released 4 independent albums and merchandise to global sales. He has also mixed, mastered, & recorded for countless independent artists. Learn more about Jared & The LN Team here.