
Autotune is the perfect example of a signal processing method that can be used in overdrive as an effect or used properly in a transparent way to improve a performance. More artists than you'd realize use this tool undetectably, while others make it very obvious.
Take artists like Cher or T-Pain, or even Lil Wayne when rapping, who nearly sound like robots during their songs. It's my opinion that the 2010 decade will be considered a "dark age" of music, partially due to this effect that many artists will come to regret in the future.
Then you consider all of the artists you think aren't using it. Let me tell you, they all are, but their mixing engineers are doing such a fantastic job with it you wouldn't know. The main contributing factor to an "invisible" autotune is a great vocal performance.
In order to push the effect into overdrive you have to purposefully have a bad performance to a certain degree, which is why it works so naturally well for rap artists in terms of singing to the correct pitch.
There are three levels of autotune, as far as I see it:
- Purposefully too much - like Cher, T-Pain, and Lil Wayne
- Too much needed - modern Pop and Country music
- The perfect amount - every other genre that you don't notice it in
The only difference between the second and third stage is how good of a vocalist the artist is. Most pop artists are selected based on their overall marketability (looks, ability to perform, above average vocal talent) as opposed to being chosen based on a supreme skill in singing.
I'm going to show you how to achieve all three stages, from sounding like a robot, to sounding like a synthesizer, to undetectable perfection.
What is Autotune?
Autotune is an audio signal processor tool originally used to correct off-key pitches in vocal performances (or any other instrument). It's also used as a sound effect applies pitch correction so aggressively that it sounds unnatural and synthetic.
The term Autotune has become synonymous with pitch correction, but it's actually a trademarked word and tool created by Antares Audio Technologies. Many DAW plugins exist that all have their own names and are referred to as such, but the effect is now commonly and simply called "autotune."
While disguising off-key pitches by slightly adjusting them to lock on key was the initial intention, Cher changed pop music for every with her 1998 single Believe. It uses the effect over-dramatically and inspired musicians like T-Pain to make it their signature sound.
How to Autotune
In this section I'll be telling you exactly how to use autotune, but I'll do it from the perspective of polishing an already great vocal performance. The key to having a transparent and musical use of this plugin is to create as best of a vocal track as possible.
This usually means singing the same section of a song dozens of times and creating a "best of" composite track. Only after the absolute best performance has been pieced together from many takes should you fix the final errors with pitch correction software.
Note: Any vocal recording or instrument you want to use pitch correction on must be a mono track. Stereo tracks don't work out. It also needs to be free of reverb, delay, and other audio effects.
1) Apply the Plugin to the Track & Familiarize Yourself With It
I have to assume you know how to use your digital audio workstation software and how to add a plugin to a track in the multitrack. What I can't assume is which plugin you'll be using. In this case I'll be showing you the Logic Pro Pitch Correction plugin. They all work the same but look different.
Though I'll show you Logic Pro's default plugin, I'm going to use terminology that's more likely to appear in all of the plugins. You'll be able to figure out what's what, since I give several names for each parameter you can adjust.
If you aren't familiar with the settings at all, please scroll down to the next main section of the article called Autotune Settings. I define each setting and also provide some suggested starting points for the three levels of pitch correction mentioned above.
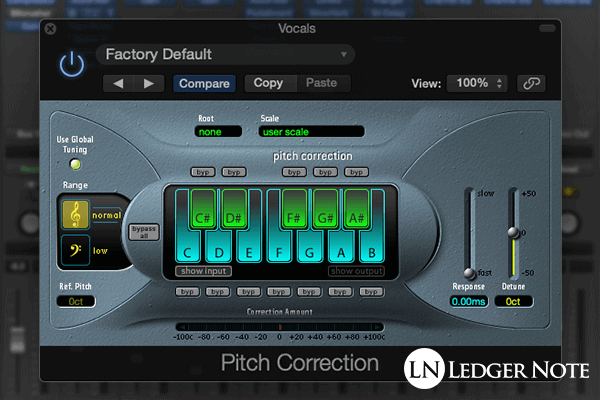
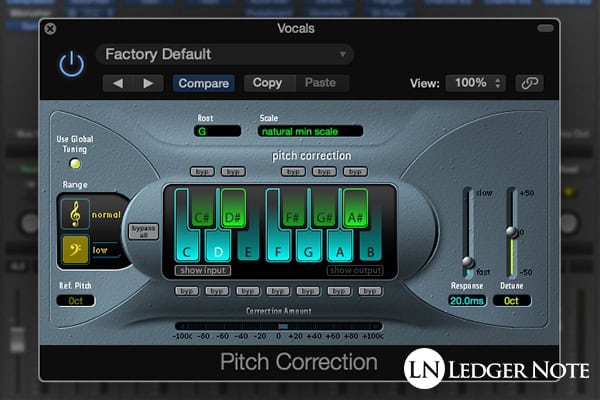
2) Select the Key, Scale, & Input Type
You'll typically have two choices. You can manually select a key (like G Minor) and a scale (Melodic minor scale), or you can punch it in manually on the provided keyboard. Sometimes, instead of a key they'll ask you for the root note of your scale, which would be G if using G Minor or G Major.
If you choose a key and scale from the list, you'll still want to adjust which notes are available as targets for tuning on the keyboard. Sometimes vocals doen't use all of the notes in a scale and you don't want them available, especially if a performance is extra "not good."
Alternatively, if you're going for the goofy robot rap vocal sound then choose the chromatic scale, which means all possible notes are available as pitch correction targets.
3) Choose Your Retune Speed
Now that you've defined the allowable notes for the effect, it's time to make it actually work. We're now going to focus on the retune knob or slider. A slower speed, like 400 ms to half of a second, will be completely undetectable but entirely too slow to even do anything in most cases.
Loop the vocals in solo mode (so you can only hear the singer) and start the retune at the slowest amount allowed. Slowly increase it and you'll begin to see the meter show which note is being detected and how sharp or flat it is in cents. That amount is how much pitch correction needs to be applied.
The retune speed defines how quickly it applies that amount of pitch correction. So if you need to slide a note up by 50 cents, that can occur instantaneously at zero milliseconds, or over 100 ms, as examples. You'll have to choose the right amount that provides the sound you want.
For electronic music, you may want it to be slightly noticeable. For the robot effect set it to zero. For a transparent use of the effect, you'll have to toy with it, but it'll be a slower setting than faster. It's impossible to tell you what the right amount is. You have to use your ears!
4) Decide How Perfect You Want the Vocals to Be
Regardless how quickly you're "snapping" to the correct pitch, you have more choices to make about how impeccable and perfect you want the vocals to be. No human can hold a perfect note. Even the best will waver by a few cents. If you remove that wavering, it will sound unreal.
If you want to add the human element back into the vocal track, use the Flex Tune option if it's available. Logic Pro's Pitch Correction has no such option. It allows the vocals to be off-pitch by the amount you define, basically telling the processor to not change the pitch if it's "close enough." A small amount of this can bring your track back down to reality.
Now focus on the Humanize knob if you have it or something similar. It tells the plugin to hold to a specific note if the vocals start to waver too far, rather than correcting to a different, unintended note. Think of it like a release on a compressor. Use this when your singer holds onto notes for a long time at the end of phrases.
Natural Vibrato is another option that's not always available. It detects when the vocalist is using purposeful vibrato and allows you to increase or decrease the intensity of it. In my opinion, I wouldn't bother using this. This is a choice that needs to be made while recording the vocals.
5) Unsolo the Vocals & Tweak in Context of the Full Mix
This is your last step. You want to unsolo your vocals so you hear the backing tracks, too. Now listen to your work in the context of the full mix. From here, the only thing you'll likely want to tweak is the retune speed.
For electronic-based music like dubstep or EDM, you may even want a slight robotic sound. For classical, jazz, rock, or pop, which are more organic sounding genres, you'll want it to be less noticeable, so you'd choose a slower retune speed.
From here, your vocal's pitches may sound great, but you may still have other issues with the tracks. Check out our article on how to mix vocals to get a walkthrough that will revolutionize your quality. You'll want to apply those principals on every vocal track, every time.
Autotune Settings
Now I want to do two things. I want to define what each of the settings on your plugin does, and I want to provide some starting settings where possible that match each of the three styles of pitch correction I mentioned before.
Pitch Correction Options
Each pitch correction plugin with have various parameters (knobs) you can adjust. For the most part you'll be confronted with five options:
- Key, Scale, & Input Type
- Retune Speed (Response Time)
- Flex Tune (Smoothness)
- Humanize (Release Time)
- Natural Vibrato (Vibrato Adjustment)
These are what they're called on the official Autotune plugin and are (typically) what you'll find on the other ones, even if they're renamed to a degree.
Key, Scale, & Input Type - Without telling the software which key and type of scale you're using, it won't know which pitches to adjust towards. You can choose these from a selectable list (like major scale, harmonic minor scale, etc.) or punch it in yourself on the available keyboard layout.
The input type will vary in complexity from simply offering the two choices of Normal (higher vocal registers) or Low (Bass and Baritone). Some will actually let you choose from terms like Soprano, Tenor, Alto, etc. This just helps the software expect certain octaves so it can process faster and more accurately.
Retune Speed (Response Time) - This is measured in milliseconds and will let you go to zero, meaning instantaneous (how you get the robot sound). This speed controls how quickly a bad note is retuned to the correct one. If you set it too fast it will sound obvious and come with glitches as well.
Most of the time you will want subtlety, so you'll use a slower value so that the listener doesn't detect the changes. This is how you'll achieve a natural sound, while the faster times will begin to sound "too good," and if the performance is bad enough it will sound unnatural.
Flex Tune (Smoothness) - This kind of option isn't always available. Think of this option as adding smoothness to a processed track that required a faster retune speed due to how off pitch the vocalist was. It tries to smooth out the transitions and make them sound more gentle and less detectable.
You may think this would fight against the retuning but it's more like adding an allowable margin of error. It basically lets you decide that if a note is close enough to the correct pitch, to leave it alone and not process it. It helps you maintain the human element to the track rather than making it unnaturally perfect.
Humanize (Release Time) - I like to think of this as a release time (similar to what you find on a compressor). It tells the pitch correction to hold fast during long notes. If your vocalist doesn't hold out long, sustained notes at the end of phrases you may not need this.
What it's for is to correct unintentional vibrato during long notes. When the singer's voice wavers by accident, it won't be "pitch perfect" like purposeful vibrato is. If the note wavers too far it'll snap to a different note. This option keeps that from happening.
Natural Vibrato (Vibrato Adjustment) - You won't always find this option either. It's kind of the opposite of the Humanize option above in that it can introduce vibrato that is otherwise missing. It takes talent to sing vibrato and to do it correctly. If your singer can't do it but the song calls for it, this option can add it in at varying amounts. It can also reduce the intensity of the natural vibrato.
Autotune Settings for Singing
Above I mentioned the three levels of pitch correction, which are basically "complete overkill," "too much is needed," and "perfect and unnoticeable." Here are some starting points to you can use, but please note that you'll have to adjust them to taste for each and every vocal track. What's needed will change each time!
For a purposefully over-dramatic use of the effect like Cher or T-Pain, set the retune speed and flex tune speeds to zero. This will snap the notes instantaneously to the pitches they should be at. Set the humanize knob to the maximum and reduce natural vibrato as much as you can.
This will cause the vocals to sound like a synthesizer. You can make it even more dramatic by purposefully singing off pitch when recording. You should be close but nowhere near perfect in order to make the plugin really put in the work to re-pitch each note.
For the current expectation for pop and country music, try setting the retune speed around 5 ms to 15 ms, with barely any flex tune. A little bit is good to keep the track sounding realistic. What you'll end up with is a pitch-perfect track but one that doesn't "snap" quickly to the notes so it still sounds like a human performance.
For natural, realistic sounding autotune, you'll want a slower retune speed (set it to where you barely hear it and then back it off a bit more) and maybe 10% flex tune to allow some wavering. That's it. Leave the other settings alone.
Pro-Tip: You can add pitch correction to only parts of a performance if you don't want to use it much but certain parts definitely need fixing. Add the plugin to an automation track with a very slow retune speed, then on the parts you want to fix, crank up the retune speed so it actually acts on the vocals quickly enough to correct the pitch.
The Differences Between Autotune Plugins
I mentioned there being a lot of pitch correction plugins, which may have left with the questions of which is the best and what are the differences. They all do the exact same job, though some have more options, while one has an unbelievable amount of extra choices.
Heres a list of some of the most popular pitch correction plugin choices:
- Celemony Melodyne
- Antares Auto-Tune (various versions)
- Wave Tune (various versions)
- Zynaptiq Pitchmap
- Melda MAutoPitch
- Synchro Arts Revoice Pro
- Izotope Nectar
- Logic Pro Pitch Correction
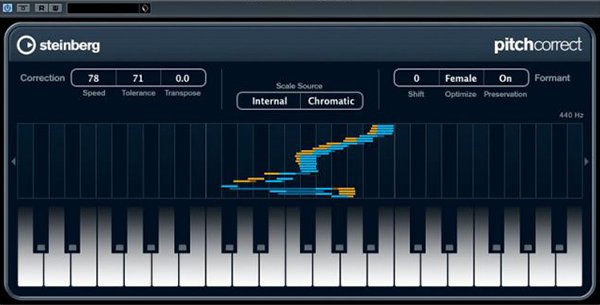
- Steinberg PitchCorrect
- Cakewalk/Roland V-Vocal
- Mu Technologies Mu Voice
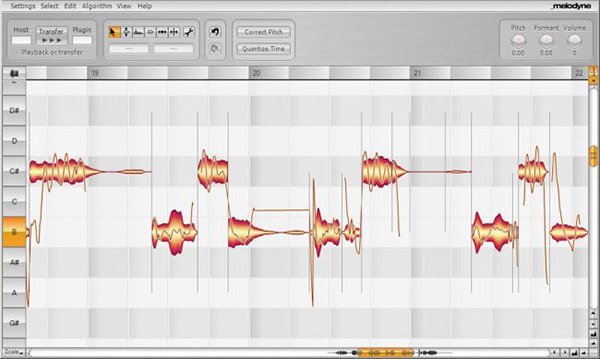
There's a lot more, but those are your most popular choices in no particular order other than Antares Auto-Tune being the most popular. Celemony Melodyne is another great but costly choice that provides some unbelievable choices, especially with the visual user interface. Look at this thing:
The differences here are that the paid versions will have more choices, and as you move into the "Pro" versions of each one they'll introduce more options for you. Many users will find they don't need the most advanced choices, especially when not adding pitch correction in real time.
Pro-Tip: Melodyne is very transparent. You can correct the pitches and tweak the cents very close to perfect and bounce the track. From there you can then apply Autotune to the "almost perfect" track and end up with a godly vocal performance that sounds very natural.
That's How to Use Autotune!
The process is very simple. The challenge is understanding what each setting does, because the short names can't possibly be self-explanatory due to the complexity of the software. Once you understand what the knobs do, the rest is a piece of cake.
With our walkthrough and explanations above, you should have know how to use autotune as well as any professional. Finding the correct settings is as simple as slowly turning the knobs and using your ears. It's truly a revolutionary plugin, not only in its power but in its simplicity.
Jared H.
 Jared has surpassed his 20th year in the music industry. He acts as owner, editor, lead author, and web designer of LedgerNote, as well as co-author on all articles. He has released 4 independent albums and merchandise to global sales. He has also mixed, mastered, & recorded for countless independent artists. Learn more about Jared & The LN Team here.