

The difference between solid production and perfect production all boils down to which recording engineer is willing to go the extra mile to take advantage of those last diminishing returns.
Most of the time, the temptation is to grab your best mic that's probably already plugged in and on a mic stand, stick it in front of the vocalist, and press record. The reality is that if you've got your room's acoustics under control, your patchbay all set up and ready to rock, then this can be a fast process.
But that's not how you get the best results.
There are a lot of things you can't just "fix in the mix" or let the mastering engineer deal with it. You can polish an amethyst all day but it'll never become a diamond. It's all about what you start with. And that's what we're focused on here... it's all about the tracking stage today!
We've broadly touched on some of this in our discussions on recording and mixing vocals and recording vocals at home. But those were more of summaries with a larger focus on mixing.
Check them out for sure, but if make sure you read this quick list too to make sure you're working with the best possible material once you start mixing. There's no going backwards.
You have to get it right the first time. And you can make sure you're doing that with our...
13 Vocal Recording Tips
Let's not waste any time. Jumping right into number one...
1) There Are No Constants
Like we mentioned before, the temptation is to keep all of your "best" gear connected and ready to be used. And then you use it over and over. But there are no constants. Even if you're recording the same vocalist over and over again, each song will be different.
You've got to get this kind of thinking out of your head. There's no best mic to use all of the time. The same goes with other pieces of gear in your signal chain. The cheap preamp might do better with this mic and singer than your best mic preamp.
The same goes with EQ and compression when you start mixing. Don't use the same plugin templates each time. There's no time-saving short-cuts because there are no constants!
2) There is No Go-To Microphone
Ultimately you'll have a microphone cabinet full of condensers, dynamics, and ribbon mics that all have different flavors. Some will be dark, some will be bright. Your familiarity with your gear will allow you to choose the appropriate mic based on it's flavor based on two things:
- The voice of the singer
- The feel of the song
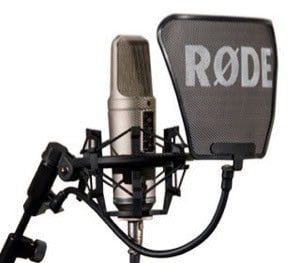
For the happy pop song with vocals by the girl with the high-pitched voice might do best with your Rode NTK. But the smooth yet sad R&B song with the deep voiced male vocalist might do better with your Oktava MK-319.

If you aren't sure which to use, then bust them all out and try them out. As we've talked about here, there is no one best mic for vocal recording (there are no constants!).
Don't be afraid to spend the extra time, because in the end what survives is the final product. That's what will reflect on you as other professionals listen and consider working with you.
3) You Can't Fix the Vocalist's Technique
It's true that you'll have to act as a producer to some degree. You'll need to help the vocalist be comfortable in the studio, explain to them the process, etc.
But what you can't do is coach them on how to sing within five minutes. It's up to them to have performed their vocal warm up exercises. It's up to them to be familiar with their own voice and to have practiced.
This is the one thing you don't have to worry about. It reflects on the singer and the band. You can't cram a decade of knowledge into someone's brain in a few minutes before you press the record button, so don't worry about it. We have some tricks we can apply later to help them out that we'll get to next.
4) Don't Punch In. Create Composite Takes
The technique of punching in is silly in my book. Not only is it a time waster but it's glaringly obvious in the final product. It's like being completely sucked into an amazing movie and then some super crappy CGI moment occurs and you're back to being "the person watching the movie" instead of having an adventure.
Punching in is the process of building out verses, phrases, whatever, by abruptly cutting the previous take before the bad part and then starting the next take at that moment. It ruins the flow of the energy and timing. There's a similar process called creating comps that's much better.
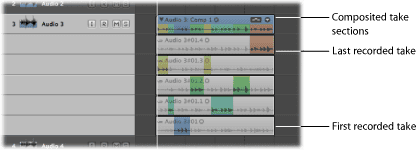
Comps are "composite takes." What you should be doing is having the vocalist run through their parts several times completely, even if they mess up. They should just keep going.
Eventually when they get a "good take" they'll relax and you can get a few more runs out of them. What they don't realize is that you've saved every single one of these takes.
They'll go home and you'll revisit the song and start cutting the actual best chunks out of the different takes and melting them together into an otherworldly take. You'll have to take your time with cross-fades, level matching, and pocketing, but in the end you're going to blow everyone's minds.
It will sound smooth too because you didn't punch in. The flow already existed because these are pieces of entire takes.
5) Don't Let the Vocalist "Eat the Mic"
I hate working with cocky vocalists who can't take direction. Here's something I've heard more than once:
"If I'm going to rap, then I'm going to get as close to the mic as possible and be as loud as possible."
If the mic was small enough, I could guarantee some people would put it in their mouth. Here's a quick list of the problems associated with this:
- The Booming Proximity Effect
- Crazy Loud Sibilance and Plosives
- Clipping over the Mic's SPL Threshold
- Humidity Damage to the Mic's Diaphragm
The list could go on. The point is that you ultimately get an unmanageable recording that can't be salvaged. If you've listened to enough rap you'll even hear this kind of thing make it onto big budget releases because the rapper knows better than the engineer.
There are two ways to stop this from happening. Using them in combination works the best. First, place a piece of white tape on the ground and tell the vocalist not to let their feet get past that mark. But then they'll lean forward, so your second weapon against this is a gooseneck windscreen.
They'll stick their mouth as close to it as possible, but since it's sticking out far from the mic, you'll still be fine. Also, you'll probably want to turn the mic to the left or right a bit so that they're forced to record off-axis. This will eradicate clipping and plosives.
6) Vocal Booths Are Small For a Reason
The reason is that smaller spaces produce better vocals. You get less smearing delays, reverbs, flutters, and no echoes like you get out of larger rooms (even those with acoustic treatment). Large rooms are designed to maintain an acoustic footprint. Vocal booths are meant to have none.
The trade off is that you end up dealing with bass issues, especially if you haven't installed bass traps. The obvious answer is to install acoustic treatment and especially bass traps in the wall-to-wall corners, but even then you'll have a bit of an exaggerated bass response.
This is a worthy trade-off that can be solved in the mixing stage. It's easy to measure or learn the bass response of your booth and EQ it out in a way that it's not noticeable.
If you don't have a small space you can use with acoustic treatment such as when recording at home, then you'll be better off to either build a few baffles to act as a booth or purchase a reflection shield as seen below:
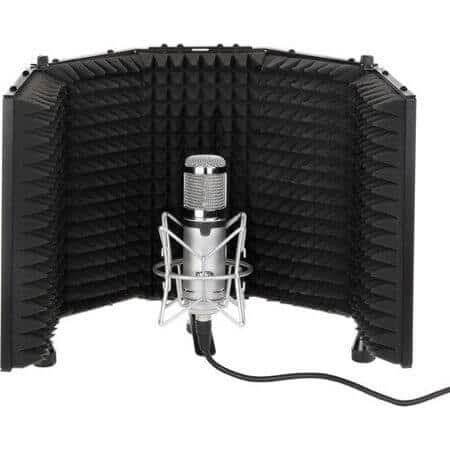
These aren't perfect solutions but they'll get you infinitely further to perfection then recording without them. Your rooms acoustics have primacy over every other factor when it comes to recording a clean signal. That's not a fun reality, but it's true.
7) Decouple Your Mic From the Ground
When I say to decouple your mic from the ground, that doesn't mean placing it on a mic stand. The stand is still connected to the ground. Even if you're careful not to bump into it, you'll still be moving your feet around and shifting your weight. All of this creates low frequency rumbles that can end up in your recording.
The first thing you want to do is make sure you're using a shockmount. This is a device that suspends your microphone in the air with rubber bands that help diminish these vibrations before they hit the mic. You can see them in the pictures above.
The second thing you'll want to do is have rubber pads on the bottom of your mic stand. If your stand doesn't have pads, you can put mouse pads underneath or get a child's play mat to place it on. Even a rug is better than a hard surface.
8) Use Reverb in the Headphone Mix
Your vocalist will be using headphones to hear the music they are singing with. The expectation is that you'll be able to feed their voice back into their ears live. Whatever they are singing into the mic is immediately available for monitoring right back in their headphones.
In this headphone mix, you can also add some reverb to the singer's voice without committing it to the recording itself. The purpose of this is to help the vocalist feel comfortable. You know how when you sing in the shower you sound a lot better than normal?
That's because the reverb hides the subtle qualities we are hyper-sensitive about from our own ears. We sound larger than life and that helps us relax and belt it out without being self-conscious. Offer that to the vocalist with reverb in the headphone monitor mix.
9) Use Closed-Back Headphones Only
Speaking of headphone monitoring, engineers and vocalists both screw this up. If the recording engineer doesn't set the singer up with headphone monitoring, then the singer will remove one side of the headphones so they can hear their own voice. If the recording engineer gives the singer open-back headphones, then the result is the same.

The result is that you end up with the instrumental bleeding into the vocal take. It probably blends in okay at first since it's at low volume and perfectly in time... until you start comping takes, applying compression, equalization, and time-based effects like reverb.
That's when you realize you made a giant boo-boo and you have to call the vocalist back to the studio and give them free time to re-record.
So make sure you're feeding their voice back into their ears and having them use the best studio headphones you have so there's no bleed (go with closed-back headphones)!
10) Set Up Then Re-Check Your Gain Staging
The process of gain staging is important to achieve the highest quality recording possible. You want to fill out all of those bits as much as you can without clipping.
Get your vocalist in front of the mic and have them sing like they intend to when you start recording. Make sure you're pushing enough gain out of the preamplifier to feed the compressor at the right levels (where the peaks are coming in just a little under 0 dB).
After your compression, apply some make-up gain again so that you're entering the recording interface just under 0 dB so the analog-to-digital converters are maxing out the bits.
In your DAW this is going to read -18 dB due to the difference between analog and digital measurements and headroom. Not even the world's best audio interface can undo clipping or interpolate extra quality for the converters.
Now, it's likely that there will be changes between the way the singer performs during the set-up and when you start recording. Double check everything during the first couple of takes while they are getting comfortable. You'll be real close after the initial set-up so it's just a matter of tiny tweaks from there.
11) Use a Cardioid Pickup Pattern Off-Axis
When you record a single vocalist, you're going to be best off using a cardioid microphone pickup pattern. This will record as much of the direct voice of the singer as possible while minimizing outside ambience or acoustic problems.
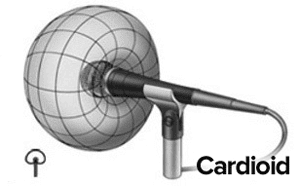
Also, don't point the mic directly at the singer's mouth. You can tilt it backwards a bit so it's aiming more at their chin, or you can turn it to the left or right a bit. What this does is makes sure the diaphragm isn't taking the full force of the sound pressure coming out of their lungs, which can be quite strong.
This will minimize plosive pops and high-pitched sibilance and provide a more level amplitude throughout the take. Your chances of suddenly distorting or clipping are reduced drastically as well. And we can solve that the rest of the way by...
12) Lightly Compress to Avoid Distortion & Clipping
The prevailing advice out there is to record vocals completely dry and only apply effects in the mixing stage. I recommend that you use a slight amount of peak-based compression on the way in.
By applying as small as a 3:1 ratio at a high threshold, you can combat any sudden loud peaks before they hit the converters and clip.
It's usually only a matter of one or two decibels that slip through and ruin a take, and all it would have took was an unnoticeable amount of compression to save the day. You're going to compress much more and lower than that later so it's not a big deal.
I'd even recommend placing a limiter in the signal path too (what is a limiter?, you may be asking). Stick it right at -0.1 dB as a final catch-all and you'll never have to worry about clipping. It won't produce any weird sounds because you set up proper gain staging anyways... right? (Right).
13) Equalization Basics
I'm going off task just slightly here, because some of you may choose to use hardware equalizers and do a little EQ on the way in. Here are some basics to get you started, but please make sure you're listening critically since you're committing this to the take!
Depending on the vocalist, see if your mic has a bass roll off switch. This can help with ground rumbles and plosives. If not, you can do the same with your equalizer.
Also, if you identify bad frequencies make sure you're cutting them instead of boosting the good ones. The logic behind that is too much for this discussion but trust me, try to cut far more than you boost.
Also, you should apply your EQ before a compressor so you're not compressing based off of frequencies you planned on cutting out anyways. And finally, you can side-chain a compressor to set up a de-esser if you can tell your singer is going to have sibilance problems.
Take These Tips for Recording Vocals With You!
If you take these 13 vocal recording tips and combine them with the tricks of the trade found in the two links at the top of this article, you'll be well on your way of extracting the maximum quality out of your gear and your vocalists. Remember us little guys when you hit the big time!
Jared H.
 Jared has surpassed his 20th year in the music industry. He acts as owner, editor, lead author, and web designer of LedgerNote, as well as co-author on all articles. He has released 4 independent albums and merchandise to global sales. He has also mixed, mastered, & recorded for countless independent artists. Learn more about Jared & The LN Team here.