
Nothing matters more than vocals. It doesn't matter if you're talking about music, podcasting, voice acting, podcasting, television and movies... What everyone focuses on is the human voice.
Of course, you know that. The question is how to mix vocals to the point that they compete with the quality of professional releases and productions. It's not hard once you understand the order of operations.
People spend a lot of money on recording gear and acoustic treatment trying to improve their quality, and that's good. But 50% of the battle comes in post-production with signal processing, otherwise known as mixing.
Let's go through the process from step one all the way through to the final polish. You can even work along in your digital audio workstation if you wish. I'd even recommend it. Let's do it. As you go through, there will be links to more of our articles where you can explore various concepts in deeper detail.
Step 1: Record the Highest Quality Takes You Can
This goes without saying, but the first thing you want to do is record at the best quality you can manage. That means busting out your best gear, making a ragtag DIY vocal booth if needed, or heading into the studio. You want your vocals coming in at an average volume of about -18 dB inside your software for proper gain staging and headroom.
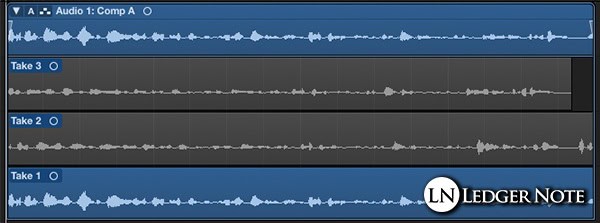
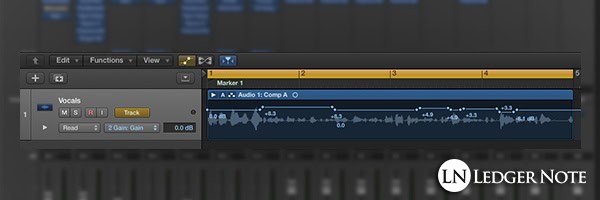
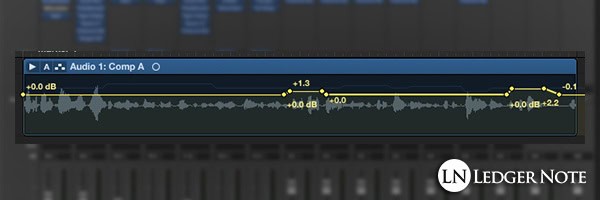
Don't record one take. You can loop a segment of the song you're ready to perform and then do as many takes as you want one after another. Your DAW will add all of the takes on the same track of the multitrack as seen in the image above.
In Logic Pro, for example, you'll see the dropdown arrow on the top left that you can click to collapse the takes, and it will label the main take as a "Comp," meaning composition, which I'll explain next. The point is to get as many recordings as needed.
Steps 2 through 5 should be done with the vocals in solo mode, meaning you can only hear the vocal track and not any of the other instruments. You need to hear all of the details of the vocals alone without interference.
Step 2: Create the Perfect Composite Track
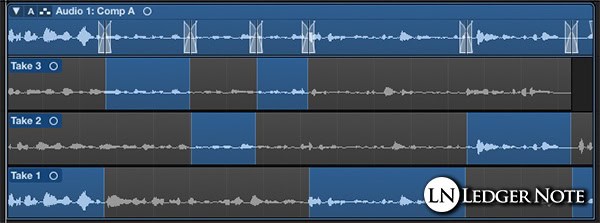
You don't have to choose the best take, meaning you don't have to stress about getting best performance ever in one shot. You can create a composite track, which is a Frankenstein monster composed of the best pieces of each take.
By clicking a sub-track and dragging the mouse, you can select the best parts of the various recordings. They will automatically have a crossfade applied to their volumes to make sure they blend seamlessly, though you may need to make some adjustments.
Now the topmost track shows the composite take, and when you're done you can click the top left dropdown arrow to collapse it all into one track on the multitrack for organization purposes. Now you have a track that's better than anything you could manage in one performance.
Step 3: Add Pitch Correction & Timing if Needed

Not everyone does this because most of the time it's not needed. But if your perfect composite track has a part where the timing needs to be adjusted, now is the time to do it. You can use a scissor tool to splice that part and then adjust it by a number of milliseconds forward or backwards to nail the timing.
After that, you can toss a pitch correction plugin on the track. A lot of people use Melodyne's Autotune but even the stock plugin from Logic Pro gets the job done. Choose the appropriate notes of the scale and how quickly it should adjust the pitch. Too fast and fierce and you'll sound like a robot.
My recommendation is to only fix what is needed (Our guide: How to Use Autotune). Autotune as a whole is going to fall out of favor eventually, so I'd avoid slapping it across the entire track like people do currently. Fads will make your music sound dated, ultimately.
Step 4: Fire Up the Noise Gate
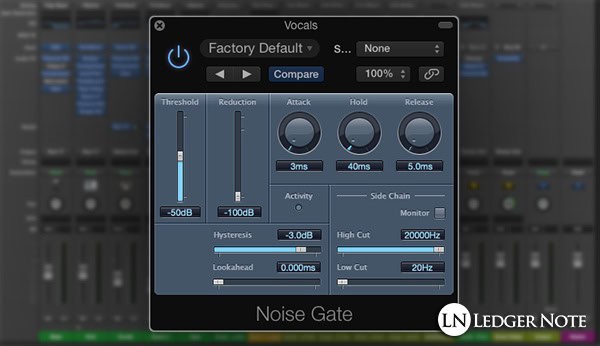
At this point it's time to give the first polish to the track by removing unwanted noise. The easiest way is to add a noise gate plugin to the track. You'll have to tinker with the threshold, attack, hold, and release to find the right settings.
What happens is, any time your vocals' volume dips below the threshold, it will gradually mute the track so no noise can slip through when the track is meant to be silent. Take care in setting this up. Click the link just above to read our guide if you need help.
Alternatively, you can apply an automation track from a gain plugin (as seen in the next step) and draw in a line that represents the volume, muting those silent regions manually. That's a pain, though. You should definitely get comfortable with a noise gate instead. It will save you tons of time.
Step 5: Add a Gain Plugin & Automation Track
At this point, there's no noise in the track, the timing is good, and the pitch is good. But the volumes might be way too inconsistent. Maybe the vocalist was swaying away from the mic, causing volume fluctuations. Now we'll fix that.
Add a gain plugin to the track and fire up your "automation track." This lets you tell the computer how to change the variables of the gain plugin automatically so you're not stuck with one setting. The parameter you want to change is the gain itself, which is kind of like another volume fader.
You want to automate the gain plugin and not the volume fader, because you still want access to the fader. If you automate the fader here, you won't be able to use it later when you start balancing levels across the whole track. This is a fancy trick that will save you a giant headache later.
Some of what you're looking to do here is reduce the volumes of when the vocalist breathes in too loudly. You also want to identify segments of the track where the overall volume is too low or too loud and adjust those.
By the end, you want the general volume levels across the track to be fairly consistent, but not perfect. We have a method (compression) to finish it off better later, so don't get too caught up in that in this step. You just want equal intelligibility in the words that are spoken and a level volume so you don't fall into the trap of over-compression later.
Step 6: Set Up Gain Staging in Full Context
Now you want to dig into gain staging, which means two things at this point. First, you can start to adjust the volume of your vocals using the fader to a proper level in relation to the rest of the tracks. You can tweak the volumes and set up the panning of all of the instruments until you end up with something that resembles a balanced song.
You need to do this so you can begin to hear how the frequency range and characteristics of your vocals are clashing with the other, less important instruments. While doing this, don't worry about perfection. Just get it closer than it was so it starts to sound balanced and tasteful.
If you're completely happy with your main composite take of vocals, this would be a good time to bounce it to another track and remove the other ones from the project. Staying organized is one thing but the main benefit is to reduce the CPU and RAM usage of your computer so you don't start bogging down later. You don't have to do this though, if you have a really fast computer.
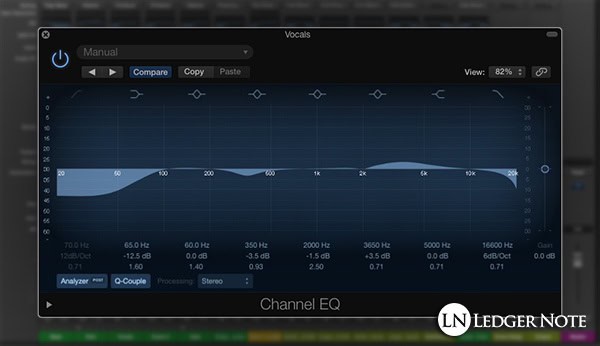
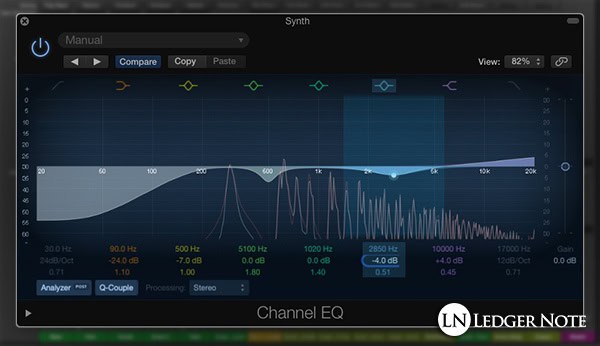
Step 7: Use Equalization to Shape the Vocal Tone
Now that your vocals are set up and able to be compared to the rough mix as a whole, we're going to go back to working with the vocals in isolation, but don't solo them any more. You want to hear the full rough mix as you do everything else from here out.
Add a parametric equalization plugin to the vocal track. What you're going to do now is make broad sweeping changes and surgical EQ changes. An example would be to add a low roll-off starting around 80 Hz and letting it drastically reduce the volume down to 20 HZ. This will knock out some hum, mic stand noises, air conditioner rumbling, plosives, etc.
You'll also want to listen for specific problems. You probably have a muddy or boomy sound, which means you can use a wide Q and reduce the volume by around 5 dB in the 200 Hz to 500 Hz range to fix it. Find problematic frequencies to reduce in volume except those high pitched squeals called sibilance. We'll fix those next.
Equalization is an art form and takes practice. If you need more insight into what to do and how to do it, take a read of our Mixing with EQ: 23 EQ Tips article or more specifically our How to EQ Vocals one. It'll help you find your footing with boosting, cutting, sweeping frequencies, Q settings, etc.
This is something you have to get good at as you continue to mix vocals. If you're brand new, try to copy the image above and then compare the results to the original track. You'll hear the changes and start to associate them with frequency ranges.
Step 8: Check for & Apply De-Essing with a De-Esser
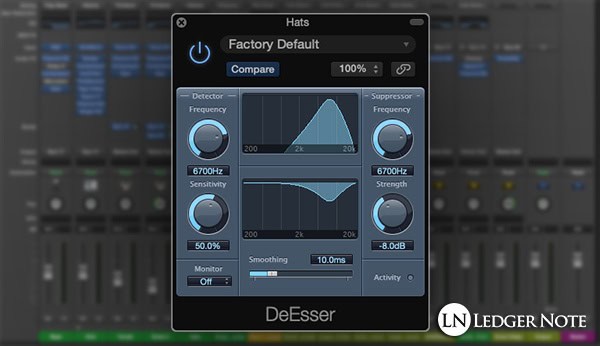
Your vocal track is now sounding pretty pristine. But you may have instances where, when the singer made "S" or "T" consonants, there's a loud, sharp, high pitched sound coming out. It happens to us all all of the time but microphones pick it up extra loud. The solution is a tool called a De-Esser (or DeEsser).
What a De-Esser does is locate these loud, sharp parts and reduces their volume. It's a type of compressor that focuses on specific frequency ranges. So like the EQ step above, you'll have to locate the problematic frequencies to target. The easiest way to find them is to fire up another EQ plugin and sweep a tight Q, 10 dB boost around until the sharp sounds get even worse.
You don't need to hunt through the whole frequency spectrum. The frequency band these problems occur in are typically 3 kHz to 6 kHz for males and around 5 kHz to 8 kHz for females.
The reason we do this with a de-esser and not the EQ plugin is because the de-esser only reduces the volume of these frequencies when they get too loud and otherwise doesn't touch them. An EQ would reduce it for the length of the entire track even when it's not being problematic for us, which is bad.
Step 9: Apply Vocal Compression (The Core Difference)

This is the step that will make the biggest leaps in terms of making your vocals sound professional. But all of the clean up and balancing had to occur first. That's because we're about to use a compressor, and you don't want bad noises or bad frequencies to trigger the compressor. So we removed them first.
In simple language, what we're about to do is crunch the peaks of the waveforms down so that the loudest parts of your vocals are less loud (the entire point of vocal compression). This makes the quiet parts seem louder and raises the average volume of the track. This will increase the intelligibility of what's being sung so the listeners can hear it better and stay focused on the voice.
You have four main settings to deal with:
- Threshold
- Ratio
- Attack
- Release
The threshold is the volume level you choose where if the volume of your vocals goes past that, it'll get turned down in volume. Start with your threshold around -20 dB for now. Let me say that you don't want to squash the vocals, but you'll probably want to use more compression than you expect. Listen in context of the rough mix as you do this.
Once you're set up with the other three options, you'll slowly reduce the threshold until you achieve somewhere around 5 dB to 10 dB in gain reduction. You'll have to choose by taste and it'll change on each track. Whatever you end up with, add that average amount of volume back with the Make Up Gain knob.
The amount the peak volumes are turned down is called the ratio. I recommend starting with a 5-to-1 (or 5:1) ratio, which means for every 5 dB your volume exceeds the threshold, it'll be turned down until it only exceeds it by 1 dB. So for 10 dB the volume would drop to 2 dB. This keeps the changes smooth and "musical."
The attack is how quickly the compressor reacts when the volume exceeds the threshold. It does this gradually and smoothly. For rap vocals use the fastest attack you can. For singing vocals you may experiment with a slower attack up to 30 milliseconds or more for a smoother result.
The release is the same but tells the compressor how quickly to stop compressing when the volume drops below the threshold again. Typically a faster threshold is good for vocals, but please experiment so you start to hear how it works.
There are tricks like having two compressors in series where you compress harder on the first compressor and then a less amount on a second. You can also do parallel compression where you combine a compressed version of the vocal track with an uncompressed (or less compressed) version. You won't need that for now, but those are advanced tips to try later.
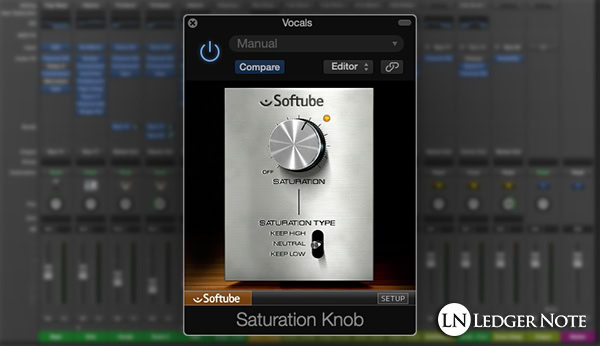
Step 10: Consider Using Saturation & a Limiter
Your vocals should sound as professional as they're going to at this point. Everything from here out is icing on the cake to make them sound fancier. You shouldn't have any crazy volume spikes. If you do it means you didn't do your gain automation right. But if it's only one or two parts, you can consider using a limiter.
A limiter is a hard threshold that says "no volume gets past this point." If you use one on an individual track, you don't want to block off more than one or two decibels tops, or it'll be obvious and you'll have distortion. It's not recommended, but you should know how to use a limiter because you'll need them in other mixing tasks.
An effect to consider at this stage is saturation. Saturation is an emulation of hardware mixing equipment that adds a pleasant and purposeful distortion that adds harmonics to a track. It makes it sound full, complex, and old school like you'd hear on recordings from the 1970's and prior. A slight amount sounds great even today.
Step 11: Add Spatial Effects Like Reverb & Delay
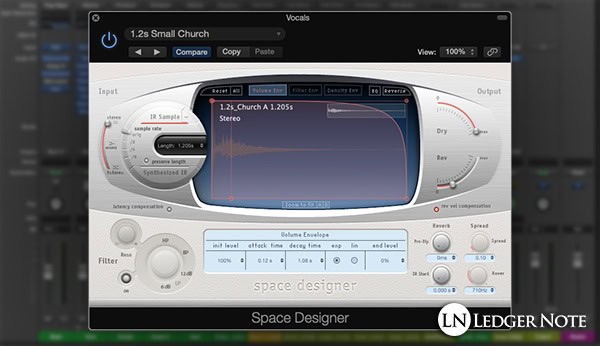
Everything is done at this point in terms of your vocal track itself. Now you're adding spatial effects on top like reverb and delay. Before you do anything, know that you want to do this on an auxiliary bus. Setting that up is easy but impossible to explain for every DAW software so you'll need to sort that out yourself.
What it does is send a copy of your vocal track to another track where you can add effects. The vocal track itself won't be heard on this track, just the resulting effects, which lets you do things like equalize the effects. This is hugely beneficial, which we talk about at length in our Mixing with Reverb article.
Depending on the song, you'll want either a short amount of reverb or a long reverb that rings out and is very obvious. The same goes for delay, which should be timed based on the tempo of the song itself. More advanced tricks include ducking these effects with sidechain compression. You don't have to worry about that yet but it will bring a lot of clarity to your mix as you start to apply that principal.
Step 12: Carve Out Room for the Vocals in the Mix
Your vocals are done! But you may still have some clashing occurring with other instruments. This is usually the snare, other vocals, guitar, or keyboard or synthesizer. Because your vocals are the most important, what you want to do is to make the other instruments get out of the way of the vocals.
You've already applied panning but that's not enough. You need to apply equalization to these other tracks. Your goal is to first identify the dominant frequencies of the vocals and then reduce those in volume slightly in the other tracks.
Usually the frequency ranges you want to pay attention to include the fundamental frequency from around 85 Hz up to 255 Hz. You'll use a low shelf or low roll-off EQ on the other instruments to take care of this. Then focus on the midrange band from around 1 kHz up to 4 kHz, cutting those with a wide Q and only about 3 dB of reduction at max.
Finally, focus on 5 kHz to 8 kHz where the presence and intelligibility for male and female vocals reside. You'll get the most gains by focusing here but still resist the urge to cut more than 3 dB or so, or you'll start to butcher the quality of the other instruments. There will always be overlap and there's no such thing as perfection. Tracks will always share frequency ranges.
Step 13: Automate the Volume Again in the Whole Mix
Your main vocals should sit well in the rough mix now, with the other instruments not clashing or distracting from the vocals. With the right volumes set and the right EQ and compression, you should have a lot of clarity happening.
Now you want to add some final touches. You want to automate the volume again with an automation track, and I'd still recommend doing this with another gain plugin rather than the automating the fader. Keep the fader free and usable!
What you want to do is draw attention to certain parts of the performance. Would the ends of certain vocal phrases sound better if they were 2 dB louder, or do they need it as the other instruments all build up in intensity? You're setting the final volumes here in relation to itself.
Step 14: Mix in Your Background Vocals & Harmonies
Finally, you may have background vocals, ad-libs for rap, doubling, or harmonies being sung. Just like in step 12, you'll want to EQ these to get out of the way of the main vocals. You'll want their volumes to be much lower, too.
Perhaps you'll pan them slightly, that's fine. But check your whole mix in mono so you can tell if they're still clashing a bit. When you compress these background vocals, compress them more heavily than the lead vocals. They'll be quieter and benefit from a more steady average volume.
What you want to do is go through steps 1 through 10 again for each background vocal. Now that you have your lead vocals and background vocals completely set up in isolation and in relation to each other, you should output both together to another auxiliary bus and label it "Vocal Bus."
Since the vocal tracks are in balance with each other, you can now simply use the fader on the vocal bus to treat all of the vocal tracks together as one stem. You can boost or cut the volumes of all vocals together while keeping their related volumes the same. This will help as you mix the rest of the song.
These Vocal Mixing Techniques Are All You Need
That's it. Most of this is extremely simple. There are a few steps where you might need a little practice and study, like with equalization and compression. But you'll have that figured out in no time at all.
Remember that this is an art form and a science, and nobody learns either nor masters them in one sitting. Your mixes will get better and better as time goes by and your ear training occurs. Now that you know how to mix vocals, all that's left is to do it over and over again and get better. But you should have great results already, much better than you had without this guide.
Jared H.
 Jared has surpassed his 20th year in the music industry. He acts as owner, editor, lead author, and web designer of LedgerNote, as well as co-author on all articles. He has released 4 independent albums and merchandise to global sales. He has also mixed, mastered, & recorded for countless independent artists. Learn more about Jared & The LN Team here.