

Spring reverb has been around for what is practically forever. Anyone who's been slightly involved in the music industry to any degree, especially guitarists, have heard of it. It's the oldest mechanical reverb around and still in use.
Of all of the different types of reverb, the spring is the most common by far in terms of manufacturing and ownership, but possibly the least used in studio engineering and mixing. How could that be? I'll explain it all below, including what it is, how we created it, and the best ways to use it.
If you're still kind of new to this whole thing, don't worry. You can play catch up real fast by skimming our article 'What is Reverb' and then pop back over to this one. You'll have a better footing, and you'll want it because we're going to dig deep and have some actionable tips.
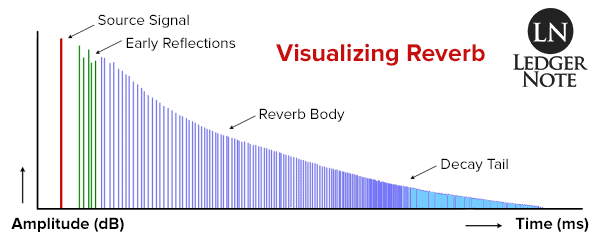
At the very least, make sure you understand the image above and how reverb plays out over the course of time. You'll hear the original sound followed by the early reflections. Each successive echo has a slightly lower volume as we pass through the "smearing out" of the reverb body and decay tail, until it's finally completely silent.
What is Spring Reverb?
Spring reverb is a sub-type of the reverb audio effect in which echoes of an original sound are played back in rapid succession with decreasing volume such that these repeats aren't heard as individual audio events but as a "smearing out" of the original sound.
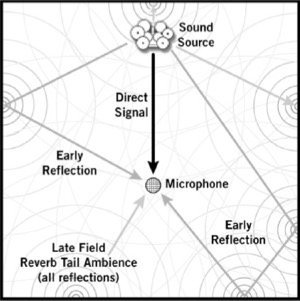
This mimics what happens in nature, when sounds reflect off of the walls, trees, rocks, and other objects in the environment. These thousands of reflections come back to the listener's ears or the microphone one after another extremely fast (on the order of milliseconds):
To achieve this sound, we originally would either travel to specific locations that emanated the reflections we needed (like a church cathedral or concert hall) or we'd have to build chamber reverberators in the studio. Both methods were extremely expensive.
Necessity is the mother of invention, and soon two new methods were created: the spring and plate reverb. Since plates were still pretty large, heavy, and costly, springs began to find their way into tons of studios and amplifiers, and are still there to this day. These are the two types of mechanical reverbs and were the first of the synthetic types.
How Does Spring Reverb Work?
Laurens Hammond was awarded the patent for producing reverb with a spring in 1939 and started using it in the Hammond organ by 1960. Soon it was released as an individual hardware unit called the Accutronics Type 4 (pictured below). It didn't take long for Leo Fender to pick it up and use it in his 1963 Fender Vibroverb amp.
Soon, tons of organists and guitarists were using this invention, which meant it began showing up in studio recordings and live performances. Plate reverb would have won the crowd over but springs were exponentially smaller and cheaper to produce and tuck away into instruments and amps.
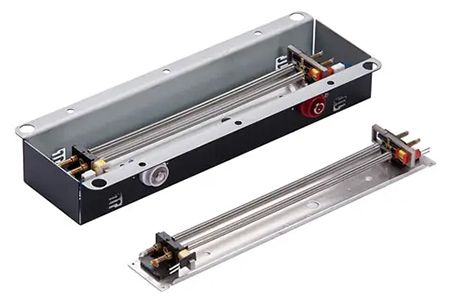
The way they work is that a literal spring (or several) is suspended in the air. One side is vibrated by an input transducer, just like a driver vibrates the cone of a speaker to produce sound. The other side is attached to an output transducer which then helps record or output the results of the vibration. The vibration is, of course, based on the sound being played by the instrument.
Fast forward the story and mechanical springs are still around and still used nightly on stage at gigs across the globe, but as old amplifiers break down and new digital reverbs are included, springs are losing ground to all of the other types of verb out there, whether in amps or in effects pedals. Why is that?
Spring Reverb Explained
Springs have a very unique sound to them. They sound far more metallic than even the big sheets of metal used for plates. When they first reached the public, they were exciting and unique. We'd never heard such a metallic, bouncy, and smooth sound before.
They managed to make a sound seem like it was coming from a physical space like all verbs do, but since they're synthetic we could also tell they weren't natural. This was a novelty and even when the novelty wore off there was hardly any other choice than to keep using them.
The metallic and bouncy sound is what has fallen out of favor. Think of those spring door stops that cats and kids love to bend and let vibrate. They have that sound, which is noticeably lacking in higher frequencies, accentuating the low-end and middle frequencies.
This coloration exudes a sense of warmth but can quickly build up to mud and a loss of clarity and focus in the mix. This happens because higher frequency wavelengths don't have the energy to vibrate the coiled spring as well as lower frequency waves do.
Besides the sound simply being less preferable to other reverbs, springs have some issues that are a part of the package and can't be avoided. Guitarists know that if you bump into an amplifier with a spring in it, it can cause the amp to output a horrendously loud sound of thunder. Similar effects can occur when the springs are driven too hard, albeit at a much quieter amplitude.
How to Use Spring Reverb Live & in Mixing
There are a lot of purists who idolize the past (for good reason) and want to emulate the old days. For that reason analog spring reverb still exists as do VST plugins and digital algorithms in effects pedals and amps. They're still very relevant. You never know when you'll get a client that wants it in a mix.
The main thing to remember about springs are that they are synthetic. You should never reach for it when you want to emulate the sound of a realistic room.
In a live setting or in mixing with a dense instrumentation, spring verb should be thought of as an effect used to bring attention to moments in time and to add color rather than as a way to emulate the natural reverb of a realistic physical space.
That means you don't want to crank that sucker up and keep it running the whole time. Keep it at lower volumes tucked underneath the instrument and general mix, bringing it up in volume during solos or special moments. If you try to make it prominent in dense mixes it's going to make a mess of things.
In more sparse arrangements it can be an "always on" effect but expect it to add a lot of bottom end to your sound. Not only will you gain a bouncy, metallic sound but you'll boost the low end and low mids. If you can run it in an effects loop and add an equalizer after it, you can better shape it to play well with your mix.
You can achieve that same concept when mixing by using an auxiliary bus. Add a send to your track or tracks to push them over to the bus, where you've applied your spring reverb and also a parametric equalizer after it. Here you can shape the sound of the reverb to not only carve out room for your instruments but also to reduce the impact of the low-end boost, if desired.
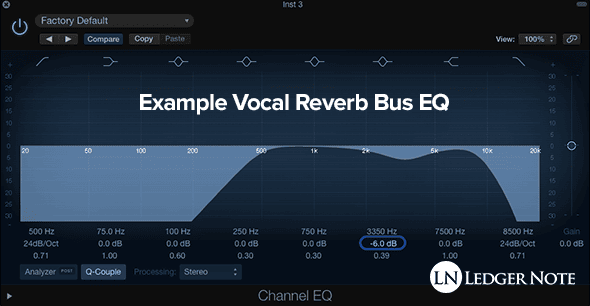
The above is an example of how you'd deal with EQ on a reverb bus. A low roll-off and high roll-off are essential to maintaining clarity in the mix for all instruments, and then you can cut around the area of intelligibility and presence. This lets the reverb fill in the gaps rather than compete with the instruments, like in the image below. Pre-delay helps with this too.

Definitely experiment though. Play around with it, blend it in with other reverbs to create other worldly sounds, mixing it in with a chorus, pitch shifting, and anything else you can come up with. Just be careful about creating a "room within a room" which is something amateur mixers do. That sounds even more unnatural.
Reverb Settings Defined
If you fire up a reverb plugin or look at your effects pedal, that's when things can start to get technical, so I want to explain the common settings you'll run into so you know what's going on. Your best bet is to start from a preset if available and then adjust it from there.
Here's the options or knobs that you'll actually use. Anything else can be ignored even by professional mixers:
- Pre-Delay - the amount of time before there is any reaction at all
- Attack - the time allotted to go from silence to full volume
- Decay - how long the reverb sounds out, the time to reduce to zero volume
- Initial Level - the loudness of the effect (use the sends & bus fader instead)
- Exponential or Linear - How smoothly the decay tail reduces in volume
- Dry & Wet - Another way of managing mix volume based on percentages
- Spread - The width of the effect if used in stereo (think panning)
- Filters - High pass, band pass, low pass, etc (use an EQ on the reverb bus instead)
Of the above, most people in live settings can get away with only using the dry and wet volumes and some filters (if even that). As a mixer you'll want to dig into the pre-delay, attack, and decay too. Mix engineers should use equalization on the auxiliary bus instead of built in filters.
Live players like guitarists will use them at such low volumes most of the time that minute changes won't even make a difference. Speaking of guitarists, if you're one you'd probably enjoy taking a look at our picks for the best reverb pedals on the market.
Spring Reverb is Still Around For a Reason
I honestly thing if it weren't for the cheapness and small size of these when all competing but better sounding reverbs available costed a fortune and were gigantic, we wouldn't even bother with them today. It's only because the classic rockers used it so much that we associate it with being vintage and classic.
You now know everything you really need to know about spring reverb. All you need to do now is experiment and practice with it. Just because I'm dogging it doesn't mean people don't like the sound. Just keep it reasonable in the mix and nobody will complain. In fact, the old fogeys will love it.
Jared H.
 Jared has surpassed his 20th year in the music industry. He acts as owner, editor, lead author, and web designer of LedgerNote, as well as co-author on all articles. He has released 4 independent albums and merchandise to global sales. He has also mixed, mastered, & recorded for countless independent artists. Learn more about Jared & The LN Team here.