People call it different things: reverse echo, backwards reverb, reverse regeneration... but in the professional sector of the music industry we plainly call it the reverse reverb effect. And thanks to computers and lookahead algorithms it's easier than ever to create.
Let's quickly define what it is for the newcomers, give a few examples of how it sounds, talk about how it was originally invented and applied, and then I'll show you the three ways we create it now with our advanced technology.
For those who need a bit of a background, please skim our articles 'What is Reverb' and the 'Types of Reverb,' because you'll have to make decisions on which type to use and understand how to use the effect normally before you flip it backwards.
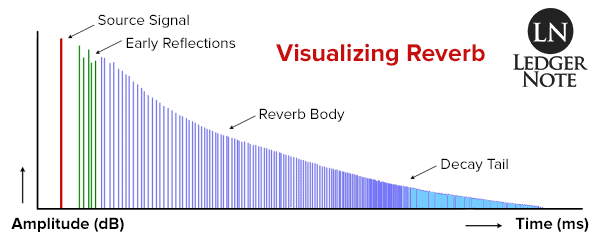
The basics are that a source signal makes a sound and then after a period of time called pre-delay, the first early reflections begin echoing. These echoes repeat so fast they are heard more as a "smearing out" of the original sound, which continues into the reverb body and decay tail at a continually decreasing volume until silent.
What is Reverse Reverb?
Reverse reverb is exactly that, a backwards reverb that builds up in volume instead of decreasing and occurs before the original sound instead of after it.
Where as normal reverb is generally used to emulate the acoustic characteristics of differing physical spaces (like making your music or instrument sound as if it was recorded in a concert hall or church cathedral), when played in reverse it sounds completely unnatural.
For this reason it is used as a special audio effect rather than in a natural sounding, accompanying soundscape design. It's typically used to sound eerie and scary; to create an 'outer space,' mystical, or psychedelic atmosphere, or to build up intensity before a segment of a song with a denser arrangement and orchestration.
When & How Was Reverse Reverb Invented?
In one area of this discussion we only have clues, leads, and claims from dubious characters. In the other we know all of the details.
When Was it Invented?
The beginnings are murky. We suspect musicians and studio engineers were experimenting with reverse echo as early as the 1940's, but we don't have proof. Jimmy Page (of Led Zeppelin) claims he invented it independently for The Yardbirds' song "Ten Little Indians," released in 1967.
None of the Led Zeppelin crew have a great track record with telling the truth. You can find entire lists of songs they ripped off for their own albums. Nobody saw the internet coming back then and never expected getting exposed.
The Beatles released their song "Tomorrow Never Knows" in 1966 (a year before The Yardbirds) that features backwards reverb throughout. Curt Boettcher used the effect on Lee Mallory's single "That's the Way It's Gonna Be" in 1966 as well.
There are countless examples from the 1960's, and you can't really go by a song's release date. So the truth is we don't know who and when exactly this was invented. We do know how it was produced, though.
How Was it Invented?
In the past, the process was simple but expensive and time consuming. Recording had to be done in real-time and committed to magnetic tape reels, which is why there was a lack of experimentation up until the 1960's as the material began becoming a bit less expensive.
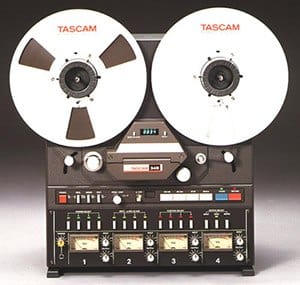
The way it worked was a pre-recorded, dry segment of audio would be played in reverse on the reel-to-reel player and routed through either a plate reverb or spring reverb (the only two affordable methods at the time). This result was then recorded to another tape.
This second tape could then be reversed again and recorded to a third tape. The result is that the instrumentation or vocals would be double-reversed and playing normally, but the reverb that was added on the second tape would now play backwards.
The final result was a reverse reverb that not only built up in amplitude over time but preceded the original signal instead of coming after it. The rest is history.
Some sub-genres today, like shoegaze (alternative rock) and hardstyle (EDM & dubstep) use it extensively. It's also heard in television production and filmmaking, especially in horror, science fiction, and fantasy genres. But they use modern tools to create the effect, which we'll cover next.
How to Use Reverse Reverb in the Present
Fast-forward to the present and we have access to computers so small we carry them in our pockets, have them at home, and even embed them into other tools. This makes recreating this effect simple. Here's the three ways we get it done now:
- Modules in effects pedals, synthesizers, or rack mount units
- VST plugins in digital audio workstations (DAW)
- Manual recreation in DAW software
If you have one of the best reverb pedals that can do this for you with zero effort or a VST plugin for your DAW, then you're done here. But maybe you don't have either or would like more control over the effect, or perhaps just want to learn more about signal processing and experiment a bit.
Here's the walkthrough for creating this sound. I'll be using the Logic Pro DAW for the visuals, but the process is the same no matter what software or operating system you use.
1) Think About If You Want Other Effects Reversed Too
The assumption here is that you've already recorded the track you want to apply the effect on. The question becomes, "Should I add other effects first so they receive the reverb too, or should I wait and apply them after?"
Think about a vibrato and guitar as an example. If you add the vibrato to your guitar first, the backwards reverb will contain the vibrato but not be affected by it itself. If you add the reverse reverb first and then add the vibrato, even the reverb will warble in pitch.
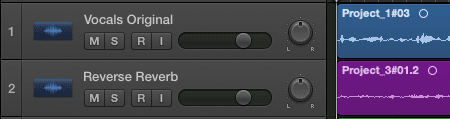
2) Create a New Track & Copy Your Main Audio To It

Just below your original track in the multitrack, create a new track and a copy of your audio. This leaves your main audio source alone and allows you to apply the destructive editing you'll need to do to a copy of it instead, which will later be deleted.
Technically this is non-destructive if you have enough "undo's" left over later, but everyone's system is set up differently. And if you forget to undo it and perform a lot of other work, you'll have to import your audio again and hope to line up the timing right. It's safer to make a copy, trust me.
When you 'copy' the track, you'll need to either bounce a duplicate copy or actually make a copy of the file, because the audio editor in the next step works on the actual file and not at the track level.
3) Use the Audio Editor to Reverse the Copy of the Main Audio in Time

There will be different terminology if you're in Pro Tools, Ableton, FL Studio, etc., but in Logic Pro you're looking for the 'Editor.' This can be found by clicking 'View' in the top menu and clicking 'Show Editor' (the keyboard shortcuts are visible in the pictures).
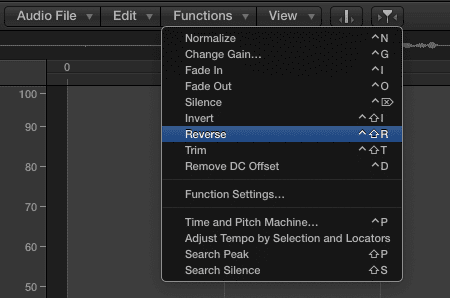
You'll see the Editor frame appear, which has its own menu. Make sure you're in the "File" view and not "Track" view. One of the dropdowns will be called 'Functions.' Click it and then choose the menu item called 'Reverse.' This does what you think it does, but destructively, which is why we made a copy of our main audio.
4) Design the Reverb How You Imagine You Want it in Reverse
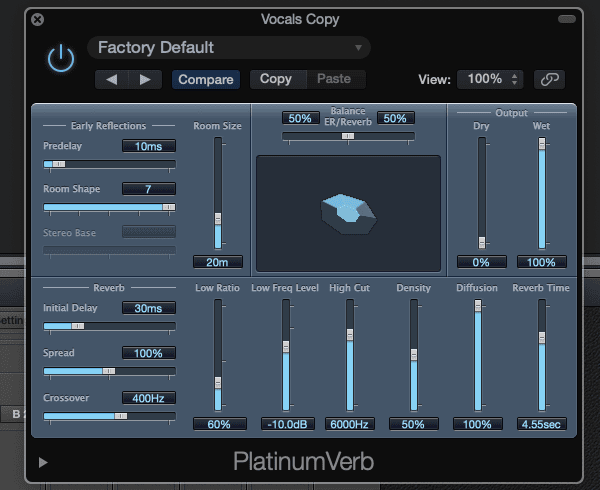
This truly is guess work, but typically you'll be happy with the results the first time. You need to apply a reverb plugin to the track with the backwards audio and tweak the settings to taste. I suggest finding a preset you like, but avoid anything with bouncing delays and make sure you choose a mono or stereo reverb, based on what you're going for.
From there you only need to adjust two things. The first is critical. Locate the Dry / Wet mix volumes and set Dry to 0% and Wet to 100%. This ensures you're only hearing and recording the reverb itself without the source signal (you'll still hear some of the original in the wet signal, it's okay). You need it in isolation and this achieves that.
The second concern is that you'll want a much longer decay time than a normal reverb would have. I'd recommend somewhere in the range of 2 seconds to 5 seconds. If you want to get slick you can do some math based on the tempo of the song, too, so it stays rhythmic.
5) Record the Effect to Another New Track
You can go through the whole ordeal of creating a send to a bus, using the bus as the input on a new track, and recording the results in real-time. That's goofy. The fastest method to get a hard audio file of your results is to bounce the track.
Bouncing the track isn't done in real time (it's extremely fast and accurate) and will create a new track for you that contains your isolated effect. Just make sure when you choose to bounce that you've solo'd the track, chosen the correct time period to render, and are not bypassing the plugins. Choose not to normalize.
6) Use the Audio Editor Again to Reverse the Bounced Track
Select the new bounced track and return to the audio editor pane (in the top menu it's "View" and then "Show Editor"). Then select "Functions" again and choose "Reverse." You now have the reverb you applied to your original audio track, but in reverse. Mission almost accomplished!
7) Line Up the Backwards Reverb With the Original Track
Technically you should have zero issues here. The backwards effect should precede the original sound, build up in volume, and end when the original audio sounds off. But if you got misaligned somehow, simply nudge your new track around in time until it's positioned correctly.
Depending on your goals, you may want to splice the file so you're only building up the backwards reverb towards the first phrase of vocals or first notes of guitar, as examples. You'll also want to add equalization to this reverb track so it's not competing with other instruments in the mix.
That's All There is to Reverse Reverb...
Once you know how to create this effect manually, there's no need to do it every time. You can use tools that do it for you that still give you plenty of options. But going through the process at least once is worth it if you fancy yourself a professional.
This is all you need to know about reverse reverb. All that's left is for you to get your hands dirty using it, either on stage or in the studio. Experiment and combine it with other effects and who knows if your name can go down in the music history books.
Jared H.
 Jared has surpassed his 20th year in the music industry. He acts as owner, editor, lead author, and web designer of LedgerNote, as well as co-author on all articles. He has released 4 independent albums and merchandise to global sales. He has also mixed, mastered, & recorded for countless independent artists. Learn more about Jared & The LN Team here.