
Anyone that has spent even the slightest amount of time with signal processing effects, either as a guitar player, synthesizer player, music mixer, or really any role will have encountered plate reverb. It's everywhere and for good reason.
Of all of the different types of reverb, none has stood the test of time and garnered more attention and love than that generated by a plate. What does that even mean? I'm going to explain everything about this beautiful audio effect, where it comes from, how we create it, and how to use it.
Strap in, it's a quick but deep ride. If you need to cover the basics, skim our article 'What is Reverb' real quick and then come back so you have a better footing. Let's do this.
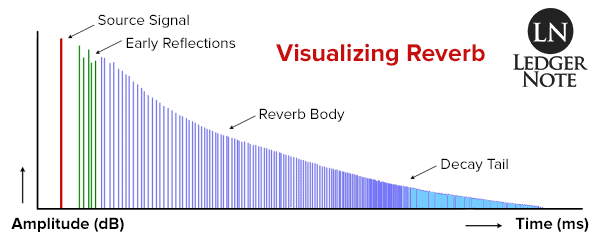
Take a look at the image above first just to get the concept of how reverb plays out over time in your head. You have the original sound, and then the early reflections come in at a lesser volume, and then the "smearing out" of the body and decay tail continue while reducing in volume until it is no longer audible.
What is Plate Reverb?
Plate reverb is an audio effect that is derived from and added to an original sound that adds a series of echos that occur in such rapid succession that they aren't heard as single events but as a "smearing out" of the original sound.
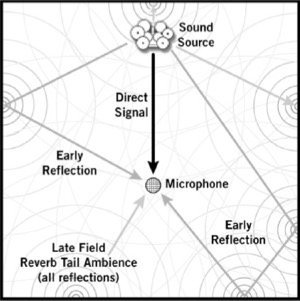
Reverb itself comes from sounds bouncing around the environment and coming back to the listener's ear or the microphone. This can be the walls of a room, rocks and trees outdoors, etc. It is thousands of separate reflections all returning back to the listener close the same time. See below:
It's similar to the single or repetitive echos heard in the delay audio effect, but there's exponentially more of them that slowly reduce in energy and volume until they can't be heard any more. It is used to make audio sound like it was recorded in a different acoustic environment.
Originally we had to either travel to a specific type of room, like a concert hall, church cathedral, or even a chamber reverberator built for this purpose. This was obviously expensive and time-consuming.
Eventually inventions like spring reverb and plate reverb came about and slowly became smaller and more affordable. Fast forward to today and you can find these effects being produced digitally in tiny computer chips embedded in keyboards, guitar effects pedals, and as VST plugins on your computer.
How Does Plate Reverb Work?
The first versions of this effect were created literally using large plates of metal suspended by and under the tension of springs at the corners. These sheets were thin enough to be vibrated using a transducer just like a driver vibrates the cone of a speaker to produce sound. The resulting effect was then recorded using a contact microphone placed on the sheet.
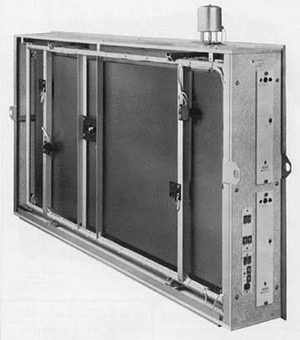
The first plate reverberator was created by Elektro-Mess-Technik. This model, the EMT 140, weighed 600 pounds and the dimensions were 8 by 4 by 1 feet. It was a whopper and still fairly unaffordable, but cheaper than building a reverb chamber in the studio. You can see it below:
The famous Abbey Road Studios bought the first one out of the gates and used it on several Pink Floyd and The Beatles albums. That raised the profile of this reverb extremely high and made its characteristic sound so noticeable and enjoyable.
This is when we left the "acoustic reverb" stage and moved on to the "mechanical reverb" stage. This included the much worse spring reverb which worked the same as a plate except we'd vibrate one end of a spring and record at the other end. It had some bad side effects and sounded too metallic, and thus the plate verb grew in popularity even more.
Nowadays, we digitally emulate having that giant box around. VST plugins for the best digital audio workstations have computer algorithms in them that can create the same sound and apply it to any track you want. Even before that we could record samples of the sound and use the frequency profile with a convolution reverb to recreate it. We've come a long way.
Plate Reverb Explained
Plate reverb has two contradictory colors to it. The initial reflections sound 'bright,' meaning they have an emphasized high-end frequency response. As time passes and it moves into the reverb body and the decay tail, that sound becomes 'darker' with even less high frequencies than the original.
Think about the most popular Pink Floyd albums and how even though they have some uplifting and beautiful melodies, they can still come off sounding eery and atmospheric. That's due to the darkness of the plate verb.
As studio engineers, we record each instrument or sound as dry as possible, meaning it's pure with no additional signal processing added and with as little influence from the room as possible (no delays, reverbs, and frequency response alterations). But this sounds unnatural to listeners because reverb always occurs in nature.
By adding plate reverberation, the audio sounds more natural because it seems to be emanating out of a natural space, but since this type of reverb is unnatural we also sense that something synthetic is going on. That juxtaposition actually ends up sounding very unique and interesting, rather than weird.
How to Use Plate Reverb Live & in Mixing
The first question is when should you use this effect over a different type of reverb. Use it when you aren't concerned with perfect realism. Sometimes you want to create a "bigger than reality" soundscape, and that's a perfect time to bust this out.
So think about it when you're working in genres like pop, rock, and rap, as opposed to ones like bluegrass, country, or orchestral music. If you want really long decay tails, you're better off using a plate than say a room reverb because rooms don't behave that way anyways. If you're going into unnatural territories, use synthetic reverbs.
One thing to remember is you can use multiple reverbs in one mix. You can bring in a plate at a certain time or blend it in at a lower level into a more natural hall reverb, for instance. In my opinion, plates sound better on lead instruments like vocals, synth, or guitar that get more attention, versus drum tracks that should anchor the track in reality (except maybe the snare).
As far as actively using this effect, many people make two fatal mistakes:
- Don't apply a plate reverb to every track that needs it (use an auxiliary bus)
- Do add an equalizer to the aux bus in make room in the reverb for clarity
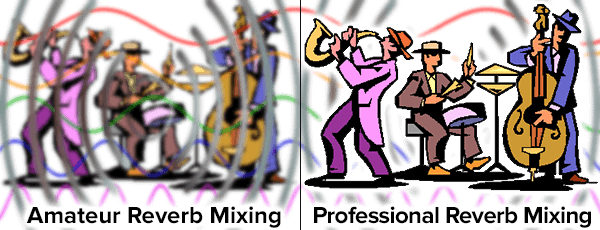
The reasons you do not want to use as many as 10 versions of this effect is because you'll end up with a muddy mess in your mix that reduces clarity big time, it's not how reverb works in nature, and you'll eat up tons of CPU power in your computer.
In nature, all sound reflections end up merging into one giant mess in the air rather than being localized at the place of each instrument in physical space. By feeding all of your tracks into one aux bus, you can create one total reverb that emulates reality.
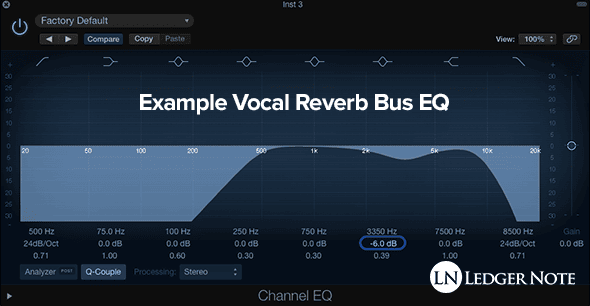
And by having a bus ready, you can add a parametric equalizer to that track, which is critical in making sure your perfectly balanced mix remains so. You should be using a low roll-off, a high roll-off, and a medium Q scoop in the region of intelligibility and presence, as seen in the image above. Your result will be more like below:
Consider adding in a short pre-delay as well so that the early reflections don't begin for a period of milliseconds (experiment with the appropriate amount). This will help bring focus back to your instruments. And as a rule of thumb, find the volume of the reverb you think sounds good and then reduce the amplitude by one or two decibels. Less is more!
Reverb Settings Defined
Your best move when using any reverb is to start with a preset and tweak it from there. But even then, you still need to be familiar with the basic parameters you are allowed to change. Below is an example VST plugin called Space Designer for Logic Pro X:
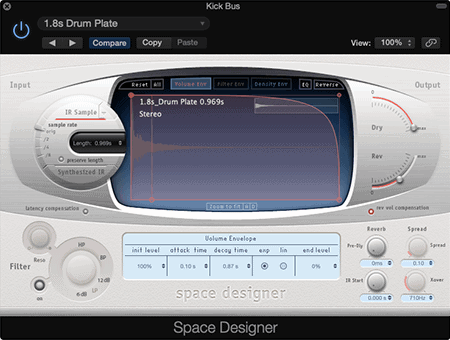
It's easy to get overwhelmed, especially when you're provided more settings than you really need. I'll cover the basic ones, and the rest you can ignore.
- Pre-Delay - the amount of time before the effect even starts
- Attack - the time it takes the effect to go from muted to full volume
- Decay - how long the reverb rings out, the time it takes to reduce to zero volume
- Initial Level - How loud you want the effect to be (use the sends & bus fader instead)
- Exponential or Linear - How smoothly the decay tail reduces in volume
- Dry & Wet - Another way of managing mix volume based on percentages
- Spread - The width of the effect if used in stereo (think panning)
- Filters - High pass, band pass, low pass, etc (use an EQ on the reverb bus instead)
That's it. You can honestly not get too involved in those, except maybe the attack, delay, and pre-delay, and be fine. The rest you can control on the aux bus using the sends, fader, and EQ plugin there.
Because you'll use them at such low levels, minute changes won't be noticeable or have any pragmatic effect on your mix. Guitarist will enjoy seeing our top picks for best reverb pedals if they're on the hunt.
Plate Reverb is Popular for a Reason
Due to hearing this all over Pink Floyd and The Beatles, and realizing it's suitable for the most popular genres out there (perhaps minus country), the usage of this exploded. And that's especially since it was the only attainable and great sounding option (let's face it, spring reverbs suck) for decades.
You should now know all there is to know about plate reverb. All that's left is to get your hands dirty and experiment and practice. Just remember, less is more and use an auxiliary bus to send entire groups of tracks over, and you'll be golden.
Jared H.
 Jared has surpassed his 20th year in the music industry. He acts as owner, editor, lead author, and web designer of LedgerNote, as well as co-author on all articles. He has released 4 independent albums and merchandise to global sales. He has also mixed, mastered, & recorded for countless independent artists. Learn more about Jared & The LN Team here.