Compressing bass is a fundamental part of any mix, and getting it right means having a great foundation to a song with well-balanced energy and an intelligible groove. Getting it wrong is a disaster.
Great bass compression settings, along with other considerations we'll mention, are the difference between a solid, full, and thick bass with great harmonics and attack, versus one that's either weak and thin or boomy and muddy. There's not a lot of in-between when it comes to the low-end.
This tutorial applies not only to bass guitar but to synthetic bass lines from a synthesizer or programmed in from a plugin in your digital audio workstation (DAW). If it's in the bass or sub-bass frequency range and serves the purpose of that instrument, then this will work for you.
What's the Point of Bass Compression?
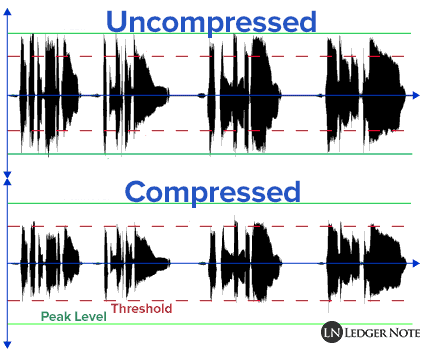
Bass compression serves one main purpose, which is to reduce the dynamic range of the amplitude of the instrument in order to provide a constant amount of low frequency energy to a song. It can also alter the tone and intelligibility of the recording by shaping the initial attack of each musical note.
Unlike other instruments, we want very little volume range in our bass tracks. We almost want to squash it down to an on-and-off pulse and then design the shape using the compressor's attack and release settings. The real volume variance will come from the string attack we allow through.
We want minimal dynamics because we want to provide a consistent experience to our listener's ears and to their speakers while using a predictable amount of headroom while mixing. Bass is often felt as much as it's heard and can place a great load on speakers and headphones.
What to Do Before Compressing Bass
What I'm being forced to assume in this article is that you know how to clean up your track by silencing regions that are meant to be muted, that you've applied bass guitar EQ properly, and that you understand what a compressor is and how the options work.
These are the things you need to know and do before you move on to compression. Your typical clean up plus equalization always comes before compression since it reacts to the volumes that you're feeding it. You don't want it reacting to frequencies and noises you intend to remove anyways.
How to Compress Bass

Here I'm assuming you know how to use your DAW's multitrack and how to apply plugins to the correct tracks. If not, you may be using your best compressor pedal or racked hardware. Either way this will all apply but I'll be sharing images from plugins. The settings work the same!
Depending on the genre, you'll want differing amounts of compression. Electronic dance music, rap or hip hop, heavy metal, pop, or any other dense arrangements will require deep compression. A lighter amount will be sufficient for genres like jazz, folk, bluegrass, and similar singer-songwriter performances.
Pro-Tip: Don't be tempted to perform these steps with your bass in solo mode. You want to be hearing it in the context of the full mix. This may mean that you need to work on other parts of your mix first and come back. You can mute the kick drum if needed for now.
1) Start With These Bass Compression Settings
When you're ready to get going, put the Threshold of the compressor at zero decibels, meaning it won't engage at all. Then set up the following:
- Ratio - 5:1
- Attack - 100 ms
- Release - 1 ms
This is a fairly aggressive ratio that should cover most cases. We want to level off and reduce dynamic range, so a heavier ratio and a moderately deep threshold is better than the opposite. We want to flatten the peaks of the waveform quite a bit without brick-wall limiting and introducing audio clipping.
2) Begin Lowering the Threshold & Increasing Makeup Gain
Now you want to start reducing the threshold from 0 dB down towards the -20 dB range. If you've done proper gain staging you should start seeing some gain reduction at this point. Aim for about 5 dB of gain reduction and then add that amount back in with the makeup gain.
At this point you can put the compressor in bypass mode to see if the volumes are similar between the un-affected and the compressed version. Try to keep the volumes fairly similar so you get a correct in-the-mix perspective on what you're doing.
You may decide that you want to drop the threshold more and get up to around 10 dB of gain reduction. If you can't get that much with a very low threshold, then you should raise the threshold back up and increase your ratio up to 8:1 or even 10:1.
The reason is, if you dip your threshold too low with a lower ratio, you'll still end up with dynamic range variances, which defeats the purpose. And your bass will sound horrible and unnatural, too. Try it if you want to understand what happens. Doing it on vocals may make it easier to understand why it's bad.
3) Select an Appropriate Attack Time
At this point you're ready to deal with the attack time. It is basically the amount of time the compressor waits until engaging once the threshold has been exceeded. Right now your attack is set to a moderate time. This means you should hear the attack of your bass notes come through.
The attack of a note is the initial spike in volume as a finger or pick strikes the strings. Every non-digital instrument has an attack to it, including vocals. Allowing it to survive helps our ears grab onto a sound and aids in making it intelligible and clear. We want to keep the attack of the bass.
So what you want to do is loop a note of the bass track and gradually reduce the attack time. Once you hear it interfering with the attack of the note, back it off some. The goal is to let the attack shine through and then immediately begin compressing.
If your attack is too fast, you'll have a smoother and softer bass since you're squashing the note's attack down. Most of the time you want a punchy bass that has a sense of percussion to the attack, but not always. Always try both scenarios and see which fits the mix better.
4) Dial in the Right Release Time
Now we want to consider the same concept for the release time, which is, in simple terms, how long the compressor waits to stop compressing once the volume dips back below the threshold. Right now you have it set as fast as possible.
Fast settings let the natural sustain of a note ring out, while a slower attack will continue compressing that decay tail, which will change the original envelope of the note and performance. This can sound weird and unnatural just as much as too fast of a setting can (though the knee can smooth things out).
Your goal, with bass that typically has long notes, is to find the right timing where the gain reduction gradually returns to 0 dB before the next note occurs. This will keep the bass from "breathing" too much and keeps the gain reduction in a "musical" time frame. You can actually time it to a quarter note or half note or whatever works based on your tempo and performance.
5) Adjust the Knee to Taste
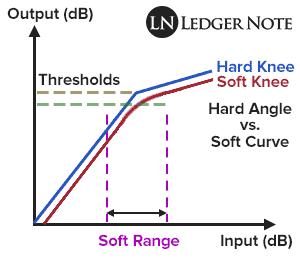
Finally, you want to turn your attention to the knee setting. You'll have choices between soft and hard. I almost always recommend setting it to a soft knee and leaving it there, even on aggressive songs. A hard knee makes for a more obvious transition point when the compression kicks in.
A soft knee makes this point in time more transparent, meaning it is invisible to the listener's ears. This sounds more "musical" and less processed, which is always the goal in most genres. Even when we compress heavily we can still make it sound subtle to the listeners.
Bonus Trick #1 - Serial Compression for Bass
One thing you can do is set up your compressor using the steps above, and then back it off to about 3 dB of gain reduction. Then you can place a second compressor right after the first and go for another 3 dB of reduction. Repeat as much as needed until you hit the desired level.
Some mixers claim serial compression sounds more transparent and natural. Perhaps it does, but I'd rather not introduce a bunch of latency and need to correct for that. I'm not against this trick, but it's one I don't use. I'm not convinced it sounds any better (or even any different) than using one round of compression.
Bonus Trick #2 - Bus Compression for Bass & Kick

Another trick is to output your bass and kick drum to an auxiliary bus meant for those two instruments. If you add a sinewave generator beneath the kick or bass, send it over as well. Even if you've applied sidechain compression to make the bass duck below the kick, send it all over to the summing bus.
The benefit here is that, once you've balanced their relative volumes, you can control them as a group on one fader. You can also apply an additional equalizer and any effects you may use. But the main benefit is adding another round of slight compression to provide glue and make the two instruments behave as one (to a degree).
Bonus Trick #3 - Parallel Compression for Upright Bass
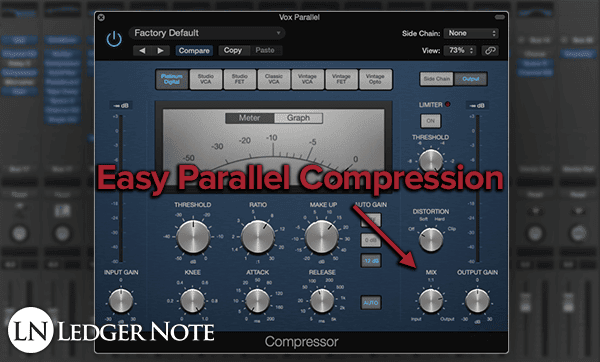
I said upright bass but really I mean any bass track that doesn't need to be completely squashed but requires "oomph" in the low-end. What you can do is heavily compress a version of the track and mix it into the original. This will bloom out the quiet parts while keeping the dynamic range of the louder parts, particularly the attack.
The easy way to do this is to use the 'Mix' knob on your compressor plugin. It essentially creates two versions of the track for you and lets you balance them in volume how you see fit.
Problems Arising During Bass Compression
As you go about this process, you may not get perfect results the first or even fifth time. It's not only about practice and experimentation. There are some other things that can be interfering with your progress that I'd like to point out.
No Subwoofer & Poor Room Acoustics
If you don't have a subwoofer, you're going to have a hard time even hearing the sub-bass frequencies or the upper bass registry that well. If you can't hear it, you can't make precise decisions. Even the best studio headphones can't reach these low frequencies at proper volumes.
You may have poor room acoustics, too. Any small room, even those with plenty of acoustic treatment, will still have problems with bass. The only fix is to add tons of bass traps and super chunks in the corners. For most, it's easier to use headphones and deal with the compromises.
Applying Too Much Compression
If you compress too much or have too slow of a release during sidechain compression, your bass will end up having a pumping sensation, where it seems to breathe. This will alter the energy of the track and totally screw up the groove. You can also end up with unpleasant distortion, versus the kind that produces harmonics that you want to accentuate.
Mixing Bass in Solo Mode
Many people will solo the track they're working on. This is not only wrong but it's not needed due to the separation between bass and sub-bass frequencies and the mid range and high-end. You want to hear each instrument in the context of the full mix as you make decisions.
What you can do though, if you're struggling or haven't mixed the rest of the track, is to route everything but the bass and kick to a bus and add a high pass filter to it. Run it up to about 150 Hz to block those frequencies out of everything but the bass and kick. This will help you hear them clearly while still having context.
Using an Extremely Fast Attack Time
I'm as guilty as everyone else in the past who defaults to a fast one millisecond attack time. That's rarely desirable because you typically want to preserve the attack of the notes being played. It makes a huge difference in clarity, intelligibility, and punchiness. Your track won't sound alive; it will sound weak and impotent.
That's All There is to Bass Compression!
If I had to summarize the whole process, I'd say to use a high ratio, medium-deep threshold, go for around 7 dB of gain reduction, use a soft knee, and then manually adjust the attack and release. The attack should let the bass' attack through and then clamp down immediately, while the release should be timed with the tempo.
Remember, it's all of the things you do before you add a compressor that helps steer you into success here. Once you do that and follow the steps provided here, bass compression is as easy as one, two, three.
Jared H.
 Jared has surpassed his 20th year in the music industry. He acts as owner, editor, lead author, and web designer of LedgerNote, as well as co-author on all articles. He has released 4 independent albums and merchandise to global sales. He has also mixed, mastered, & recorded for countless independent artists. Learn more about Jared & The LN Team here.