If you're a long-time follower of LedgerNote, you know I've written a ton about mixing tricks of the trade to help you get better clarity, especially in the bottom-end of your mix. Sometimes there's only so much you can do with equalization.
And that's where the concept of sidechaining comes in. It's not hard to understand or set up, though we all need that first set of instructions, otherwise it's nearly impossible to figure out. Let's jump right into it.
I'm going to explain everything I've mentioned thus far plus toss out some applications to get you thinking. Remember, mixing is an art and a science, and you could be the one to discover new ways to use this advanced method.
What is Sidechain Compression?
Sidechain compression is a method of using a dynamic range compressor to manage the variance in amplitude of an instrument or recording track, like usual, except this time it's being triggered by a different instrument or track.
Let me say that in normal people terms (and for beginners, check out our What is a Studio Compressor? article).
When we normally use a compressor we apply it to a track on the multitrack mixer; set the threshold, attack, and release; and then let it be triggered by the amplitude of the track it's placed on. It's a self-contained, intelligent volume control so you don't have to ride the fader on the mixer.
In the case of sidechaining compression, we want it to compress the track it's applied to, but we want to trigger it when a different sound surpasses the threshold. We are making the compressor take its directions from a different track. See the image below for a diagram on how it works.
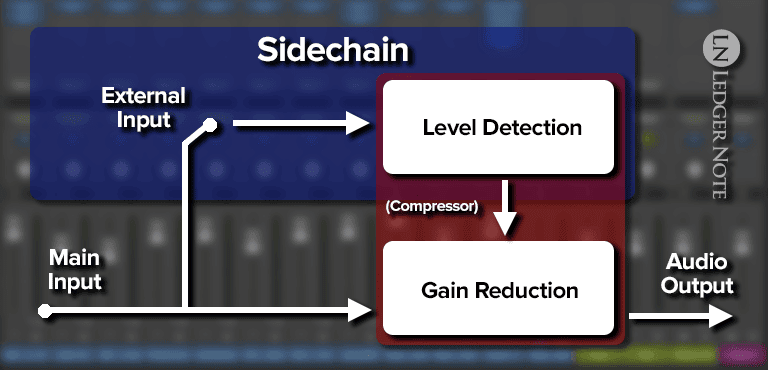
There's a big reason we do this. In the majority of cases it's about gaining clarity in the mix. If it's not making sense yet, it will in a second.
Uses for Sidechaining Compression
I want to list out a few uses for sidechaining compression so you can start to get an idea why we do this in the first place:
- Making the music duck behind dialogue (e.g., Broadway recordings, live DJ setups).
- Making ambient and crowd mics duck behind the speakers (live TV events, etc.)
- Forcing the bass to drop in volume when the kick drum occurs.
- Punching through a reverb or ambient pad.
These are a few examples of why and when we'd use this method. For instance, maybe we have a rich, lush reverb ringing out behind the vocals, but it's getting in the way of and reducing the clarity and intelligibility of the vocals.
So in this way we can basically direct the compressor to reduce the volume of the reverb itself when the vocal track starts playing. This way, we can regain clarity automatically without managing it manually on an automation track to dip the volume.
We also have some great tips on how to use reverb masterfully, if you're interested.
The Benefits of Sidechain Compression
So obviously this is mainly about making sure the sound that should be getting most of the attention can be heard by the listener with the most clarity possible. It's about making sure other tracks aren't getting in the way. Clarity is the main benefit.
This doesn't only apply to vocals and vocal compression. Obviously, if we have a mic on a studio audience, we don't want their cheering and clapping to be too loud when the host is trying to talk. But what about trying to find the perfect balance between a kick drum and a bass line?
It's not that we want the listener to focus on the kick. It's just that you can't really make both of those instruments out at the same time since they share the same frequency range. So in this case we'll slightly reduce the volume of the bass when the kick drum occurs.
Here's some more tips for mixing bass and kick if you need help in that area.
Some producers in specific genres, like EDM, use sidechain compression to make the music "pump," meaning the bass will breath in and out (since the kick drum is usually "four to the floor" on the quarter notes). They can use a slower attack and release to make the energy of the song as a whole increase and decrease rapidly, locked into the groove.
Despite these kind of niche applications, the main benefit is bringing clarity to a mix. You may have used all of your tools and tricks, especially equalization, panning, volume balancing, and normal compression but still have a problem. You've found a new tool to use and it's likely the solution.
How to Sidechain a Compressor
First and foremost you need to make sure you're using a compressor with sidechain capabilities. You're probably using a plugin, so you're in good shape.
Hardware options may or may not have this option, but honestly, who's completely mixing out-of-the-box these days anyways? The best compressors will have it, so that should give you a heads up in that arena, too.
I'm going to walk you through setting up sidechaining with a compressor in Logic Pro. If you're using any other DAW like Pro Tools, Cubase, FL Studio, Ableton, or whatever, they all are going to have similar setups that this will translate over to.
If the stock compressor plugin doesn't have sidechaining capabilities, you'll have no problems finding one that does for free or to purchase. Most do have it.
Step 1 - Add a Compressor to the Track You Need to Duck
Remember, the compressor goes on the track that's in the way. It's the track you need to reduce in volume at specific times to get it out of the way of something more important. In this case, I'm going to use the stock Logic Pro compressor plugin:
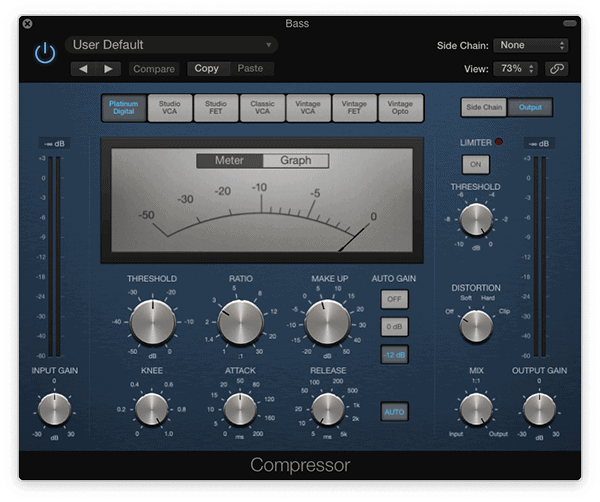
So far I've not done anything with this other than apply the plugin to the Bass track and open up the compressor. You'll see the name of the track it's on at the top.
Step 2 - Choose the Track to You Need Clarity On
You may be asking "okay, but choose it where?" You're going to choose it as the "Side chain" track on the top right of this plugin. If you're on a different digital audio workstation (Pro Tools or one of the other best DAW options.) or plugin then it may be somewhere else. But on this one it's in the top right corner:

I made a big arrow pointing to the option. In Logic Pro, this plugin won't read your custom track names so make sure you're choosing the right input or bus.
In most cases you'll want to use a bus so you can feed it a pre-recorded track versus an input off of your audio interface. You can't simply choose a track (in Logic Pro, anyways), but you can choose a bus.
I have an auxiliary bus set up for the kick drum on Bus 4, which is why I chose it. I've done some signal processing on the track itself then spit the full output over to Bus 4 for this purpose alone.
Step 3 - Configure the Compressor to Taste
The rest is easy, but you want to keep it straight in your head. Everything works like normal except the threshold. The attack, release, ratio, and everything else will apply to the track you have the plugin on (in our case, the Bass track).
The threshold is different. You're setting this based on the track the compressor is sidechained to (in our case, the Kick bus). So when the kick exceeds the threshold, the bass is compressed with the other settings you chose.
So here, I'd want a pretty fast attack so the bass ducks out of the way of the kick immediately, but I want a medium to slower release so that the bass comes back to full volume at a pace that's not jarring. Otherwise you start to get pumping, especially with a deeper compression ratio.
More Sidechain Compression Tips
You thought I was going to leave you hanging! I'm going to share more ways to use this technique that you can explore.
Gain Vocal Clarity - As I mentioned before, whether in music or broadcasting, ducking the audience or a guest's "noises" behind that of the host can help tremendously. You can make reverb duck behind the lead vocals or even the rhythm guitar or keyboard, for example. The idea is to make sure the most important tracks take precedence, especially over those in the same panning region and similar frequency ranges.
Make a De-Esser - Make a send for your vocal track and send 100% of the volume to the new bus. Slap an EQ plugin on it and locate the frequency band where the sibilance is occurring and boost it (that's right, boost it). Now the trick is to sidechain the equalizer to the compressor and let the compressor act on those frequencies. Or you could, you know, just use a de-esser since those exist now.
Reduce the Snare in the Overheads - When you record overhead tracks for a drum kit, you'll usually end up with too much snare volume in them. All you need to do is setup a compressor on the overheads and sidechain them to the snare bus. When the snare hits it'll suck it's own sound out of the overhead tracks (and everything else too, so don't get too aggressive).
Low-End, Kick & Bass Clarity - As mentioned above, you can duck the bass line when the bass drum hits so that the kick can be heard with more clarity. Use a very fast attack on the bass but a medium release. The main thing is to duck the bass fast so the attack of the kick can be heard clearly, which is what increases intelligibility the most. It also preserves massive headroom.
Punch Through Ambience - In movies we'll record the sound of the scene so we can use it as background noise. The same goes for keyboard pads and reverb. It's all to create a realistic and lush sound, but we don't want that in the way of the main sounds, so duck them at the right time.
Make Your Kick Meatier - A huge trick in rap production is to make a beefy kick. Sometimes people layer with 808 kick drums but you can also just tune a deep sine wave and play it beneath the kick. But how do you make it fire only when the kick plays? Your noise gate can also have a sidechain that can be attached to the kick bus! When the kick fires, it lets the sine wave play. It's as simple as that.
Sidechain Compression Made Easy!
Now you know one of the open secrets of professional mixing engineers. The funny thing about these secrets is you can share them out in the open and only a fraction of the people that encounter them will ever put them into practice.
I want you to be one of those people that actually use this method, because you'll get a lot of mileage out of it. There's hardly a song you won't use it on once you understand fully when and how to apply it. Now open up your mixing toolbox and put sidechain compression in it!
Jared H.
 Jared has surpassed his 20th year in the music industry. He acts as owner, editor, lead author, and web designer of LedgerNote, as well as co-author on all articles. He has released 4 independent albums and merchandise to global sales. He has also mixed, mastered, & recorded for countless independent artists. Learn more about Jared & The LN Team here.