
It's hard to blame musicians for not having a perfect gain stage... Most have never even heard of this aspect of signal processing.
Ignorance won't save you though. It's either done right or you've compromised your ability to have the highest quality song at the end of the day.
Your gain matters at every step, from the preamplifier, equalizer, compressor, converters, and even when printing the mix for your album release. Too much and you're clipping and distorting.
Too little gain is like saying "I know 4k Blu-Ray is a thing now but I'd rather sound like a VHS tape."
And that's the real crime, the situation most people find themselves in because they aren't aware of this critical balance between gain and resolution.
Today we're going to cover this topic in it's fullest extent. If you apply the information here to your next tracking and mixing session, you will, without a doubt, notice a difference.
To get this, you really need to understand the difference between gain and volume, which we've covered in our Gain vs. Volume article.
I'll explain what it is you're missing with great visual analogy so you know what to listen for, because it's subtle, but it's the difference between an amateur garage band and a pristine professional result. Let's jump right into it with...
What is Gain Staging?
Gain staging is the process of setting each gain stage to the proper levels to achieve a maximum quality, both in the analog or digital realm.
So what's a gain stage? It's every point at which you can adjust the amplitude of your signal. This includes trim knobs, input and output gain controls whether in a plugin or hardware, your mixer faders, the volume controls on your instruments, and more.
They all are meant to work in harmony so each piece of equipment in the signal chain receives the signal at the correct volume to maintain the highest resolution possible.
It's like a desktop puzzle. If your gain structure is too low, you undermine your ability to finish the puzzle by leaving pieces of the puzzle in the box. You can stand back and tell what the picture printed on the puzzle is, but if you move closer you'll see gaping holes in the image.
An Example of Bad & Good Gain Structure
Here is an example describing this process:

Your goal is to create a large sound stage full of details. When you record with levels too low or too high, it's like creating a tiny image and then zooming in during normalization, mastering, and when your listeners turn up the volume.
They'll hear a grainy version of what you intended, and whether they realize why or not, they'll know it doesn't sound like the other professional records they enjoy so much.
Aim For These Levels While Gain Staging
There's a lot of bad information out there that keeps getting repeated. Amateurs are telling each other where the peaks of their amplitudes should be hitting at a maximum, mainly because DAWs use sample-peak metering. That's not how this works or how to gauge it.
You shouldn't be worrying about peaks or maximums. You should be looking at averages, because the goal is to fill every computer bit with as much digital information as possible while operating at the levels in which your gear performs best.
To understand what levels you really need to be aiming at, we need to discuss the three main reasons for having so many gain stages in the first place:
- Distortion Ceiling
- Noise Floor
- Full Resolution
Let's look at each so we know why we're doing this, and then we'll discuss the technical numbers (the part that confuses people who do try to solve this problem).
The Listenable Dynamic Range
We can wrap the first two points up in one discussion. They both concern and are the boundaries of what is called the dynamic range of your signal. At the bottom is the natural noise floor of electronics and background sounds that creep into your signal, and at the top is your distortion ceiling.
You can look at it as a mathematical equation:
Distortion Ceiling - Noise Floor = Dynamic Range
Your dynamic range represents the volumes in which your signal is free from noise and isn't clipped and distorting, but there's a caveat as always. Just because you're a few decibels above the noise floor doesn't mean you're in the clear.
The reason is that that is a very quiet volume and you or your listener will have to raise the amplitude to hear it comfortably. In the process of boosting the volume, you're also boosting the noise floor. Here's an image to explain why this is a problem.
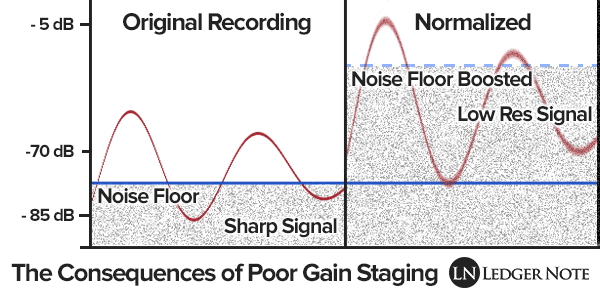
If you're only 5 dB above the noise floor, you will always be only 5 dB above the noise floor, because you didn't achieve a high signal-to-noise ration. This is because you just barely recorded in the dynamic range instead of dancing in the sweet spot where full resolution occurs (we'll get to this next).
Fortunately, we all have the computers and hard drive space to be recording in 24-bit these days (instead of the old 16-bit standard). For serious work you should be working in 32-bit. Each jump has given us a drastically larger dynamic range, but what this really means is it's driven the noise floor lower and lower.

The only people who have an excuse for recording near the noise floor these days are those who don't realize they need to be using a preamp with their microphones... and even then it's barely excusable (and easily fixable).
In the same vein, if you're recording too hot, you'll encounter the distortion ceiling. Electronically this refers to the maximum amount of voltage a signal path through a piece of hardware is designed to take.
Digitally it refers to the bits and information they can hold before their cup is too full. By the time you've balanced your levels in a mix, it'll look (and sound) like this:
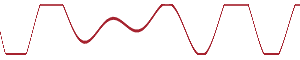
Everyone knows not to record too hot and to back off when the red light comes on, so let's not spend any time on that. Thankfully, all of these peculiarities are standardized, which allows us to discuss and find...
The Full Resolution Sweet Spot
Here's the short version of a long story. You can't just push it till you see your peaks nearing the red lights. You can't see what number is popping up as your peak and base your gain stage on that.
One reason, as we said before, is that we're dealing with averages (root mean square, actually) here, as is the hardware, software, and the human auditory system.
The second reason is that analog and digital systems use different decibel scales of measurement!
The difference is:
- Analog uses dBu, which stands for decibels unloaded
- Digital uses dBFS, which stands for decibels full scale
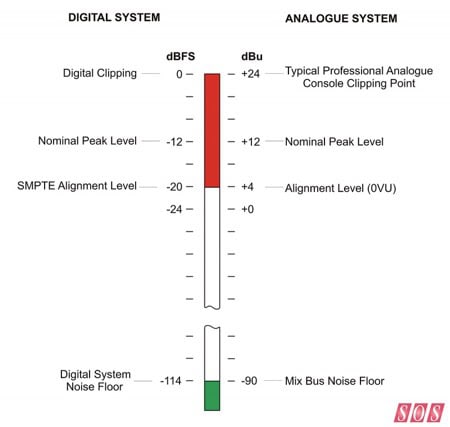
You can convert between the two, but it's unnecessary. What you'll never do is make them equal to each other. Although there's no exact standard, the best magic numbers to remember are:
0 dBu = -18 dBFS
This will keep you safe on any system. It also represents the sweet spot you want to set all of your gain stages to on average.
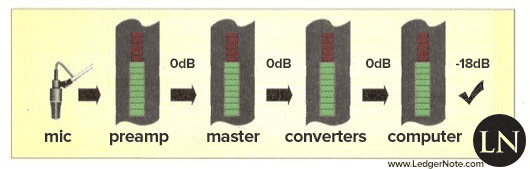
Let's explain with the discussion below while referencing the image above. Hardware equipment works in dBu, which is a measurement of voltage.
There's no maximum voltage you can send through a wire except for the fact that you'll burn it and break it at a certain point, although typically you'll hit a real distortion ceiling around +20-24 dBu.
Digital equipment like our sound cards, interfaces, DAWs, and computers as a whole work in dBFS, which is a measurement of detail held in a binary number. There is a maximum here, which is when you reach 0 dBFS, moving up from larger negative numbers.
But remember, at 24-bit and 32-bit recording you have plenty of headroom (about 18 decibels worth).
Finally, The Gain Staging Levels Are...
We said all of that above so we could say the following and have it make sense:
In the analog stage, you want to bounce around 0 dBu. You can go positive here without clipping, it's part of the design. But on average all of our gear is designed to perform best at that level. Transient peaks are fine as are dips below, but in general you want to be hanging out there at 0 dBu.
You don't need a voltage meter to check this. What you want to do is set all of your gains and trims to zero, right up the middle. This ensures there's no influence up the signal chain. But you do want it all hooked into the interface or mixer.
If you're on a mixing board you can watch the levels there (and will know how) but let's talk in terms of using a digital audio workstation (DAW) software, like the best DAWs including Pro Tool, Logic Pro, or FL Studio.
Again, set all of the faders to zero, and monitor your microphone (or instrument if you're direct injecting) levels on its own fader. You want to begin testing levels and set the trim on your preamplifier until you're dancing around -18 dBFS in the DAW on the fader.
Recall that -18 dBFS is equal to 0 dBu, so this means you're hitting your preamp's output at the right levels, which will mean you're hitting the input of the next piece of gear at the right level.
If the next piece is a compressor and you're compressing with 10 dBu of gain reduction, then you'll want to add 10 dBu back to the average signal with the output gain.
Your goal is to manage the output of each piece of gear so that you're dancing on average at 0 dBu, which will read -18 dBFS inside your recording software.
That's it. The ultimate goal here is to always be hitting your analog-to-digital converters (into your sound card or interface) and your digital-to-analog converters (back out to the speaker monitors) at 0 dBu / -18 dBFS. It is where they perform their best and you pack the bits full of as much resolution as possible.
You'll want to do the same once you've recorded at this perfect level and start working with plugins. Manage your level on each track this way so the signal is moving into and out of each effects plugin at the right level, and finally into the fader at -18 dBFS.
Of course you'll begin reducing levels as you mix, and the goal will then be to manage your levels at the mix bus compressor and master output.
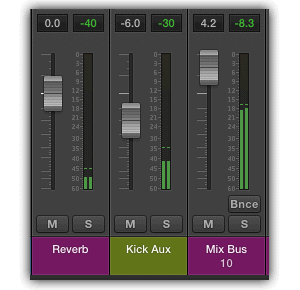
In the picture above, you can see my mix bus is dancing around -18 dB, although it peaked as far as -8.3 dB (it actually goes higher across the whole song). But averaging lower leaves plenty of headroom and dynamics for the mastering engineer to work with.
The tracks feeding those Reverb and Kick auxiliary busses are staged correctly too, although I'm feeding them in at lower levels. A good gain stage on each track keeps the noise floor down and crams in more detail.
You may not be able to average -18 dB in a full mix, but you will want to use all of the resolution you can by pumping as much volume as possible without clipping the peaks of your waveforms.
I try not to push a peak higher than -5 dB, personally, because some transients will slip past you even with compression. A limiter at 0 dB is always a good idea to catch these. If you need help, I've written about how to use a limiter here.
This does not mean to compress like crazy so you can get louder though. It's not a war for more volume at the cost of audio attrition. Leave plenty of headroom for mastering!
So remember... I'll say it again in a different way to help burn it into your noggin:
0 dB analog = -18 dB digital
It's good to understand why we're shooting for these numbers, even without digging into the math. But even if you forego understanding why, as long as you know these numbers you'll be set and achieve as great of results as the gain stage brainiac.
Tips to Maintain the Proper Gain Staging
There are a few things you can do to help you wrangle in your signals so they can hang in around -18 dBFS without peaking or sounding cruddy. The name of the game here is full resolution audio, but you don't want that full of noise and distortion either.
So besides managing your levels in and out of every piece of hardware and software, here's a couple other tips to keep you in the sweet spot.
Attenuate Instead of Boost
This goes for faders and equalizers. You'll hear people say that you should cut instead of boost when EQing, but you'll hardly find the reason why people recommend subtractive equalization. There are several reasons, all of which are complex and beyond the scope of this conversation.
But the related reason is that you've recorded in at the proper levels and have found that you want to sculpt the frequency response of a track so it sits in the mix better.
Any frequency range that you boost will also boost the noise floor in that range. If you want a certain frequency to sound louder, then you should cut around it instead. This keeps the noise low.
Obviously if you cut drastically you'll have to push up the fader, which on the surface seems to create the same problem. But if you've done your recording engineer job properly, you'll have a huge signal-to-noise ratio where this isn't a problem.
The same goes for boosting on one track, but what you don't want is a boosted, accumulated noise floor where it's all added together and noticeable.
Compress on the Way In
Although everything starts with your vocal or instrument miking, there is a way to raise the RMS (averaged) value of your signal, and therefore your signal-to-noise ratio, which is to compress your signal on the way in before you hit the converters.
What you're doing is minimizing the height of amplitude peaks so that they're closer to the average, which in turn raises the average when you turn up the make-up gain.
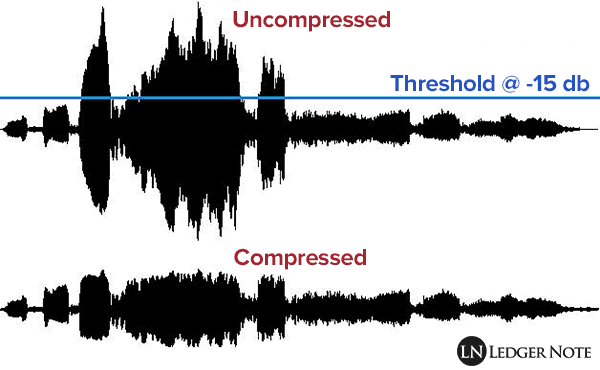
While this does increase the volume of the noise floor a bit, your signal-to-noise ratio increases at a greater rate, and since human hearing is based on averages the detectable noise is even lower.
It also helps you then run through each piece of the signal path without adding more noise in each jump of the chain.
Gain Staging is Everything for Focused Imaging
None of this will make you a better musician or songwriter, but it will make each recording incrementally more enjoyable. And as a mixer or recording engineer, there's no excuse for not perfectly executing your gain staging.
This is a large part of how newer, non-minimally orchestrated and arranged music still sounds as crystal clear as a completely digital track with three or four tracks.
Achieving such high levels of perfection requires a lot of gear, acoustic treatment, and mixing skills, but at minimum you can at least easily get this part right and then move on to the next part of the equation. Keep grinding!
Jared H.
 Jared has surpassed his 20th year in the music industry. He acts as owner, editor, lead author, and web designer of LedgerNote, as well as co-author on all articles. He has released 4 independent albums and merchandise to global sales. He has also mixed, mastered, & recorded for countless independent artists. Learn more about Jared & The LN Team here.