There are very few topics and techniques that amateur mixing and mastering engineers will avoid out of the sheer complexity and thus confusion. One of them is stereo bus compression and auxiliary bus compression.
Today our goal is to remove this shroud of mystery so all of us can enjoy the fruits of this advanced mixing technique. It's not nearly as complicated once you understand what you're not supposed to do!
Once you're out of the danger zone, your songs will benefit from a sense of coherence that will be directly attributed to the increased punch and glue coming out of your mix bus, all thanks to your carefully tweaked compressor settings.
At the same time, let's be clear:
Not all professional mixers prefer this method. Some swear by leaving all of this work up to the mastering engineer.
But at the same time, we aren't talking about that level of compression, where you make adjustments after the mix is finalized. We're talking about mixing into a compressor as part of the process, and doing so fairly lightly as to leave plenty of dynamics and headroom for the mastering engineer to perfect.
So without further ado, let's get down to business, get this info out there, and get back to mixing...
What is Mix Bus Compression?
Mix bus compression is the act of mixing through a compressor on the master output, although the term is commonly used today also to refer to sub-mixing sets of instruments on an auxiliary bus as well, such as drums.
It is used to give a sense of "glue and punch" to the mix, creating a sense of cohesion between the various tracks.
This can be achieved with plugin compressors or outboard, hardware compressors. With today's modern plugins, neither style is at a disadvantage. It boils down to preference and access to the best compressors for the job.
The important aspect to reiterate is that we aren't printing the mix and then applying compression, which should be left to the mastering stage of the process.
Before we do anything we are slapping compression on the mix bus so that our audio is massaged by it from the get-go, so we can make the appropriate sonic choices initially instead of disrupting our careful balance later.
This glue is provided by this effect: Consider what happens when you compress a waveform that consists of a single sound. Now think about compressing a waveform built out of two or more combined sounds. They will be impacted together. This is the core difference.
Which Mix Bus Compressor Should We Use?
There are four main types of compressors, whether they're analog or digital:
- VCA (Voltage-Controlled Amplifier)
- FET (Field-Effect Transistor)
- Variable-Mu Tubes
- Optical Compressors
The difference between them comes from the circuitry applied to execute the gain reduction. Each may offer access to various time-based controls as well, such as attack, release, and even the choice of setting the compression threshold and ratio.
The discussion of which type is best for bus compression rages on, but it's my opinion that whether you're using a valve, vacuum tube, or transistor to get the job done matters little. What matters is your preference for transparency or coloration and how "musical" either option is.
What we mean by musical is how obvious the compression effect is to the listener. Even most of that is derived from the settings you choose.
The best way to gain an understanding of how each of these works is to use a plugin that allows you to switch between each emulated circuit type with the same settings so you can listen to the changes. Most default, stock plugins is your DAW will have this ability, if not four separate ones you can bypass to create the comparison.
It's useful to mention that the Neve, SSL, and API plugins are every bit as good as their hardware brethren, and although costly they're still significantly cheaper than equivalent outboard options.
Pro-Tip: This is non-negotiable. If you choose to use two dual-mono compressors, they must have a stereo link capability so that they both respond equally to peaks in either channel. Otherwise you will offset the center of your imaging constantly.
Don't make your listeners sea-sick. If you go this route, you can disconnect the stereo link for tracking mono instruments as well and make your budget stretch.
As far as specific recommendations, you could honestly get the job done with any on our list of best compressors, but if we had to pluck one out of the bunch it'd be the Empirical Labs Distressor.

Trends come and go but the Distressor never falls out of favor. The one above is mono but you can score a stereo pair for less than the price of two mono's.
You'll notice that you don't even need a side-chain detector (as mentioned below) because these beasts come with high-pass filter and mid-range detector options.
What Stereo Bus Compressor Settings Are Best?
I'm answering this question although most of us know the answer already:
"There are no set-and-forget settings. Each song will demand a unique set of parameters applied."
With that being said, there are some features you will appreciate having that will make your life a lot easier and bypass the need for too much extra auxiliary bus compression. Let's look at those and then, hesitantly, I'll give the newcomers a starting place to work from.
Auto-Release
Because we're no longer talking about individual (and thus predictable) instruments, it's advantageous to accept the help of computers and look-ahead algorithms.
Some compressors feature an auto-release that will attempt to determine just how long it should "hold on" to the compression before letting go and returning to full amplitude again.
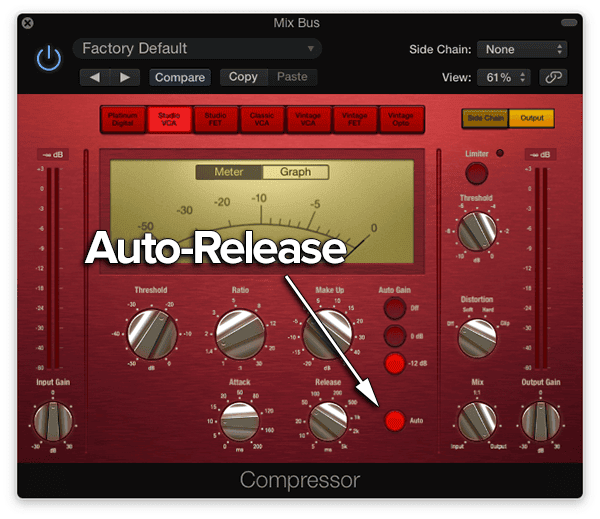
The mix bus will be receiving all of the tracks and so there's not going to be any regular dynamics from which you can set your release. It's going to be extremely variable. Letting the auto-release handle it can help you achieve the sense of "musicality" we mentioned before.
Side-Chain Detection
Although a side-chain option is par for the course on plugins, not all hardware compressors feature this. What it allows you to do is force the compressor to react to a separate track yet still act on the original.
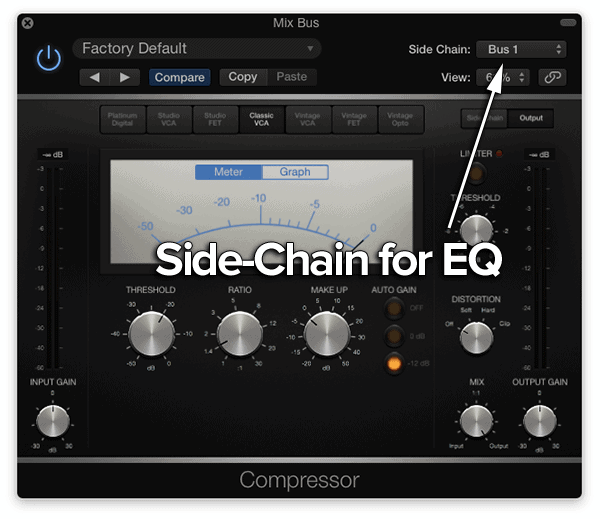
Take the example of a modern rap song with a huge, tuned sub-bass kick acting as the kick and the bass. If you attempt to bus compress with this running through it you're going to end up with a pumping sensation every time the kick fires off.
But with side-chain detection you can run a copy of the mix through an equalizer on a bus to EQ the low frequencies out or even a copy of the mix without the kick in it. So now you can apply your sub-mix compression while ignoring the kick altogether and bypass the pumping problems.
Multi-Band Compression
Most of us are familiar with this concept thanks to the advent of parametric equalization. It works the same way on a compressor, where the frequency spectrum can be separated into bands of two or more (up to 8 usually). So here you could compress the 2k-5k frequency range by itself, for example.
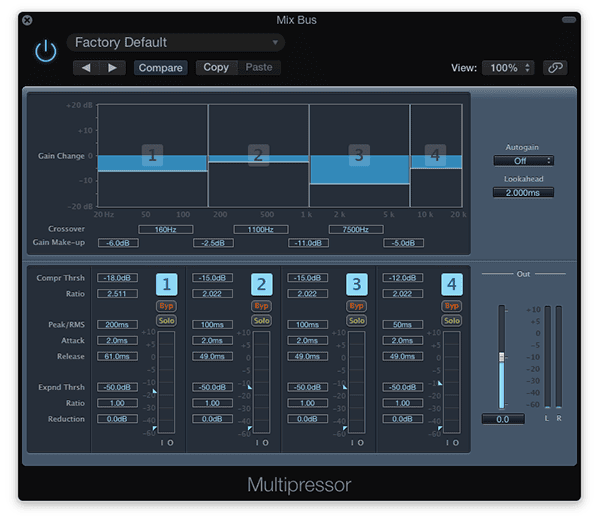
My opinion on this is that it should be left to the mastering engineer. If you're running into problems where you feel multi-band work is necessary, you probably need to work on those individual tracks versus fixing them on the mix bus.
Other Considerations
Remember the two main purposes of compression:
- To gain consistency within the variances of amplitudes
- To sculpt each musical event to your preferences
Most amateurs don't even realize the second purpose is an option. They usually turn the attack and release as fast as possible and crush everything.
But sometimes we want these initial transient hits to exist, so we set a slower attack. Maybe we want a really smooth, Pat Metheny style guitar sound, so we set a slower release. Or maybe we're dealing with rap vocals and do want fast settings on both.
Remember to ponder these options as you set up your stereo bus compression. Listen closely to all of the instruments in the mix and see how you're affecting each in the summed total.
Mix with your ears, not your eyes!
It's easy to lose the musicality of the mix if you're not paying attention. You'll find that this is intimately tied to the tempo and genre of the song. Faster tempos will need a faster attack and release.
You don't want your release longer than when the next kick or big guitar strum comes through. You'll want a slower attack if you still want your snares to pop, etc.
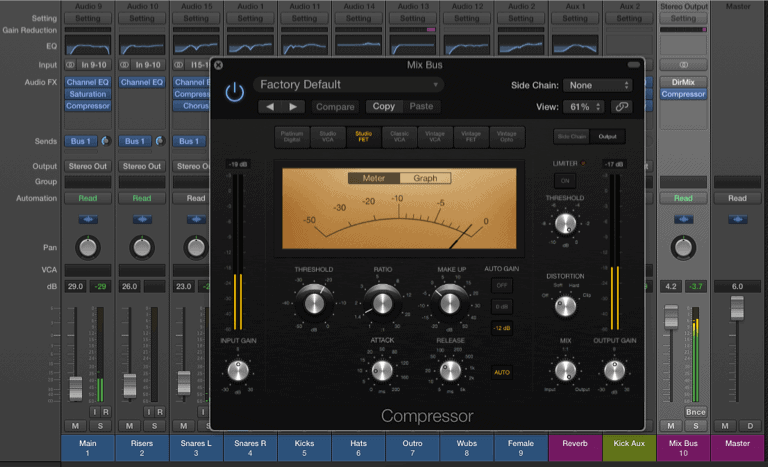
A Decent Starting Point
We aren't looking to squash anything here, just glue it together. So a great place to start is a with a low ratio and a medium attack and release. Then slowly drop your threshold down until you're seeing anywhere from one to three decibels of compression.
- Ratio: 1.3:1 up to 2:1
- Attack: 50 milliseconds
- Release: 150 milliseconds
- Threshold: 1 to 2 dB in gain reduction
Please take this as a starting point and not a template. Every song is unique and will require their own tweaks to these parameters.
Pro-Tip: Use the make-up gain to match the subjective levels of the mix at first, not for headroom or staying in the sweet spot of the converters. This will allow you to bypass the compressor so you can have an easy A/B comparison of the effect. When you're done you can re-dial in the make-up gain.
A couple final words of warning so you don't self-destruct your mix...
Don't Mix With Master Bus Compression Settings
The biggest issue people run into with mix bus compression is they go too hard. They set too high of a ratio and too low of a threshold. Think about this...
You're already compressing each track individually, most likely. Some people might then push them through a set of auxiliary bus compressors. And finally they're hitting the stereo bus compressor. And there might even be a limiter set up too!
The problem arises that the faders get wonky. They stop doing what you expect them to do.
For instance, let's say you want to increase the volume of a synthesizer solo so you push that fader up, but your compressor is post fader and then you hit the mix bus as well. No matter how much you push it up, you can't seem to get any more volume and it starts to sound worse.
Meanwhile the rest of your mix is being compressed harder along side the synth thanks to the mix bus compressor, so instead of getting a louder synth, you're getting an objectively quiter synth that is subjectively louder due to the root-mean-square amplitude, and you're now getting less volume out of everything else.
Typing and reading that was confusing, let alone finding yourself in the midst of mixing that way. This is why we say to compress very lightly on the stereo bus!
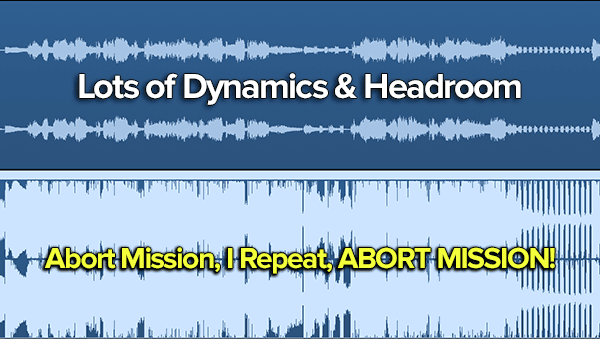
It should be said too, that if your intention is to ship the mixes off to a mastering engineer, you shouldn't be needing or using limiters. You shouldn't be normalizing the mixes with too much make-up gain.
You shouldn't be attempting to get to perfection yourself, just semi-close. Leave them headroom and dynamics to work with so you aren't paying for a salvage mission instead of a polish.
Use a Bus Compressor With Care
There's not much more that can be said. All the words in the world can't explain what you have to hear for yourself.
Start with the settings above and tweak them based on your tempo, genre, and dynamic material in the song and then as you mix into it, you'll hear the cohesion you've been seeking but not yet attained.
Mix bus compression takes time to get accustomed to, but once you start nailing it, your listeners will notice. Until next time, happy mixing!
Jared H.
 Jared has surpassed his 20th year in the music industry. He acts as owner, editor, lead author, and web designer of LedgerNote, as well as co-author on all articles. He has released 4 independent albums and merchandise to global sales. He has also mixed, mastered, & recorded for countless independent artists. Learn more about Jared & The LN Team here.