There's a danger to studio recording and mixing the results. We all fall prey to using our eyes instead of our ears. It's simply a part of how our brains are wired and how we survived all this time.
But the beasts of the recording jungle, your clients and audience, will eat you alive if you listen with your eyes instead of your ears. It's a trap but also a legitimate shortcut that can take you a solid 80% of the way to your final results.
You just have to have the discipline to switch back to ear-mode before signing off.
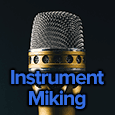
Instrument miking is one of those areas where you can get most of the way to completion without listening, especially as an experienced veteran.
There are general tips and tricks that will help you fly through miking up an entire band, and in most live settings you'll find that you can keep a lot of it without having to go back and tweak things.
But in the studio, those final tweaks are the difference between a grammy and a flop. With that being said, let's take a look (and listen!) at the main ways to place your microphone in front of an instrument for the highest quality recordings.
Miking Techniques - Placement Variables
The first thing you need to do to start wrangling in the infinite possibilities is to consider the four main variables that will have a significant impact on the way your results sound:
- The type of microphone and its own frequency response
- The distance and angle of the mic from the sound source
- The acoustic footprint of the room you're situated in
- Where the instrument and microphone are in the room
If you can deal with those four items effectively, everything else will be negligible and not worth worrying about. So what do we mean by each of these?
Mic Type & Frequency Response
There are different types of microphones. For example, there are dynamics, condensers, ribbons, and more, but those are likely the type you'll use during a live gig or studio session. Each type performs differently and each model has a different coloration, which is to say frequency response.
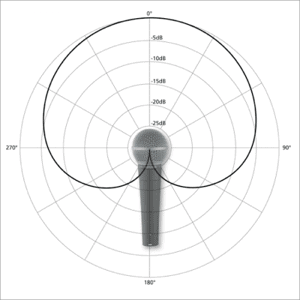
There are also various pickup patterns, but you'll most likely use cardioid (but know the rest too!)
Some are darker, some are brighter, some have a proximity effect, etc. You'll want to be familiar with the broad strokes and common microphones, as well as the preamplifiers you're using.
If you're miking an entire band with a drum set, you'll want to prioritize your best mics with your best mic preamps on the most important instruments.
Microphone Distance & Angle
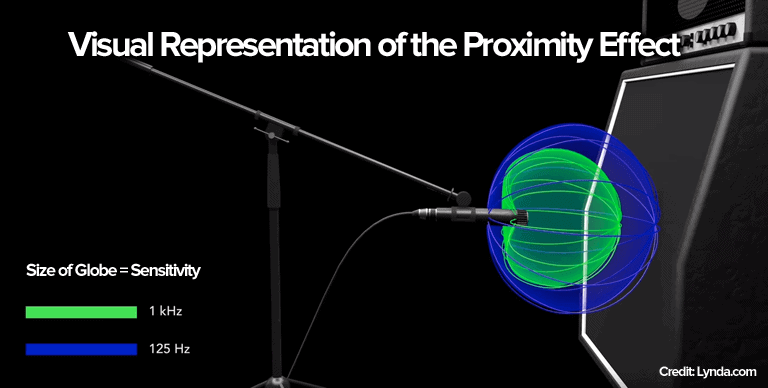
When thinking about this, the first thing that comes to mind for me is the proximity effect. Most mics display some amount of this effect while some have an extremely pronounced effect. It's basically when a microphone is placed too close to a sound source and the bass frequencies are boosted.
This can be taken advantage of (like getting that radio DJ voice effect) but it can also catch you off guard if you aren't aware of it. Try to keep 6 to 12 inches of distance between the mic and any instrument with much bass.
You'll also want to consider the amount of air being pushed into the diaphragm of the microphone. A vocalist or brass player is going to be pushing a lot of wind in one direction.
A trick to employ here to not encounter plosives is to rotate the mic horizontally or vertically away from the sound source by 15 to 30 degrees. Instead of being perpendicular and taking the full brunt of the force, the diaphragm can now let the air slide past it to some degree, reflecting some of the force and reducing the chance of a loud pop coming through.
Of course, wind screens and pop guards can help if available. Listen as you do this though, it can alter the frequency response. It won't be drastic but in the studio, every bit counts.
Room Acoustics
If you're in a live bar with tons of people chattering, who cares. You're stuck with a provided stage and the sound guy will throw up a live mix for you to help compensate.
If you're in a quiet room recording material for you debut album, you'll definitely care. Even a room with perfect acoustic treatment will have varying responses in different zones of the room.
Acoustic treatment will tame reflections and absorb bass so you aren't left with a muddy, fluttery mess when you mix. But if you don't have access to a treated room, you can follow a few pieces of advice to minimize the damage.
The first is to employ close miking, where you place the microphone as close to the amplifier or instrument as possible (generally 12 inches, or closer if you want the proximity effect).
What this does is ensure the signal from the source is much louder in the recording than the reflections bouncing around the room, whether from the same instrument or others (called bleed). Equalization can take care of a bunch of the mud later.
The Source & Microphone in the Room
Finally, you have to consider your own placement within the room. Close miking helps, but there are other ways to mitigate the bad effects of poor room acoustics.
The first would be to stay away from corners and side walls. These areas will boost the bass in anything you record, due to science and stuff. It has to do with standing waves.
You'll want to listen in and monitor as you set up in the middle of the room (technically just past middle aiming down the long distance of a non-square room) so you don't end up in the peak or trough of a standing wave. This can boost frequencies or suck the life out of them. Always listen along as you set up.
Instrument Miking Techniques
So now you're managing to find a decent spot in the room and have matched mics and preamps to the right instruments. It's time to put mics in front of musicians!
We'll start with the most generally applicable and move down to other techniques that you can use with the right gear and a well-treated room.
The 1:1 & 3:1 Methods
These are the "ole reliables." One-to-one refers to the ratio of the distance of the microphone from the instrument to the width of part of the instrument that's making the sound.
I don't agree with this concept under or over a certain width (like that of a guitar fretboard or a grand piano), but people mention it so I'm doing the same so you'll at least know what they're talking about.
The real rule here is "put it where it sounds good" while keeping in mind the proximity effect and not introducing too much bleed and room reflections.
Once you've established a good distance, let this be your "1." That one is the distance of the mic from the instrument. Now we can talk about the 3-to-1 method, which is a rule of thumb for Stereo Miking of the same source and A-B Miking of different sources.
It means that if you're going to use two microphones on the same source, the mics need to be three times as far apart from each other as they are close to the instrument. So take your "1" measurement and make sure triple that distance separates the two mics.
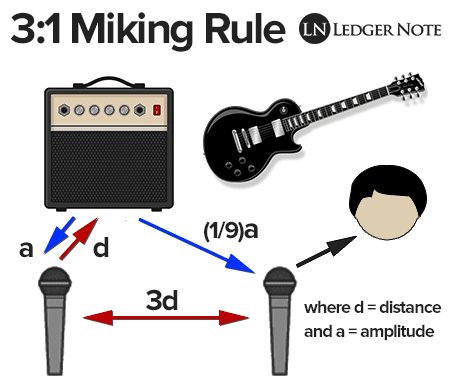
The reason for this is to make sure you don't end up with phase issues. Phase is when two waveforms of the same source recombine and interfere with each other.
Constructive interference is when certain frequencies are boosted in volume, while deconstructive interference is when they cancel each other out. It has to do with peaks and peaks lining up, or a peak and trough canceling, respectively.
The 3-to-1 rule keeps this from happening, mathematically, by reducing the volume of bleed between the two mics. The same goes for miking different sources.
Or, alternatively, you can use an X-Y mic pattern where the mics are oriented vertically in the same space so the distance is identical. Either the 3:1 Rule or the X-Y Pattern are the go-to miking techniques most for stereo recordings.
You can also investigate miking techniques like Blumlein stereo, Decca tree, ORTF stereo, and mid-side miking. I find them all too complicated when the above two are more than sufficient and avoid phase cancellation perfectly while producing plenty of stereo width.
Close Miking
We already talked about this so I'll keep it short. Close miking is when you place the microphone 12 inches or less from the sound source. The purpose is to minimize bleed from other instruments and to block out reflections from in the room.
You aren't actually blocking anything, but what happens is that the main source is much louder than the unwanted noise in the recorded signal. So when you mix and balance levels, the noise will be too quiet to be noticeable.
But get too close with the wrong mic and you'll get a huge bass boost (again, called the proximity effect).
Distance Miking
Distant miking is not recommended for rooms without acoustic treatment or great separation between instruments, unless you purposefully intend to record the natural acoustic environment full of reverbs and slapbacks, like in a cathedral or auditorium.
Three feet of distance is where you get into the realm of distance miking. This can work great for drum overheads since they're so loud, but otherwise it's not really a current trend for studio recording.
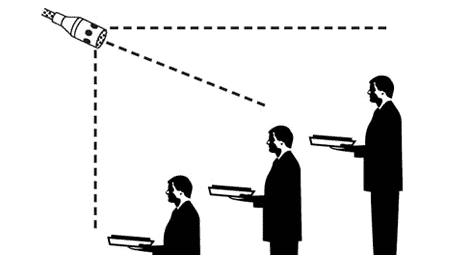
For live choirs or orchestras it's very pervasive, if not the main technique.
Accent Miking
Accent miking is kind of a sub-technique. You'll hear it talked about in the sense of close miking one member of an orchestra, for example, so their volume can be increased during a flute solo.
That's the correct interpretation, although you'll hear people discuss it as a secondary mic used to capture "accents" like string rubs on a guitar so they can be controlled in a mix. Either way, it's meant to offer more mix control.
Ambient Miking
You'll see this done in two ways for two reasons. The first is Miking the Walls with boundary microphones. These "pressure zone microphones" have a hemisphere pickup pattern and are literally placed on the walls to capture the entire room at once. You'll probably never use this method, ever.
The other method is used a ton, especially in television and film. It's an extreme form of distance miking where you go capture the ambience of the outdoors.
You might want an isolated sound clip of the crickets churping to mix into a lapel-miked intimate conversation later. The same goes for music where you can record the audience and all of the reverbs for further control.
Points of Contact
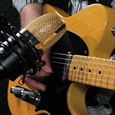
This is a general guide for when you aren't sure what to do. With guitars, woodwinds, and other complex instruments it can be unclear on where to set your mic. The trick is to use multiple mics, mind the 3:1 rule, and capture every "point of contact."
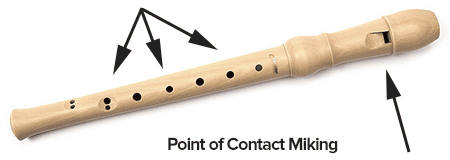
So take a recorder as your example, like above. You'll want to aim a mic at the mouthpiece where the musician is blowing wind past, and at the finger holes where the notes are formed.
Then you can mix them together and find the perfect natural balance. You may not even need to employ any of our equalization tips if you get lucky!
The Musician's Ear
Although this is very subjective, most musicians play in a way that is pleasing to their own ears as they play. It's not what the audience hears, but we can be assured it sounds good.
So another method for miking an instrument is to use a boom mic stand and place it over the performer's shoulder near their ear. Now you'll be recording precisely what they're hearing, so you know it's tolerable at least, if not absolutely fantastic.
Freeform Monitoring
This is the real rule. There are no true sets of rules you can employ each time without having to listen with some headphones as you set up. You need to be actively engaged in sweeping the mics around to find the sweet spots as you try out the methods above. Every situation is unique.
The methods above get you close, but you have to get your hands dirty to make it the rest of the way to perfection. So grab your best studio headphones and listen as the musician plays and you move the mic about.
Miking Techniques Are Plentiful But Easy
This is meant to be an overview to give you a framework to work within. Over time, we will continue to publish instrument-specific articles such as our guide to miking an acoustic guitar. Feel free to use the search function at the top of the page to find an article related to the specific instrument in question.
Otherwise, these techniques and tips will land you in the ballpark and then you can monitor and sweep to find the right spot. There's no magic or right or wrong, just trial and error. Happy recording!
Jared H.
 Jared has surpassed his 20th year in the music industry. He acts as owner, editor, lead author, and web designer of LedgerNote, as well as co-author on all articles. He has released 4 independent albums and merchandise to global sales. He has also mixed, mastered, & recorded for countless independent artists. Learn more about Jared & The LN Team here.