The following review may contain affiliate links which may earn us a small commission when you click on them, at no extra cost for you. As an Amazon Associate we earn from qualifying purchases.
You bought the best microphone you could get your hands on and now it's time to pair it with the best mic preamp possible!
A microphone preamplifier is the key to achieving the highest quality recordings your mic has to offer. So many people keep buying better mic's and yet they aren't satisfied because they don't know the secret... those crappy mixer and interface preamps aren't cutting it!
So, if you are looking for a way to achieve the highest sound quality, we got you covered - check out our review of the best mic preamps! Our selection includes the very best equipment for every budget and skill levels!
Not sure whether you need a mic-preamp? Click here to understand what a mic-preamp is and why you do need one.
Click here to go to the FAQs
Included in this guide:
| Avalon VT 737SP | Best mic preamp when budget is not an issue | Buy on Amazon |
| DBX 286S | Best single-channel preamp (which wont break the bank!) | Buy on Amazon |
| Grace Design M101 | Best for home producers seeking professional quality | Buy on Amazon |
| Universal Audio Solo/610 | High-end results with no frills design | Buy on Amazon |
| Neve 1073DPX | Best dual channel preamp | Buy on Amazon |
| Focusrite Scarlett 2i2 3rd Gen | Best for voiceover and vlogs | Buy on Amazon |
| Behringer Pro MIC2200 V2 | Best for all-in-one solution for beginners | Buy on Amazon |
| Focusrite Scarlett Octopre | Best for multiple-channels preamp | Buy on Amazon |
Avalon VT 737SP
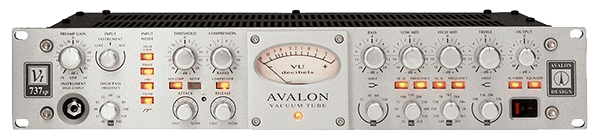
The Avalon VT-737sp is considered by many an engineering jewel. Boasting a superlative tube amp, sweepable EQ and high quality compressor, it’s not surprising the most popular channel strip. The amplifier works miracles on vocals adding a warm color while providing access to quality compressor and equalizer. You can run the most basic mic through the VT-737sp and still achieve a high quality, warm and sweet sound. Recording studios specializing in rap, R&B, and pop and high profile musician/singers caliber of Jay-z, Beyonce, Dr. Dre and The Rolling Stones have featured and/or worked with one of these.
The Avalon VT-737sp is a mighty piece of equipment with far more functions that a beginner will be able to name, yet will easily allow the more experienced users to bring their music to the next level. The VT-737sp is a rack-mounted sturdy machine with a classic functional design.
Specs
- Preamp type: 3 inputs pre-amp with mic, instrument, line
- Discrete Class A equalizer, variable active and switched passive design
- Compressor with optical passive attenuator incorporating twin vacuum tubes and stereo link
- Four dual triode vacuum tubes (Sovtek 6922)
- Inputs: 1 x XLR (mic), 1 x XLR (line in), 1 x 1/4" (Hi-Z)
- Outputs: 1 x XLR (line out)
- Other I/O: 1 x 1/4" (link)
- Dimensions: 19 x 12 x 35 in (482 x 305 x 89mm)
- Weight: 22lbs (10kg)
Pros:
- High quality all-in-one solution
- Ideal for digital recording
- Vacuum tubes provide incomparable sound integrity
- Vintage and sturdy design
Cons:
- Price tag (you do get what you pay for!)
DBX 286S

DBX are veterans in the signal processing game and that shows in the DBX 286s. In this channel strip, you gain access to their entry-level preamplifiers and also their popular compression. It mounts a de-esser, which gets rid of the sibilance that will spike out on "S" consonants in vocals or string scrapes on guitar, etc.
It also has a compressor on board which when used in live recordings is great in order to avoid any accidental clipping and distortion before hitting the converters.
This particular model is a solid-state and single channel preamp which will suit most people's needs just fine. Notice that this is a rackmount unit. You can set it on your desk if you don't have a rack, but I'd recommend getting some of those fuzzy sticker pads to put on the bottom so you don't scrape up your desk.
Specs
- Preamp type: Solid State Channel Strip with equalizer and compressor
- Other features: De-esser, Enhancer, Expander/Gate
- Inputs: 1 x XLR (mic), 1 x 1/4" (line)
- Outputs: 1 x 1/4"
- Other I/O: 1 x 1/4" (insert)
- Dimension: 1.75" x 5.75" x 19" (4.5cm x 14.6cm x 48.5cm)
- Weight: 4.5 lbs (2.04 Kgs)
Pros:
- Great value for quality
- Simple and straightforward to set up and use
- Enhancer’s LF Detail / HF Detail add warmth and clarity for vocals
- DBX compression is ideal for vocals
Cons:
- One channel
- Quite noisy
Grace Design M101
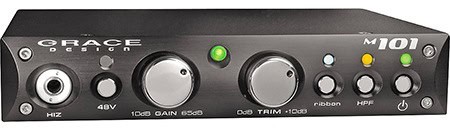
The m101 is a favorite among home users and small studios looking for either a direct injection point or a preamp that is absolutely as transparent as possible. Basically, what this guy does is it takes your microphone and show you its true potential. It unlocks the most value out of any mic you throw at it.
It comes in this half-unit desktop version that can be rack-mounted with ears or on a shelf, and also comes in a 500 Series version called the m501.
The Grace Design m101 has a simple and clean design however has all the standard knobs and controls expected on a preamp of this caliber including a gain switch with 12 positions giving up to 65dB of boosts to instruments and mics alike. It also has a ribbon mode which will deliver a gain boost and protect the most delicate part of the machine.
Specs
- Preamp type: Solid state single channel
- Inputs: 1 x XLR, 1 x 1/4" (Hi-Z)
- Outputs: 1 x XLR, 1 x 1/4" (Balanced), 1 x 1/4" (Unbalanced)
- Dimensions: 8.5 x 9.0 x 1.7" (216 x 228 x 43mm)
- Weight: 2.4 lbs (1.09 kg)
Pros:
- High quality components
- Ribbon mode” to protect the delicate ribbon mics
- Simple design
Cons:
- One channel
- No EQ nor compressor
- Mostly for mics, it won’t work well with instruments
Universal Audio Solo/610
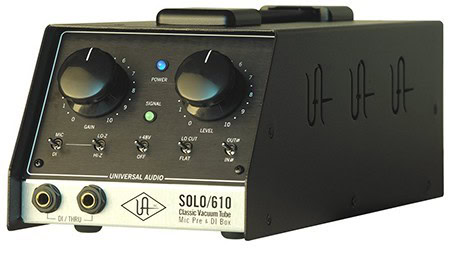
Another standalone lunchbox chassis, the Universal Audio SOLO/610 is modelled after the classic Putnam 610 pre's that are highly coveted for their beautiful tube coloration. Like all at this range, it's got a low-cut feature, phantom power, impedance settings for the tube and D.I. input, and phase reversing.
This is a single channel preamplifier with phase reversing and tube circuitry. It has a feature the others haven't featured: a ground lift to disconnect the ground loop and remove any hum and buzz that's being picked up by nearby electronics.
The low-cut switch is going to take care of most of that, but you may not want to engage the low-cut depending on what you're recording, so this extra option is very nice.
Specs
- Preamp type: single channel tube
- Inputs: 1 x XLR (Mic), 1 x 1/4" (Hi-Z)
- Outputs: 1 x XLR, 1 x 1/4" (DI Thru)
- Dimensions: 5 x 14 x 5.75 (127 x 355 x 146mm)
- Weight: 9 lbs (4 kg)
Pros:
- Rugged, well built and portable
- Sophisticated sound
- DI input with loop-through functionality
Cons:
- Noisy
- Vacuum tubes may need replacement after frequent use to maintain quality output
Neve 1073DPX
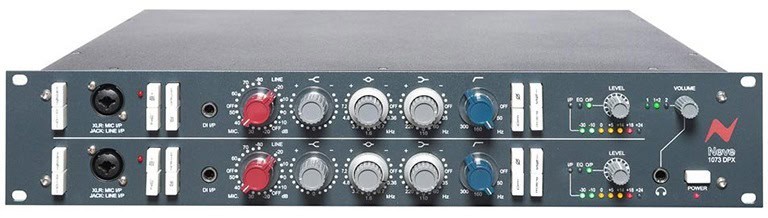
The 1073 might be the option with the most pleasing and noticeable color to it.
As you look around online you'll see a lot of 1073 numbers with letters tagged after it. Do not be scared: this is denoting the 500 Series, the EQ alone, etc.as overtime Neve has redesigned the original model to enhance quality adding and removing features in order to showcase the best possible preamplifier.
The classic console version was just the 1073, featuring a preamplifier and an equalizer and that's what you're looking at here, turned sideways with two channels and sought after quality features. If you scoop this up you want two channels so you can record stereo sources as well. You've heard this monster on most of the most famous records since 1970. You've got direct injection input, inserts on the back, headphone monitoring, level meters onboard, and everything else you could need.
The equalizer has 3-bands and a dedicated high-pass filter. Basically, you can use this live or in the studio and dial in the perfect mix and commit it to the take if you prefer instead of doing it all in the box with plugins.
Specs
- Preamp type: solid state dual channel
- Inputs: 2 x XLR-1/4" combo (mic/line), 4 x XLR (mic/line)
- Outputs: 2 x XLR (line)
- Other I/O: 2 x 1/4" (DI), 4 x 1/4" (send/return)
- Dimensions: 3.5 x 14 x 19 (89 x 355 x 483mm)
- Weight: 22 lbs (10 kg)
Pros:
- Multichannel
- Enhanced musical and EQ flexibility
- Signal monitoring (incl. headphone monitoring)
- Top quality components
Cons:
- Price tag
Focusrite Scarlett 2i2 3rd gen
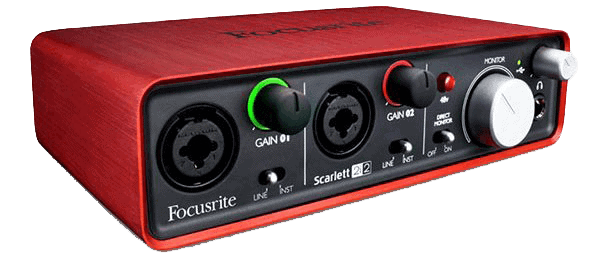
Are you an aspiring youtuber, a podcaster or simply interfacing for the first time to the world of mic preamps and need an affordable, simple yet reliable solution? Look no further than the Focusrite Scarlett 2i2 3rd Gen. It may be tiny and considered only an entry level interface, however, this mighty solution delivers great performance and offers great features without breaking the bank. Recording quality is simply amazing at this price range and the 3rd generation preamps assure high quality sound across the whole gain range - bonus point: the extra amp it’s a blessing for soft spoken podcasters.
The Scarlett 2i2 is powered by USB-C and able to give immediate feedback on input gain level through the halo metering LEDs on the control panel.
When purchasing the Scarlett 2i2 3rd gen you will receive access to Ableton Live Lite, Plug-in Collective access and Hitmaker Expansion Bundle. Moreover you’ll receive a 3-month Avid Pro Tools Subscription.
Specs
- Preamp type: dual channel
- Inputs: 2 x XLR-1/4" combo (mic/line/Hi-Z)
- Outputs: 2 x 1/4" TRS
- Headphones: 1 x 1/4"
- Dimensions: 1.9 x 6.9 x 3.9 (48 x 176 x 99mm)
- Weight: 1 lbs (0.5 kg)
Pros:
- Easy to set up and use
- Affordable, portable and simple
- USB powered
- Comes with a software bundle and supports iPad Pro
Cons:
- Flimsy unit (expected at this price tag)
- Lacks features of more advanced models
Behringer PRO MIC2200

Historically, Behringer has been a manufacturer of high quality equipment at affordable prices. The Pro MIC 2200 is not different: it delivers high quality sound with the warm tone of the old generation tube-equipped recorded sounds, making it ideal for instrument recordings.
The Pro Mic 2200 comes in at a larger scale than most entry level preamps and boasts a parametric equalizer, multi LEDs level controls and an ultra-wide bandwidth (10Hz-200Hz). Additionally, low-end resonance can be cleared up by the apposite switch making the Pro Mic 2200 a feature-packed piece of equipment.
This fine machine is designed for beginners who are looking to step-up their game through the use of advanced components without splurging too much.
Specs
- Preamp type: Low noise dual microphone / line preamps
- Inputs: 2 x XLR 2x TRS Phone
- Outputs: 2 x XLR, 2 x TRS Phone
- Dimensions: 19 x 8 x 1.6 (480 x 220 x 40mm)
- Weight: 5 lbs (2.3 kg)
Pros:
- Integrated equalizer with tone control
- Ultra-wide bandwidth from 10 Hz to 200 kHz
- Packed with necessary features at an affordable price
Cons:
- Flimsy unit (expected at this price tag)
- Budget components
- Lacks features of more advanced models
Focusrite Scarlett Octopre
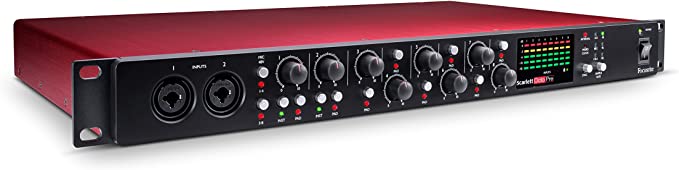
The Focusrite Scarlett Octopre boasts 8 second generation mic/line preamps providing a wealth of facilities, pads and headroom for additional inputs which will satisfy the most demanding producers out there. The Scarlett OctorPre additional analogue inputs, preamp and compressor can be added to any interface that is equipped with ADAT through the use of a single cable.
The Scarlett OctoPre will support sample rates up to 192kHz however don’t forget that ADAT technology will only support 4 of the 8 channels at 192kHz. By using 2 optical cables you will be able to use all the 8 channels however at 96kHz which is still quite useful if your interface has two ADAT inputs.
Focsurite is famous for its low noise and low distortion sounds and the Scarlett octopre8 is no exception: get ready to be amazed by the natural sounding of the output no matter the input.
Specs
- Preamp type: solid state multi-channel
- Inputs: 8 x XLR-1/4" combo
- Outputs: 8 x 1/4"
- Other I/O: 2 x Optical Toslink (ADAT)
- Dimensions: 11.2 x 19 x 1.7 (286 x 482.1 x 44.4 mm)
- Weight: 7.1 lbs (3 kg)
Pros:
- Multichannel
- ADAT compatible
Cons:
- Most users do not need 8 channels
FAQs
We're going to discuss what a preamp is, what it does, why you must have one, and the types available. If you already know what's up, please feel free to scroll down past this short section to get to the buyer's guide!
This post assumes you understand how to set up a studio and how the signal path flows (mic then preamp then...).
What Exactly is a Preamplifier & Why Does My Mic Need One?
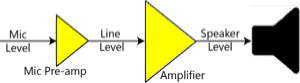
I cry every time I see someone recording a microphone without a preamp, mainly because I did it too. Unlike electronic instruments like a keyboard or guitar that produces it's own line-level (or instrument-level) signal, a microphone produces a mic-level signal by converting acoustic energy into a very low-voltage output. The catch is that mic-level is anywhere from 50dB to 80dB quieter than line-level.
The purpose of a preamplifier is to boost a mic-level signal up to a line-level signal.
If you attempt to record a mic-level signal, you're going to find it's extremely quiet and the volume will have to be boosted significantly, with horrible results. You're going to expose all of the noise in the environment, the hum of electricity, and any unwanted transients of the mic itself. What a preamp does is boost the mic signal without boosting the rest of the trash you don't want.
Of course, some preamps do that much better than others, which is where price comes in. Someone's gotta pay for that research and development!
Do Different Preamps Affect My Recordings in Different Ways?
Yes, but they all affect your recording quality in good ways. What you'll want to decide is what flavor you like.
This is why many studios have several preamps on tap that they like to pair with various microphones for certain instruments or styles of vocal recording. Let me explain while keeping it simple...
There are two types of flavors:
- Coloration
- Transparent
Transparent preamps are invisible to the ears. What they do is boost the signal while maintaining the original flavor of the microphone, which might be dark, bright, or neutral.
Colored preamps will add coloration, which is to say that it imparts its own signature sound to your recording. Generally this is just different levels of "warmth" that is coming from harmonic distortion.
What is This About Coloration Versus Transparency?
This harmonic distortion is a type of saturation that can be very desirable, especially for vocals (but it can always be added in the mixing stage too, so a transparent preamp might be what you want if you're only going to buy one. This keeps your options open). The saturation is the color and a lack of it is the transparency.
This saturation comes from the two types of preamps, separated by circuit design:
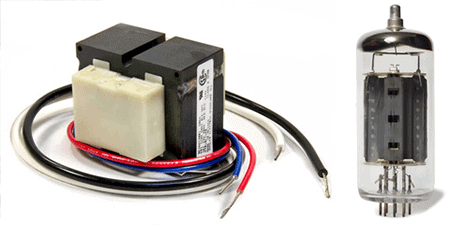
- Tube Preamps
- Solid-State Preamps w/ Transformers
Preamplifiers with tubes are going to impart a flavor of color to your signal. Vacuum tubes (pictured on the right above) have gas inside them isolated by a space with nothing inside of it, not even air (here's a great indepth explanation).
People will modify their tube mics and preamps by swapping out tubes for different styles. Solid-State styles have no gas or moving parts. The ones without transformers (pictured above on the left) are transparent, while those with transformers can apply different colors based on the transformer.
What About Phantom Power & Direct Injection?
Some microphones like condensers with tubes for instance require a power source of about 12 to 48 volts. This is fed to the mic back through the same XLR cable from the preamplifier, although some will have their own power boxes or even take a battery.
The point is that pretty much every single preamp, even on lowly 4-channel mixers and single channel interfaces, will feature phantom power that you can enable or disable. This is something you should be aware of but also realize you don't have to worry about it. It's a standard that's always built in.
Direct injection, or DI, is a line-level input that bypasses the amplification part of the circuitry but still allows you to color your signal. This is great for bass guitar, synthesizers, and other line-level instruments especially if you're wanting to run them through a channel strip for the EQ and compression on top of the color of the pre.
What's Up With 500 Series & Lunchboxes?
All of this recording and mixing is just a type of signal processing, which is used in tons of industries out there. The 500 Series style is not new, but is only recently gaining popularity among the music and recording industry. Let me list off the pros and cons so you can decide if you want to go this route.
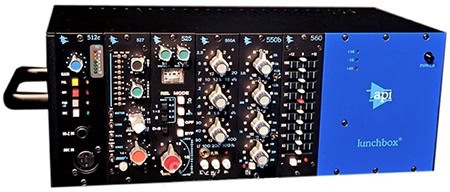
Pros: First and foremost, you have to buy a Lunchbox (the one above is highly recommended around the net), which is a rectangular box with a variable number of vertical slots in it. There are small ones with handles on top for portability and there are larger ones that can be rackmounted.
What these do is provide power to the 500 series units you buy. The lunchboxes themselves are a hefty up-front cost, usually around $500 to $1,000 for a decent one with enough slots. The 500 format units are plug and play in any manufacturer's lunchbox, in case you were wondering. It's all standardized.
If you can get past that hurdle, you win out because all of the 500 series units are much cheaper than their counterparts. The three reasons they are less expensive is because the chassis is much smaller, the power is handled by the lunchbox, and they are all one channel for the most part.
Basically you're paying for a lot less parts and electronics. What's cool too is there are compressors, EQ's, and everything else in this format. You can mix and match and create your own channel strip or fill that sucker with a ton of pre's.
Cons: The negatives are that, depending on what you're recording, you'll need to buy pairs of preamps so you can handle stereo signals. They are also more compact, leaving less space to print information around the knobs and forcing the manufacturers to cram more knobs in a smaller space.
Neither of these are big deals. It's just a matter of taste. I like horizontal rack units just because I do. I will eventually build out a lunchbox though so I can have cheaper access to more expensive preamplifiers.
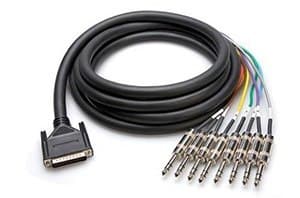
One more point to mention is that some lunchboxes require special DB-25 snake cables (like above) instead of typical XLR's or male-to-male TRS cables (some offer DB-25 and XLR like the API lunchbox above).
Think about the number of slots you're buying too, in regards to the overall width of the box. If you decide you want to rackmount it, you don't want to go over the standardized 19-inch width. Most lunchboxes are this width or less and can be mounted with rack ears as an additional cheap purchase.
Also heads up, I'd save myself the headache and get one that has XLR or TRS inputs and outputs. If you're going to keep it portable, I'd want an internal power supply too. If I was going to rack it, I wouldn't care about the external power supply (it's just an additional "wall wart" style box instead of just a power cable coming out the back). Ones without internal power have room for another couple of slots, bringing you up to 8 instead of 6.
Things to Consider First
If you've gone hunting for the best mic preamp already, then you know there's more considerations you have to deal with before committing to a purchase. The main three are:
- Coloration
- Form Factor
- Channel Choices
We already covered coloration above. The next thing to consider is the form factor. Form factor refers to the physical design of the preamp's case. It boils down to three options:
- Desktop
- Rackmount
- 500 Series
Making this decision is as simple as deciding how many pieces of outboard studio gear you're going to collect over the years. If you think you'll buy several preamps, compressors, EQ's, set up a patchbay and all of that then you'll want to consider your classic rackmount style or a 500 series style that fits into a 500 series lunchbox chassis.
These can be rackmounted as well or carried around like a literal lunchbox for portability. If you're only working with vocals or one signal path at a time and don't think you'll buy more than one preamp and will do the rest of your mixing in the box, then you might enjoy a desktop style which is just a standalone box that sits on your computer desk.
If you rule out desktop styles, then you don't need to worry too much about choosing between a horizontal rackmount unit versus a 500 series style right now. Most of the respectable companies will offer their preamps in both styles. But heads up because most 500 series pre's are single channel mono. Speaking of number of channels...
Lastly, you'll have to choose how many channels of pre-amplification you'll need. Your most common choices are single channel (for mono recordings like vocals), dual channel (for stereo recordings like acoustic guitar or piano), or a channel strip with as many as 4 or 8 preamps in them.
A Word About Channel Strips
You'll find two types of channel strips out there. Some are just a row of preamplifiers that take XLR inputs from your mic cable and spit the signal out the back with a 1/4" patch cable. This is good for recording entire bands at once or a full drum set, etc.
It's a cost effective choice but you're getting back into the "Jack of all trades, master of none" territory. You can find perfectly presentable preamp channel strips, but they won't stand up to the single and dual channel options at the same price range.
If you need a ton of channels (mainly for drums), I'd recommend buying at least one or two solid channels from this list and then tracking drums and less forward instruments on cheaper preamps for the time being, such as through a 8+ channel interface until you can grow your collection. Your listeners will get far more out of hearing perfect vocals than "less than average everything."
The other type of channel strip you'll see out there are the kind that encompass your entire signal path. They will feature a preamplifier that feeds directly to an EQ and then to a compressor, or some variation. Some of these are fantastic and we'll mention a few below.
Don't feel like you're compromising on quality on these as long as you pick from the ones mentioned. I'm specifically only mentioning the ones that didn't sacrifice any components to compete on price.
Those are the Best Mic Preamps Out There...
We covered the basics of what a preamplifier is for and how it affects the quality of your musical recordings. We then listed off the best of each category, with the categories relating to prices of under $200, under $500, under $1,000, and where there's no limitation on budget.
I tried my best to give you the quickest description of each's sonic qualities and their technical features. Unfortunately there's no good way to listen to each of these preamps and make comparisons.
Shootouts are almost impossible to create scientifically with controlled variables since I can't reach out of the screen and make sure your'e listening on the best studio headphones or monitors you can get in an acoustically treated room.
It's also nearly impossible to find a store that stocks all of these and will let you play with them. Renting them is expensive as well, when you could put that cash towards owning one instead.
That's why we've shown you the best of the best. From there, you can read about the transparency and color, number of channels and other features, and go from there.
In general, since you're upgrading, you're going to be very pleased with whatever decision you make, especially the higher you reach in budget. Your main goal is to unlock the full potential of every microphone you use, and to do that just pick up the preamp that catches your eyes that's in the highest budget range you can manage.
Don't get caught up in what's the best vocal preamp or the best one for this or that. They all serve the same function in the end, which is to crank up the mic-level signal to line-level while keeping the signal clean of noise. You could even ignore the concept of "color" and end up perfectly happy, because it's such a super subtle and subjective concept anyway.
Don't bog down in analysis. None of these pre's listed on this page will do you wrong. Get you the best mic preamp you can afford and get to recording!