

With advances in technology driving the cost of music recording microphones, interfaces, and computers down, everyone is building their own home recording studios. Why not, right?
Why pay $500 for a 5 hour time block in your local studio when you can buy a really nice mic for the same price? Double that and you've got nearly everything you need to record vocals, guitar, keyboard, and nearly any other instrument you can dream of playing.
If it was that easy then every single musician in his or her bedroom recording studio would be pumping out the studio-quality hits, but they aren't. It's the opposite.
Everyone's audio sounds like garbage, full of room reverb and noise from computers and air conditioners and TV's in the next room over.
There is a solution to all of this and it's definitely worth pursuing if you're serious about recording and extracting all of the value possible out of the gear you've bought.
Let's get to the bottom of this topic so you can decide if its feasible for you to pull off in your own home. And if you're in the process of building a studio at home or elsewhere, you'll learn all you need to know to get it done right.
First, let's clarify the term 'soundproof room,' since many newcomers to audio and music recording seem to have some pretty large misconceptions about it.
What Soundproofing Is (and Isn't)
Most people confuse soundproofing a room with another aspect of studio recording, mainly because the term for this other aspect is far more obscure, even though we see it all around us all of the time.
This term is 'acoustic treatment,' and there's a critical difference between treating your acoustic environment and soundproofing your room. Let's understand that difference real quick.
Soundproofing
Soundproofing is the act of drastically reducing or entirely blocking out noises coming from outside of your room.
The key difference to note here is that stopping unwanted sounds from outside of your room from sneaking in is what the term 'sound proof' designates.
It also keeps sounds created inside the room from escaping and driving your neighbors crazy or from being picked up in the vocal booth in the studio room next door.
Acoustic Treatment
Acoustic Treatment is a set of wall and ceiling panels that absorb and diffuse noises bouncing around that are generated inside of your room.
The term 'acoustic treatment' refers to the insulation batting inside the walls and the rigid fiberglass panels hung about the room that help absorb excess sound reflections in the room.
If you clap your hands loudly in an empty room you'll hear a spring reverb if the room is small and if it's larger you'll hear a delayed echo.
Acoustic treatment stops the sound from bouncing around by absorbing it and turning the vibrations into heat, so you only record the first instance of it traveling towards the microphone.
Other types will diffuse the sound and reduce their energy (and therefore volume). This is also a crucial part of achieving a perfect-quality but natural sounding recording.
We've already covered the topic of how to use acoustic treatment at length. If that's what you're looking for, there you go! But stick around and apply some of the following tips while you're at it, because you can't hit the studio quality level with only one or the other. You'll need both.
Why Do We Create Soundproof Rooms?
Naturally, we all wonder what uses there are for soundproof environments. As you likely suspect, it's not just for recording, but also playback and privacy. The goal is two-fold:
- Keep outside sounds out of your recordings and ears
- Keep inside noises in and out of your neighbor's ears
For most of you reading this, the goal is to keep the noise level inside the room as low or lower than the natural noise floor of your recording equipment.

But there are tons of other reasons. We use giant concrete blocks to reflect traffic and construction noises from disturbing neighborhoods near the interstate. We use insulation to reduce the sound of plumbing, elevators, and other people in hotels and apartments.
It's used in gymnasiums during sporting events, isolating movie theater rooms from each other, keeping treadmill and exercise bike vibrations from driving others bonkers inside a gym, and so on.
You'll use it to isolate sounds from your equipment, like the whirring of a computer fan and the sound of your air conditioner. It's used for business and residential acoustics. It's everywhere, you just never see it because it's hidden in the build.
Pretty much every noise we hear in the environment has the capability of ruining the best solo you've ever played on guitar or the best vocal take you've recorded of your future top 10 pop song.
Even the weather has to be taken into consideration! A thunder strike may only last for half of a second, but that's long enough to make you have to press delete on an otherwise perfect recording.
Let's start looking at how to reduce outside noises to negligible amounts.
The Five Systems of Soundproofing
There are five methods we use while soundproofing a room. They are:
- Loading Dense Mass
- Damping Vibrations
- Decoupling Structures
- Closing Air Gaps
- Applying Acoustic Treatment
Let's go through all five in order.
1. Loading Dense Mass
What 'loading mass' means is that we want to increase the amount of material on and within the boundaries of the room. Specifically, we want to increase mass and density for two reasons.
The first reason is to increase the amount of sound wave energy needed to cause the the walls (including ceiling and flooring) to vibrate.
This means that most mid-range and high frequencies will be forced to bounce back away from or into the room since they can't deposit much energy into the walls, while also reducing the ability of the much longer bass waves from vibrating the structure, which would otherwise be emitted into or away from the room.
Also, by increasing the density (and thickness of that density) you reduce a sounds ability to penetrate and pass through the boundary and into your room.
To reiterate, the main concern here is for bass. You don't want it to pass through the walls nor vibrate the walls, which creates a secondary, derivative bass that anyone who has lived in an apartment building is familiar with (footsteps and subwoofers).
Mass alone isn't enough if it isn't dense enough. You want either a ton of mass in volume like a brick and cinderblock structure or less volume but a lot of mass compressed into a thin sheet, which we'll discuss below.
With a massive and dense barrier, sound will hit it and will either be reflected entirely back into the environment, be absorbed into the mass, or some combination of both. But it won't get into your room at a loud enough level to mess up your recordings or wake up your neighbor's baby or dog.
You've likely figured out that we're talking about the walls, ceiling, and floor here. Here's where your first consideration comes into play.
Ask yourself whether or not you're building a room from scratch, like building a floating floor and ceiling plus secondary interior walls, or are trying to soundproof a pre-existing room without framing additional walls and losing room size.
And if it's the second case, do you own the room? Can you tear out the drywall and add some insulation and a vinyl acoustic barrier?
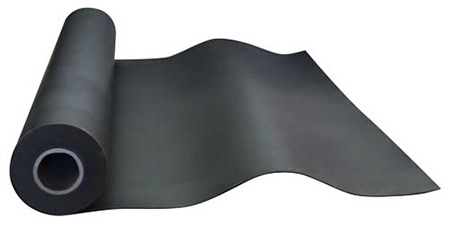
You aren't out of luck if you don't own the room and can't get into some construction. You can still use an acoustic barrier, which is typically called 'sheetblock.'
It's meant to be used on the inside of drywall, preferably on both sides of the frame of a wall surrounding the insulation, but you can still apply it to the outside of the wall and then cover it with another thin layer of drywall to hide it.
If you spackle and paint good, nobody will ever know it's in there. But if you're willing to do that then you might as well tear down the original drywall so you can work with the next step.
As implied above, what you want to do in the next step before replacing the drywall is to add insulation inside the air gaps in the wall's frame. Most companies use fluffy pink insulation but it's not rated for sound so much as to help regulate temperature.
So if you add some rigid fiberglass, like Owens Corning 703, into the walls you'll want to make sure you have adequate air conditioning, because it absorbs sound but doesn't let heat and cool air pass through very well at all.

If you have the means, you want to use the sheetblock on both sides of the wall with rigid fiberglass in between. This goes for the walls, ceiling, and floor (we'll talk about decoupling your room with a floating floor later).
To give you an idea of how this works, materials are measured for their effectiveness at soundproofing and assigned a rating. This metric is called the Sound Transmission Class (STC) rating. It's slightly misleading because it's one value for the entire frequency spectrum.
And as we all know, walls and insulation are real good at blocking high frequencies but we still hear people stomping around and vibrations running through them. Rigid fiberglass will help with that bass transmission as will damping.
The better metric to read about for sound blocking is called the Sound Transmission Loss (STL) rating, because it takes into account the ability to block sounds at every frequency band in decibels.
So if you find your room is still having issues with a specific range, such as 3 kHz to 5 kHz, you can apply more mass that performs well in that range based on its Sound Transmission Loss rating.
The above work will take care of most noises in the mid-range and upper frequency range. The next two will finish off the bass region and bass vibrations.
2. Damping Vibrations
No matter how much sheetblock, rigid fiberglass, and drywall you use, you'll still have to deal with the transmission of vibrations in the bass region.
It will travel through and along the wooden frame of a room, along the drywall, and will creep up your mic stands and into your microphones and recordings, our outward disrupting your neighbor's sanity.
These vibrations, by the way, are why shockmounts exist for suspending your microphone in the air between rubber bands on your mic stand.
So your next goal is to slow down these vibrations so they can't reach your microphone or your ears at any meaningful level. The only way to do this is to allow it to vibrate a material which can convert their energy into heat.
This is exactly what acoustic treatment does, but in our case here we want capture the vibrations that are already inside the walls. The best way to do this is by using specially designed caulk glue when building the frames of the walls and installing the drywall.
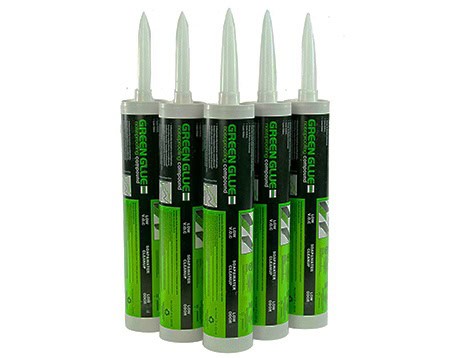
Pictured above is Green Glue's damping compound, which works just any other brand such as Liquid Nails, with the key difference being that it's designed to not only hold material together but to dissipate vibrations. It doesn't matter if you're using drywall, MDF or gypsum board, plywood, or even concrete. This stuff will stick to it and suck out the bass vibrations.
But you have to use enough, so make sure you're reading the directions. For Green Glue to act as a soundproofing compound, you should use 1 or 2 tubes per 4' x 8' sheet of drywall.
The official application guidelines say that using only 1 tube will still provide about 70% of the benefits if you're on a budget. I'd go ahead and shoot for 2, since you can't exactly tear down the wall and add some later once you've glued it.
You can use Green Glue in two ways. The first is to help attach your drywall to the wooden frame itself in addition to screws. The second is sandwich it between two pieces of drywall and then treating them as one.
You can use thinner pieces if needed so your cumulative piece isn't too thick. This will allow the two pieces to vibrate slightly, allowing the glue to absorb the vibrations before encountering the sheetblock.
Our goal is to dissipate as many vibrations as possible with damping, but our third tactic is to stop as many vibrations from reaching our walls and mic stands as possible. This is done through decoupling.
3. Decoupling Structures
You're probably familiar with this concept already. When you saved up and bought the best studio monitors and subwoofer you could afford, you likely splurged on some isolation pads.
These are the foam cushions that your monitors or subwoofer sits on that isolates it from the speaker stands they're on. This is to stop the transmission of vibrations across that boundary through absorption and decoupling the structures.
Now imagine applying that same concept to your entire room and you'll get the idea and purpose behind decoupling structures. There's several ways of getting this done, and some of them solve the issues of not being able to tear down the walls like when you live in an apartment.
They also are good for building an isolated vocal booth within an already soundproofed room, since you'll still need to isolate sounds from each other so you can get a crystal clear recording in each microphone.
There's three main methods to decoupling structures by:
- Separating Structural Layers
- Building Double Walls
- Creating a Floating Floor
Let's look at each in order. When we say 'separating structural layers,' we mean that we have another choice from using a damping material like Green Glue above when we attach the drywall to the studs of the frame of the wall.
Because they touch, we use a damping glue to suck up the vibrations. But what if they don't touch at all? That's the goal of separation. This isolation can be achieved through the use of "Resilient Channels" and "Whisper Clips."
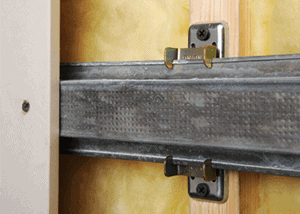
What those two items above do is mount between two parts of your structure and thereby create a small air gap. So if your drywall has a 1/2 inch gap between it and the frame, then no bass vibration can travel from the frame to the drywall and into the room.
This can be applied to all four walls and the ceiling. Is it better or worse than using the acoustic caulk glue? Neither, but they can be used in conjunction, which brings us to the 2nd method.
Let me mention that you can have another layer of vibration absorption between the joists of your frame by using acoustic Joist Tape. It's cheap enough to warrant doing, since one roll should be enough for an entire room's worth of framing.
Imagine building your wall as described above, where we fill it with rigid fiberglass and then attach the two pieces of sandwiched drywall using the Green Glue and sheetblock.
Now, from the inside of the room, we can use the Resilient Channels and Whisper Clips to create a 2nd wall on the inside that floats off of the 1st wall. This can be drywall only or even have a thinner layer of fiberglass sandwiched between two pieces of drywall like a mini-wall.
The idea is that by having a secondary wall that is separated by an air gap from the primary wall, you can double your absorption and restrictions of sounds and vibrations.
It's doubly expensive too, but if you're going all out it's always best to do it right the first time if you have the means, and especially if you're recording professionally with clients (and have the room size for such a space-consuming build).
If you take the concept of double walls and a double ceiling and apply it to the ground, you get the idea of a floating floor. This is a less fun idea to think about but it's more critical than a double wall or ceiling will ever be.
The reason is that all of your equipment is in some fashion touching the floor, whether that's a microphone on a mic stand, a microphone on a desk, a subwoofer resting on an isolation pad on the ground, etc.
The floor receives and gives off more vibrations than any other surface, especially with you walking on it and rolling your computer chair around. It works just like the walls do in terms of propagating vibrations.
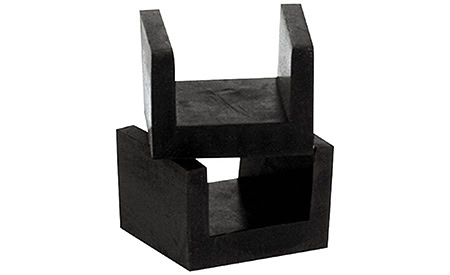
Underneath a new, secondary floor you can create an air gap using something like the U-Boat Floor Floater's above to build another floor on top of the first using acoustic caulk like Green Glue and more vinyl acoustic barriers like Sheetblock.
You want to stop vibrations from outside from creeping up into this floating floor while restricting vibrations that you and your musicians create while walking and working on it.
When all three points above are done right, you have what the recording industry calls a 'room within a room.' And that's pretty soundproof, but there's one more step.
4. Closing Air Gaps
This last step seems like a final annoyance, but it's actually the icing on the cake. If you skip this step, you're sabotaging all of the work and money you just put into your room.
The good thing is that it's not hard, costly, or time consuming. All you want to focus on here is going back across your hard work and filling in the air gaps that are left over.
A lot of this is a part of the typical build process anyways. You've probably already caulked in the gaps between pieces of drywall. But did you know there's still more types of acoustical caulk for that? It's important that you use it because it doesn't become stiff.
That means no cracks will form and it remains flexible so it can vibrate and dissipate vibrations. This isn't the same as the glue above (doesn't have to support the weight of structural material), but performs the same task.
There are other items you may not have considered, like when you cut channels for electrical lines and air conditioning ducts. There are gaps around those pipes, gaps around your windows, door frames, A/C vents, and more. You want to identify these spots and fill them with foam gaskets.
You don't have to get too concerned about the quality of foam being used, but to really make sure no sound is getting in or out, you might consider stuffing any extra space you can with insulation before closing those gaps back up. Because while there is 'acoustic foam' out there, it all sucks pretty bad.
You may want to get a long, horizontal bean pillow to throw at the gap between your closed door and your floor, or install an automatic door sweep that fills the gap with rubber.
Neither have a great visual appeal, but with the pillow and a little sewing you can at least get a better control over the density than a thin strip of pre-made rubber.
5. Applying Acoustic Treatment
If you're soundproofing a room as a musician or recording engineer, or even as someone creating a room to listen to music or watch movies, then you'll definitely want acoustic treatment regardless.
It's purpose is to suck extra sound reflections out of the air so you're hearing or recording only the primary instance of a sound. When sound bounces off the walls and comes back, you get reverb, frequency response issues, muddiness, and other problems that provide a lower quality listening and recording experience.

But in terms of those concerned with keeping sound from getting out of the room, this is another layer of protection. The reason is that these reflection panels are created using the same high density, rigid insulation that you use inside the walls.
Though you won't and don't want to cover the entire surface area of your room-within-a-room, you will use enough to reduce the energy of the sound bouncing around in the room before it ever hits the walls.
And that means there's far weaker sound waves hitting the walls in many places in the room, reducing their ability to transmit sound outside.
That's it! Those are the systems you put in place when constructing a room to get it as soundproof as possible. But there are still more considerations for the inside of the room.
Other Studio Soundproofing Considerations
Just because you built the most soundproof room in the world doesn't mean you won't sabotage your recordings from the inside. You'll forget to turn off the air conditioner and it'll kick on during your recording session.
Your computer's fan will start spinning a million revolutions per minute suddenly and ruin your take. Your chair might squeak. What are we to do about these internal noise reduction problems?
Easy Fixes That Add a Plus One
The suggestions in this section are simple to implement but will only make the biggest difference once you've secured all of the other problems. But let's look at these real quick.
Your room likely has windows. The first order of business, one you might want to do before you begin dealing with wall construction, is to consider your windows. You want at least double pane windows if not specially designed acoustic windows built to stop sound transmission.
That will stop sound from coming through them in either direction, but now you have a glossy area on a wall that will reflect high frequencies back at you. Consider adding acoustic curtains over them so you can close them when it's time to record. This will fix the issue of high frequency reflections.
Now take a look at your door. Is it a weak interior door that's hollow? Consider switching it to a solid-coor door made out of compressed particle board (loading dense mass!) and sealing the frame with weather stripping. Again you have another reflection point that you can destroy by mounting an acoustic treatment panel to the door.
In terms of decorating for lounging musicians and songwriting sessions, consider using plush couches with cloth covers (not shiny faux leather). They'll absorb and help scatter sounds. In addition, consider having a large, thick area rug that can help restrict higher frequencies from bouncing off the floor.
And finally, think about using a large bookshelf to store books, mics, cables, and other gear. This can act as a giant diffusor to help break down sound wave energy and stop any frequency nodes from building up.
Keep Computer Fan Noises Out Of Your Recordings
We're all familiar with the sound the fans in our computers make as they start heating up from working harder. This is a noise you will have to deal with in one way or another. People have come up with quite a few solutions here, some of which are far better than others that you may, unfortunately, not be able to use. Let's take a look.
- Use Direction
- Use Distance
- Use Absorption
These are your options. We're saving the best for last, because it combines all of these techniques together.
When we talk about using direction, this generally means pointing the exhaust of the fan away from your microphones while simultaneously pointing your microphones away from the computer.
This might work okay if you're recording one vocalist or just one instrumentalist, but that luxury doesn't exist when you're recording a whole band and need to use the whole room.
But if you're only recording with one mic at a time, this technique works especially well if you're using a microphone with a cardioid pickup pattern.
Using distance means two things. You want to move as far away from the computer fan as possible, while also using a technique called close miking to move the mic as close to the vocalist, for example, as possible.
Because the volume of a sound decreases exponentially with distance, you can reduce the amount of it you end up recording. Then, by moving the mic closer to the sound source you do want to record, you increase the signal-to-noise ratio high enough that you'll never notice the fan noise.
But what you really need to do to some degree is use absorption. Fortunately computer fans aren't very loud and are of a higher frequency range, so something as cheap as some acoustic foam or even a makeshift box with a pillow in it will absorb most of the sound.
You want to be careful here though, because your computer is trying to exhaust heat away from itself, so you can't trap the heat in. You'll get ideas about how to allow hot or cold air in and out while still absorbing sound in the next section about air conditioners.
Whatever you do, don't allow your computer to overheat because you'll reduce it and its components lifespans if you keep it hot for too long, or it might freeze up or bog down while you're recording.
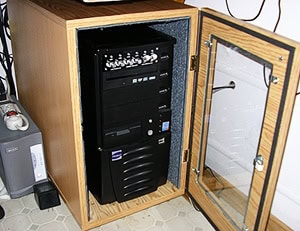
Another thing you can do is try to keep your computer as cool as possible so the fan doesn't kick on. There are custom 'quiet' fans that you can install in rackmount cases that hold your computer with other gear.
There are concepts such as the Isobox (isolation box) that you place your computer in, which is basically what we're talking about above with the makeshift box and pillow. It works like a reflection filter for a microphone.
You can make a DIY Isobox with the techniques above, where you're ultimately making a tiny room within your room for your computer to live in. Just make sure it's well ventilated. You can use the Isobox for guitar amplifier recording and much more, too.
The absolute best thing you can do is move your computer into a different room.
You may have heard the terms 'equipment room' and 'computer closet' from the information technology sector, and this applies to the music recording industry too. By moving all of your noise making equipment out of your soundproof room, you can regain your noise isolation.
All it requires is running channels for cables through your double walls and floating floor. It takes a bit of pre-planning but in this way you're using direction, distance, and absorption altogether with no compromises.
If you can't get it out of the room, you can at least stuff it into a closet and use some cheap absorption inside there. Just make sure it's ventilated.
Keep Air Conditioner Sounds Out Of Your Recordings
The second type of noise you'll encounter is the unpredictable noise of your air conditioner. It has the worst timing and will ruin your best takes, so chalk this up as another problem you must deal with.
A lot of people will run down the hallway and cut the A/C off while they're recording, but that doesn't work for longer sessions with a lot of bodies creating heat in one room.
We'll assume that you have to have some air conditioning running on hot or cold. There are some things you can do to minimize the noise problems.
Your first step is to make sure all of your ductwork is sealed up with tape in other areas of the house or building. This will make your A/C unit more efficient but most importantly it stops sounds from other rooms from getting into your duct and bouncing its way into your room.
You can add insulation wrapped around the ducts as well, which not only helps sound not leak into it but will keep the air cooler or warmer as you pass it through your walls.
Next, you can remove your vents if they add noise. You don't technically need them and they may be rattling and shaking when the unit turns itself on. You can check.
If they're silent they can stay, but I'd go ahead and remove them because they may shake from resonating when you start playing music loudly. You never know which notes will be the right ones.
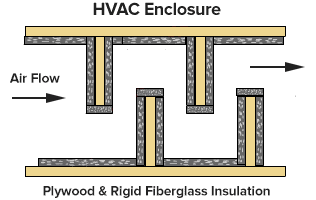
The task that will do the bulk of the silencing is to create sound dampeners. You can find more info about them by searching terms like 'HVAC enclosures,' but the idea is to create a winding channel in front of the vent.
Inside this channel will be rigid fiberglass or acoustic foam that will absorb the sound as it bounces around through the channel, while the cool air can flow all the way through impeded and into your room. You can build these around window A/C units and portable A/C units as well.
Keep Sounds From Bouncing Around With Acoustic Treatment
The third and final type of noise created inside a soundproof room is the ambience from all of the sounds you intended to create.
This is one of the most critical aspects of achieving a professional quality audio recording. It's too much to go into in detail, but again we've explored the concept of acoustic treatment already in depth, linked at the top of this article.
The main idea to understand is that all sounds will travel towards your microphone and be recorded. But what's also happening is the sounds go past the microphone, bounce off the wall, shoot back and bounce off the other wall, and do this thousands of times constantly.
All of these sound waves at varying frequencies make their way back into your recordings, but they also bounce off of one another creating what's called 'constructive interference' and 'destructive interference.' This means they cause each other to be louder and quieter in certain frequency ranges.
Each room's dimensions will also dictate how sound bounces around. These dimensions will create nulls and peaks in the room and if you just so happen to place your mic in one of those zones, your recording is going to sound much nastier than it should.
Professionals can come in and measure your room and mathematically determine how to treat it, but you don't have to go that far as an independent or amateur recording engineer. You just need some acoustic treatment to stop the sound from bouncing around so much.
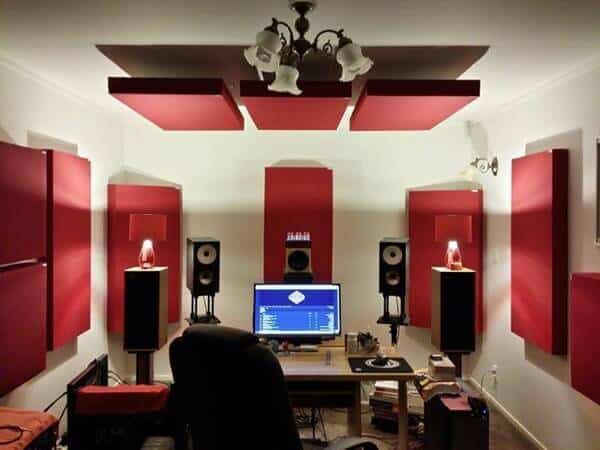
You'll want side wall acoustic reflection panels, corner-mounted bass traps, front and back wall bass traps of thicker density fiberglass, and reflection panels on the ceiling known as a 'cloud.' It may seem complicated but it's not, and it's actually quite the fun journey to take as you learn about it.
We condensed the entire topic into one long article above. Please read it so you don't fall into the trap of using cheap acoustic foam, which will not get the job done in the mid-range and bass regions.
Also, don't fall for what noise reduction plugins claim to offer. "Fix it in the mix" is bad mixing advice and usually impossible.
How Much Does It Cost to Soundproof a Room?
You may be here wanting to know how to soundproof a room cheaply, but I'm afraid to tell you it doesn't work like that. There's no such thing as cheap here because you can't do a halfway job or do it with lesser materials. Either you do it right or it's not soundproof.
If you look around on the internet, you'll find all kinds of estimations and calculators that tell you that people make their rooms soundproof for $1,000 to $2,500. These sites are making the same critical mistake of confusing acoustic treatment with soundproofing, and they're not even using enough acoustic treatment.
Those that are talking about the same thing we are will reveal how silly their article is once you read on and they start talking about hanging acoustic curtains, foam panels, thick carpeting, and new ceiling tiles. Is a curtain really going to stop the noise from your neighbor's loud pickup truck?
The reality is, if you want to do this right and you're not talking about your bedroom or home theater, you're looking more in the range of $10,000 - $30,000 depending on the size of the room.
This figure takes into account deconstructing the walls to add rigid fiberglass insulation and sheetblock, building double walls and a floating floor, running electricity, air conditioning ducts, and audio cabling, plus the application of acoustic treatment on the inside.
I'll say that a halfway job is better than no attempt at all, but the reason we recommend not doing that is it's hard to go backwards and add more isolation, mainly because you're using glues and caulks and then adding trim and borders so your room looks nice. It's possible but you'll ruin some drywall and have to do a lot of sanding to remove excess glue and caulk later.
And That's How to Soundproof a Room
As you've seen, to truly make a room soundproof requires some construction work, but there's also a lot you can do to reduce the amount of sound you allow to leak into and out of a room without hiring a carpenter.
It's not complicated and most of the work done is usually a do-it-yourself job. It's just a bit pricey. But every penny sunk into a project such as this will reap dividends in the quality of your recordings after the fact.
As a professional, it's a must to record in a quiet, noiseless room. If you're in a building alone or with nobody else in any next-door rooms, then you may not need this at all.
But you'll still want to use acoustic treatment. Either way, it never hurts to learn the principals of how to soundproof a room! You'll use them eventually in some aspect in your career.
Jared H.
 Jared has surpassed his 20th year in the music industry. He acts as owner, editor, lead author, and web designer of LedgerNote, as well as co-author on all articles. He has released 4 independent albums and merchandise to global sales. He has also mixed, mastered, & recorded for countless independent artists. Learn more about Jared & The LN Team here.