

The best audio interface can be your best friend. The worst can be an absolute nightmare. How do we know what we need or which to choose if we don't have any prior experience? We'll start by walking you through the selection thought process with a summary of the various features and benefits you'll encounter…
Recording technology has come a long way in the past couple of decades. There are major label releases where artists recorded songs on a tour bus or in a hotel closet with the same gear you can have in your home studio for an affordable price. You can also have access to the most advanced gear out there for a far more reasonable cost than we paid in the 80's.
The individual at home can produce the same quality of recordings for their podcasts, YouTube videos, and music as a major label pumps out. The only difference is that while the single person in their bedroom might only need one or two inputs, the professional studio might require 32 inputs or even more. Even radio broadcasting studios can operate with bedroom producer levels of inputs, though.
In this article, we'll show you our hand-picked recommendations from the cheapest to the highest quality so you can choose the best audio interface in your budget range based on your quality and input/output needs.
As we always say, buy right and buy once. Buy wrong and buy twice.
Moreover, at the very bottom, we will provide all the info and context you need to know about home studio and professional recording interfaces (they function the same!) to narrow your hunt down so you can make a well-informed decision.
Your goal will determine what you need. Are you a rapper, singer, or podcaster? In this case, you can get away with a single channel or two to accommodate yourself and a friend with a microphone or instrument each.
But maybe you suspect or already know you'll eventually want to record an entire band. That's going to drastically change the number of inputs and preamps you'll need on your recording interface.
And then there's the question of USB, Firewire, or Thunderbolt connections. And preamplifiers and high-impedance instrument inputs. And what the heck do all these knobs do?
Visit our FAQs section for more information
Included in this guide:
| LEXICON ALPHA | Best Entry-Point for Newcomers | Buy on Amazon |
| MACKIE ONYX BLACKJACK | Best of the Cheapest Options | Buy on Amazon |
| FOCUSRITE SCARLETT 2I2 | Best Budget Pick | Buy on Amazon |
| PRESONUS AUDIOBOX ITWO | Best for Mobile Musicians | Buy on Amazon |
| STEINBERG UR22 MKII | Greatest Devices Compatibility | Buy on Amazon |
| FOCUSRITE SCARLETT 18I20 | Best Bang for the Buck | Buy on Amazon |
| MOTU ULTRALITE MK4 | Best for Studio and Stage | Buy on Amazon |
| APOGEE ENSEMBLE | Best of the Best | Buy on Amazon |
| RME FIREFACE | Best Ultracompact Format | Buy on Amazon |
| ANTELOPE AUDIO ZEN TOUR | Best for Portability and Ease of Use | Buy on Amazon |
| UNIVERSAL AUDIO APOLLO 8 | Best for Professional Recording | Buy on Amazon |
| ANTELOPE AUDIO ZEN STUDIO | Best for On-the-Go Producers and Engineers | Buy on Amazon |
| UNIVERSAL AUDIO APOLLO TWIN MKII | Best for Professional Mobile Recording | Buy on Amazon |
LEXICON ALPHA
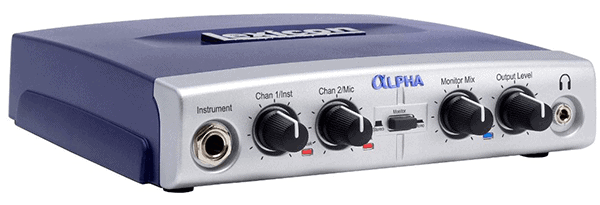
The Lexicon Alpha is a dual-channel interface, featuring two XLR mic inputs on the back leading to the preamps and two TRS inputs as well so you can jack in from other standalone gear. The front features a convenient high-impedance instrument input on the front for recording guitar and bass as well.
Notice that the headphone output here is at 1/8th inch like your standard sports or iPhone earphones. The master monitor outputs are TRS here.
This offers you all of the little features you'll find extremely useful like peak indicator LEDs on the front, being able to drop your monitor mix from stereo to mono to check for phase issues, and an independent headphone volume control.
It also will get you into the realm of 24 bit / 48 kHz recording, as will everything else mentioned here. Heads up, the one thing it doesn't have is Phantom Power for condenser mics, so you may have to spend extra for a standalone power supply if you go for this option.
If you don't already have a DAW, this comes with Cubase LE4 and LE5, plus they toss you their Pantheon VST reverb plug-in. I recommend this as the best of the absolute cheapest options. If you're struggling to save up extra cash and need to get started recording immediately, this will do the job just fine. If you can wait a little while longer, you'll do better to jump up to the next interface just below.
Specs:
- Item Weight: 1.1 pounds
- Compatible Devices: Laptop, Personal Computer
- Connectivity Technology: USB
Pros:
- Great sound quality
- Flexible hardware routing
Cons:
- Limited access to PCM90 parameters
MACKIE ONYX BLACKJACK
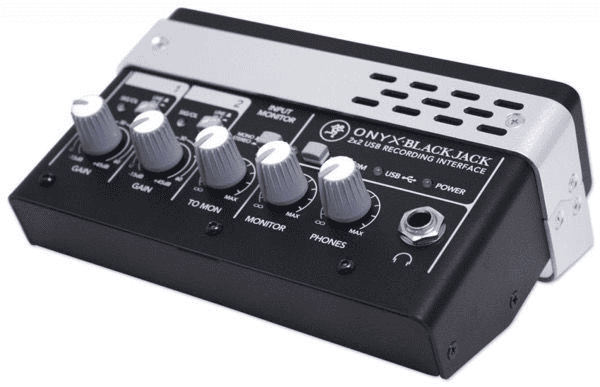
Mackie's Onyx Blackjack has a conveniently angled and attractive faceplate for desktop usage. It's also built with metal instead of plastic unlike other desktop interfaces. But what really makes this the best of the entry-level over the Lexicon above if you can spend a tad bit more is the Onyx preamplifiers in both of the mic/instrument combo inputs.
I've had these preamps in mixers before and they've stood up to many of the higher-end interface preamps I've used since then. Mackie has been around a long time and moves a lot of volume of products so they've cut us a good deal on the preamps in the past decade. Their Cirrus Logic A/D converters are also a cut above compared to others in the price range.
Here you're looking at all the nice extras like stereo and mono switching, Phantom power, and being able to switch the line inputs to instrument inputs with the push of a button. It comes with their Tracktion 3 software so you can get started right away.
Specs:
- Item Weight: 2.3 pounds
- Compatible Devices: Personal Computer
- Connectivity Technology: USB
Pros:
- Good audio quality
- Tracktion 3 software included
Cons:
- No digital I/O
Best Audio Interface Under $200
The following are what I'd recommend to any serious hobbyist or independent musician getting their chops together that still prefer a desktop form-factor and don't need a lot more than two inputs and outputs. You're jumping up a bit in quality in regards to the components, especially the preamplifiers.
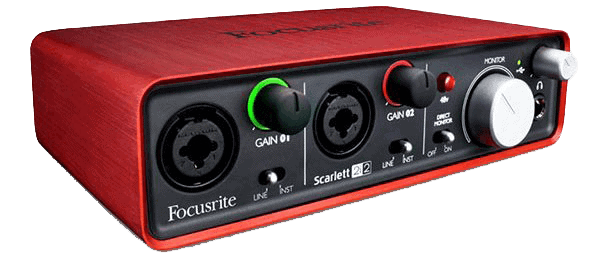
FOCUSRITE SCARLETT 2I2
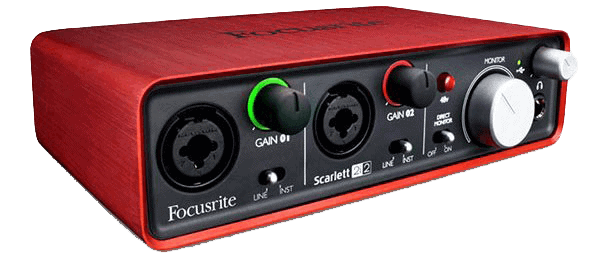
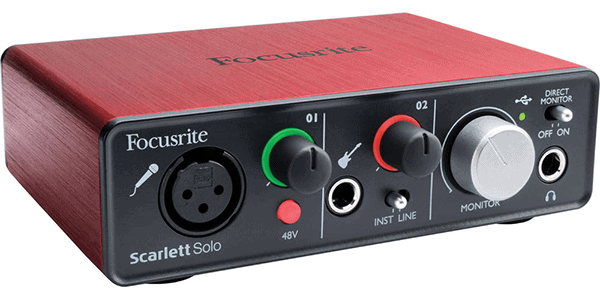
The Focusrite Scarlett 2i2 is so pretty that I used the Scarlett line-up in all of the pictures at the top of the article. This is their duo-channel version of the Scarlett Solo but it goes all the way up to 6 inputs and 6 outputs. They all use the same components and solid metal unibody case.
Focusrite doesn't play around with their preamps. Even though I've got a ton of standalone high-end preamps, I'll still use these (I have the Saffire Pro 40 interface mentioned below) for certain applications. Another great feature on these is the Direct Monitor switch so you can hear what you're inputting through your speakers without all the extra routing inside the DAW.
In addition, they hook you up with Ableton Live Lite, the Scarlett Plug-in Suite, and the Red 2 & Red 3 Plug-in Suites. You'll end up with a ton of nice compressors, EQs, gates, reverbs, and the works. They'll be better than all of the stock plug-ins found in most DAWs. If you like this look but want more inputs and outputs, check out the Focusrite Clarett line-up as well, or the Scarlett 18i8 model.
Specs:
- Item Weight: 1.1 pounds
- Compatible Devices: Personal Computer
- Connectivity Technology: USB
Pros:
- Low-latency monitoring
- Easy to set up and operate
Cons:
- Lightweight body can be easily pulled by cables
PRESONUS AUDIOBOX ITWO
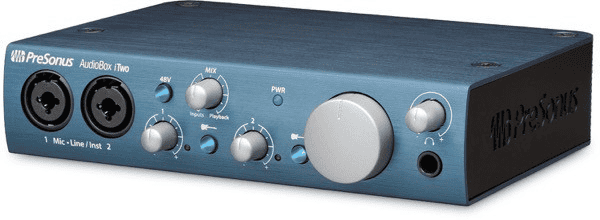
The PreSonus AudioBox iTwo gives you two combo inputs plus a MIDI controller connection on the back and all of the convenient features from those above that you can expect on all below as well. It's rugged, powder-coated blue chassis and small size makes it a great option for the portable musician as well. It even offers you the Capture Duo software to record on your iPad on the go.
In addition to the Capture Duo app, you get the full-featured Studio One Artist DAW for Mac & PC, plus 4 virtual instruments and 27 effects plug-ins. Top that off with 6+ GB of loops and samples and you can quickly achieve a unique sound to your songs (versus all the people using the same stock FL Studio sounds, for instance. It's so recognizable).
One thing PreSonus is known for are their Class-A preamps. I actually recorded my first album on some and was absolutely pleased. I've moved on since then but I listen back and it's still a quality recording!
Specs:
- Item Weight: 1.04 pounds
- Compatible Devices: Personal Computer and Mobile phone
- Connectivity Technology: USB
Pros:
- Easy to use, with solid construction and clean signal paths
- Zero-latency software monitoring
Cons:
- Full Capture app is a paid extra
- Headphone output could be slightly louder
STEINBERG UR22 MKII
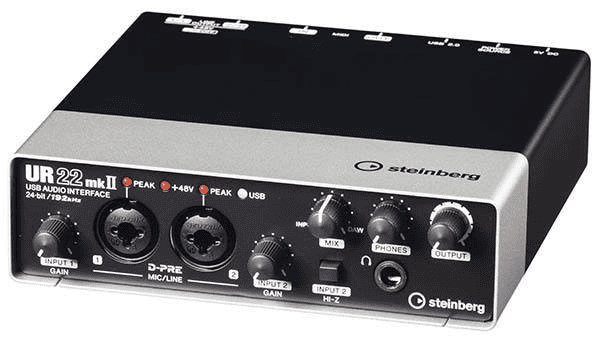
The Steinberg UR22 mkII likely rings a bell in your head. That's because they are the team that makes the Cubase DAW software. As you can see on the face, it natively records at 192 kHz sample rate so you're getting the most resolution out of whatever your source is.
The DAW / Input cross-over knob is nice for self monitoring through the headphone output while recording or practicing. Nothing worse than not being able to hear yourself as you perform and having to only wear half of your headphones.
This beast features MIDI inputs, iPad connectivity, two of Steinberg's D-Pre preamps, and comes with the Cubase LE DAW. Unlike other lesser interfaces we chose not to feature here, this guy along with the others provides plenty of gain for any mic you toss at it.
It also features their dspMixFx so you can add effects like parametric EQ, reverb, and dynamic range compression to your monitor mix without committing these choices to your recording (helps with vocal performances big time).
It's powered by the USB cable, which is convenient if you're a traveler and have your laptop or tablet charged and ready to rock. It's a fast set-up and break down for those moments of inspiration or can happily reside on your desk and wait patiently for you.
Specs:
- Item Weight: 3.4 pounds
- Compatible Devices: Personal Computer
- Connectivity Technology: USB
Pros:
- Very respectable sound quality
- Incredibly simple to use
Cons:
- There's no stereo option for direct monitoring path
Best Audio Interface Under $500
At this point, if you're spending this much then you're likely also acquiring other pieces of gear that need to be racked and have begun to think about acoustic treatment, microphones, and other items that impact recording quality.
There's a few more desktop and portability-focused solutions I'll share, but most everyone is going to be focused on rackmount gear from here out.
I'm only mentioning two interfaces in this budget range because they're a cut above all others comparatively. The rest are basically just bigger versions of the ones listed above with more inputs. This is the true step upwards, and each have bigger models you can look into as well.
FOCUSRITE SCARLETT 18I20

Ah yes, old trusty. The Focusrite Scarlett 18i20 is what I use right now and have for the past few years (including their Saffire Pro 40). I snagged this to act as the center of my entire audio setup for recording and entertainment. Not only does it have enough inputs to accommodate all of my standalone preamps, but the eight preamps included in it are pretty tasty themselves.
It's called "18i20" because it has 18 inputs and 20 outputs. That's more than enough to record a full band at once, but you can even daisy-chain two of these together or toss in one of Octopre strips for additional expansion. I've recorded vocals, guitars, bass, synth, and drums all at once with no expansion though. Plenty of inputs here. It even has a built-in talkback mic.
You can use Firewire or Thunderbolt for your connectivity before you fire up the Midnight Plug-in Suite, Red 2 & Red 3 suites, and a bunch of others after you register the product online. It also uses the MixControl DSP Router for monitor/headphone mixing. It doesn't come with a DAW because at this point you probably have one. I use it with Logic Pro with zero issues.
What's nice about the MixControl software is that while there are two headphone outputs on the front, you can route any of the outputs to act as headphones with their own individual mixes. There's also four monitor outputs so you can run two sets of monitor speakers and do quick mix comparisons.
With eight preamps that double as instrument inputs plus a boatload of other line-in's and MIDI, you're ready to rock. This is a full-fledged studio interface that has all of the features you think you need and more.
Specs:
- Item Weight: 15.9 ounces
- Compatible Devices: Personal Computer
- Connectivity Technology: USB
Pros:
- Tried and tested frontend
- Good monitor software/hardware
Cons:
- No output metering
- MixControl could be more flexible
MOTU ULTRALITE MK4
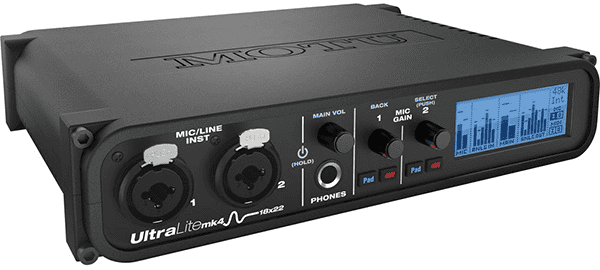
Here's one more desktop style option called the MOTU Ultralite mk4. I've owned one of these, a MOTU 828 mkII, and used one of their 8pre interfaces. They're solid.
Perhaps you're the kind of person who's looking for a desktop solution like those in the categories above, but want one that pushes a more professional level of quality. That's where the Ultralite line-up comes into play.
Though it has the smaller form factor of a desktop interface, it holds nothing back. You're looking at 18 inputs and 20 outputs, with low latency drivers and a full blown DSP. Whether in a small home studio or on the go recording mobile, there's nothing stopping you from having a studio-grade result at the end. It includes their brand new ESS Sabre32 DAC converters with 123 dB of dynamic range.
The latency is so low it can be used on stage for live mixes with all 40 channels firing at once. It even comes with an incredible 48 channel mixing software with an EQ, reverb, compressor, gate, and more. You can rig up aux buses and everything, all in 32 bit resolution. You can even control it from you smart phone or tablet if you're on wifi or wired in.
And later, if you decide to move into racked gear, there are rack mounting brackets you can add on and daisy chain this with another half-width MOTU interface all in one rack unit. My personal, many year experience with MOTU interfaces left me with a great taste in my mouth.
They're reliable, the software is supreme, the onboard screens were easy to use if I wanted, and the preamps were delicious. What more can I say. You'd be happy with one of these.
Specs:
- Item Weight: 3.52 pounds
- Compatible Devices: Personal Computer
- Connectivity Technology: USB
Pros:
- Good price and an excellent range of outputs
- Very portable and easy to use
Cons:
Best Audio Interface - No Price Considerations
There's a point in the growth of your studio where you'll make the decision of dropping obscene amounts of money on a giant digital mixer desk with top quality everything in it that functions as your interface... or just sticking with an interface for the time being.
The price differences are catastrophic. If you're ready jump into the big leagues but not to the tune of a five-figure spend, then take a look at this interface.
As you look around, you'll see more options than the two I'm about to share but I don't feel they justify the price for the workflow and appearance. If I'm going to spend that much then I want a full-fledged 64+ channel mixer desk to really impress my clients.
Otherwise, these will offer you unbelievable A/D conversion with the highest quality preamplifiers you'll find in an interface (the same as those triple the cost in other high-end interfaces), with plenty of inputs and outputs to not stifle your workflow. Many modern studios skip the mixer desk altogether these days, which is why these options exist.
The following are your best value-per-channel interfaces before you get into the realm of obscenity. If you don't already have your eye on a specific interface before looking at this list, then don't wander beyond these two options until you've gained more experience.
APOGEE ENSEMBLE

Apogee is known for their mastery over their converters and clocks, both of which are included in the Apogee Ensemble. This is the newest version of the Ensemble, where they opted for a complete black redesign of the face to include all of the button controls over their old silver version.
This baby can handle 30 inputs and 34 outputs at once and can interface with your computer over Thunderbolt if you're concerned about maxing out USB or Firewire. This has full-on digital I/O over ADAT, optical, Toslink, etc. for daisy-chaining or digital communication from preamp strips or whatever else.
The Ensemble features eight native preamps with stepped gain, meaning the knobs click into positions (probably every 6 dB, I'm not sure). I prefer this over smooth pots because those tend to have dead spots or produce static at times.
Another crazy feature with Apogee is having almost zero latency. They managed to get it down to a 1.1 millisecond round trip through the interface, into the computer and DSP plug-ins, and back to your monitors. That means when it comes to the actual recorded material you're looking at probably half of a millisecond (not detectable by human ears).
It's the small things that I appreciate with the Ensemble, such as the built in Talkback functionality so you can speak into the headphones of the vocalist or band you're working with and offer them guidance (or communicate from different rooms!). You can daisy-chain up to four of these interfaces together too.
It's hard to praise this one and the one below enough. Both have on-board DSP control to route and tweak monitor mixing as well as software utilities, full recall of settings, templating, and much more. Conversion and word clocks aren't the sexiest of gear but they are among the main contributors to crystal-clear recording quality. That's what you're getting here.
Specs:
- Item Weight: 10.78 pounds
- Compatible Devices: Personal Computer
- Connectivity Technology: USB, XLR
Pros:
- Impeccable sound quality
- Flexible complement of inputs and outputs
Cons:
- No Thunderbolt cable supplied with unit
- All the line inputs are on XLRs, and most of the line outs on D-Sub
RME FIREFACE
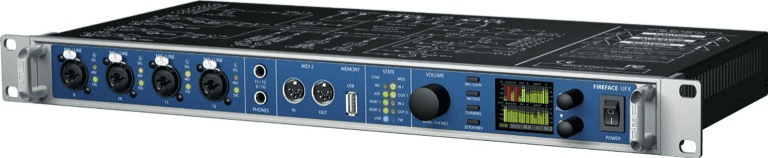
The RME Fireface is the other great option before you should consider an entirely different direction. With 30 inputs and 30 outputs, you're ready to rock. You can use Firewire or USB, it has two MIDI inputs, it has a built word clock to stabilize any external gear you throw at it, and you can even output with ADAT and SPDIF.
It has four front-facing microphone preamplifiers that double as instrument inputs. One of the coolest things about this interface along with the Ensemble above is that you can manage your monitor mixes from the hardware itself if you don't want to fire up their TotalMix FX software to route signals and apply DSP effects.
The preamps themselves are extremely transparent even up to the possible 65 dB of gain they allow. Each preamp runs through two parallel converters to minimize noise and eradicate data glitches. This sucker even has expandable monitor controllers for your desk so you can switch between monitors for referencing purposes and even has a remote control.
I think the coolest part is that even without the TotalMix FX DSP software you can save mix settings for each output to recall later during the next recording session. This also lets you create templates so you can create a consistent routine, mapping everything to patchbays and headphone amplifiers, etc. Give this one a good look if you're serious about buying top of the line and not having to upgrade ever again.
Specs:
- Item Weight: 12 pounds
- Compatible Devices: Personal Computer
- Connectivity Technology: USB
Pros:
- Incredibly powerful built-in mixing functionality
- Excellent sound quality, with RME’s best mic preamps yet
Cons:
- Hardware meters are tiny
ANTELOPE AUDIO ZEN TOUR
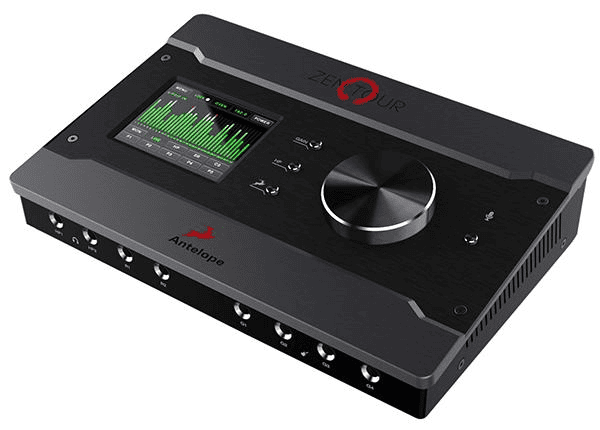
There are a lot of musicians who want recording portability without sacrificing quality, and the Antelope Audio Zen Tour is the answer. You get 4 analog inputs that are mic and line combos, plus 4 high impedance line level inputs on the front.
You can get 16 more by daisy chaining through the ADAT connection. With USB and Thunderbolt connectivity, you're good to go no matter where you end up, no matter who's computer or laptop you use.
Most solutions like this are for hobbyists, but the Zen Tour takes itself very seriously, compromising on nothing. You're getting the finest preamps, converters, and word clock with nearly zero latency and minimal jitter. On top of all that, their DSP technology comes with tons of classic plugins of every type, emulating all of the legendary gear, so you can mix live on the spot with the rotary dial or the touch screen panel.
For the band member that's doing all the recording at another member's house, this is the dream. You have enough inputs to record the whole band with dedicated drum mics. And you can do it at a pristine 24-bit, 192 kHz sample rate. It's top tier studio gear in a portable chassis.
Specs:
- Item Weight: 3.09 pounds
- Compatible Devices: Personal Computer and Headphones
- Connectivity Technology: USB
Pros:
- A surprisingly comprehensive selection of I/O in a compact desktop package.
- Excellent audio specifications and good subjective sound quality.
Cons:
- The touchscreen is small and not terribly useful.
- No speaker switching.
UNIVERSAL AUDIO APOLLO 8
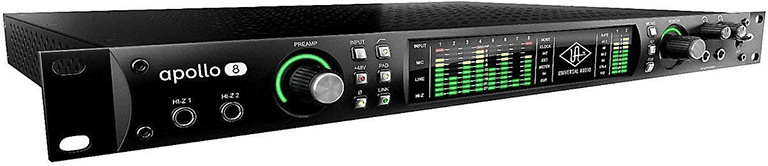
While many interfaces give you two preamps along with a boatload of instrument inputs, the Universal Audio Apollo 8 does it right and provides four Unison preamps as well as double Thunderbolt connectivity. You're looking at 18 inputs, 24 outputs, ADAT optical ports, S/PDIF I/O, two headphone jacks, top tier digital conversion, and word clock jacks, all in a clean single space rack unit.
Thunderbolt interfaces are the future, and you'll be future-proof here. The Apollo 8's recording resolution: 24-bit/192kHz.
It also features four SHARC processors. This lets you do realtime monitoring mixes during tracking with their UAD plugins. You can even daisy chain up to four of these together, all accessible through their Console software on both Mac OS and PC computers with the Windows operating system.
There's no compatibility issues here. The UAD plugins are included and total 16 options. I can't list them al here but a sampling includes the UA1176LN Legacy, Pultec EQP-1A Legacy, Teletronix LA-2A Legacy, RealVerb Pro, and many more. We're talking compressors, EQ's, guitar and bass amp modeling, preamp emulations, reverbs, and more. Neve, Manley, Lexicon, Studer, you name it.
You'd think all of this live plugin mixing might create some latency but they've managed to keep you down around the 2 millisecond to 5 ms range thanks to their digital signal processing (DSP) acceleration.
We could gush over this forever, but just know that you're getting access to some top-of-the-line plugins in addition to the hardware you need to track, overdub, and do some realtime analog mixing for some crystalline recordings.
Specs:
- Item Weight: 17.1 pounds
- Compatible Devices: Personal Computer
- Connectivity Technology: USB
Pros:
- Improved console utility
- Wide choice of Unison emulations
- Decent low–latency performance, especially on the output side
Cons:
- No Thunderbolt cable supplied
- No surround support or talkback controls
ANTELOPE AUDIO ZEN STUDIO

If you're looking for an option like the Zen Tour above that's not only portable but can be rack mounted as well, then the Antelope Audio Zen Studio will be up your alley. This format allows for a much larger I/O capacity, including up to 12 high-end mic pres, all with phantom power capabilities, and 8 line level inputs.
It also goes the extra mile and offers 24-bit and 192 kHz analog-to-digital conversion. Their word clock is their 4th generation 64-bit "acoustically focused conversion" with jitter management. You get two dedicated headphone outputs plus ADAT and S/PDIF and a couple TRS inserts. This is very top of the line, as good as you'd get trying to piece all of these individual pieces of gear together.
You also get access to five of Antelope Audio's vintage EQ plugins modeled after some classic hardware equalizers. Those can be used to their fullest extent thanks to the Zen Studio's Field Programmable Gate Array (FPGA) that gives you zero latency DSP mixing.
They claim it's eight times more powerful than competitor DSPs, which is incredible for recording engineers piping out headphone mixes for band members.
Engineers for Jay-Z, Rihanna, Justin Timberlake, and Timbaland all prefer Antelope Audio, if that tells you anything. One thing you should know is you'll control everything about this interface through the Zen Control Panel software if you want to do it quickly.
That includes preamp gain and all of it, due to the lack of knobs. That's not a big deal, especially if you're rack isn't right by your side anyways (there is a rack mount brace available!). Once you've recorded you're in-the-box in terms of initiial level control even if you do outboard mixing. Check this one out if you want another option with all top of the line internals without having to put it together piece by piece.
Specs:
- Item Weight: 8.18 pounds
- Compatible Devices: Personal Computer
- Connectivity Technology: USB
Pros:
- Sounds very good
- Flexible signal routing and low-latency monitoring
Cons:
UNIVERSAL AUDIO APOLLO TWIN MKII
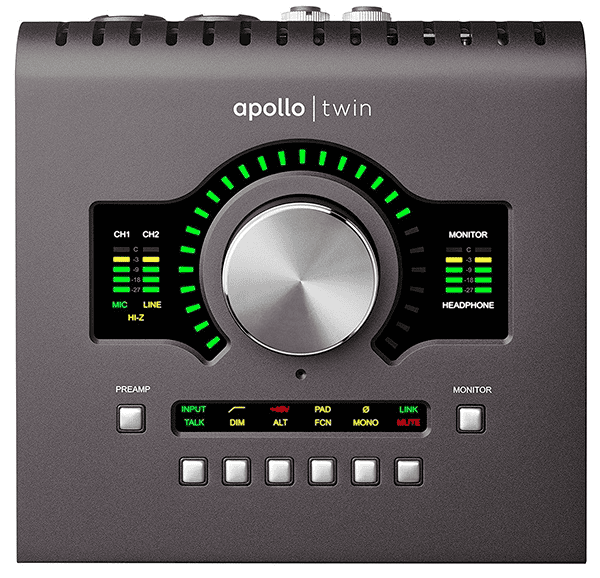
Maybe you liked the Zen Tour above but it's a bit pricey because you don't need 8 inputs. You can get a very similar option right here with just 2 inputs, called the Universal Audio Apollo Twin mkii, the smaller portable brother of the Apollo 8 above.
As a matter of fact, you're getting the same Unison-enabled preamps and insanely good A/D and D/A conversion, plus the same UAD analog emulation plugin suite. It's pretty much the same thing with 2 inputs and portability for the musician on the go.
This is perfect for the solo rapper, singer, guitarist, etc., but that doesn't mean you can't overdub and record as many tracks and players as you want. That's ideal for tour buses or small home studios that don't want to compromise on quality but don't need entire racks of equipment. It's good enough for the likes of Kendrick Lamar, Post Malone, Arcade Fire, and many more top sellers.
Once you come to learn and love the quick workflow the interface provides for you right on your desk, you won't want to let go of it even as you grow, which is fine because you can combine up to four more Apollo interfaces of any type, including Apollo 8 and Apollo 16.
That means you can stuff those in your rack and still have this bad boy on your desk to monitor, talkback, and live mix from. You can't beat that kind of expandability.
Specs:
- Item Weight: 3.85 pounds
- Compatible Devices: Personal Computer
- Connectivity Technology: Thunderbolt
Pros:
- Incredible audio quality
- Real-time tracking and monitoring through Unison plugins
Cons:
- Thunderbolt only, currently Thunderbolt cable not included!
Find the Best Audio Interface for You
This is the best, fastest, and cheapest methods to create high quality recordings you can send straight to online music distribution companies, offer as a music download to fans on Soundcloud, toss in your iTunes and move it to you mp3 player, whatever. This is how it's done.
FAQs
In this section, we've got all the info you need below in the audio interface buyer's guide. The first step to any recording in this day and age is to grab yourself an audio interface, because you need a way to digitize the audio and get it into your computer.
What is an Audio Interface?
An audio interface is the piece of studio equipment that allows you to record an analog signal, convert them to digital audio signals, and then transport them into your computer so you can do all of your post-processing work like mixing and mastering. It is used in sound recording and production for audio engineering for the entertainment and telecommunications industries.
This is one of your two sound devices that are a bare minimum for capturing audio. The other is a microphone or an electric instrument of some sort with an output jack. If you're recording any real-world source, such as your voice, an acoustic guitar, or a saxophone you'll need a microphone in addition to your interface.
This is because something has to record the sound waves and convert them to electricity. That's the mic's job, which plugs into your interface. Otherwise you can plug an electrical or digital instrument in in the same fashion.
The interface takes the signal from your microphone or instrument and digitizes it before sending it to your computer. It does this with an analog-to-digital converter using pulse-code modulation. You can think of this whole package as a standalone computer sound card that has some extra features.
This is a much more convenient and higher quality option than the old method of recording to magnetic tape or cassette tape where each copy suffered from generation loss.
What's Inside an Audio Interface?
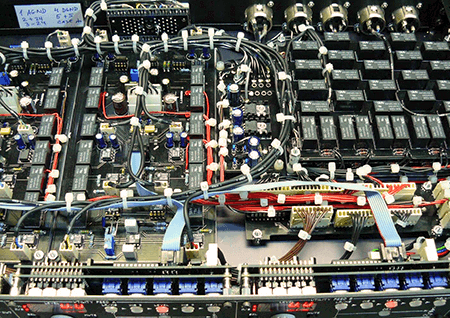
We don't need to know how a car is built in order to drive it, but in the case of a recording interface it does help to understand what's going on inside of the chassis in order to visualize the signal path. It becomes even more important if you want to begin using hardware compressors and equalizers, for instance.
Let's use this picture as a generic reference, showing instruments, a microphone, loudspeakers, etc., and how they all connect together:
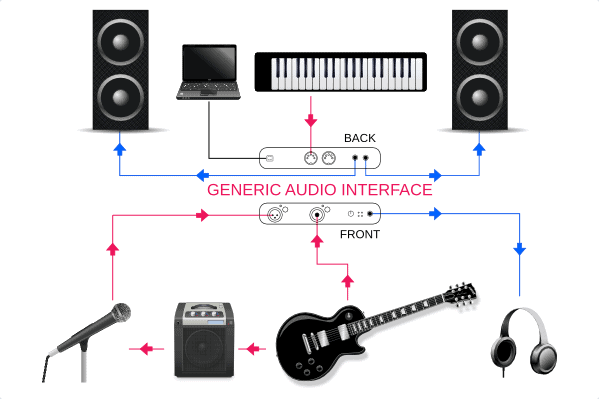
The red lines show audio sources leading to their respective inputs. The blue lines show outputs leading to studio monitor speakers or headphones. The black line leads from the interface to the laptop and is how they communicate with each other. Each line represents a studio cable of some type.
Inputs
Recording interfaces will always feature a combination of the following input types:
- Microphone (balanced XLR cable to preamplifier)
- Instrument (unbalanced TS/TRS cable bypassing mic preamp)
- MIDI (digital information about how an instrument is played)
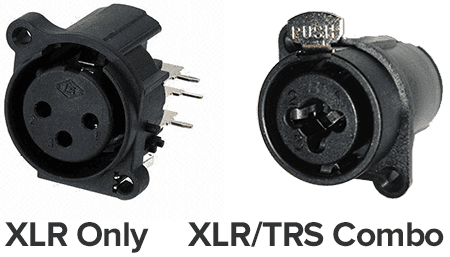
While in the past, some interfaces had separate XLR inputs for microphones and separate TS and TRS Hi-Z (high-impedance) inputs for electronic instruments, most now combine that into a single input.
The difference between the two is that microphones need to be ran through a preamplifier because their electrical signal is much smaller in amplitude when produced by a transducer than that of an electronic instrument (which still needs a DI box, interface, or some audio power amplifier to hit line level).
The two-in-one inputs route the signals differently based on which cable is plugged in, and you can expect to find those versus separated inputs as the standard on most recording interfaces these days.
The XLR input for mics will run it's signal through a preamplifier, while the Hi-Z input for instruments will bypass it. The front of your interface will feature a gain knob (sometimes called 'trim') which controls the amount of volume you're adding to your microphone signal.
You'll also find a button to engage the 48v phantom power, which is a small electrical charge that runs up the XLR cable to power your condenser microphone. Some mic's include their own external power supply and don't need 48 volt phantom power, but using it won't damage your mic if it's not needed (though you should turn it off before unplugging or plugging in your mic).
One more input type you see in the image above is the MIDI input. These aren't always found in low-cost interfaces but will typically appear in the higher budget options.
This is for keyboards and other digital instruments that can output MIDI data so you can replace your standard keyboard sounds with other sound fonts stored in your computer or another external sound bank and later manipulate that data if you choose. It's how most pop, rap, and dance music is created these days.
The same goes for instrument inputs. If you find you need one later but your interface doesn't feature one (it will) you can use a Direct Injection (DI input) box to take the input and output it through an XLR cable. High quality D.I. boxes are available at extremely cheap prices due to their simplicity in operation and construction.
The smallest of digital audio interfaces provide one mono input, while the next step up has two mono inputs that can be used to record in stereo, since all audio in the present is at least in stereophonic sound if not surround sound. Monophonic sound fell out of favor in the 1950's!
Outputs
Studio interfaces will generally always have three types of outputs:
- Headphones (personal monitoring, output on front)
- Monitors (room monitoring through speakers, master outputs on back)
- Interface Cable (to communicate back and forth with the computer)
The lower-end interfaces typically will only feature one headphone output with a dedicated volume control while the more expensive options may feature two or more. There are also dedicated headphone amplifiers that offers strips of outputs for all of the band members, so this isn't really a concern as long as there's at least one.
These are almost always quarter inch TRS outputs. In the picture below you'll see RCA jacks as well. There are all kinds of adapters available for a dollar or two, so again, no worries here about cable conversions.
Studio monitors refer to your speakers, not your computer screen. That's the term used in the music industry for flat-frequency response speakers that help with critical listening and detail-oriented decision making.
Most interfaces uses XLR cables for the master output to your monitors, although some will use TRS cables. All types of cables and adapters are available to make sure it works with your monitors.

Finally there's the interface cable, which is usually USB powered or uses Firewire. Newer options can feature Thunderbolt cables for Mac computers and expensive options may use Ethernet cables (not that common these days) or even optical cables.
The new USB and Firewire versions are both more than fast enough these days to deal with any scenario, so you can choose whichever you want based on the inputs available on your computer. Once again, there are adapters to switch between the two that still keep everything within a digital system of transmission.
The interface cable is an output but it also brings audio back in from the computer so it can pump it out of your monitors. The main component at this juncture of the hardware is the Analog-to-Digital Converter and Digital-to-Analog Converter.
It changes your audio signal from electrical to binary code and back so your computer and your monitor speakers both can understand the signal. This is often done with oversampling (at sampling rate frequencies higher than the Nyquist rate).
What Makes the Best Audio Interface Cost More Than Another?
The price of each interface all boils down to two things:
- The cost of the build and marketing
- The audio quality produced by the components
The cost of the build includes the research and development, the cost of the electrical components inside, the number of inputs and outputs, whether the chassis is built of plastic or steel, etc.
While there is a point of diminishing returns in terms of quality, the closer you get to perfection the more it costs because enormous amounts of research and experimentation go into it. And of course, the consumer pays for the cost of marketing. Which leads to the next part...
Inside of an audio interface, the two main components that determine the quality of your recordings are the preamplifier for microphone inputs and the quality of the A/D and D/A converters. I'd wager to say 80% of the 'quality' aspect of the price all comes from these two aspects. This is where all of the works goes in to bring you clarity and true reproduction of your source signal.
You're basically paying for the best mic preamps possible for the price range, the converters, and the firmware that allows the stuff in the box to talk to the computer. The fancy chassis matters visually and the circuit board is what it is. It's all about the electronics being used. When it comes to interfaces, you do get what you pay for.
The Best Audio Interface FAQs
There are some FAQs that pop up that belong in the list of things you should be considering before committing to a purchase. Let's deal with those questions real fast. An informed decision is a good decision.
Also, you may want to bookmark our article on how to set up your audio interface for recording for later. It'll save you a ton of time and headaches, rather than trying to read the manual for the interface and your DAW software.
1) How Many Mic Preamps & Instrument Inputs Do I Need?
Solo Musicians & Personalities: If you're a one-person show, you can record one source at a time. So even if you're laying the tracks and building an entire song, you're still one person with two arms having to deal with it one or two tracks at a time.
If you're a vocalist, podcaster, or video producer, one is probably enough although two might be better if you intend on having guests. Sharing a mic sucks. In this case, one or two inputs is all you'll need, but be careful.
Make sure you've got two XLR inputs if you want to use two mics, because each will correspond with an individual preamplifier. Watch for two Hi-Z inputs for instruments if that's your route. Most will have combo inputs, just make sure you check.
Recording Engineers / Songwriting Teams: If you intend on recording a full band, you can get away with two but you'll have to go through the process of layering tracks. It all depends on if you want to record a live performance of everyone at once or record the drums first to a click track and let everyone take turns from there.
Then you need to ask if you want to individually mic each drum with room mics as well. The number of inputs you need if you plan on recording live sound can grow very quickly. There are common options of 4 and 8 inputs and a lot of times you can purchase two of the same interfaces and daisy-chain them to get up to 16 inputs or more.
Some individual interfaces will offer up to 36 inputs, some with only XLR/preamp inputs and some with only TRS inputs. Others have a mixture. The options are out there to fulfill your needs if you can decide on what they are first.
I should mention MIDI connectivity again. If you're capable of playing the piano or have a MIDI guitar and want to write digital music that way, then you'll appreciate having a MIDI input. Otherwise there are standalone options that are relatively inexpensive. This doesn't need to make or break your decision, but it's something to be aware about.
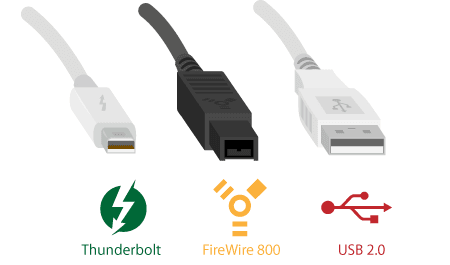
2) Do I Want USB, Firewire, PCIe, or Thunderbolt for my Interface Cable?
This question is outdated these days. USB and Firewire are both plenty fast enough at 1.25 GB/s bandwidth and 800 MB/s respectively. Thunderbolt audio data transfer rates are at 5 GB/s are now widely available, especially good for recording entire live bands with many simultaneous tracks.
There is the PCIe option which requires you to install a special sound card and isn't common for home studios or really even professional studios any more. For 99% of cases, USB 2 / USB 3 or Firewire will do the job for home studios and small professional ones which is why those are the two most common options.
Be aware that Firewire is slowly being phased out in the computer industry. Eventually you'll have to use a bunch of adapters if you choose that now.
Most computers have USB inputs while not all feature Firewire. My suggestion is to check which your computer has and go with that. Try not to convert between the two or run through USB expanders. Always go straight into the computer to dodge strange incompatibilities and power issues.
They happen more than you'd expect. Also, Thunderbolt 3 now shares the same port as USB-C, so while they'd both essentially be classified as a USB audio interface, Thunderbolt (40 Gbps transfer rate) can carry far more data, but far more than you'd ever need. USB-C (10 Gbps) is far better than USB 2 (480 Mbps) as well. The technology is steadily improving far past what we could ever need.
3) What About Digital Inputs & Outputs?
People ask about this because some higher-end interfaces feature these I/O options. I didn't mention it before because basically, if you don't know what it is you don't need it, you just need analog outputs. If you need it then you'll already know what it is.
These are options like optical lightpipes, S/PDIF, ADAT Lightpipe, TOSlink, coaxial cable, TASCAM, TDIF, D-sub cable, audio over ethernet, etc. Some that carry video will even use HDMI and DisplayPort. None of these are something you're going to use in a home studio and not often in a professional studio either.
You're far more likely to use a patch bay to take advantage of various pieces of gear than be statically set up through digital I/O. You don't need to worry about this at all. We're not recording a 50 piece symphony orchestra.
4) What About On-Board Digital Signal Processing Software?
DSP, or digital signal processing, is only something you'll usually find on interfaces with 8 outputs or more. It's a piece of software you install on your computer that lets you create mixes within the interfaces outputs.
So if you're recording a band and the vocalist says, "Hey, make me louder in my headphones and add a little reverb," then you can do it right there from the software.
It allows you to create headphone mixes that don't affect the original sounds you're recording. This can often be done from the LED panel on the front of the interface but it's not efficient at all.
The software is a life saver in that regard, far better than any analog audio technology. They'll even have cue systems and a headphone amplifier so you can talk to people through the mics and headphones plugged in.
You'll find this option can be installed on even lower-end interfaces depending on the company but you won't use it probably. MOTU has their CueMix, PreSonus has Virtual StudioLive, RME has TotalMix, etc.
It's usually included on CD inside the packaging when you purchase or you're directed to download it from their official websites. You may have to install them because it's coupled with the software drivers for the interface, or you might not.
They're all a full on onboard digital mixing console software with faders, mock input jacks, even auxiliary sends, panning control, subgroup assignment, and more. It's just like what you'd find in a digital audio workstation but meant for monitoring rather than mixing and mastering.
These are critical to monitor the attenuation of each channel, known as gain, to make sure each signal is coming in at a nominal level to avoid audio clipping. This can happen in digital form too, so you have to monitor these levels before the A/D converters and after in the software. It happens before hand on VU or peak meters (often times just a single red LED light).
But the analog decibels (dBu) have an equivalent in a digital signal called decibels Full Scale (dBFS) you can monitor in the software. The key is to avoid clipping and distortion while still getting the best signal to noise ratio possible.
Many even deal with bandlimited distortion by passing the signal through an anti-aliasing filter so you don't get aliasing distortion. You can learn all about this topic in our gain staging article.
5) What Software Comes With the Purchase?
It depends. Some will include limited versions of popular DAWs, a digital audio workstation, like Cubase or FL Studio. You're not going to luck out and get a fully expanded version of Pro Tools or Logic Pro unless you're buying a full mixing console, but you might get something.
It is important to make sure that the interface you choose can be used with the DAW that you're using on your computer.
DAW compatibility is rarely an issue but it's worth checking. Most of the time they are universal in their ability to be used across the board because your computer recognizes the inputs as "input options" for the system.
Play it safe and check the compatibility though, especially if you're looking at an interface with four or more inputs. Watch out for operating system requirements too.
Sometimes you'll get plugins for popular DAW's too, like parametric equalization, amplifier emulators, advanced audio filter options, compressors with better audio compression algorithms than stock plugins, etc.
6) What's This About Sample Rates & Bit Depth?
This is quite the question. Rather than explain how it all works beyond this picture, let me just make a recommendation.
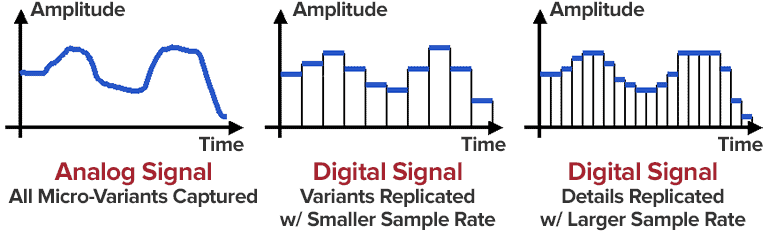
Make sure the interface you choose can record at 24 bits and 48 kHz (where Hz means hertz, the number of times per second a sample is taken) minimum, if not up to 192 kHz.
There are options that exist at 16 bits and 24 kHz that are more for hobbyists. A higher audio bit depth is better, even though CD audio and mp3's are played back at 16 bits.
You want to roll with the industry standard. If you really want to make sure you're getting the most quality possible, get converters that can handle 96 kHz or even higher, although 48 kHz definitely gets the job done and is how most CD's and MP3's are released.
Even professional releases get rendered down to 16 bit and a 44.1 kHz sample rate, but keeping your source material at 24 bit / 48 kHz is your best bet in terms of quality and hard drive storage capacity usage.
7) What Form Factors Are Available?
You have two options:
- Desktop
- Rackmount
The desktop versions are just that. They sit on your desktop where you can reach them easily and twist the knobs and swap cables. These kind typically feature four or fewer inputs.
Rackmount versions are about 19-inches wide, heavier with metal chassis's, and feature ears and screws so you can mount it within your studio rack with your other gear. I should mention that I've never seen a 500 Series interface in case you were wondering.
You'll see both form factor types below. Some desktop types have adaptable ears that can allow them to be mounted while some rack mounted types have removable ears and pegs you can screw on the bottom to not damage your desk. Otherwise there are also rack shelves you can use to place a desktop version inside of a rack.
Jared H.
 Jared has surpassed his 20th year in the music industry. He acts as owner, editor, lead author, and web designer of LedgerNote, as well as co-author on all articles. He has released 4 independent albums and merchandise to global sales. He has also mixed, mastered, & recorded for countless independent artists. Learn more about Jared & The LN Team here.