How to Set Up Your Audio Interface to Record Audio
Our most recent question that was generalizable enough to benefit the entire community is a very fundamental hurdle that nearly everyone runs into: how to use an audio interface. Being a musician usually involves learning an instrument and some music theory, of course.
But rarely do we anticipate needing to learn our way around computers to enhance our hobby. And that's what happens when you decide to start recording your own songs or covers.
I remember having to deal with this my first time ever recording around 18 years ago. This question comes from a real life guitarist friend who finally bought his first interface and couldn't figure out what was happening when he'd press record. I'll explain what was happening and how I solved it, which includes the general tutorial on setting up your audio interface.
How To Use An Audio Interface
Question:
I just bought the best audio interface I could afford. When I record on it, my tracks sound real distant and have a lot of noise in them. I'm using the same Shure SM57 and cables I've used tons of times to record elsewhere so I know nothing is wrong with them.
Can you help?
Koi
Answer:
The next night, my brother and I ran over to Koi's home and I started investigating while they set up the guitar, amp, mic, and stand just as it was before when the bad signal was coming through. I confirmed the mic was receiving the signal, passing it through the interface and on to Logic Pro X, where we then recorded it.
And just as described, it sounded horrible. There was a lot of reverb, noise, and some distortion when the amplitude was increased. Why was this happening?
I checked everything, but missed one detail even though we deliberately looked at it in the settings. We started to blame it on the headphones going bad, so we switched headphones and the problem was still there, but that was what revealed the problem.
As I was talking out loud I realized that we weren't recording through the mic that was being used to close mike the amplifier at all. We were recording through the laptop's microphone! I could hear myself loud and clear but barely hear the guitar.
How to Setup Your Audio Interface
I'll state the obvious just for the sake of anyone reading who doesn't realize the basics of cabling. Your interface will be packaged with a power cable or power adaptor which obviously has to be plugged into the wall or your power conditioner before you can even turn the thing on.
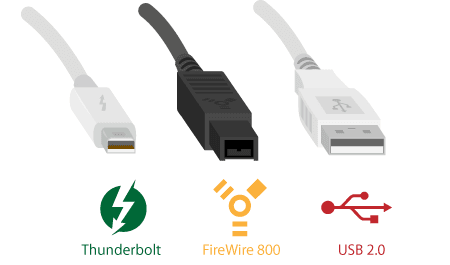
It will also come with (these days) one of three options for cables to connect to your computer, depending on which type you purchased. You'll either have a firewire cable, thunderbolt cable, or a USB cable, either of which has to be plugged in before your interface can communicate with the computer.
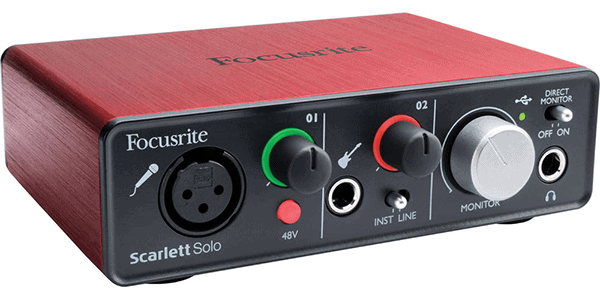
Your interface's job is to capture audio signals from a microphone or a direct input from a guitar, bass, keyboard, etc. It converts that electrical signal at the analog-to-digital converter into a digital signal consisting of binary language your computer can understand. Think of the interface as a really fancy outboard sound card that comes with nicer preamplifiers and other features.
Even in today's world of plug-and-play hardware, you'll rarely be able to just plug in your interface and be able to start accepting audio signals and outputting music through it automatically, even if your computer tries to do this for you. It's a bit more complicated than other types of devices your computer is used to talking with.
It used to be the case that your interface would come with a CD you would use to install drivers, or a card that would direct you to the manufacturer's website to download the drivers. This may still be the case for some purchases, but most often the interface will be able to use the standardized system drivers in your operating system. You'll know if you need separate drivers based on what happens in the next step.
Choose Your Audio Interface In Your Operating System
The next step is to find your audio settings for your operating system at large.
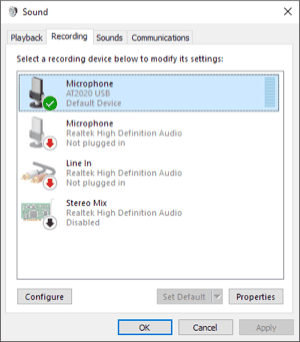
On Windows, if I recall correctly, you'll find these settings by navigating to the Start menu > Control Panel > Hardware & Sound > Sound, and then you'll work within the Playback and the Recording tabs. It will look something like this:
On a Mac you will venture to the top left of your menu bar to click the Apple > System Preferences > Sound, and then work within the Output and Input tabs. It will look like this:
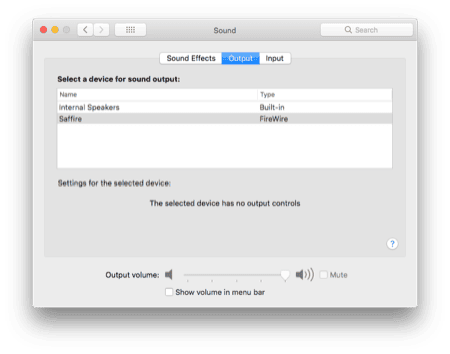
As you can see, I have the Focusrite Saffire Pro 40 set up as my output device. This routes all of the sound out of the firewire cable and to the interface and then out of the master stereo outputs through the XLR cables to my Adam Audio A7 studio monitors.
It's how I listen to music, watch movies, play YouTube videos, etc. I never change this output setting, but I do switch the input device back and forth between my webcam (for phone calls and video conference calls) and my interface (for recording).
You will want to set memorize how to navigate to these settings because you may also have to change your input and output devices frequently, especially if you use a laptop that you take with you on the go. You will need to select your audio interface in these two tabs when you get ready to record.
You may ask "but what if I want to listen through headphones?" You can choose your headphones as an output if that exists, or it may automatically show and be chosen once you plug them in like my computer does. Alternatively, you can choose your interface as the output and use the headphone jack on it just like you would with external monitors.
Select Your Audio Interface In Your Digital Audio Workstation
Now that you have your computer communicating with your interface in general, you're halfway done. The next step is to set your digital audio workstation (DAW) up to use your interface. For the example below I'll be using Logic Pro X, but the steps will be nearly the same for Pro Tools, Garage Band, FL Studio, Ableton, etc.
Open up your DAW and navigate to the general settings section, however that is done. In Logic, I select it's name in the menu bar and then Preferences, which provides me with a direct link to each tab in the settings. The one we're looking for in called Audio and looks like this:

You should find, regardless of which software you are using, a tab within your settings that behaves just like the operating system sound settings. It allows you to select which device connected to your computer will be used for the input and output devices.
In my case I can choose my webcam as an input device, but you'll see I have "Saffire" chosen, which is the name of my audio interface. I select the Saffire again for the output because I want to push the music out to my monitors and headphones, which are both routed through the interface.
Choose Which Input From Your Interface to Use on the Multitrack
Now that your DAW is communicating with the interface, you have one last task before you can press record and actually capture audio. On your multitrack or your mixer, depending on your preference, workspace, or software, you'll find a way to select an input for that specific track only. Let me explain the reasoning for it being set up this way.
Your interface may have only two inputs. Mine has 20 different inputs which can be associated with microphones or direct injected instruments. You want to record each instrument or vocal take in isolation on its own track and this is how its done. But the software doesn't know which input which microphone or instrument is connected to. You have to instruct it:
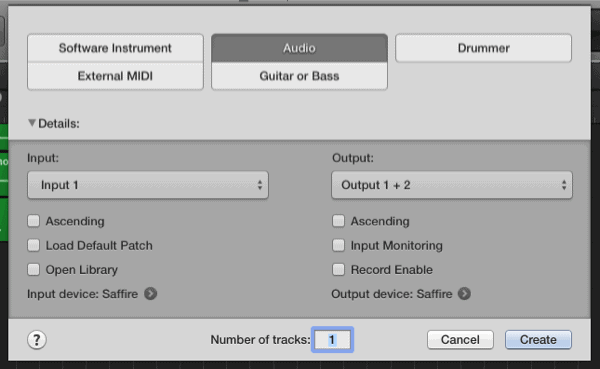
The image above is what appears in Logic Pro when you add a new track to your multitrack and mixer, if you don't specify before hand. It needs to know what type of track this will be, and that can include:
- Software Instruments like ES2 synthesizer
- Audio for instruments or vocals that you record
- Drummer for synthetic drum sets like Ultrabeat
- External MIDI for a MIDI keyboard or MIDI controller
- Guitar or Bass, which auto-loads certain plugins for you
You will want to setup an audio track. Now in that image, you can go ahead and choose which input you want to use and set it up for recording and even turn on input monitoring for that track. But I never do it on this screen.
I always do it on the mixer, which I'll show you below. The reason is that your interface will simply provide a list of inputs labeled like "Input 1, Input 2... Input 19, Input 20." But those software labels hardly ever match the numbers you see on your interface.
For instance, most interfaces will have a couple of inputs for XLR cables that have preamps in them or you can use TRS for the direct injection of a bass or guitar. Those will usually be labeled 1 & 2 on the hardware itself, but when you look on the back, the label numbers start over at 1 again, instead of at 3.
This throws off your ability to know exactly which input you're using if you go by the software labels. Often you have to get close and then keep going "mic check, mic check" as you test different inputs until you see the meter start moving and hear yourself through the input monitoring.
There's a little trial and error but once you figure it out, you can find the I/O Labels settings that allow you to name your inputs and outputs. So if you always set your drums up in the same way on the same mics on the same inputs, you can just label them and save yourself a ton of time. That looks like this:
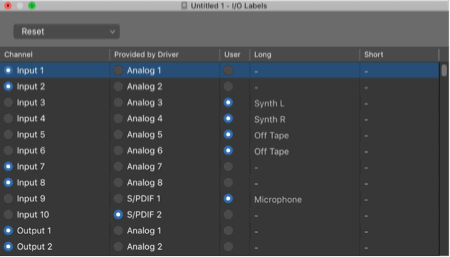
You can see the software name, hardware name as given by the driver, and then you supply a user based name. In Logic you can create a long, descriptive name and a shorter, abbreviated name, which will appear in different places.
Now, let's back up. How do you select which input to use on the mixer? In Logic Pro X, you simply find Input on the mixer, click and hold it, and then select the new input source. But remember, it has to be an audio track to see your audio interface's input options instead of a list of plugins. Once you click and hold the Input option, this is what you'll see:

Once you've identified and selected your correct input, you simply have to enable the track for recording.
Note: Make sure you've set your track up to be mono for a single mic or stereo for a stereo mic or mic pair. If you're using two separate microphones you can use two mono tracks, or one stereo track by choosing a dual input source like "Input 1 & 2."
Enabling recording is done simply by navigating to the multitrack, finding the [R] button, and pressing it so that it's red and blinking, like below:
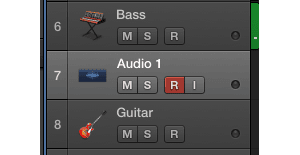
Depending on whether you're using your interface's software mixer (if it even has one) or not, you can press the [I] button to enable input monitoring on that track. That means you'll be able to hear what the microphone is recording inside of your headphones, which is incredibly useful for all vocalists and instrumentalists.
You have to make sure you have nearly zero latency when you do this or there will be a delay. In an image above you could see I've achieved a 9.3 millisecond latency, which is as good as zero.
Now, once you press the master record button, every single track that you've chosen an input for and enabled the track for recording will begin capturing whatever the microphone or direct input is hearing. That's all there is to it!
That's How to Use an Audio Interface!
When you start getting comfortable with the routine, changing the system and DAW input and output devices takes 5 seconds each. You can even set up projects by mapping your inputs around pretty quickly especially once you've adjusted the I/O labels.
But where you'll really save time is by setting all of this up once for every input you have, and saving it as a template. It's a lot faster to delete the tracks you won't be using on a particular project from the template than it is to re-set it up each time.
But that's a topic for another day. Until then, Happy recording!rnJared
Jared H.
 Jared has surpassed his 20th year in the music industry. He acts as owner, editor, lead author, and web designer of LedgerNote, as well as co-author on all articles. He has released 4 independent albums and merchandise to global sales. He has also mixed, mastered, & recorded for countless independent artists. Learn more about Jared & The LN Team here.