

You might be thinking "mixing in mono? I thought the 1950's came and went?" I'm not telling you that your final result will be completely centered between the speakers, just that you'll work that way for at least half of your mix.
Why does pretty much every professional do this, and if not at least spends 10% of their time not working in stereo? Because when you drop the audio down to mono you don't get to hide behind panning to create clarity in the stereo field.
And it's not just getting "fake" clarity. You'll expose problems like phase cancellation, equalization problems, and much more. Fixing these problems when they're glaringly obvious is much easier. In fact, without this trick you may not even know these problems exist.
Let me explain exactly what I mean, why we should do it, and then I'll take you through the exact process every top mixing engineer uses to get this done. The end result in your own work will impress you so much that you'll integrate this into your workflow forever more.
What is a Mono Mix?
A mono mix is when your music, recordings, or any other type of audio is played at equal volumes out of both speakers (no panning), meaning the listener won't experience two separate channels but one single channel (called the center channel or mono channel) in the center of the stereo field.
This doesn't mean we won't use panning. It means that we'll hide the fact that we have used it by forcing all of the instruments to be perceived as centered. This won't be the case in our final result, but doing this during the mixing process exposes a lot of problems that need to be fixed.
If you have a savvy ear and have listened to early mono mixes of The Beach Boys or The Beatles, you've been astounded with how clear the results are, despite everything being crammed in one centered channel.
The stereo mixes sound even better and that's due them pushing the boundaries by having no choice but to employ this method. And that's what we'll be walking through. You'll find issues you never know existed in your mixes, fix them, and beam with pride at the result.
Why Mix in Mono?
Nobody wants to experiment like this without understanding why we're doing it. There's three core reasons and once you read through them you'll see that this is a no brainer. Before we get to the benefits, let me explain why we even bother doing this, since nobody listens in mono these days.
When you're seated in front of properly set up speaker monitors in mix position in the studio or you're wearing headphones, you'll get a perfect stereo image. But not every listener will be seated in the sweet spot or be in an ideal listening environment (like a car, gymnasium, at a party, etc.).
They'll perceive different balances of volumes coming out of each speaker, and in the worst case scenario they'll perceive it in mono. They'll hear phase issues if they exist. Some radio stations still broadcast mono.
The point is, by going through these steps you'll improve the audio quality for all listeners, no matter where they're at, and even more so for those listening correctly. It's a win-win for everyone involved, including you for your own music or that of your clients.
You'll Get Better Equalization Balance
It's easy to pan instruments left and right and think they aren't clashing in the frequency spectrum. The truth is, if you aren't right in front of the speakers that may not be the case. You, as the mixer, may never know until it's too late and your music is published and in the hands of your fans.
Though you may have great clarity between instruments, it can get even better. I'm sure you've heard crystal clear mixes and wondered how they ever pulled it off. This is how. When audio tracks have perfect separation in mono, they have god-like clarity in stereo.
You'll Expose & Fix Phase Issues
Phase issues are when the audio coming out of each speaker comes together in such a way that their waveforms interfere with one another. This is either constructive or deconstructive interference and causes volumes to be boosted or reduced.
Your mix can sound perfect and then you step two feet to the side and suddenly it sounds horrible. That's the problem this fixes. And it's often the biggest problem in the upper low-end where much of the energy resides, so catching this issue is of the highest importance.
Your Mid Channel Will Be Impeccable
The biggest advantage is that the instruments you don't pan at all will sound incredible. It doesn't matter if you know how to mix vocals like a champ if your panned rhythm guitar is smushing up against them. This will also give you a lot of insight into how your bass frequencies are playing with the mids.
The middle channel is everything and the panned sides are just icing on the cake. This will force you to ensure your panned instruments are completely out of the way of the center. It matters a ton in all tracks, but if you employ LCR mixing you're going to be amazed.
How to Mix in Mono
You should be convinced by now that this is the way to go. So let's discuss exactly how to do it. Remember, we're only going to spend about 50% of our time in mono while doing spot checks in stereo. Then we'll reverse that and work in stereo while checking out our work in mono.
The reason for that is once you start adding in reverbs, delays, and other effects, you need to keep checking your EQ frequency balance and listening for phase cancellation again. It's simple at that point, but don't forget to do the final check.
1) Start By Balancing Levels & Adjusting Panning
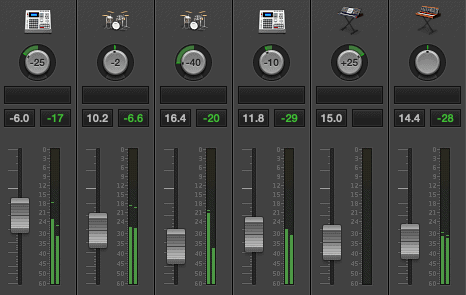
Like with any project, you'll start by cleaning up the tracks, organizing the multitrack, and then balancing your levels. If you need help with that, check out the Pink Noise Mixing method, it's as revolutionary as this mono method.
Once your levels are good, add in your panning on the instruments you want and to the degree you want to shift them in the stereo field. You may have to push up the volume a bit more since you lose up to 3 decibels as you pan to the extreme. The best digital audio workstations can and may already adjust for this so please check that.
People may argue this but I recommend applying rudimentary EQ and compression at this point. Some don't. It's up to you how you want to do it, it can come after step 3 if you like. But if you do it before hand, when you adjust your EQ in step 3, return to the same plugins rather than slapping another EQ plugin on top of the first.
2) Set Your Master Output to Mono
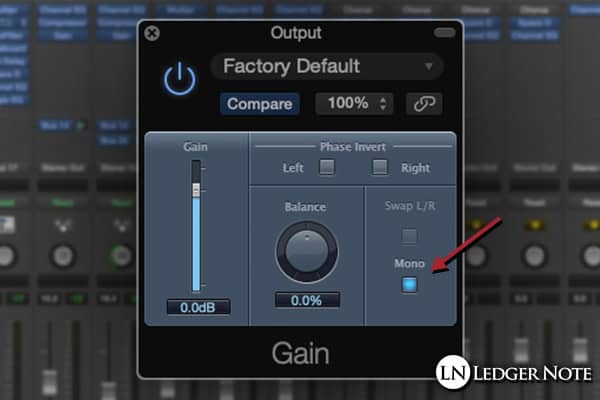
Now it's time to drop down to mono from stereo. There's two ways of doing this. Your summing bus or master output on the multitrack probably has a "channel mode" button to switch your entire mix to mono. If it doesn't, another method will be to use a plugin.
Most DAW's will have a default plugin for this purpose. For instance, Logic Pro has the Direction Mixer plugin or their Gain plugin that features a mono switch. Once set up, you can simply enable it or bypass it to switch from stereo to mono with one click. It doesn't matter which way you achieve this, but it's critical.
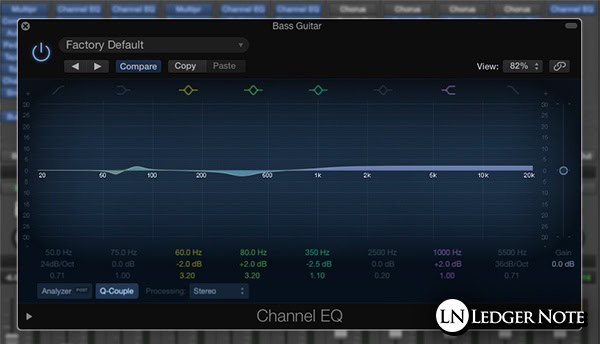
3) Reduce Masking with EQ
Now that you're listening in mono mode, it's time to turn your attention to the clarity of the mix. As you know each instrument will share frequency ranges, but each will also have a tighter dominant range that provides the clarity and intelligibility.
Now that you don't have panning to protect you from this cruel reality, you'll have to put in real work with your EQ. I recommend a parametric equalizer on each track. You cannot accept anything other than perfection in this step. This provides the bulk of the benefits of the mono mixing method.
Think about it like this. Just like panning moves tracks left and right, think of the frequency spectrum as bottom to top, where the low-end is bass and the high-end is treble. Your ears and mind envision it that way, if you haven't realized it yet. That will help you carve out a spot for each instrument.
4) Eliminate Phase Cancellation
Now you want to listen for phase issues. If you recorded guitar or piano in stereo, for instance, you may find that your miking method wasn't ideal and now you have phase cancellation or boosting. Fortunately the fix for this is real simple, but let me explain the problem.
Certain frequencies in these tracks may sound louder or quieter than they should, or you may even have ended up with the dreaded comb filtering where this problem exists across the entire frequency spectrum for that instrument.
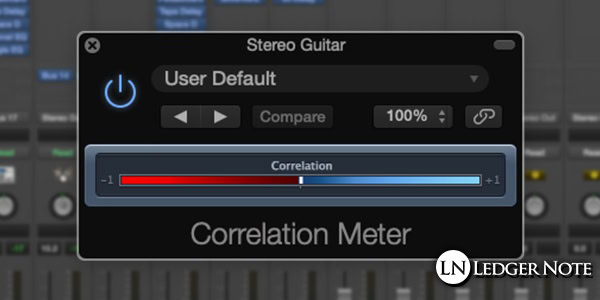
First you need to know if it's happening. If you can't hear it you can use the Logic Pro Correlation Meter plugin to get a visual representation. You want to be at +1 for most tracks and 0 for widest panned tracks. Anything below 0 and heading towards -1 means you're at risk for phase cancellation.
There's two ways to fix this. You either can invert the phase of the left or right channel and hope that does the trick, or you'll need to apply a delay to either channel. Logic Pro's Gain plugin has a phase invert button and you can choose a side, or there's the Sample Delay plugin.
The idea is to move either side channel's waveform back just enough to stop the cancellation from occurring. If you go too far with a delay you'll create a widening effect, so be aware of that. Try phase inversion first, it may save you some time and trouble dealing with delay.
5) Check Panning & Levels in Stereo Again
Now, before you start messing with time-based effects like reverb or any other types, go ahead and pop the mix back out to stereo. You should hear your tracks panned to the same positions you had them before you dropped to mono, but with much more clarity now.
If you didn't apply compression yet, now is the time to do that, and then drop to mono again to check that the results didn't muddy up the mix or knock off your volume balance too much. Make whatever volume, equalization, and compression tweaks you want in this stage.
6) Add Your Spatial Effects & Time-Based Effects
All of your final touches like reverb, delay, flangers, chorus, and anything else can now be safely applied. Make sure to place any of them possible on their own buses, because you'll want to be able to EQ them separately. Why?
Because once you're done applying them, you'll drop to mono again and check the clarity. Effects are the fastest way to muddy up a mix, so you need to be able to EQ them, too. Once they sound perfect in mono, pop back out to stereo and smile, because you're done. You should notice you have less ear fatigue at this point too. Just another benefit!
Now let me explain why we don't just stay in mono the whole time or even send out final mixes in that fashion. It should be obvious, but hopefully the people skimming will stop to understand this part. It also emphasizes why we pop out to stereo to do frequent checks as we go.
Expand Your Mono Mix to Stereo Frequently!
You'll still be mixing your recordings in stereo. Modern music requires stereo and we're not simply going to ignore it. We just build our strengths in mono and then check the mix along the way in stereo, always working mainly in mono largely until the end.
Of course at the end you'll work mainly in stereo and then only check in mono, the reversal of what you did earlier. Here's the reasons why it's advantageous to reverse the approach as you progress deeper into your mix.
Stereo Matters for All Modern Music & Genres
Everything in today, no matter if that's movies, television, or music, is recorded and played back in stereo. The only exceptions are things like podcasts and news shows that are exclusively vocals. Even bluegrass is recorded using a stereo mic setup.
And even in cases where every track is right up the middle, you'll still hear stereo reverbs and other elements. There's no escaping stereo and for good reason; it's a superb technology, one that matches the fact that we hear in stereo with our two ears.
You Have to Check Your Volume Balance in the Panned Elements

You have to pop back out to stereo anyways to double check the volumes of the panned elements. Just because you made sure they're perfectly equalized to not clash with the mid channel and they don't have phase cancellation issues with one another, doesn't mean they're at the right volume.
Remember, when an instrument is panned it gradually loses volume up to 3 decibels at the maximum pan position due to the panning law. You'll need to compensate for that and you won't be able to hear it in mono. Plus, if you don't pop back out to stereo you can't relish in your amazing work or hear the mix how your listeners will.
Nobody Actively Listens in Mono (On Purpose)
This is kind of a repeat of what I said earlier but it bears repeating. If a listener isn't wearing headphones or sitting perfectly in front of speakers, they aren't hearing true stereo the way it was designed by you to be heard. That's why we use the mono mix trick.
By making sure the music sounds great in the worst case scenario (mono), we ensure it sounds good in these non-ideal situations like a driver in the driver's seat sitting way too far to the left between speakers or people dancing in a club off to the side with their backs to the speakers. Even some radio stations are still broadcasting in monophonic sound.
And That's Why Mixing in Mono Rocks
The method is extremely simple to apply. You find a way to sum your mix down to mono (usually with a plugin on the output track) and carry on like normal. Once you get great results there, you know you have zero issues in stereo.
Don't forget, while using this mixing in mono trick to frequently refer to your stereo mix and back and forth. Stereo is the final goal and mono is just a tool to get there, so don't get too caught up in the method. It's a path back to stereo!
Jared H.
 Jared has surpassed his 20th year in the music industry. He acts as owner, editor, lead author, and web designer of LedgerNote, as well as co-author on all articles. He has released 4 independent albums and merchandise to global sales. He has also mixed, mastered, & recorded for countless independent artists. Learn more about Jared & The LN Team here.