Forget your preconceived notions. Acoustic guitar equalization is a piece of cake once you understand what to listen for (and how to listen for it). The principals below work for mixing in the studio and for live performances on stage.
There's two aspects to mixing any instrument, and that's getting it to sound amazing by itself while also allocating a dominant frequency range so it can shine in the full mix with all of the other orchestration without stepping on their toes, and vice versa.
How to EQ Acoustic Guitar
While there are a few professional tricks to employ while EQing acoustic guitar, most of the time less is more. That means less plugins, less tracks, less recordings from fewer mics, less overdubs, etc. The instrument and sound is complex enough, especially when playing chords, that too much will sabotage your efforts.
Most of the time, I recommend routing all of your tracks to a guitar bus. This lets you deal with all of them as a group, providing glue, minimizing your work load, reducing plugin usage and therefore CPU usage, making it easier to spot phase issues, and more.
If you aren't sure how to do that, definitely learn but don't let that stop you here. You can apply these principals to all of the tracks individually and get the same results, and perhaps better depending on your recording techniques.
Pro Tip: If you're recording at home or in the studio, send a dry signal to the digital audio workstation. That means don't apply any onboard equalization on acoustic-electric guitars, and don't have a signal chain full of effects pedals. Do it all in post-processing so you have as many options as possible while mixing.
Acoustic Guitar Equalization
When you fire up a project that includes acoustic guitar, there are four steps you'll always go through no matter what. It doesn't matter if you've recorded with a DI box or jacked right into your interface, if you used a single mic for a mono recording, or if you set up a stereo pair. You'll always do these things first.
1) High Pass Filter the Low Frequencies
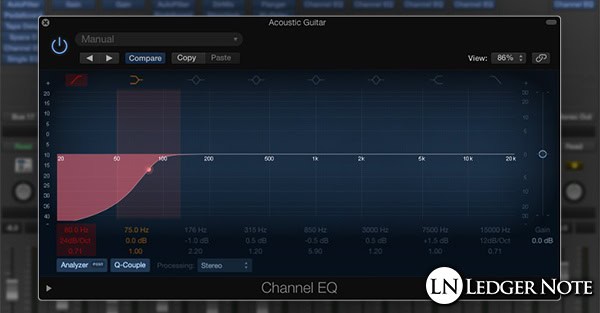
The first thing to do (on any recording) regarding equalization is to set up a high pass filter. I prefer to use a parametric equalizer where I can have 5 and 6 bands at once, or you can stack various plugins on the guitar bus on the multitrack. The result is the same but you get less latency with one plugin.
A high pass filter, or bass roll off, lets you define a frequency and gradually reduce the volumes of all frequencies below that threshold. What this does is cut out nearly all bumps, floor noises traveling up the mic stand, low frequency hum, and sub-bass which is unnecessary (leaving you more headroom).
Every track is unique, but in general a good EQ setting to start with is around 80 Hz with a 0.75 Q at about a 24 dB per octave roll off. This ensures the sub-bass is nearly silent and the bass range is drastically more quiet. Even as a singer-songwriter with just vocals and guitar you'll want to do this.
Ultimately you may make this roll off more drastic in context of the full mix to make even more room for the bass guitar and kick drum. Bass guitar EQ is another animal entirely and you don't need anything more than the kick drum competing in that area.
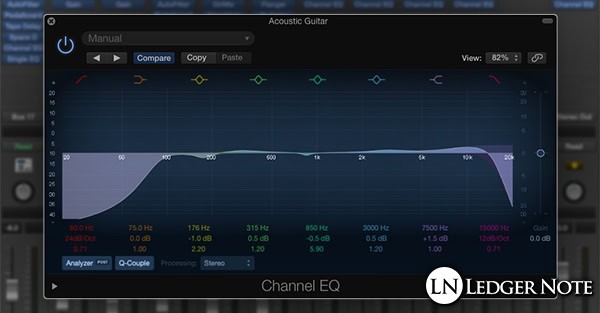
2) Tighten & Balance the Bass Frequencies
At this point you want to turn your attention to the remaining bass frequencies in the upper bass range from around 80 Hz to 250 Hz. Generally I'll slap a low shelf EQ and set it around 250 Hz - 300 Hz and experiment with lowering it as a whole. Often times this gets you very close to where you want your sound to be.
You may find that while you've made vast improvements with this simple technique, the bottom-end now feels like it's lacking some "oomph" especially with the 5th and 6th strings. What you can do now is add a small boost around 150 Hz to combat this issue. I recommend using a wide Q and no more than 5 dB of boost.
The wide Q keeps the transitions between frequencies sounding smooth and musical, versus abrupt and noticeable. This is important, especially in the bass region where so much energy resides. Try moving your center frequency around with various amounts of boost to find the sweet spot, then you can adjust your Q from there.
3) EQ the Acoustic Guitar in Solo Mode
Now you want to put your guitar bus in solo mode. I'd probably have already been doing that but it doesn't matter. The point is that we're now going to work in the mid-range and high frequencies and need to hear them precisely. High quality headphones can help here too, especially if you don't have acoustic treatment panels in your room.
What I want you to do is scroll down when you're done reading the this step and the next. You'll find a section called "Acoustic Guitar Frequency Range" which breaks down all of the sub-ranges that you'll want to listen for and balance tonally. I'll provide individual advice there.
In particular, you're going to revisit the bass to listen for fullness (versus a weak and thin sound) and for boominess, which sounds like you recorded in a muddy box (your room). Then you want to build a balanced body volume before tweaking the presence and air. And finally you can reduce string squeaking if it's a problem.
4) Equalization in the Context of the Full Mix
Finally, you want to un-solo your acoustic guitar bus so you can hear the full mix. You'll need to get the rest of the mix together as much as possible before returning to this step. The goal is to define the range allocation for the acoustic guitars.
Since your guitar tracks are probably panned if they're rhythm guitars, possibly in stereo, and since even the lead guitar is likely to be panned to some degree, you want to mix in mono at this stage. This lets you center all of the instruments to really hear what's clashing or not and lets you spot out any phase issues.
Typically you'll only be contending with rhythm or lead guitar, vocals, piano, and perhaps the snare and hi-hats to a degree. Your goal is to perform compensatory EQ on all of these instruments so that they all share this mid-to-upper frequency range but each have their own dominant areas.
This is crucial for having clarity and intelligibility in your tracks. Though they sound amazing in solo mode, when they all play together they have to share the frequency spectrum. Panning helps but we drop to mono so there's no excuses or shortcuts which only hurt your results later.
It's impossible for me to say much more here other than to focus on the boominess region, the body, and presence. Sometimes, if you need to reduce the presence to make room for the vocals (which are more important) you can make up some clarity using air, sparkle, brilliance (whatever you want to call it). Each set of tracks and songs are different, so use your ears!
Additional Acoustic Guitar EQ Settings
You have to understand that there's no best EQ settings for acoustic guitar. Each track is different, each mix is different, and each song has a different orchestration and arrangement. You will have to do the work each time by listening critically with your ears. There's no shortcuts in mixing, unfortunately.
However, there's a lot you can do to make your life easier when it comes time for equalization. I'm going to point those out below, including more EQ tips. The better you perform these tasks, the less EQing you'll need and the better your results will be even when you need more.
Get the Recording Right
The most important part of recording acoustic guitar is the guitar itself, the performance, and either the microphone or the preamplifier used. You have to get it right at the source of the audio. This means getting a guitar setup done, using new strings, using your best acoustic guitar, and practicing so you play your best.
It also means seating yourself in the right spot in the room. That's usually not in corners but the center of the room between the two walls and about 30% down the long direction of the room. That's your best spot in the room, in terms of room acoustics (avoiding reverbs, flutters, comb filtering, and bass build up).
Also, your mic placement is incredibly important. Even a matter of an inch can change the entire sound of your performance, especially when using two or more microphones. Experiment and find the best positions using our tips on miking acoustic guitar. You need to know about gain staging as well.
Search for Phase Cancellation
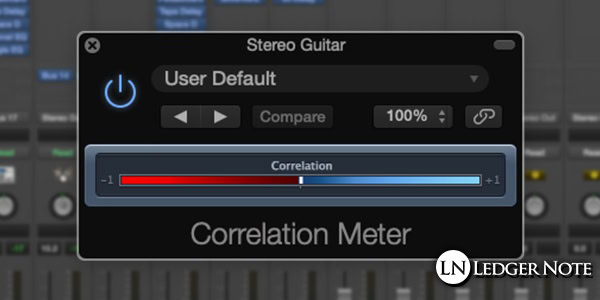
Once you've dropped your mix to mono, you should be able to hear any phase cancellation or constructive interference that occurs when recording in stereo. In order to deal with this, you need to either flip the phase of one channel or add a short delay to one of them. If you can't hear it yourself yet, use a phase correlation meter plugin.
What happens is certain frequencies will be boosted or cut in volume, and in rare cases completely muted due to the wave forms meeting each other in the air and interfering with one another. It's just like how waves in the bath tub can randomly explode in your face due to their energies colliding at their peaks, for instance.
Clean Up The High End Too
Just like you used a high pass filter to clean up the sub-bass, you can use a high pass filter to clean up the high frequencies. You can add a high shelf if you prefer. But the uppermost high frequencies should be reserved for instruments like cymbals.
You can focus around 10 kHz or a bit higher with a high shelf EQ to gently boost the top-end to add more clarity and air to the recording. To work on your presence and clarity, focus on a boost around 5 kHz to 7 kHz or so. This will help you cut through the mix without clashing with the vocals too much, but keep it subtle.
Compression, Panning, Modulation, & Reverb
Obviously you're going to use some compression after your equalization, which will help boost intelligibility if you set up your attack right especially. Panning is going to help with clarity and clashing with other instruments, but don't use it as a crutch.
If you still need help cutting through the mix or popping enough to draw attention, try modulation effects like chorus or flanger, or add a delay (try ducking it with sidechain compression). And if you need to smooth it out and drop it back in the mix but you can't justify dropping the volume any more, definitely use some reverb. We have a great article on how to mix with reverb if you're interested.
Acoustic Guitar Frequency Range
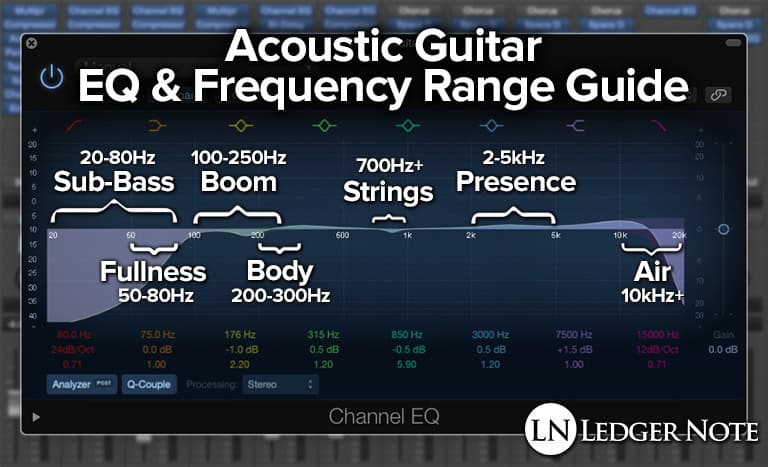
Knowing how to EQ acoustic guitar is largely about knowing the frequency bands where certain problems reside. They're named after the characteristic they bring to the overall quality of the track, with some named neutrally, some named good, and some named after bad characteristics.
Sub-Bass: 20 Hz - 80 Hz
It doesn't matter if you're a singer-songwriter performing solo or mixing a full band, there's never a reason for acoustic guitar to reach deeply into this range. Start rolling off quickly at 80 Hz (maybe even higher depending on the context) to get rid of noises, rumbles, and sub-bass that eats up your headroom.
Fullness: 50 Hz - 80 Hz
The reason I recommend using a roll off for the sub-bass is so you leave some of the upper bass, which is the fullness range. Too little in this range and your guitar will sound weak and anemic. Too much is distracting and will mask other bass instruments. Try a low shelf EQ to control this range and add a slight boost back if needed.
Boominess: 100 Hz - 250 Hz
This region is tricky. Too much causes your guitar to have bursts of mid-range energy, but too little will leave you sounding thin. It also contributes to muddiness and boxiness, though that reaches up to even 500 Hz.
You have to be careful here, because removing too much of that will destroy the fundamental sound of the guitar. You'll almost always want a slight cut in nearly every track centered around 250 Hz or a lot of mud will accumulate across all the tracks. One or two decibels is enough.
Body: 200 Hz - 300 Hz
This small range is what lends "body" to your recording, which adds the weight and anchors the guitar in the mix. This is why you have to watch out when trying to suck out the mud. You need to maintain this region carefully. Use a tighter Q on a band of the parametric equalizer and sweep a boost around to find the sweet spot.
Strings: 700 Hz & Up
A lot of times, the sound of your fingers sliding up and down the strings will reside here (and can reach even higher). Do not place a cut in this region to handle string noises. If they bother you, you want to use a de-esser, which is like a compressor sidechained to an EQ. It will reduce those frequencies only when they become too loud.
Finding the right frequencies involves creating a very tight boost on your EQ and sweeping it up and down the spectrum at at least a 10 dB amplitude increase. When you find it, you'll make the string squeaking a lot worse, and in this way you've found the range to cut in.
Presence: 2 kHz - 5 kHz
This region is all important. Think of it as a sense of firmness. If you add too much EQ here it can become too harsh and rigid, but too little sounds kind of flimsy and soft. Getting the presence right will make your guitar mix sound amazing, but be careful.
You want to always prioritize vocals in this region over the guitar. You can automate a boost in this region to only be there when the vocals aren't playing. This way you get the best of both worlds without clashing with the most important part of the song (the vocalist, sadly).
Air: 10 kHz - 20 kHz
People call this area air, sparkle, brilliance, sharpness, etc. It brings the highest frequencies out of the guitar. Play it safe here with a high roll off around 16 kHz and dropped out completely by 20 kHz, and then you can manage what's left with a boosted high shelf.
Don't overdo this. It sounds cool on vocals, but on guitar you may think it sounds magical until someone with a set of tweeters or a bad EQ set up in their car plays your song and suddenly it's an ear drum piercing mess. Use headphones when working in this range so you can get to a precise level of detail.
EQing Acoustic Guitar is Simple!
At the end of the day, you just need to know the frequency sub-ranges to target for each tonal characteristic you want to boost or cut and how to use the right tools for the job. After that, though there are a few tricks like mono mixing, it's really about critical listening.
Bookmark this page if needed so you can reference the frequency ranges above, or save the image associated with them. Learning those and the names associated with them is just about all there is to acoustic guitar EQ.
Jared H.
 Jared has surpassed his 20th year in the music industry. He acts as owner, editor, lead author, and web designer of LedgerNote, as well as co-author on all articles. He has released 4 independent albums and merchandise to global sales. He has also mixed, mastered, & recorded for countless independent artists. Learn more about Jared & The LN Team here.