
When you receive a raw DAW project file with a song ready to be mixed, the first thing a mixing engineer will typically do is balance the levels across all of the tracks in relation to one another and pan them around.
You may not realize this as an organized person, but more people than not send in the most absurd projects with 50+ tracks, unlabeled and ungrouped, with zero effort in place to clean up the noise in the tracks or anything.
To create a "volume reference" we tend to hunt down the kick drum and bass and get them sounding great together then bring in the snare drum. From there you have the main rhythm down and can start bringing up hi-hats, vocals, and other instruments on the faders.
The problem is, when using a reference from within the mix itself, levels can change on you quickly as you start the clean up, equalizing, and especially dynamic compression phases. And that's where pink noise mixing comes in to save the day.
What is Pink Noise?
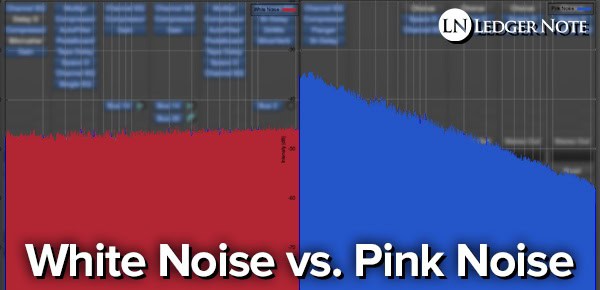
Pink noise, like white noise, is random noise scattered across the entire frequency spectrum of human hearing. While white noise features a constant amplitude in every frequency, the energy of pink noise decreases by three decibels for every increasing octave.
This decrease of 3 dB per octave in spectral power density is by design because humans don't hear frequencies in a linear fashion. We hear logarithmically based on octaves. Each successive octave may cover the same increment of frequencies or notes, but they each contain twice as many Hertz (cycles per second) as the previous octave.
Noise of the pink variety allows us to hear each frequency at relatively the same volume. It's perfect for when humans need to make decisions based on how things actually sound, versus taking measurements with electronic equipment like decibel meters.
An interesting side note is that though we hear volume in the frequency spectrum in a logarithmic fashion, even that's not a perfect curve. There are slight peaks and dips between 1000 Hz and 24 kHz. These are measured, known, and graphed in what is called the Fletcher Munson curve.
How Does Mixing With Pink Noise Help?
As mentioned above, this is all about speed. The slowest and most tedious parts about mixing is that the projects you work on are disorganized with too many tracks and that setting a reference volume from within the mix tends to lead to a lot of "back and forth" as the reference itself undergoes signal processing.
That back and forth ends up meaning entire groups of instruments or single tracks have to be constantly tweaked in volume until you start to lose perspective. It also means you tend to end up with too little headroom and have to bring the entire mix down in volume, leading to imbalances and revisiting volumes again.
When mixing with pink noise, you only use it initially as a volume reference track. By setting the average volume of the pink noise to a proper level, you'll ensure you'll always have enough audio headroom while finishing off the mix, but not too much when you're done. This is critical for the mastering stage of a song.
Using Pink Noise to Mix
The initial steps will be different depending on your digital audio workstation (DAW), whether that be Logic Pro, Pro Tools, Reaper, FL Studio, etc. I'll be using Logic Pro but you should be able to easily follow along all the same, since a multitrack is a multitrack regardless of the name attached to it.
The only thing you'll need to determine is if your DAW has a tone generator plugin (the best DAWs do) to create pink noise or if you need to download one or simply import a recording of the noise, which can easily be found online.
1) Add a Pink Noise Generator or Sample to a Track

Regardless if you're using a plugin or a sample, you'll want to create a new track for the noise. You can't slap it on the master output bus or it'll override all of the audio if you don't have a Thru option (Logic Pro's plugin does not). If yours does have a Thru option, you can save yourself a step otherwise.
When using a plugin, you'll be given the choice of setting a level, which is an RMS level and not a peak level. The RMS (root mean square, basically an average) level will be about 3 dB lower than the peak. The noise will have some volume variance but no more than plus-or-minus 3 dB.
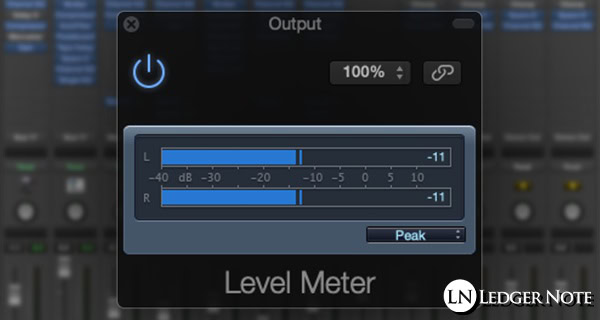
What you want to do is have the RMS level set to output around -14 dB. Adjusting this within the plugin while leaving the fader at unity is preferable. This will put your peaks around -11 dB, which is what you'll want to shoot for on a level meter plugin added to the track you placed a sample on, if using a sample.
2) Put the Noise in Solo Mode & Solo Each Track With It
You won't need to solo the noise if you have it on the output bus, but otherwise place it in solo mode. Now you can solo each individual track or group of tracks one at a time and bring them up in volume until it sounds equal in volume to the pink noise.
There are some inconsistencies you'll learn here, like a tendency to make your bass line and kick drum too loud, or to find the right level for more dynamic tracks like vocals. It's fine because you'll still make final adjustments later. Your goal here is to get close.
Make sure you're using dry tracks here. You likely haven't started setting up reverb buses or anything else, but if you have, go ahead and mute those. You want to make these choices based on the dry audio without any other influence.
3) Mute the Pink Noise & Adjust to Taste
Now that all of your tracks are up on the faders, go ahead and mute the noise generator or remove it entirely. Listen to your new mix with no tracks in solo so you can hear the full context. It should be pretty close to where you would have set the levels with your previous, more tedious method.
It is expected that you'll have to make adjustments to individual and group volumes, and even more so as you start applying EQ and compression. But they will be minor and you'll continue to dance around the same RMS value for your mix.
I just did this again as I'm typing this out for you. My average volume is dancing around -11 dB or so now, with peaks jumping up to as high as -1 dB on the kick drum. I can tell it's too loud and will be turned down, but using this method I still never clipped, which is more than I can say for setting reference volumes the traditional way.
Pro-Tip: One thing you can do at the end is use a Match EQ to take a snapshot of our entire mix's sonic footprint and invert that as an EQ curve, which you can then apply to the pink noise track itself. This will let your entire mix come through and fill in the gaps with the noise so you can do a sanity check at the end and tell if any instrument is wildly too loud or too quiet.
Pink Noise Generator Plugins

My recommendation is to use a plugin to get this done over importing a sample each time. It'll be faster (and cooler) and speed is the name of the game here. Here's a list of the plugins you'll likely use and which DAW you can find them in, plus one you can download if yours doesn't have one:
- Logic Pro - Test Oscillator
- Pro Tools - Signal Generator
- Reaper - Pink Noise Generator
- Any DAW - Credland Audio's PINK
I'd grab Credland Audio's plugin above if I didn't have one just to have one made for that specific purpose. Otherwise you'll have to find a synthesizer plugin that manages to have the option to generate this style of noise. And you'll have to go through a ton of steps to create it each time. Go for speed!
And That's the Pink Noise Mixing Trick
It's really that simple. It's a three step process that can happen super fast compared to the old method. The key is that pink noise exists outside of your mix and is a constant in terms of volume and energy, matching exactly how we perceive frequencies.
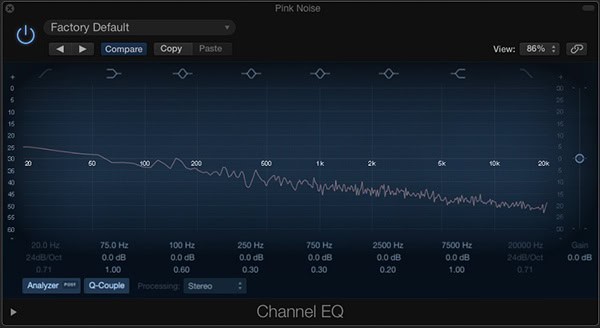
And because it follows the same logarithmic pattern as our ears do, it's a perfect guide to the right volume no matter the frequency ranges we're working with. If you were to look at a perfectly balanced, dense mix in a frequency analyzer, it would look very similar to the downward sloping pink noise curve.
Setting volume levels is a challenge for even professionals, causing us to get lost in these details instead of making progress with signal processing. Pink noise mixing is a life saver for those of us that keep re-tweaking volumes constantly.
Jared H.
 Jared has surpassed his 20th year in the music industry. He acts as owner, editor, lead author, and web designer of LedgerNote, as well as co-author on all articles. He has released 4 independent albums and merchandise to global sales. He has also mixed, mastered, & recorded for countless independent artists. Learn more about Jared & The LN Team here.