Lots of listeners hear older recordings and realize that something sounds different than the new crystal clear, extremely sterilized, computerized recordings of today. It's not just a sense of nostalgia.
There is definitely a difference but it's hard to put your finger on it. Even audiophiles have a difficulty nailing down just what that subtle feeling is that separates the new from old.
There's a lot of myth and mistake to be found online when you start searching for the answer to this mystery. People attribute it to transfers being made from needles and records to digital.
They'll say it has to do with "analog warmth" from using tube electronics and outboard studio equipment. The truth of the matter all boils down to one thing: tape saturation.
The race to emulate recording to tape began soon after recording and mixing engineers began to move further and further into the digital domain. Quality climbed higher and higher, yet something was missing.
A sense of life that we were used to hearing was gone. This is when plugin companies began creating all types of simulation plugins to fill this void in the listener's hearts.
But even among professionals there's still tons of confusion about what saturation plugins do, which are the best, and how to use them effectively. We're going to clear up all the murky waters right now...
There's an entire crowd of amateur recording engineers and mix artists out there paying obscene prices for outdated technology, modding their current microphones, EQ's, and compressors, and all kinds of other shenanigans.
"If I change this tube for that one and then solder in a different transistor and use active electronics instead of passive, maybe then I'll get that sound." People start experimenting with their gain staging, headroom, and all kinds of things to emulate the good old days.
Don't fear. Most of them just need reasons to justify tinkering and spending money on their passions and hobbies. You don't have to spend a single dollar to achieve this affect, although you might get better results if you spring for a nicer option.
All you need to do is know what it is you're dealing with and how to properly use it. Let's do this...
What is Tape Saturation?
That "warmth" everyone is hunting for entirely comes from tape saturation. Sure, all of the other analogue gear and tubes and other stuff might contribute some, but here's the real deal.
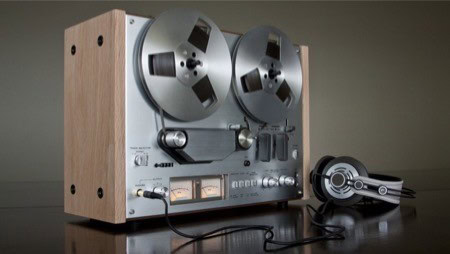
Back when we would record on reel-to-reel tape (and could afford the tape!) we would record every instrument to a different track on a different piece of tape.
When you'd mix, you'd play all of those pieces of tape back, run them through the various pieces of outboard equipment, and then record them again back to tape to save your work.
After a bit of work, you'd have each instrument on second or third generation tape. Then you'd make a drum stem that combined all of your drums together, for instance.
By the time you combined all of the instruments and takes into one master recording, you've gone through tons of generations of tape.
These mechanical reel-to-reel systems weren't perfect any more than your cassette player in your car or Walkman was. The speed would vary a little bit. The tape heads would collect dust or degrade over time causing more friction.
What this resulted in was every take having random, very small and almost imperceptible changes in different frequency ranges:
- < 0.1 Hz referred to as Drift
- 0.1 Hz - 10 Hz referred to as Wow
- 10 Hz - 100 Hz referred to as Flutter
- 1 kHz - 5 kHz referred to as Scrape Flutter
These small vibrational perturbations were all but eliminated from tape machines by the 80's, with their amplitudes contributing less than hundredth of one percent of the overall sound in the recording.
But remember what I said about fourth, fifth, and tenth generational recordings? It starts to stack up when you have a copy of a copy of a copy...
And that's what tape saturation is.
What you end up with is a giant mixture of barely audible distortion, phase irregularities, micro pitch shifting, and harmonic transients popping out across the entire frequency spectrum. And it sounds great!
Mixing engineers discovered that they could print to tape even hotter than normal, in the range of soft clipping, to further amplify these pleasurable sounds. It creates a wall or haze that you can't hear through, unlike these new digital recordings where everything is superbly isolated.
If you're having a hard time understanding what this "sound" is like, check out the quintessential example by the Moody Blues on their track "Go Now." They loved exploring using way too much of everything, and part of their distinguished sound is creating crazily complex vocal harmonies washed in too much reverb.
You won't hear that here in their early stuff, but this is a perfect example of waaaay too much tape saturation (and going into the realm of full-on distortion):
You can think of it like putting an absolutely invisible sheet of glass in front of your television screen. You can't see the glass itself, but the light coming through it and into your eyes has small differences that creates a sheen that otherwise wouldn't exist.
And if someone to remove that piece of glass, you wouldn't know what was missing but you'd prefer the previous version because you were used to it. That's what this tape saturation craze is all about.
Emulation & Simulation of Tape Saturation w/ Plugins
That's a doozy of a sub-title there. The question becomes "How can we emulate those effects in our digital recordings without going through the process of using all analog gear and recording to tape?"
To simulate these micro-anomalies of tape rushing past a tape head and having a magnet do its magic, plugin creators invented algorithms to mimic the soft clipping of tape that can't happen in the digital realm.
In other words, tape saturation plugins offer a special type of distortion.
These plugins give you a lot of the same parametric equalization options that most modern equipment gives you now, but the essentials remain the same. These plugins apply a controllable overdrive to produce a fuzzy distortion of extra harmonics and transients.
Example Uses for Tape Saturation Plugins
You can slap saturation on any instrument. Grunge and rock bands might like some on their electric guitars or even heavily on the vocals as an effect here or there. But it really shines on the lower frequency instruments like drums and bass. Synth leads really shine with it too though. Try everything!
Read these descriptions, please, and then explore the video we put together that displays each of these specific examples in audio form!
Bass Lines
When you apply these plugins to individual tracks, such as the bass line, you can add a lot of punch, warmth, and harmonics to help it stand out a bit more.
You can't add any high-end sparkle to a sound that didn't have it in the first place, but with this type of distortion you can force these harmonics to pop out and then control with equalization.
Drum Bus
Another example use would be to apply it across a drum bus where all of the individual tracks are routed through.
By applying the tape saturation to this auxiliary track you can "glue" your drums together, especially after a slight bit of grouped compression. Slap on a slight reverb after the saturation and you're cooking with fire!
Parallel Saturation
If you can't find the right amount of saturation, you can always route your signal off to a bus and apply saturation there.
Then you can push it as heavily as you like and then recombine it with the original signal at any volume level you want. This way, you can create a very intense sense of saturation but mix it back in at lower volumes so it's not so obvious.
Master Track
Perhaps the most common use of a tape saturation plugin is to place it on the master out track to truly emulate mixing down to tape. This would apply the saturation across the entire mix as a whole, providing that "wall of pleasurable fuzziness" over the entire recording.
If you're looking to take your modern record and give it the old flair of sounding as if it was recorded on tape, there's no better album to emulate than John Mayer's Battle Studies. Like The Beatles' Abbey Road, Battle Studies was named after the recording studio where it was recorded and mixed.
They used all of the benefits of modern digital computer technology but... they actually recorded to tape! It's the perfect mixture of crystal clear digital recordings and tape saturation (maybe a tad too heavy on the saturation for me).
Stream some samples so you can hear it by clicking the album cover below and download a copy if you dig it. It's a great record.

Now that you know what this saturation sounds like, let's cover some of the core concepts and questions and then I'll show you a list of plugins that are currently considered the best for this.
Tape Saturation FAQs & Primer
Whether or not tape saturation is a pleasing effect is entirely subjective. Young people aren't going to care and may even find it a negative effect. Us older folks or younger fans of the oldies may prefer it.
Remember to focus on the desires of your listeners versus your own before you start applying saturation. Not everyone remembers or cares for the reel-to-reel sound.
Here are some common discussion points regarding this topic:
What is tape saturation?
When we used to record to magnetic tape with tape heads (just like cassette tapes and VHS movies played by a VCR) minor variations in the speed of recording and playback caused the tiny effects discussed above to become apparent.
After combining many takes recorded to tape, they became even more obvious. Mixers discovered that you could print to tape hotter than normal into the realm of soft-clipping (which isn't possible in the digital realm) to amplify the effect. It's a type of compressed distortion that creates a sense of pleasing warmth.
This seems technically bad. Why do people seek after it?
Agreed. Today we can record the audio that is so clear that we've reached the upper limits of perfection. In fact, it's so clear that it feels lifeless and empty at times. Old timers enjoyed the sound of saturation.
Although it's less pristine, it adds a subtle dimension to the music. These harmonics are barely noticeable but add a much needed depth of sophistication even to the simplest music.
In the end, it boils down to preference. Sounding like the classics may result in you being compared to the classics, which is a great thing for your business.
Do I want to add saturation to my electronic dance club music?
Maybe, maybe not. If you produce the type of music that is perfectly quantized with no change in velocity and is mastered to compete with other current albums (aka squashed to death with a compressor and limiter), then probably not.
But if you're the type of producer that likes a humanized aspect of non-quantized drums that you played in with a MIDI controller and you like to maintain irregular velocities, then you very well may love the added character and moodiness of saturation.
Your listeners likely will as well. It just depends on whether or not you want to stand apart from the crowd for blend in with your contemporary cohort.
How should I use these tape saturation plugins?
As mentioned above, you can apply them in overdrive to individual instruments as an obvious distortion effect. You can also just apply it to the master track very lightly to emulate older reel-to-reel recordings.
Another method would be to apply it to each instrument as lightly as possible and then again on the master track. In this way, the combined light saturations will come together to simulate stems being bounced to different tapes and being mixed down one last time to a final tape.
You'll have to experiment and develop your own style, but those are three great starting points.
The Best Tape Saturation Plugins, Free & Paid
If you know this is a direction you want to take your music, then by all means you should spend the money to achieve the best result possible. But maybe you aren't sure and would like to test it out first.
Below is a list of the best tape saturation plugins available, including some free options at the bottom so you can test the waters.
Saturation by URS
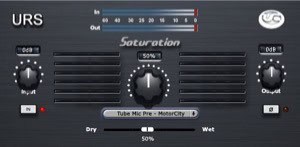
The URS Saturation plugin is a fan favorite and goes at the top of the list. It's as simple as can be. Choose one of ten vintage analog algorithms, tweak your drive with the input gain, mix it in parallel, and set the volume with the output gain.
You can run your saturation through models based on varying tape speeds, tube amplifiers, and transformers. For $99 on Windows or Mac, this is one you should give serous consideration. It requires the iLok II dongle for ProTools though. That's the only downside.
Decapitator by Sound Toys
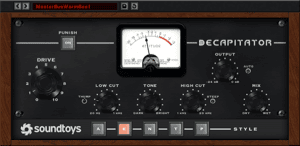
This is the big leagues. Available for Windows and Mac at $199 USD, the Decapitator is an analog saturation modeler featuring five base algorithms to start from.
Along with input and output gain to control the drive and volume, you can even run it in parallel right from the plugin using the Mix knob. Toss in a low cut, high cut, and tone option, and you're getting premium tape simulation without spending a lot of time finding the sweet spot. It's done for you.
Phoenix II by Crane Song
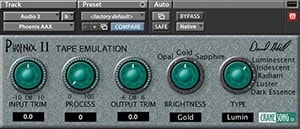
This bad boy is only available for Pro Tools, and if that's okay with you then give it a shot. This is one of the plugins whose sole focus is nothing more than tape emulation.
The best part is, besides the individual controls you can tweak, you have five jumping off points based on algorithms that are based on five different popular tape recorders from the past. The Phoenix II is a great option for those who want a few fantastic options and then move on with life.
Roundtone by Sknote
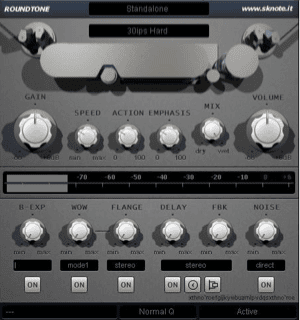
While other plugins offer multiband control and all of these other options, the Sknote Roundtone is one of the few that let you dig into the Wow and Flutter type of options we discussed above. A neat aspect is that the user interface actually displays a reel-to-reel tape head.
Don't take my word for anything though, because you can hear before and after demo tracks on their website above! Snag the Roundtone for Mac or Windows for $30 USD.
TapeHead Saturator by Massey
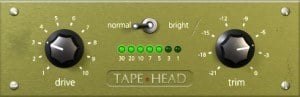
Massey's TapeHead Saturator is another plugin with a simple user interface, but you shouldn't take that to mean it's any less good. Heads up before you go any further, this one is Mac only at $69. There's no frills here, just a perfect emulation of tape running past a tape head and thus the name!
You can control the drive and have one EQ option. My favorite aspect of this is the Trim knob, which allows you to adjust the output gain, which is what almost every other plugin of this type is missing.
Ferox by ToneBoosters

Available for PC or Mac, ToneBoosters' Ferox is another multi-featured plugin. Along with saturation, you can also control the compression, gain, drive, EQ with low and high pass filters, and even add a delay to the saturation effects. You can also change the character of the saturation with the saturate and hysteresis knobs.
This is the cheaper option compared to the ReelBus plugin they offer that features more tape recorder models. You can try both out with their trial bundle and pick up ReelBus for as little as $20 EUR.
Saturn by FabFilter
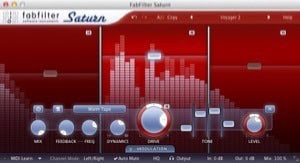
This is one of those plugins that have taken saturation to the limits. You can have up to 6 bands of multiband processing so you can target specific frequencies, getting down to that scalpel level of detail for your songs. The Saturn plugin has 16 types of distortion, including analog tube, tape saturation, bit crushing, and guitar amp modeling.
There's countless modulation options too, but if you don't want to get lost in all of that you can find your favorite presets, of which FabFilter has created 150 to save you time. You can't beat it. You can get this for Windows and Mac for about $155 USD.
Saturation Knob by Softube (Free!)
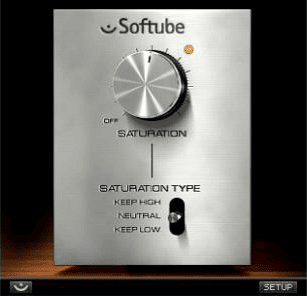
This is the best freebie out there for saturation. The Saturation Knob is as easy to use as possible. There's a single knob to change the input gain and a switch to roll the effect off at the bottom or top, leaving them unaffected by the saturation. That's it!
Head over to Softube's site to hear some examples and download it for Windows or Mac. I use this across the master track for the slightest amount of saturation to my more computerized MIDI songs.
FerricTDS by Variety of Sound (Free!)
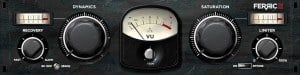
Another freebie with a bit more control (but not necessarily better or worse) than Softube's plugin above. This plugin actually won the KVR Developer Challenge in 2009. What I like about the Bootsy FerricTDS is the limiter, because saturation necessarily boosts the gain to create the distortion.
It's one less step in the mix process. If you're on Windows, give it a whirl. Unfortunately it's not available for Mac OSX though.
Tape Saturation Plugins Are Great!
Tape saturation is not the opaque mystery that the internet makes it out to be. All we're seeking to do is replicate the slight, yet pleasingly warm, harmonic distortion across the frequency spectrum that resulted in recording to reel to reel tape.
That's it! We can still pull it off in the digital realm without dealing with tons of outboard racked equipment and miles of expensive tape. Find you a tape saturation plugin you like from the list above and you're off to the races... Just remember, most of the time with effects like this, less is more. Happy mixing!
Jared H.
 Jared has surpassed his 20th year in the music industry. He acts as owner, editor, lead author, and web designer of LedgerNote, as well as co-author on all articles. He has released 4 independent albums and merchandise to global sales. He has also mixed, mastered, & recorded for countless independent artists. Learn more about Jared & The LN Team here.