Gated reverb is the sound of the 1980's. One might argue, "No, it's MIDI production or it's the synthesizer." Say what you will about the blatant and overt sounds of that time, but the trained ear hears something completely different.
It's all in the drums, especially the gated snare drum. They're powerful. They punch through the mix. And they don't sound like anything ever heard before or after, either in nature or through a computer.
Even with the 80's making a come back with synthwave and other similar sub-genres, all of these musicians are flocking to the sound of huge drums driving the rhythm to simulate that beloved decade.
Let's talk about exactly what's going on with this characteristic sound, when and how it was developed, and how we can recreate it in the modern era with our best digital audio workstation software and VST plugins.
It's critical to understand (skim our article 'What is Reverb' if needed) how this core effect works to get a handle on how to use it in combination with a noise gate to create the gated ambience we're talking about.
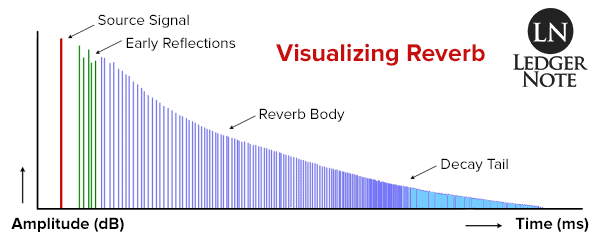
The basic concept is reverb is a series of extremely fast delay echos that sound like a "smearing out" of the original sound. These echoes gradually lose their energy and thus volume until they decay into complete silence. You may now proceed!
What is Gated Reverb?
Gated reverb is an audio signal processing technique that involves using a loud reverb effect that is cut short by a noise gate instead of allowing it to naturally decay in amplitude over time.
What made it unique at the time was that most reverberation effects were used to simulate the acoustic qualities of various locations or rooms. Even synthetic, mechanical ones like plate reverb and spring reverb were used in a realistic fashion.
This sound was intentionally meant to be unnatural and unrealistic. It was meant to sound huge and powerful. The only other use of this effect that can match it in creativeness and its ability to extract amazement from its listeners is reverse reverb, but even it is less useable in general.
Though experimentation was done using this mixing technique on all kinds of instruments, it was generally accepted that the best use was on drums. This became the signature use and sound of the 1980's pop music scene.
It's still used today in music that is meant to emulate the sound of the 1980's in the recording studio, and is used in general with live sound reinforcement PA systems for drums so they carry the same impact for all audience members in huge stadiums or auditoriums.
Who Developed Gated Drums & How?
In 1979, studio engineer Hugh Padgham and record producer Steve Lillywhite developed the gated reverb sound during sessions at Townhouse Studios with Phil Collins, Peter Gabriel, and XTC.
Hugh Padgham made the accidental discovery when recording the song "Intruder" by Peter Gabriel for his self-titled and third solo album. They were using a drum overhead mic as a talkback channel, which allows the engineer in the control room to speak to the artist in the isolated instrument room through their headphones.
Typically, talkback microphone signals are heavily compressed and use noise gates so that the voices can be heard clearly over the cacophony of the rest of the rough mix during the recording phase. Sometimes reverb is applied to the talkback channel simply to make it more pleasant and smooth.
Talkback channels are triggered by the press of a button, which opens the mic up for passing an audio signal. Padgham opened the overhead microphone while Phil Collins was playing drums for the track and heard this most amazing sound effect occurring.
The effect was then used on the drums for the Intruder song and many others by the artists in the studio during this period, most notably on Phil Collins hugely successful single "In the Air Tonight." It quickly spread to other studio engineers and artists' albums. Soon, you couldn't get away from it until the fad began dying off in the early 1990's.
How to Create Gated Reverb Drums
Let me say up front that there's not much room for flexibility here. The only real choice you get to make is which of the types of reverb you'll use. Beyond that, the methods are fairly strict if you want the authentic sound.
You should know, there are premium reverb plugins that offer this effect without manually setting it up, but they never sound as authentic. It's always best to set it up yourself at least once so you know how it works, too. And thankfully it's a very quick process.
The New Way - Effects Processors in the Box
In the modern era, we record as dry as possible and mix after the fact. This provides us with the most options and the ability to experiment and hit 'undo,' etc. This holds true even if we program in the drums using MIDI to trigger one-shot samples.
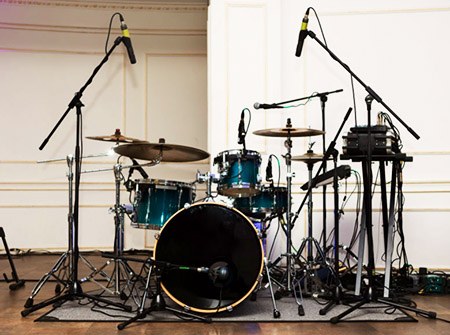
You could route out of your audio interface and patchbay through a hardware reverb unit, but you're most likely simply going to drop a VST plugin on the multitrack. So choose which of the drums are going to receive the gated reverb treatment. At minimum you're going to treat the snare drum.
1) Create an Auxiliary Bus & Send the Original Drum Track To It
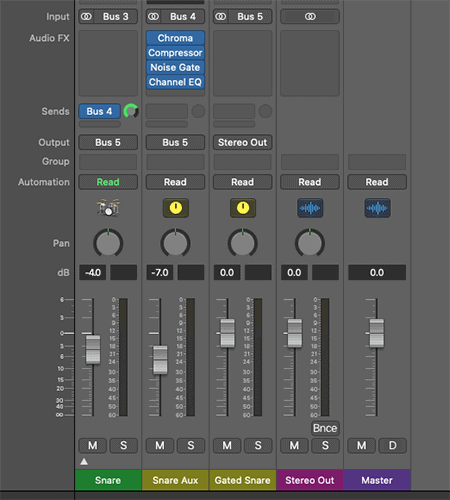
To get the gated snare drum sound, you need to create a send on it's track to a new auxiliary bus. On this aux bus you need to add a series of plugins in this specific order:
- Reverb
- Compressor
- Noise Gate
- Equalizer
You won't deal with the EQ until you're completely done creating the effect. It's to bring clarity back to your mix, but I'd go ahead and drop it in there while you're at it.
2) Add the Reverb & Heavily Compress It
Here you get to experiment with what reverb sound you like. I'd probably stick with a neutral room reverb, but try it all out. A plate reverb can even work here. It all depends on the style of the song itself, so you may use a different one for each track on your album.
Make sure you set the Wet volume to 100% and the Dry volume to 0% so you get as much reverb as possible and as little of the original audio source. Set a long sustain and release (over around one second total is fine) so the volume doesn't waver much.
Finally, head to your compressor and clamp down on the reverb hard. I'd drop the threshold slightly into the reverb body (instead of just the peaks) and use at least a five-to-one ratio if not a bit higher as a starting point.
Experiment here as the settings will change each time. There's no hard rules or go-to settings. Use a fast attack and don't worry about the release. You can even test not using a compressor at all.
3) Set up the Noise Gate with a Sidechain
Now pull up the noise gate. You'll realize immediately that you can't possibly make use of this thing by triggering it with the compressed reverb itself. What you need is to use the sidechain functionality to trigger the gate to open and close based on the original drum track.
If you don't know how to do this, consult our 'Noise Gate' and 'What is Sidechaining' articles. They'll tell you how to do it, plus other information you should know about noise gates, but here's the critical concept:
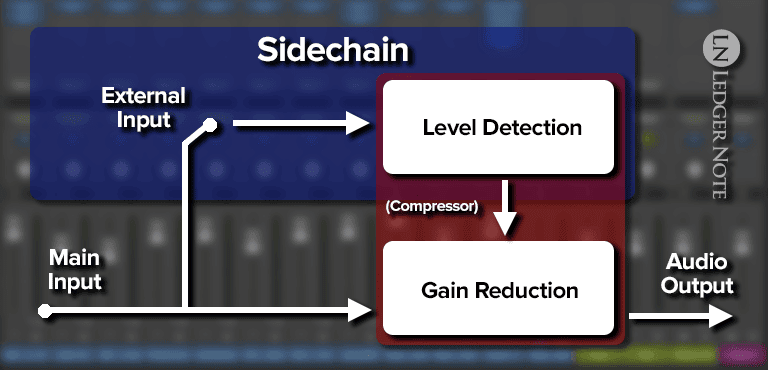
Instead of having the noise gate use the reverb track's unvarying levels (due to the heavy compression), we'll have it use the levels of the original drum track. When the original snare drum strikes, the noise gate opens up and allows the reverb to shine through.
Now, set the Hold setting to about half a second. You'll adjust this to taste based on the tempo of the song, but that's a good starting point. Hold tells the gate to stay open for that period of time. Then set the release to be very fast. You want it to close abruptly, but slow enough that it's a smooth transition.
You should now have a gated reverb coming through behind the original drum track. You'll want to tweak the Hold setting on the gate and then use the volume fader on this auxiliary bus to balance the volume of the effect with the original track.
4) Use Equalization to Regain Mix Clarity
What most tutorials don't tell you is that you're going to need far more mixing work on this auxiliary bus to make sure the mix as a whole doesn't turn into a muddy mess. Please read our article 'Mixing with Reverb' to learn more, but I'll give you the main tip here.
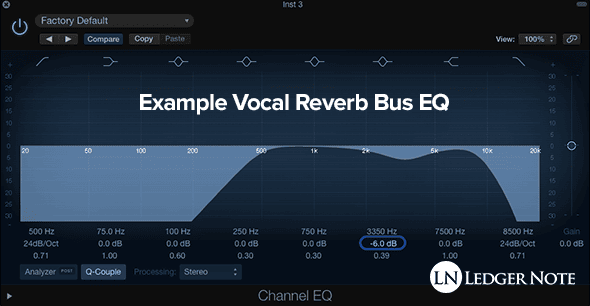
You're going to want to slap a parametric equalizer on this reverb bus in order to make sure it's dodging the main drum sound. You can also add a bit of a pre-delay to let the attack of the original drum sound cut through, but you'll also need to worry about the body of the sound, which an EQ curve like the one above makes for a great starting point.
5) Output Both the Original Drum & The Aux Bus to a New Bus
As a final tip, I recommend switching the output of both the original drum track and the auxiliary bus where all the plugins reside to a new bus. You can label it "Gated Snare." What this will do is preserve the volume balance between the two.
Now, if you need to adjust the snare's volume in the overall mix, you'll use the fader on this new bus, which will adjust both the original snare and the gated reverb together, keeping the balance you carefully created. Congrats, you're done! Now repeat it for any other drum you want.
The Old Way - Room Mics in the Studio
For posterity's sake and for those who keep it old school, I want to also share the original way of creating gated reverb. If you still like to mix out of the box and commit a mix to tape live rather than tinker around after the fact (you're braver than I am), this is how you get it done.
Note that in this method the entire drum kit receives the effect as you can't isolate any specific drum in the set. You'll set up your typical stereo pair overhead mics and close mics on at least the snare and kick. But you'll also want at least one ambience microphone set up to capture the sound of the room.
Because the sound of the room itself is what provides the reverberation, you'll take down some acoustic treatment from the walls and remove a rug or two, or choose a different, more reflective room to record in.
From here it's easy. You're going to compress the ambience mics heavily to get an even and detailed reverb from the room and then pass the signal through a noise gate. You want the noise gate to clamp down and smoothly mute the reverb, but you can't rely on the ambience track to trigger it properly.
This means you need to sidechain the original close mic tracks to the noise gate to tell it when to open and shut. You want it to open immediately upon hearing the close mic track and then set the hold to about half of a second (adjust to taste and tempo), then close with a very fast release. The release should be smooth but abrupt.
You'd do this with the snare drum and repeat it for any other drum you set up a close mic for. Once finished, you can then balance their levels against one another and apply some equalization to the reverb track.
Gated Reverb Will Never Go Away!
Some people breathed a sigh of relief when the 1990's rolled around and this effect fell out of favor. Others immediately began developing a sense of nostalgia. Soon the 80's decade of pop became "The Oldies." We gave it another 20 years or so and now there's a renaissance of this sound.
Gated reverb will always be with us. It's a cliche now. It reminds us of better times. It makes us think of retro-futurism and how we used to envision the present era. Personally, I think it's awesome and you probably do too. Wield this tool appropriately, and keep it safe in your mixing toolbox for future generations.
Jared H.
 Jared has surpassed his 20th year in the music industry. He acts as owner, editor, lead author, and web designer of LedgerNote, as well as co-author on all articles. He has released 4 independent albums and merchandise to global sales. He has also mixed, mastered, & recorded for countless independent artists. Learn more about Jared & The LN Team here.