In addition, I'm going to provide you with some professional tricks of the mixing trade that you can explore once you understand the lay of the land and feel comfortable with your results.
These tricks aren't a must but can take your mixing to the next level in terms of clarity, intelligibility, and presence in your vocal recordings. And that's the goal of compressing vocals in the first place.
If you're here then you likely already understand what a studio compressor is and does. If you don't, I'm going to write up the most summarized version possible at the bottom or you can read that linked article if you need the full explanation.
My main goals will be to give you the guide that you can follow along with, then I'll give you some advice on general vocal compression settings that you can reference again in the future, and finally I'll share some of the tricks the top-tier professionals use.
How to Compress Vocals in 7 Easy Steps
Whether you're using hardware or a software plugin, these steps are the same because they're both a vocal compressor. The philosophy, the knobs and parameters you can change, and your goals will remain the same. I'm going to use a plugin for this walkthrough from Logic Pro.
Note: You must resist the temptation to mix with your eyes. There will be tons of visual methods to see the effects of your work, but they're pointless. Focus with your ears only. That's the only aspect that matters to your listeners. Also, don't solo your vocals as you mix them. Listen to them in the context of the full mix.
The plugin I'm using is a default VST in Logic Pro. No matter what digital audio workstation you're using (here's the best DAWs), it too will come with a default compressor. It may look different, but the same options will be provided, so you'll still be able to follow along just fine.
Obviously, the first thing you need to do is add a compressor plugin to your vocal track in your multi-track mixer. If you don't know how to do that, please read the manual for your DAW software.
1) Set the starter vocal compression settings
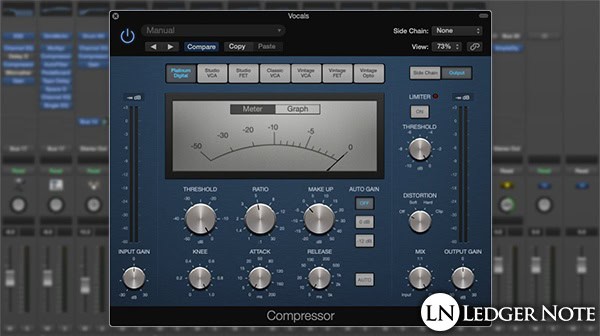
Below I provide some settings you can start with, but ultimately you won't need them. Set the threshold to 0 dB, your ratio to 5:1, the attack and release as fast as they can go (usually 1 millisecond), and the knee to 1.0. Set the make-up gain to 0 dB (as well as the output gain if you have that).
If you were to press play and listen, you'd detect no changes. That's because the threshold is set as high as possible. The ratio is pretty strong, but that's what you'll use on nearly every pop, rap, rock, or metal vocal recording. On ballads or opera style vocals you'd use a lower ratio.
No matter the genre or style of vocal performance, you'll almost always want to use the fastest attack and release possible. They're used to shape the waveform in specific ways that aren't really relevant to the human voice. If you're using a really deep threshold it can matter but you shouldn't be. We will slightly tweak them later, though.
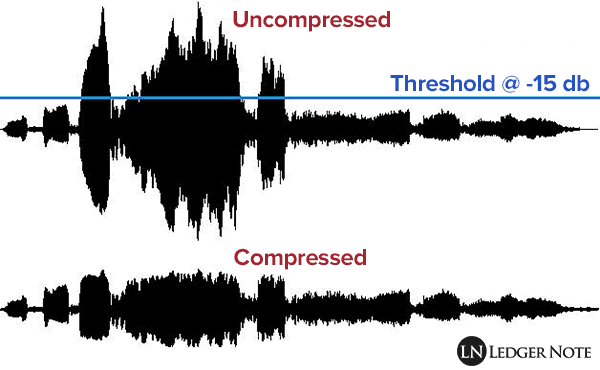
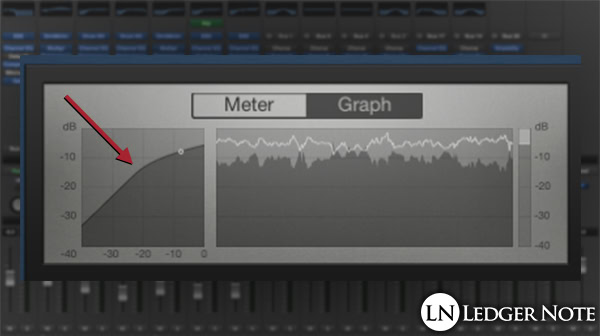
2) Lower the Threshold & Watch the Gain Reduction

Now we want to engage the compressor by lowering the threshold. How far you lower the threshold will depend on if you did proper gain staging when recording. The average volume of your track should be bouncing around -18 dB right now. It might not be, so adjust it using the input gain knob.
Go ahead and slowly lower the threshold while watching the gain reduction meter until it's bouncing around -5 dB. This will mean most of the peaks over the threshold are being reduced by around 5 dB. Aiming for 4 dB to 6 dB in gain reduction is a great starting point.
Gain reduction is a better metric to pay attention to than any other, especially for dynamic compression as opposed to tonal compression (I'll mention this later). Once you dial in the right amount, we can start tweaking other settings.
3) Revisit the Ratio Based on Genre & Vocal Performance
For most applications, especially with modern mixing, you're going to focus on dynamic compression. This means you're concerned with reducing the dynamic range and making the average volume more consistent.
There may still be cases where you're dealing with tonal compression, which will use a lower ratio and focus more on the attack and release. This would be for slower vocal performances like a love ballad, a jazz or classical song, etc.
These are times when the nuances and subtleties of the vocals matter more and there should be more dynamic range used for emotional purposes, especially in sparser arrangements. For most pop, rap, and rock-based genres you're going to squash the vocals a lot more than you expect, especially due to the mixes being denser.
So, for dynamic compression, start with a 5:1 ratio and explore going higher, even up to an 8:1 ratio, depending on the threshold. For tonal compression try a 2:1 or 4:1 ratio, perhaps with a higher threshold (closer to 0 dB).
4) Add the Gain Back Using the Make-Up Gain
If you increase the ratio, you'll increase the gain reduction, and vice versa. This is fine but something you should be aware of, because you'll add that average amount of gain back using the make-up gain.
As you reduce the volume of the peaks your track will be perceived as being louder in general, but only after you add back the lost gain. Loudness is perceived based on the RMS (root mean square) value of the vocals, which is a kind of average. You're increasing this average by compressing, but you're also reducing the overall volume.
So loop a representative part of your vocals and look at the gain reduction meter. If it's bouncing around -6 dB then add +6 dB back using the make-up gain knob. Gain and volume are not the same (learn about gain vs. volume here), but you can think of it as adding back the volume you're losing.
You should be able to watch an input gain meter and compare it to your output gain meter too, as an alternative to simply adding back the average gain reduction. It doesn't matter either way, you can simply use your ears. The point is to push the volume back up in the mix to appropriate levels.
This basically keeps your fader available for real mixing, rather than forcing you to push it all the way up. You can continue to revisit this make-up gain setting as you change your compression settings to keep your vocal volume in check in the full mix.
5) Stop & Check How the Vocals Sound
At this point you want to take a serious listen to determine the main point of all of this - how are the vocals sounding in the mix? Do they cut through the mix better? Do I have more clarity? Can I better understand what the vocalist is saying? The answer should be yes, thus far.
Are they still too dynamic? If some parts are still too loud compared to the quieter parts, you have three options. You can reduce the threshold a bit more, but more likely you should increase your ratio (or a combination of both).
If things are too far out of whack, you probably need to return to the initial track and automate a gain plugin track to get a better balance before the compressor kicks in. My assumption here is that you've already done this. If not, you need to regardless so you feed the compressor a more steady signal.
Are the vocals too squashed? If the vocals sound too compressed (you'll know it if you hear it) then start slightly reducing the ratio and slightly bumping up the threshold in increments. You'll hear the squished characteristics reduce and then go away. At that point, make them even less compressed. It's better to have too little than too much.
6) Tweak the Attack & Release Settings
At this point, the vocals are compressed to the right amount and are sitting in the mix at the right volume. Now you want to think about the attack and release. If the vocal track features fast syllables like a rap song might, you'll want to use around the fastest attack you can. I usually choose 1 millisecond here but up to 5 ms to 10 ms can be fine.
For slower vocals like a love song, you may want some of the initial transient of the waveform to be maintained before the compressor clamps down. That means you'll want to gradually make the attack slower until you get the effect you want.
This can help the listener grasp on to new phrases and consonants in the vocals as well as let more of the emotion of the performance shine through. Make sure you time it based on the length of the syllables or you'll start compressing in the middle of them and it'll sound horrible.
For rap, pop, and rock styles of singing, go with a fast release. For slower vocals you'll want a slower release so that the compression gradually releases the vocals rather than abruptly. Too fast and it can sound weird on the decay tails of notes being held in time as they dip below the threshold.
7) Set the Compression Knee
There's one setting we haven't touched, which is called the knee. You can think of this as a "smoothness" setting. The higher you set it (a maximum of 1.0) the smoother the compression will sound. A lower setting (a minimum of 0.0) will have no smoothness, but a more sharp beginning to compression.
A higher knee is more "musical" in the sense that the listener won't detect the point where the compressor clamps down. It makes the effect more transparent by gradually increasing the effect instead of making it a binary "on or off." For vocals, push it to 1.0 and call it a day.
At this point, you're done. Your vocals should sound 100x better than they did before, especially if you followed all of the other vocal mixing steps (mainly equalization first).
Vocal Compression Settings
Let me state up front that there's no single setting you can use for every vocal track. There are some general starting points you can use, but you will have to tweak them to taste, as we walked through above. Here are some basic settings you can start with:
- Threshold: -20 dB
- Ratio: 5-to-1
- Attack: 1 milliseconds
- Release: 5 milliseconds
Start with these settings. The first thing to do from there is lower the threshold until you're getting around 5 dB of gain reduction. From there, decide if you need more. If so, consider dropping the threshold and increasing the ratio gradually but together.
For slower vocals (not rap, pop, or rock styles), consider a lower ration of around 3:1 and a higher threshold with a slower release. I can't suggest exact settings because again, it changes per track, tempo, song, and genre. Just use your ears!
Professional Vocal Compression Tricks
I'm going to put you on the trail of some advanced vocal compression tricks that the professional mixers use, but I can't go into full depth on any of them. In some cases I'll link you to articles we've written on them, but it'd be too much for one article. Follow the trail!
Parallel Compression
Also called New York Compression, parallel compression is the act of combining either a completely dry (uncompressed) or a lightly compressed version of a track with a more heavily compressed version of the same track.
The result of this is that you'll maintain some dynamics for emotional effect but really "fatten out" the lower volume sections. The advantage is you'll have independent control over the volume of each version of the track and can mix them to taste.
The other benefit is you can add reverb and delay to the uncompressed version so that those effects maintain more of the dynamics of the original performance, while you give the listener a more heavily processed version.
Sidechain Compression
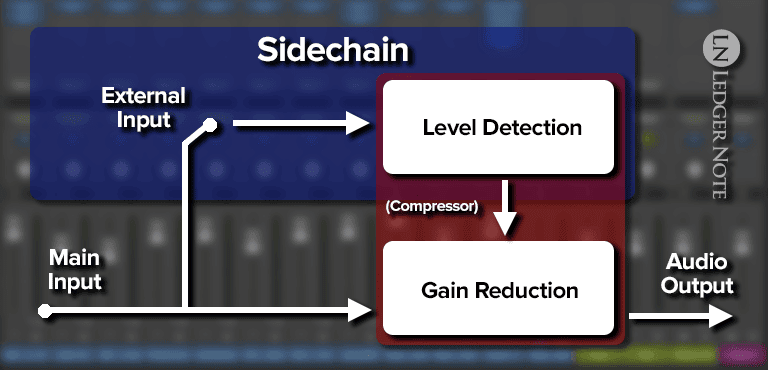
Sidechain compression allows you to use a different audio track as the trigger for the compressor on a different track. An example would be placing a compressor on a lead guitar track and sidechaining it to your vocal track.
So any time your vocals are present in the mix, you'll automatically compress the guitars so that they duck out of the way of the vocals. Another common use is to duck the bass guitar behind the kick drum so it can be heard more clearly.
Noise Gate
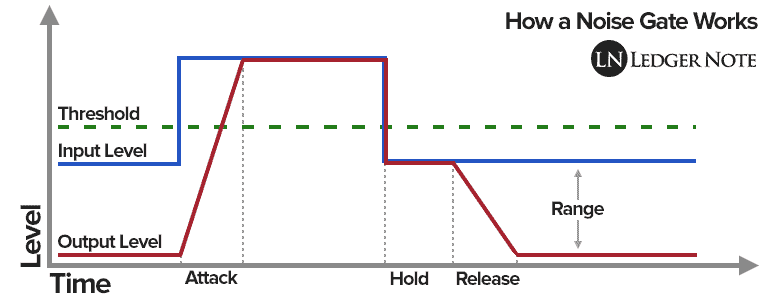
A noise gate is a compressor that does the opposite of what you'd expect. It compresses (most of the time totally silences) any sound that does not exceed the threshold (as opposed to going over it like normal). Mixers use this to automatically mute regions of a track that are meant to be silent so no noise comes through.
DeEsser
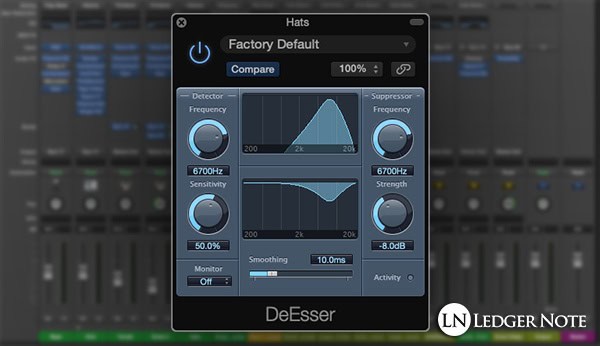
A deesser (or de-esser) is a type of compressor sidechained to an equalizer in order to target and reduce sibilance and plosives in volume.
Sibilance is the main culprit, which are the loud and sharp sounds that come out when vocalists make S and T sounds. Plosives are bursts of air when we make P and B sounds. Those have to get taken care of and a deesser makes it very easy.
Compressors in Series
Some mixers will push vocals through two or even three compressors, one after another. Their goal is to reduce the gain by 2 - 3 dB per compressor. They feel this provides a smoother, more transparent and musical result.
Multiband Compression
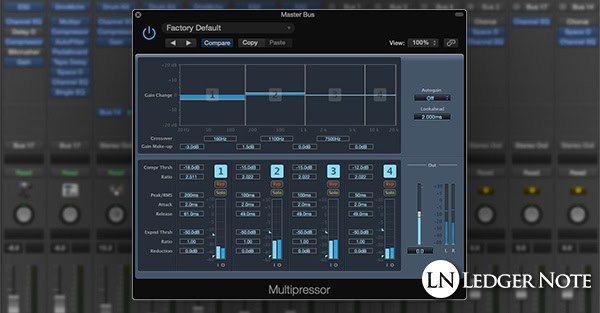
Multiband compression is a type of compressor used by mastering engineers. It's a combination between a compressor and a parametric equalizer that lets you target specific frequency bands. It's used on full mixes rather than separated tracks, where it's not needed.
What is a Vocal Compressor & How Does It Work?
It doesn't matter if you're compressing vocals or any other instrument or sound. The same tool does the same job, and that's to minimize the variance in volumes across a recording.
By this, I mean that the tool seeks to reduce the distance between the loudest part of a recording and the quietest. It does this by reducing the amplitude (volume) of the highest waves in the waveform based on settings that you provide.
To keep things simple, you'll basically be working with the following settings:
- Threshold
- Ratio
- Attack
- Release
The threshold is the decibel level where you decide "if any part of this recording gets louder than this level, I want to reduce the volume of just that part." How much you reduce the volume is decided by the ratio setting.
How quickly the compressor reacts to the vocals exceeding the threshold is called the attack. How fast it stops reacting when the volume dips below the threshold is called the release. These are used to shape the waveform to make sure it continues to sound smooth and musical, rather than abrupt and jarring.
Example: If you set your threshold to -20 dB and your ratio to 5:1 (five-to-one), then a part of your recording spikes up to -10 dB, that spike will be reduced in volume until it only reaches -18 dB. That's because the spike went 10 dB over the threshold and was divided by five, so only 2 extra decibels of volume were allowed past the threshold.
The ratio is used to smooth out the transitions rather than a hard limit, which is what a limiter is for (which is a type of compressor). You want to find the right balance between a higher threshold and higher ratio, or a lower threshold and lower ratio.
A fast attack makes the compressor clamp down immediately while a slower one will let a part of the volume peak come through. A slow attack can help the listener "grab onto" a sound, but won't sound great on vocals. You'll typically want to stick with a faster release in general.
That's How to Use a Compressor on Vocals!
Our seven step walkthrough is the exact method used by anyone and everyone in the music industry. Like I said, once you know how to compress vocals it's a piece of cake, but feel free to bookmark this page and return to it at any time you need.
Jared H.
 Jared has surpassed his 20th year in the music industry. He acts as owner, editor, lead author, and web designer of LedgerNote, as well as co-author on all articles. He has released 4 independent albums and merchandise to global sales. He has also mixed, mastered, & recorded for countless independent artists. Learn more about Jared & The LN Team here.