The amount of people that either don't know about noise gates is astounding. The number that know but won't take the time to learn how to use them is sadly astonishing.
That's largely because there's no easier or better way to get huge gains in audio quality while performing live, recording, and during mixing. And gating is easily the biggest time saver during post-processing.
Regardless of the scenario, it's no harder than either putting a noise gate pedal in your signal path or slapping a plugin on your multitrack in the DAW. We're talking like 10 seconds of effort to automatically clean up the hum and rumblings in your audio.
Of course, you have to know how to set up a noise gate, but that's a piece of cake and I'm here to show you how it's done. One read of this and you'll be good to go forever and reclaim countless hours of cleaning up noise manually.
The only problem is that if you set it up willy nilly without focus, you can end up with weird, choppy audio. And that'll be your own fault, because it's just as quick to get it right as it is to get it wrong.
Let's cut to the chase. Get ready for faster, cleaner mixes. Get ready for flawless, live music no matter where you are. This is the shortcut you've been waiting for. Just put in the effort to learn the setup real quick.
What is a Noise Gate?
A noise gate is an electronic device that attenuates the volume of an audio signal by either allowing the signal to pass through unaltered or by closing off the possibility for the signal to pass through entirely.
To state that in more basic terms, it either does nothing to your audio or it mutes it, with nothing in between. It's literally a gate that's either open or closed. You can think of it like a traffic light that at times doesn't restrict the flow of traffic at all and at times stops it entirely.
The best way to explain this is to understand that it's very similar to a compressor in the same way that a limiter is. Both of those also regulate the amplitude of an audio signal by either reducing volume above a certain decibel level or setting a maximum volume to avoid audio clipping and distortion.
So while a limiter sets a maximum volume and a compressor aims to achieve a sort of average volume, a noise gate has the job of creating a "no volume" zone only while no purposeful audio is being played. As soon as you start singing vocals or playing guitar again, audio is allowed through the gate.
How Does a Noise Gate Work?
The question then becomes "How does it know when to mute the signal or not?" It's based entirely on the amplitude (volume) of the audio passing through it and whether or not it has exceeded a threshold value.
To keep things simple, let's say that the noise floor of your audio signal generated from the electricity, 60 Hz hum in the cable, rumbling of the mic stand, the self-generated noise of the microphone itself, the air conditioner's sounds, and the whispering of the audience adds up to around a constant 10 dB of volume.
Obviously you don't want to amplify any of that nor play it back out of the speaker monitors. So you add a gate and set the threshold to 11 dB, just above the volume of the noise. Now any time the volume of the audio signal dips below 11 dB it is muted entirely. It's barely any more complicated than that.
Let's walk through the actual set up of inserting a gate into your signal path and then we'll look at how to configure one, first by defining the settings available. Then I'll offer some settings as starting points for you to start experimenting.
How to Set Up a Noise Gate
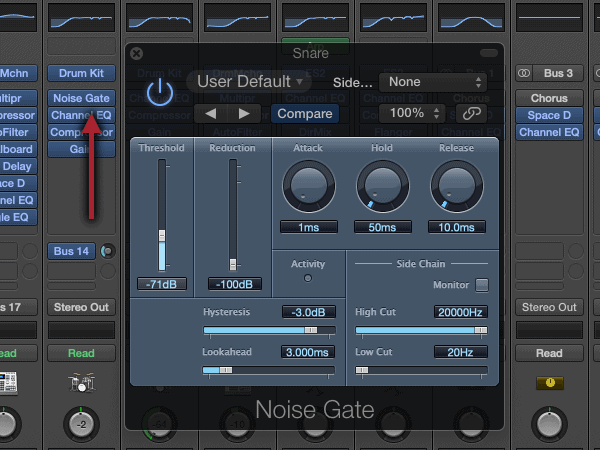
The first key to setting up a noise gate is to make sure you place it as early in your signal chain as possible, and that means right at the initial output of your instrument or microphone. The same goes for mixing on a multitrack where you can drop in plugins.
Gating in Live Audio
In a live situation, no matter what instrument you play, whether it outputs an instrument-level or you're using a microphone, you'll want to use noise gate as early in the signal chain as possible. That's before you amplify (but not pre-amplify) or add any other effects. This is typically done with an effects pedal or a racked piece of hardware.
The reason for this is you want to get rid of the noise before you do any other processing. Otherwise you end up pushing the noise through the amplifier or adding reverb tails to it, etc. And if you try to gate it out later, you'll have a louder noise floor to contend with or artifacts from effects that can sneak through (or get chopped off in "silent" sections).

Ninety-nine percent of the time you'll use your best noise gate pedal (my personal favorite above) rather than lugging a rack around. For a microphone, you'll have to pass it through a preamplifier first in order to boost the signal from mic-level to line-level.
For instruments, you can jack straight into the pedal because the output is high enough in amplitude for there to be a high enough signal-to-noise ratio. Otherwise you'd wouldn't have a large enough spread between the signal and the noise, volume-wise, to set an accurate level without creating a choppy sound.
Audio Gating During Mixing
When in a recording studio, it's not recommended to use a noise gate before committing to audio tape or to the computer's memory, unless you're dealing with a scenario like heavily distorted guitar in which case you'll probably use a gate. You want a raw signal so you can edit it without worrying about the influence of other effects.
Like our live scenario, before you add any other effects or even turn up the gain or volume, you want to clean up the noise. Sometimes this can be done with an equalizer for specific frequency bands (like low-end rumble) but often it can't and that's where a gate saves the day. You want to place a noise gate plugin in the signal path before any other plugins so you can feed the other ones a clean track.
If you get this right, it'll save you tons of time splicing tracks or automating the volume parameter. That's the beauty of a gate, it mutes or reduces the volume of the noise for you automatically so you can get right into the fun parts instead of slogging through manual, meaningless work.
How to Use a Noise Gate
Here's the real meat of the discussion, which is actually using the noise gate's different parameters. These are the variables you get to control and you definitely need to every time. The correct settings will change for every performance or recorded track. There's no escaping this part, but it's easy once you understand it.
The main controls that you'll tweak include:
- Threshold
- Attack
- Hold
- Release
- Range
- Hysteresis
- Sidechain
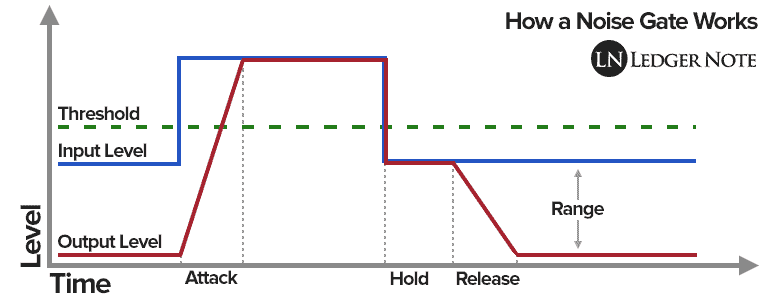
Let's go over each. The last three only sometimes are available and aren't necessary. The graph of the audio signal above will help you understand it visually. Combine this image, if you can, with actually changing these controls while listening to audio and it'll make far more sense.
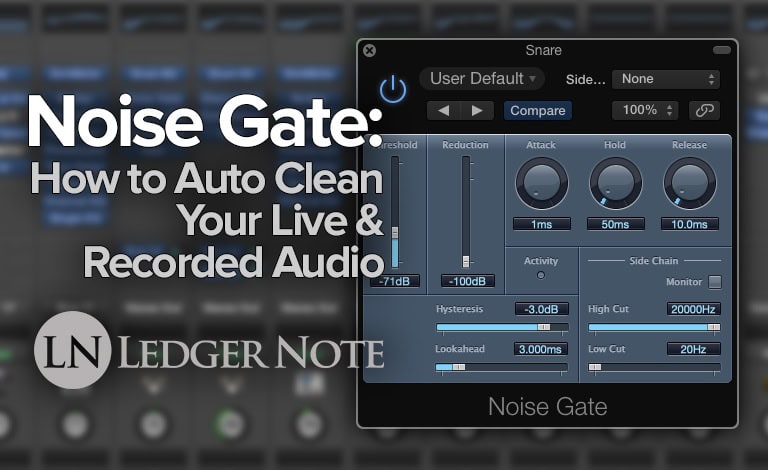
Threshold
This is the level as measured in decibels where the gate is opened or closed. If the volume of the audio signal dips below the volume as set by the threshold, the gate is closed and the audio is muted (or sometimes reduced, as mentioned below).
If the volume of the audio exceeds that of the threshold (is louder) then the gate opens and all audio is allowed to pass through. That's important to note. The low volume noise is also allowed to pass through, but your signal-to-noise ratio should be high enough for it to not be noticed.
Attack
You can think of the attack as the duration of time it takes the audio to fade-in once the amplitude passes the threshold. You can set a very fast attack in the order of milliseconds or you can set a slower one in the tens of hundreds of milliseconds.
If you set it too slow on the wrong sounds, you'll get a choppy start to the audio kicking back in. Think of a violin slowly ramping up in volume. If your attack is too slow you won't hear the early parts of the volume swell. In my opinion, it's really not possible to set it too fast, and faster is nearly always better.
You can use a slow attack setting to shape the sound of a "fast attack" instrument like a drum, where it increases in volume quickly. But you should really leave that job to a compressor later in the mix.
Hold
The hold control tells the gate to stay open for a definable period of time after the audio amplitude drops below the threshold. Consider the case of a rapper spitting out words quickly and taking strategic, rhythmic pauses.
Without a hold, the speech would dip below the threshold constantly and be muted, causing a choppy, chattering result. With a hold, the gate will wait for the time duration you set to begin muting the audio again. This allows you to have brief moments of low volume in your signal without triggering the gate to be closed. It's extremely useful and important for audio that comes in rapid bursts.
Release
The release is the opposite of the attack. It is the fade-out duration for when the audio dips below the threshold. An extremely fast release is like not having one and this rarely works out in your favor, so don't ignore this setting.
Almost all audio has a "tail," meaning it naturally fades and reduces in volume on its own. At some point it will fade beneath the threshold. If your release is set too fast, it will abruptly cut this tail off and sound horrible. If it's set too slow, you'll fade out so long you allow a bunch of noise through.
You need to find the right length of time that you allow the audio to decay naturally but still chop out the noise before it's had a long enough time to be noticeable. The tails of your audio will vary in length, so there's never a perfect setting. You're better off being too slow than too fast.
Range
The range control lets you decide if you want to mute the audio or reduce it in volume a certain amount when the audio descends below the threshold. You won't always have this option but it's nice to have. You can end up with a much smoother end result in regards to your release settings.
Noise is already fairly quiet, so turning it down by maybe 15 dB can be better than muting. The noise can become imperceptible but the decay tail of your audio signal can still be heard to some degree even if the release is set too fast for that particular part.
If you have this choice on your plugin or pedal, I recommend using it unless you're dealing with heavily distorted guitar or something similar, in which case you should allow the gate to fully mute the signal (or even manually automate the gain or volume).
Hysteresis
Hysteresis is rare enough that I've never owned a gate that had the option. It gives you two thresholds to give you more control over accidental chatter by closing and opening the gate too fast. Between a hold setting and a release setting you won't need this, but it's cool to know about.
The first threshold determines when the gate opens. The second threshold is set around 3 to 5 dB quieter and it closes the gate.
Once it closes, the audio has to exceed the first threshold again to open it up. This gives you some leeway when closing the gate so you aren't rapid fire opening and closing like in the rap vocals example.
Sidechain
A sidechain is an additional input used to trigger the gate based on a different audio signal than the one you want the gate to act upon. We go into much greater detail in our "What is Sidechaining?" article if you're interested. Most plugin noise gates will offer this but not many pedal options will. An example would be adding a deep sine wave to a kick drum to give it more bass.
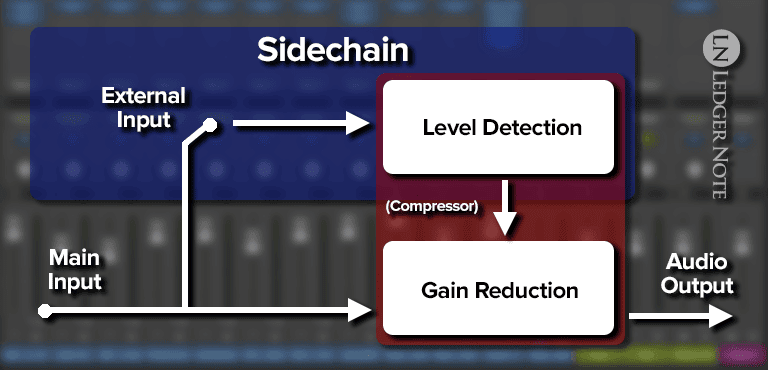
You would apply the gate to the sine wave and only open that gate when your kick drum exceeds the threshold. In this way you can make the sine wave mimic the timing of the kick drum.
You won't use this in live settings, which is why it's rare to see on pedals. It's used in mixing, thus it's nearly always available in the VST format.
Noise Gate Settings
You're probably hoping I'll drop some settings on you that you can use without having to think about it. It doesn't work like that. You have to change the settings every time to get a tasteful sound.
Otherwise you'll end up with a choppy signal and everyone will wonder what the technical problem is on your end. You will be to blame!
What I am going to do is tell you the step-by-step process of deciding which settings to use. If you follow this process and most importantly use your ears and not your eyes, then you'll have no problems.
1) Insert the Gate Inline - Remember, I've told you to always insert the noise gate immediately after your instrument or after the preamplifier for a microphone. That's before boosts, cloud lifters, and anything else you might be using to amplify the signal.
2) Set a Minimum Attack & Release and Maximum Threshold - With these settings, you should hear absolutely nothing due to the threshold being set so high. No sound is getting through yet.
3) Start Dropping the Threshold Slowly - Slowly lower the threshold value until you start hearing the loudest parts of the instrument come through. The attack should not be noticeable since it's set to be so fast. You will hear the release because it's set fast. It should sound choppy (on purpose for now).
4) Lower the Threshold to the Noise Floor - Keep dropping the threshold until the instrument sounds completely normal except for the decay tail being chopped off by the release. Note the best sounding volume for the threshold, then test going lower until you hear noise in the quiet parts.
Then increase the threshold until you cut out all of the noise and take note of this level. Both noted levels should be close to one another. If not, play around in the gap between them until you get the best result. At this point you should have no noise in the silent regions but a choppy main signal.
5) Choose the Best Attack Setting - Typically keeping it fast is what you want. You can use a slower attack to reduce the "snap" of the initial sound of the instrument if you want, though I recommend doing that with a compressor later. You tend to want the attack set fast so the full audio comes through immediately when passing the threshold, but if it's too abrupt you can slow the attack down to make it smoother.
6) Set an Appropriate Hold - You still have a fast release chopping off the ends of your signal. Now you want to increase the hold until you're no longer activating the gate between notes of your instrument. This should stop most of the "chopping" except at the ends of musical phrases with very long decay durations. Think of it like a preliminary release almost.
7) Adjust the Release - You want to listen to the ends of the phrases where you know the gate will kick in and start adjusting the release until you're letting the decay ring out as long as possible until it dips into the noise. Don't set it too long or you'll introduce too much noise. Let it cut the noise out.
8) Raise the Range - Currently you have the range set to mute the noise when the gate is closed. This may still be slightly but abruptly cutting off the decay tails of your signal. You can now choose, instead of muting the noise, to set the reduction to -10 dB to -20 dB. What this will do is still let the decay tail be heard to some degree so the "muting" of it is now less abrupt.
This is for live audio. For mixing you want to to keep the range at the maximum so it mutes the noise. You'll need to be more liberal and generous with the hold and release, but it's still better to have tiny bits of noise while muting most of it, than to let all of it through at quieter volumes.
Once you get comfortable you can set up your noise gate in as little as a minute or two, often times faster if you know you're using the same instrument at the same levels.
Extra Settings on Digital Noise Gates
Digital gates will offer a few extra settings. I won't go into detail but you can look them up. The first is EQ Filters to set a frequency band in which the gate acts. This is great for when you know most of your noise is below 150 Hz, for example, like a kick drum being recorded on in your snare drum track.
You can tell the gate to ignore everything below 150 Hz, meaning any sounds in that range that exceed the threshold will not cause the gate to open, which lets you cut the kick drum out of the snare drum track. You can set low cutoff and high cutoff filters.
Another option is called the Lookahead. This allows the computer to read a certain amount of milliseconds forward in an audio track so that it has more time to prepare to open the gate when needed.
This helps you have a more accurate attack because it can act immediately without needing to calculate on the fly. It can be demanding on your CPU resources so use it sparingly.
What Are Noise Gates Used For?
You may still be wondering when you'd use a gate besides just cleaning up the regions in your signal that are meant to be silent. That's most of the applications, from single track recordings to controlling the sound in a church or big arena. There's a few other tricks I'll mention that you can research too.
For big sound reinforcement systems like dozens of speakers in a gigantic stadium, the slightest amount of noise would be extremely loud. Gates are absolutely used in these situations, inline on each individual signal and at the end of the entire signal path right before the amplifier.
On live television like talk shows or the news, it's used to stop bleeding between mics where one host's mic might pick up the guest speaking from across a table. This also helps stop audio feedback loops, which we're all familiar with due to the loud high frequency band shrieking that occurs.
Of course the main use is to stop ambient background noise, electrical hiss, radio static, audience sounds, etc. But it can also be used more purposefully to create specific effects. It's usually pretty niche and only appears in certain genres.
These tricks include creating a gated reverb, particularly on the snare drum, in 80's pop and the currently popular retro genres like synthwave. It's used in podcasting and audiobooks to save hundreds of hours of editing.
Electronic dance music will use envelope following, known as trance gating, to tighten up a performance and create a rhythmic pumping. A really cool use is in studio recording called multi-latch gating to record from various mics at increasing distances away from the audio source.
Another thing you can do is ducking, which reduces the volume of another track when the main track is playing. You'd use the sidechain and range to do this, but I recommend doing this with sidechain compression later. Just focus on noise reduction during the first application of audio gating.
Now that you know how to use a noise gate and you understand what a noise gate does, you'll find that it is an indispensable tool in stage performance and in mixing. You'll also discover other creative uses if you experiment, especially with the sidechain option.
Conclusion: What Does a Noise Gate Do?
To recap, a noise gate either opens or closes the pathway for an audio signal to emit sound. Generally, it is either fully open and allows the sound to pass through unaffected, or it is fully closed and mutes the sound altogether.
The main appeal of a noise gate is in the automation it can provide. Mixing engineers spend most of their time cleaning up recorded tracks rather than really mixing, and this tool shaves off a ton of that time by cleaning up the supposedly silent regions.
You may be thinking that a little noise in each track won't matter, but when you add 30 tracks together that noise is very obvious. And thanks to the noise gate, you've probably never heard that amalgamation of unwanted sound. Add this tool to your skillset. You won't regret it.
Jared H.
 Jared has surpassed his 20th year in the music industry. He acts as owner, editor, lead author, and web designer of LedgerNote, as well as co-author on all articles. He has released 4 independent albums and merchandise to global sales. He has also mixed, mastered, & recorded for countless independent artists. Learn more about Jared & The LN Team here.