
The de-esser isn't a modern tool at all. Even before it existed in its current form they were being created by using several other signal processing units in combination.
They exist for a single purpose, though their use has been expanded a bit over time. When humans speak or sing, we have a tendency to create harsh bursts of high frequency sounds when pronouncing certain syllables. The de-esser solves this problem masterfully.
Let's go through what they are, how they were originally constructed, what they do and what they're used for, and how exactly to use one. Once we're done you'll have zero issues putting them to work in your own recording and mixing process.
What is a De-esser?
A de-esser is a tool to remove sibilance from live broadcasts or recordings of human vocals.
The problem arises from when we pronounce certain syllables that require a sharp burst of air to reach higher frequencies. These are called sibilant consonants (or sibilance) and the high frequency bursts of air usually reside in the range of 2 kHz to 10 kHz. This varies based on gender and individual.
The sibilant consonants include sounds represented by:
- s
- sh
- ch
- j
- z
- t
We never notice this problem in real life because of the way the energy of sound dissipates quickly over longer distances. But if someone where to whisper in your ear you'd hear them, and because we situate microphones closer to our mouths for close miking, they will record these high-pitch sounds.
The de-esser exists to remove these annoyances during or after recording. This is sometimes called de-essing and less frequently called desibilizing.
A De-esser is an EQ Side-chained to a Compressor
To understand what these valuable tools do, it helps to understand how they were originally created. In order to solve the problem, you have to first ask "how can we reduce the volume of sibilant consonants without effecting any other aspects of the vocal recording?"
That immediately rules out equalization, which is applied to a whole track. We could automate the EQ parameters or even simply the volume fader at just those parts of the recording, but that's entirely too time consuming. We need a method that provides true, hands-free automation.
Both of those ideas are great leads and it turns out combining them is the answer, and that's done through side-chain compression. To fully understand this, you need to grasp "What is Sidechaining?" and "What is a Compressor?" I'll explain it quickly but shallowly here.
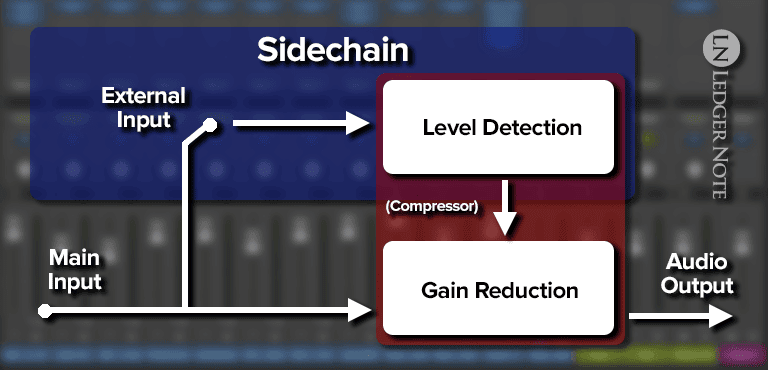
A compressor will automatically reduce the volume of a part of a recording if the amplitude of that part exceeds a certain value. Compressors have a sidechain, which is way to trigger the act of compression based on an external input rather than the input of the audio recording itself.
In this case, we want to side-chain a parametric equalizer. So instead of making the compressor activate based on volume, we can now do that based on frequencies instead.
If you dial in the EQ to the frequencies where the sibilance is occuring, the compressor will activate only when those frequencies occur. You have to then set a fairly high threshold so the compressor only clamps down when there's a loud spike in those frequencies, which will be the sibilance.
What Does a De-esser Do?
The above discussion should have made it clear. A de-esser is basically a compressor with a parametric equalizer side-chained to it so you can target only the sibilant consonants. When the EQ notices the sibilance occur with their high amplitudes, they're reduced in volume by the compressor portion.
A de-esser is used mainly to reduce the volume of sibilant consonants so they aren't annoying or piercing to the listener's ears. It can also be used to target troublesome frequencies on any other instrument besides vocals, like the string squeaks of a guitar or bass guitar for example.
Nowadays, nobody actively creates their own de-esser with an EQ and compressor, nor do they use a hardware version. We all tend to fix these problems in post-production during the mixing stage. And we do this in a digital audio workstation using a VST plugin version of this tool. Here's the best DAWs you can peruse if you still need one.
How to Use a De-esser
Before we even discuss how to use a de-esser, I want to state two truths that always apply:
1) You always have to set up the plugin with custom settings. There's no preset you can use, even on the same vocalist. Depending on the microphone, the position in front of the mic, the room or placement in the room, and even the day, the vocalist's sibilance will be at a different frequency range.
2) You should probably use two de-esser's in serial rather than trying to clean up the track in one pass, which can be too aggressive. Sometimes this isn't enough and you'll have to perform some manual de-essing using volume automation. The end goal is a perfect vocal recording, even if it takes extra time.
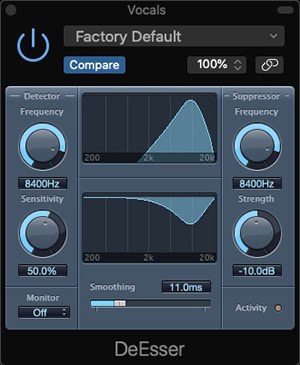
A de-esser will have two sides to it. The first is the detector (which is the equalizer) and the other is the suppressor (which is the compressor). Both ask you to set the target frequency. You'll want to set them both to the same value, which is where the sibilance is occurring.
Male vocals tend to have sibilance in the range of 5 kHz to 6 kHz. Female vocals tend to have the problum in the 7 kHz to 8 kHz range. This is only in general, and it may fall anywhere in the range of 2 kHz to 10 kHz.
The sensitivity setting is essentially the threshold on the compressor. You want to set it to a volume where sibilant consonants exceed it in volume, but every other part of the vocal track stays beneath it.
The strength setting lets you choose exactly how many decibels of gain reduction you want to apply. So if you set it to -10 dB it will drop the sibilance by that much. You don't want to be too aggressive here. Use just enough reduction that the sibilance is tolerable without leaving artifacts.
You can set the monitor to "detector" which solo's the frequencies being targeted. This lets you listen in closely as you sweep the frequency around in the range to find the center frequency of the sibilance. It's extremely helpful and should be used each time. Un-solo it once you've found the target frequency so you can hear the final result as you set the strength setting.
The smoothing option is like an attack setting and lets you choose how quickly the suppressor reacts. Keeping it too fast (below 10 milliseconds) can sound abrupt. Too slow and you won't hear any effect. Somewhere in the range of 10 ms to 20 ms is typically best.
Where Should a De-esser Go in a Vocal Chain?
If you're recording live or broadcasting such as with a podcast or as a radio disc jockey or even a TV host, you'll need a de-esser in your vocal chain. A vocal chain will consist of the following:
- Microphone
- Pre-Amplifier
- Equalizer
- Compressor
- De-Esser
- Effects Processer
That is the order you want to use which illustrates where a de-esser goes in a vocal chain. It should come after the compressor because a compressor can contribute to the problem of sibilance. By creating a more even dynamic range, a compressor can seem to turn up the volume of sibilance.
So we need to tackle it after compression, but before we add any other effects like reverb or delay, or you'll have false positives due to the influence of these effects and will act upon the effects as well, which is unwanted.
De-essing for Sibilance Free Recordings
That's all there is to know about this wonderful mixing tool. Now that it's in your toolset, you'll likely discover other uses for it. Mixing is an art, not a science, so it's all about being creative and finding new applications for the same old tools.
To give you some hints before I send you off, think about using a de-esser on guitar string squeaks, drum cymbals to reduce brightness, harsh frequencies on brass instruments, and more.
Jared H.
 Jared has surpassed his 20th year in the music industry. He acts as owner, editor, lead author, and web designer of LedgerNote, as well as co-author on all articles. He has released 4 independent albums and merchandise to global sales. He has also mixed, mastered, & recorded for countless independent artists. Learn more about Jared & The LN Team here.