
As far as we know, this method of compression was invented (or discovered) by Dolby Laboratories in 1965 and used in their Dolby A noise reduction circuitry. Eventually in 1977, Mike Beville casually described its use in Studio Sound magazine.
The Beville article, called Compressors and Limiters was reprinted in 1988 and that blew the lid off of a masterful technique hidden right out in the open. The "secret" was passed around the New York City studio scene and that was a wrap.
Since then, studio engineers, mixing engineers, and mastering engineers have used it to great effect. But what exactly is this mysterious technique and why is it considered so good? And how the heck do us lowly musicians at home put it to use?
What is Parallel Compression?
Parallel compression, commonly called New York compression, is a method of dynamic range compression used in audio mixing and sound recording to provide a more consistent volume while preserving aspects of the natural dynamic range of a sound.
Unlike the standard downward compression usually applied, where the loudest peaks of an audio signal are lowered in amplitude, parallel compression can be thought of as an upward compression. This is because the quietest parts are made louder to more closely match the highest volume parts.
The way this works is a dry (no signal processing applied) version or a lightly compressed version of a track is combined with a heavily compressed version, played back at the same time.
These two separate tracks are mixed together at different volumes to achieve the effect of raising the amplitude of the troughs of the waveform while leaving the crests alone.
The combined result will feature more clarity, intelligibility, and fullness while maintaining some of the natural dynamics. This preserves an emotional aspect of the performance while also allowing other time-based effects like reverb and delay to be applied to the un-processed version of the track.
Note: Due to some confusion regarding Mike Beville's citation of Roey Izhaki's work, some less knowledgable people have taken to calling this technique 'side-chain compression.' You'll be best served to not do that, because it is completely distinct from another compression technique called sidechain compression.
Stick with what all the other industry professionals use, which is Bob Katz' terminology: parallel compression. Before it had this name, we called it New York compression, based on the city where it gained prominence. The more descriptive name has since won out.
How to Setup Parallel Compression in Your DAW
Remember, the point here is to allow the transients of the original recording to be heard while still taking advantage of compression as usual. That should clue you in on the first part of the setup. The method is the same whether using one of the best digital audio workstations or a hardware mixer and compressors.
You can achieve this in various ways, but I'll show you the most efficient method that contains the fewest steps and leaves you open for more advanced mixing tricks later in your process. Let's pretend we're talking about vocals so we don't have to be vague in the discussion.
I'll be showing you screenshots from Logic Pro, but the process will be the same in Pro Tools, Ableton, Reaver, FL Studio, and even Garage Band, since they all use the same multi-track mixer workflow.
1) Create an Auxiliary Channel By Adding a Send
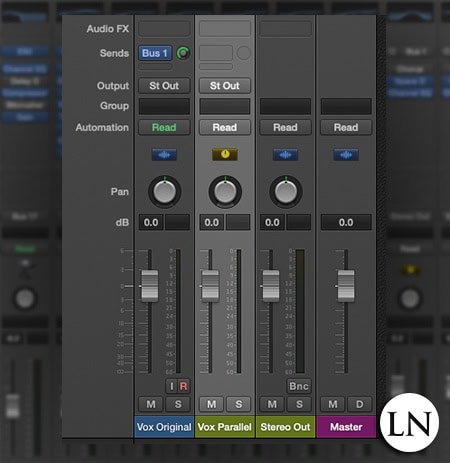
Our goal is to create a copy of the original track. The best way to do that is by adding a send to the track and setting it's gain to unity (zero decibels). This means we'll "send" a copy at the same volume to a new auxiliary track, which is automatically created when you add a send.
It's important here that you make sure the send is set to be pre-fader. Otherwise, when you change the volume of the original track on the fader, you'll mess up the compression on the auxiliary channel. Pre-fader will send the raw track without any volume changes added from the fader on the original vocal track.
Make sure to give this aux channel a name like "P.C. Vox" so you don't get confused later when you have 50 tracks and 20 buses set up.
2) Create a 2nd Auxiliary Channel to Act as a Vocal Summing Bus
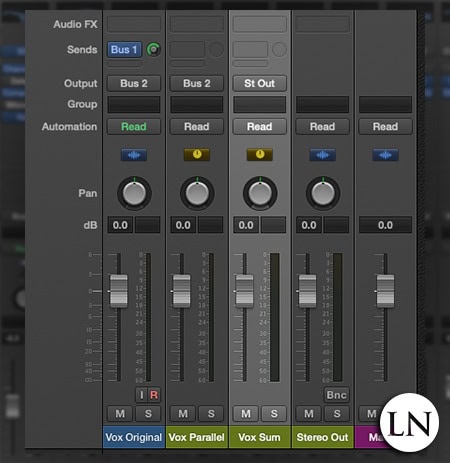
You don't have to do this but it's good practice, especially if you want to bounce stems later. What's important here is that by routing all of your vocals to a final 'vocal bus,' you get a single volume control post-faders and after gain automation.
The idea is that once you balance all of your vocal tracks in volume relative to one another, you will then have a single fader on your final 'vocal summing' bus where you can adjust the volume of the entire group without having to tweak each individually (and potentially get them out of balance).
On your original vocal track, set the output to a new bus. Then do the same on the bus that your pre-fader send from step 1 is aimed at. Both will now output to this new aux channel, which will then output to the master bus. You'd do well to label this aux channel as something like 'Vox Sum.'
3) Add a Compressor PLugin to the Vocal Bus
Return to the vocal bus created in step 1 and simply add a compressor plugin to the track. If you don't know how to compress vocals, jump over to that link and run through the process then come back here. Otherwise, go ahead and do your thing, but use a higher ratio and deeper threshold than you normally would.
Remember, the goal here is to use upward compression, which "blooms" out the quiet parts in the final combined track. That means you'll be squashing the vocals far more than you would with normal downward compression.
4) Latency Warning: Add a Compressor to the Original Track
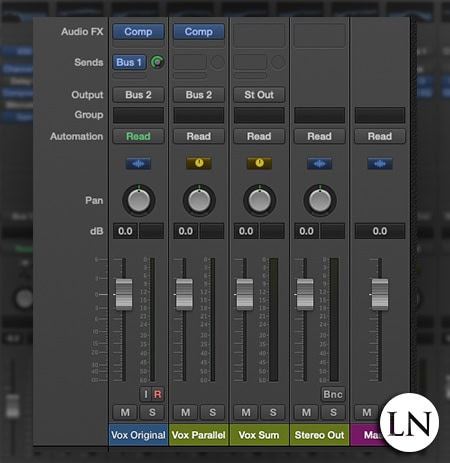
Here is where nearly everyone screws up. Even computers and digital mixing boards have latency due to the processing time it takes to run through a compressor plugin. So what you want to do is add another compressor plugin but this time to the original track.
You have a choice here. You can either lightly compress the original track (and disrupt and have to revisit the bus compression) or just leave it uncompressed. But either way, add a compressor to the track.
If you don't want to add any compression, just set the threshold of this compressor to 0 dB and the ratio to 1:1 if you want to be extra careful. But with the threshold at the limit, there will be no effect to the original track. Do NOT put the compressor in bypass mode!
The trick here, even with no real change occurring to the track, is that it still has to pass through and be processed by the plugin. And since both versions of the track (the original and the vocal bus) are passing through the same plugin, they'll have the same amount of latency.
If you don't do this, you'll get as little as half of a millisecond or up to 3 milliseconds of latency on the parallel track. And when re-combined at the vocal summing bus, you can end up with comb filtering. But in our case we now have the same amount of latency, even if it's undetectable to us.
5) Mix the Volumes of the Two Tracks to Taste
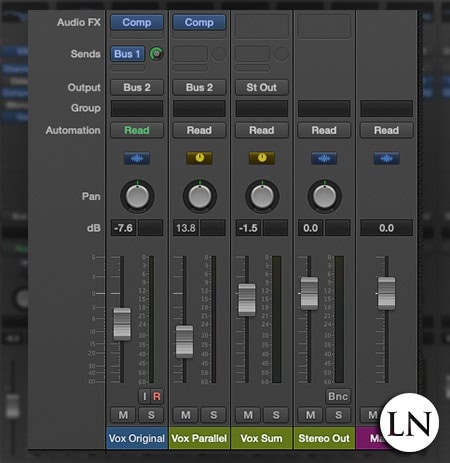
I can't tell you what values to use here. You'll have to use your ears to get it done according to what sounds good in the context of the full mix. So un-solo the vocals and listen to the whole song as you do this.
What you're going for is the sound of a typically "downward compressed" result like you hear on professional music records, but one that still has some "snap" to it. What you're trying to adjust is how much of the transient attacks of the original track to allow through.
Think of it as deciding how much dynamic range to add back to compressed version. Too much and you might as well not be compressing at all. Too little and you might as well have not bothered with parallel compression. You'll know what sounds right when you hear it.
Because of the way we set it up with the pre-fader send, you can now use the faders for both the original track and the vocal bus to get to the right volume relative to each other. Then later when you want to adjust the volume of all of the vocals, you can use the fader on the vocal summing bus we set up. Beautiful!
6) Secret Shortcut Method to Parallel Compression
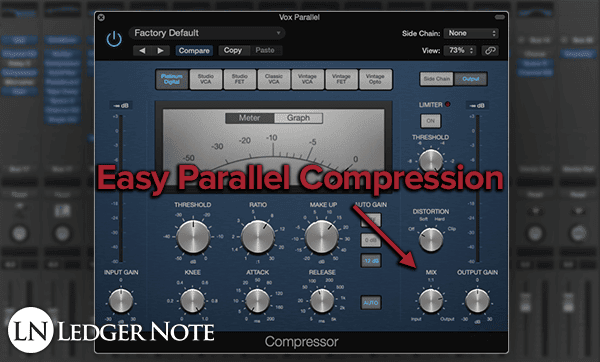
Okay, you made it this far so I'm going to share the secret shortcut method to getting this done without all these sends and buses. I wanted you to go through the original process so you'd understand what's going on, but there's typically a faster way now.
Most modern mixing plugins, like we've seen on reverb plugins and pedals forever, have a Mix / Dry knob on them. This is a ratio that allows you to set up the effect you want and then say "I only want 80% of the effected version of the track while keeping 20% of the original dry version."
So if you have this control on your compression plugin then you can use that. It basically means that you'd turn the compressed version down to 70% in volume and turn the dry back up to 30% of its volume, as an example. It's automatic parallel compression!
Parallel Compression Settings
You can use this technique on nearly any instrument. Anything you'd compress can benefit from this method. But each will require a different set of settings.
The best I can do is provide you with some starter settings that will get you most of the way there. From this point, you'll need to adjust it each time. These settings assume your gain staging is good (dancing around -18 dBFS):
- Threshold: -25 dB to -30 dB
- Ratio: 8:1 to 15:1
- Gain Reduction: Around 20 dB
- Attack: 1ms
- Release: Auto or 100 ms to 200 ms
- Knee: 1.0
- Make-Up Gain: Add back the gain reduction amount
These settings will compress everything deeply but as transparent and musically as possible, thanks to the fast attack and rounded knee. It obviously won't sound transparent by itself, but once mixed back in at lower levels it will sound just fine.
Generally, this method is used mainly for vocals and for drums. So I want to mention both of those separately for those looking for it, which most of you likely are.
Parallel Compression for Vocals
For vocals, I completely recommend the starter settings above, especially with the fast attack. If you don't use a fast attack then you'll doubly boost the transients once you combine the tracks, which defeats the purpose.
Of course, you can experiment and since the compressed track will be at a much lower volume the impact won't be as exaggerated as I might have made it sound. But this entire method hinges around letting the original track dictate the dynamic range and not the heavily compressed version.
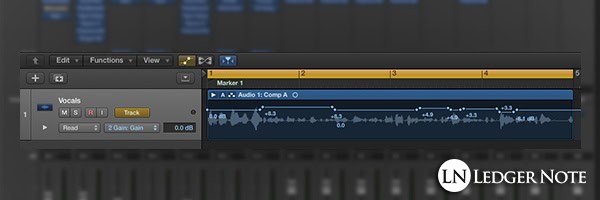
One thing to consider is you may need to use an automation track for a gain plugin before the compressor in order reduce the volume of the inhalations and other various noises like sibilance and plosives. You can mute the silent regions quickly this way too.
Don't use a noise plugin on faster vocals like rap, pop, or rock. You'll have too many unwanted issues trying to dial that in perfectly that can cause a pumping sensation when the gate engages and disengages at the wrong moments.
Avoid the temptation of maintaining a ton of dynamic range. Unless you're mixing classical music, there's hardly a single genre in the present day where the vocals aren't extremely squashed. Bring some dynamics back but at the end of the day you still want it heavily compressed.
Parallel Compression for Drums
For drums, you'll want to follow the same process as mentioned in the steps above. You could use the "secret shortcut" I showed you but I think setting up an auxiliary bus is still better here.
This is because you don't end up with granular control, which you'd might think was bad but in this case you don't want to try to balance that many drum tracks and still have to do it again with their individual sends.
What you want to do is set up a single drum bus with a single compressor on it. You'll send each individual drum track to this group bus and through the same compressor. I'd still do it pre-fader and then use the send volume knobs to control the volume of each parallel track moving into the bus.
Once you have them all on a single group bus, you can add a parametric equalizer to make certain frequencies pop out or hide (you'll definitely need this). You'll have a grouped volume fader, too. And you can still output both the originals and the group bus to a "Drum Sum" channel at the end.
Another trick here is to add a lot of saturation to this group bus or even straight distortion. Better yet, push the output gain of the compressor up to get a musical distortion. This can sound great in the drums and it will be at such a low volume it will sound purposeful and tasteful, adding character and harmonics.
Rear Bus Parallel Compression
You'll see this tossed around online and I completely recommend against it. The idea is that you'd finish off your mix and then send every track (or group sum bus) except your drums to a final compressor before the master. Then you'd shave off a few decibels (or a ton) of gain reduction and mix it in to taste.
This is similar to using mix bus compression, expect the reason that works so well is you set it up at the start of a mix and it's not in parallel. So as you're mixing you're making decisions as you go while hearing the effects. With the rear bus compression method you don't get to make decisions along the way.
New York Compression is a Neat Trick
And that's all there is to it. The entire point of this technique is to increase the volume of the quiet parts rather than decrease the louder parts. This is done by compressing a copy of the original track and then combining them back together again.
Don't forget all of your usual equalization methods, which you'll need to apply to the auxiliary bus. But then consider all of the reverb and delay tricks you can now use on the original track. Parallel compression opens up a world of options while improving clarity and preserving the humanity of the performance.
Jared H.
 Jared has surpassed his 20th year in the music industry. He acts as owner, editor, lead author, and web designer of LedgerNote, as well as co-author on all articles. He has released 4 independent albums and merchandise to global sales. He has also mixed, mastered, & recorded for countless independent artists. Learn more about Jared & The LN Team here.