No matter your goal... whether you're a rapper, producer, singer, podcast creator, video game designer, etc., you need a quality vocal chain set up and ready to rock at home. Recording vocals at home used to be a dream, and now it's a no-brainer. Money is no longer the barrier to entry.
The know-how is what gets in the way because you have to know not only which pieces of studio equipment you need, but how to hook them up, in what order, and how to record the signal in your computer, not to mention using the software. That sounds intimidating right?
Don't worry. After this article, you'll understand the concept like the back of your hand and know exactly what you need. Remember, the question is not just "how do I record vocals?" but how to get a clean and clear end result that sounds professional.
This broad question could open a huge can of worms that could spawn a discussion that could go on for weeks. What we're going to do is skip the nuances and get right down to the nitty gritty with a quick overview so you can get started immediately.
I'm even going to wrap it up with a few equalization and compression tips to take your clean recording from crystal clear to polished and ready for your listeners. In the future, we'll explore each sub-topic in this article in more depth.
Here's a table of content of sorts to let you know what we're going to cover, in order:
- Microphone
- Room Acoustics
- Mic Stand & Shock Mount
- Pop Filter & Wind Screen
- XLR Cables
- Preamplifier
- Interface
- Software
- Vocal Mixing Tips
- An Example of Perfect Quality Vocals
If you cover the basics of each of these areas, you will achieve decent results that are good enough to present to the world without being embarrassed.
If you go the distance and take the time to accumulate the equipment by trading up quality over time and really learn the tricks of the trade, you'll have pristine results that would make the Abbey Road guys cry.
I jest, but you can compete and even charge money to help others get the results they need. Let's get started. At the end, I'll show you some Abbey Road results that'll make your mouth water.
Note: All of the "recommendation" links you'll see below formatted like this will all take you to Amazon so you can get an idea of the price and other technical details. I'll show you my favorite budget option and then my absolute favorite option available, despite cost, so you can get a frame of reference.
If you're ballin' on a budget, you're still going to get massive results with these suggestions. In some cases, I won't show you this or that product since it's all budget. I'll show you different types since we're here to learn and not purchase.
How to Record Vocals at Home
Don't worry about the order that these various pieces of equipment go in within the signal chain. We'll cover that in the next sections. It's simple and will make plenty of sense by the time you get there.
Microphone - Actually Recording the Vocals
The microphone, obviously, is the very device that allows you to capture the fluctuations of your vocal cords. When it comes to mics, price doesn't always correlate to quality. Some of the best vocal microphones are fractions of the price of others.
There are also many types of microphones that you should be acquainted with. But as far as vocals go, you need to ask yourself what type of vocals you'll be recording.
Dynamic Mics - For Loud & Fast Vocals
If you're recording rap vocals, heavy metal screaming, or anything else that's forceful and varies in volume and intensity constantly, you'll want to go for a dynamic microphone. They can not only withstand the force of air that'll be shooting out of your mouth, but won't decrease in their ability to record as humidity rushes past the diaphragm.
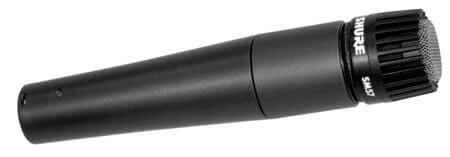
Budget: Shure SM57 - "The Industry Workhorse."
Give it a good preamp and it'll take you all the way. Big studios default to it for a lot of applications.Favorite: Electro-Voice RE20 - "The Radio Announcer's Choice"
I'll venture to say 99% of radio shows use this for their DJ's and talk shows. It's got a great proximity effect to enhance the bass in your voice if you choose.
Condenser Mics - For Sensitive Singing Vocals
On the other hand, if you're recording singers with beautiful voices that feature subtle nuances that should definitely show up in the recording, then you'll want a condenser microphone. You'll see various types, but go for a large diaphragm condenser mic. Because it's larger in diameter, it's more sensitive to each sound wave that hits it.
That also means that you shouldn't scream directly into it or let spit fly into it, etc. If you decide to record a rapper or "screamo" type of vocalist on it, make sure they face off-axis and use a pop-filter and windscreen, without question. No matter what type of vocalist you're recording, expect a lot of sibilance and plosives at times.
Budget: MXL 990 - "As Good as the Rest of Your Chain"
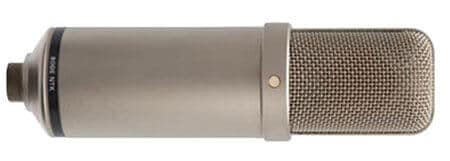
My feeling about this mic is that it will perform as good as you'll let it, based on the rest of your gear. You'll eventually want to upgrade, but it'll get you started for sure. It will become your bottle neck for quality later on, though. (Another option is the Oktava MK-319)Favorite: Rode NTK - "Crystal Clear High-End"
I love this mic more than my cat (not my dog though). I go to this mic for all types of vocalists, unless their voices feature a lot of bass and I want to capture that. This microphone shines for anyone with a mid to high frequency ranged voice. It only gets better as you pair it with better preamps.
Here's a heads-up to remember as you continue this article. Most mic's have different casings that require specialized shock mounts.
Fortunately, if you buy most mic's new (and I suggest that for condensers so you know it wasn't treated roughly), it'll come with its own custom shock mount and mic stand adapter. If you order a bunch of stuff at once, be careful that you're not doubling up on those items!
The Best Place to Record Vocals at Home
People want to know if they should record in the closet or put a mattress up against the wall, and all sorts of tactics to avoid dealing with their room acoustics. What you should be doing is using acoustic treatment (even cheap stuff) combined with a reflection filter in your main room and not trying to hide in a closet or corner.
Room Acoustics - Getting Clear Vocal Recordings
Something that a lot of people don't consider is that the recording environment is just as important as the equipment you use. Many home studios choose to use a closet as a make-shift vocal booth to try to avoid these issues, but that only exacerbates the issue. What is this issue I'm talking about? Acoustics.
Room acoustics refers to the size of the room, the orientation of the walls, how smooth the walls are, how your studio monitors are effected by these variables, etc. All of these things affect how sound waves will bounce back to the mic. These "bounces" are called reflections.
They can create delays, reverbs, constructive or deconstructive interference at various frequencies, and a multitude of other problems like flutter and on and on. The tools discussed in this section will help you combat these problems. You've basically got two options.
Acoustic Treatment - Stopping Phase Issues & Muddy Quality
People will tell you, "Oh, you don't need to treat your room, just close mic everything." Don't listen. If you want to record freely in your studio room or vocal booth, it will require acoustic treatment.
I'm going to tell you a little about it here, but if you want to learn more please head over to our full feature on acoustic treatment. Prepare to lose your mind and become addicted though. It's a fun topic.

To be honest, I'm not going to suggest this to someone who's recording vocals exclusively. If you're mixing or recording a band all at once, then this is for you.
There are two types of acoustic treatment out there, the cheaper and less effective egg-crate foam type, and the more handsome paneling option. Within both there are reflection panels, clouds, bass traps, diffusors, and more.
Again, read our full feature if you want to go this route; it's too much to cover here.
Budget: Egg-Crate Foam Kits - "The Ugly Option"
I honestly would only ever use these kits inside of a vocal booth, and have. Some people are happy to plaster their walls with this stuff, but not only would I not want to look at it, but it's not that great. The positive is that it's cheaper than the dickens and does help.Favorite: Professional Studio Paneling - "The Now We're Talking Option"
You can order these from GIK Acoustics. That's the main option I'd consider if I hadn't made my own by ordering the right high-density insulation and doing some wood-working.
Reflection Filters - Stopping Reverb & Comb Filtering
If you're mainly focused on vocals, let's be honest. Skip that whole can of worms above and go for a reflection filter. These are miniature acoustic treatment panels that attach to your mic stand and envelop your mic.
Not only will they block out any reflections making their way back towards your mic, but they also stop the creation of reflections in the critical directions (based on the pick-up pattern of your mic, which should be cardioid for vocals). It'll make more sense if you look at a picture of one:
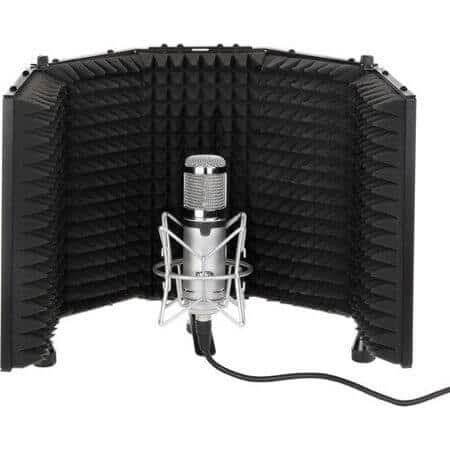
The snazzy part is that the egg crate foam, in this case (and what makes it suck in the full-on room application) is that it only absorbs middle and high range frequencies. It let's the bass frequencies pass through it here so they don't bounce back at you (which is a huge problem in small rooms like vocal booths or closets).
This is your ticket to the big leagues for cheap if you're only recording vocals at home. With the EQ tips I'll share with you at the end of this article, you'll be absolutely pleased with the results.
Budget: SE Electronics Relflexion Filter - "The Rav-4"
This guy gets the job done, but you get the one half-circle shape and that's it. That's not a deal breaker by any means.Favorite: Auray Reflection Filter - "The Aventador"
Not only do I feel Auray's option has a more sturdy construction, but you can change the shape and open up your mic to more room ambience if you choose.
I've said my piece. Start with a reflection filter and save yourself the acoustic treatment nightmare until you're ready to expand beyond just vocals. Then the nightmare will become a beautiful fantasy that you can't get enough of. It's absolutely my favorite aspect of having a studio.
The Final Noises That Sneak in Vocal Recordings at Home
There are three other considerations to worry about. Noises coming from you shuffling your feet around (or people walking in other rooms) that vibrate the floor can creep into your mic. So can the strange noises from our mouths that our ears don't hear, like plosives and sibilance (pops and hisses).
Mic Stand & Shock Mount - Stopping Foot Noises
This part isn't nearly as fun as the rest, but it's crucial. As far as mic stands go, you have a couple of options. These include a desktop stand and a standing, traditional mic stand. It really depends on what you're doing.
If you're podcasting or recording audiobooks, you might as well sit down since it's going to take a while. If you're trying to perform your best take of vocals ever, you'll want to stand up so you can get a full lung and stomach expansion and belt it out.
When it comes to standing stands, you can consider whether or not you'd like to add a boom to it (the part that stretches out so it's not just straight up and down).
Also, think about how heavy the shock mount, the reflection filter, and the mic is. This will help you decide if you want a boom, and the critical decision of if you want tripod legs or a heavy circle base. I prefer legs.
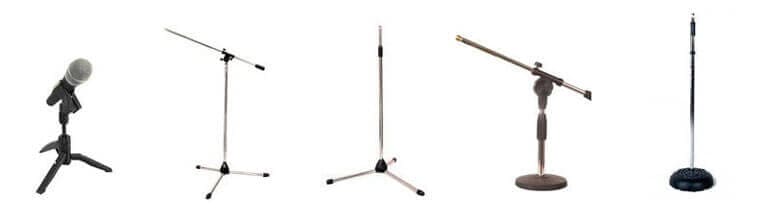
Tripod Legs: If you want to use a boom, you'll want a stand of this type of stand so you can angle the boom over a leg to keep it from tipping over. Especially if you have a reflection filter on it and a heavy condenser mic.
Circle Base: If you forgo a boom, then you can rock a tripod or a circle base. The circles are usually made to be very heavy to keep from tipping. And you're less likely to trip over a leg and knock the whole set up over (which is bad for a condenser's tube).
When it comes to shock mounts, a condenser mic should come with one custom fitted to it. You can buy them for dynamics, but it's not as necessary.
What they do is suspend the mic in mid-air off of the mic stand using rubber bands so that bass vibrations aren't moving up the stand and getting into your recording. If you have a random mic but no shock mount, search for a one-size-fits-all and it'll do the trick.
Pop Filter & Wind Screen - Blocking Out Plosive Pops
There's not much to this. Pop filters do exactly what they sound like they do, which is help dissipate bursts of air, known as plosives, that occur during syllables that start with the letter "B" or "P" for instance. I prefer the kind of pop filter that is on a flexible arm that extends towards the vocalist.
You can orient it in a certain way to achieve two results: You can keep the vocalist from getting right up on the mic and spitting all over it and breathing their hot, humid air into it, and you can trick them into remaining slightly off-axis.
This distance and off-axis orientation should completely eradicate pops. If they don't, you can use volume automation when you clean up the vocals to hide any that slip through.

Wind screens are essentially the same thing as pop filters, and you can combine the two if you have an unruly vocalist. While a pop filter is a thin piece of fabric stretched out (think of panty hose), a wind screen is a thicker chunk of foam that goes all around the mic (think of a sock). Wind screens may come more in handy if you have a vocalist who likes to hold the microphone in their hand.
Pop Filter: This is an example of your typical pop filter, unlike the nifty one above. They are cheap enough that you can put up two if you need.
Wind Screen: These are you basic wind screens. They are only a dollar or two each, and you can buy them solo or in packs. You can get any color of the rainbow too.
At least have one or the other, but go ahead and pick up a nice pop filter and a pack of wind screens. They are both cheap enough and are more than worth it. The last thing you want is the perfect take ruined when it could have been saved by you not being a cheapskate!
Connecting Your Home Vocal Recording Studio
We've discussed the main and most fun gear needed, but there's still more. You'll need some cables, a preamp (if your interface doesn't have one), an interface to communicate with your computer, and some software to help you record and edit the final results.
XLR Cables - From the Mic to the Preamp or Interface
Notice I didn't just say "cables." I specifically typed XLR. Any microphone worth it's weight is going to expect an XLR cable. If you even consider using a mic that asks for a USB cord, you should take that USB cord and... well, you get the point.
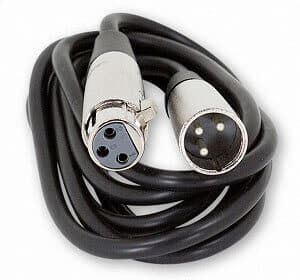
The main reason I wanted to talk about XLR's is to save you some money. One of the biggest myths in the business, and it's only perpetuated by audiophiles who have more money than sense, is that super expensive cables are better than cheap ones.
Yes, to an extent, that's true. You don't want to go so bottom rung that the cables don't have any shielding and pick up tons of 60 Hz hum and other electrical interferences.
But you also don't need these cables that get your money through crazy marketing. If a cable tells you all about it's 24 karat gold micro-weaved and braided shielding with quantum vibrational flux capacitors, then put it back on the shelf.
There's one company that's notorious for this type of scam, and they are a real "monster," ya feel me. I'll point you in the right direction (take note of the length before you order any cable!):
Budget: There are plenty of budget cable companies. Hosa does a good job, Livewire is okay, and Monoprice is another that pops in my head. They aren't budget, but more so standard in price.
Favorite: If you can afford the extra spend and want a piece of mind, I like to run my vocal signal chain with Mogami cables, along with my monitors. They go the extra mile without extorting you.
This goes for all cabling of all types all across the board. Never fall for the marketing trick. Now, the one thing that is true is that if you're using an unbalanced (versus balanced) connection, you don't want a ton of extra length on the cable.
That's more opportunity for interference to be picked up. With balanced it doesn't matter. This is another topic that's far beyond the scope of this article. Honestly, just don't get a 30 foot cable if you only need 6 feet and you won't need to worry about it.
Preamplifier - Boosting From Mic Level to Line Level
Let me stress this, because it's not obvious until you've had some experience. The difference in a crappy preamplifier and a quality preamp is literally night and day.
And yes, you must have one, because you have to boost the signal in the cable from "mic level" to "line level." Stuff like electric guitars, keyboards, and electric basses are already at line level, but mic level is very quiet.
Some goofy dudes will try to get around having to buy a preamp by just cranking the volume on their inputs like mad. All you're doing is introducing a boat load of noise. You need to boost this signal without also boosting the noise, and that's what a preamp does.
Let me preface this part of the discussion by letting you know that interfaces will come with preamps on most every channel, that you can bypass or not. So if you're stretching your budget thin, you're better off not buying an independent outboard preamp and adding some extra cash to your interface purchase.
If you can afford to pick up a stand-alone racked or desktop preamp, then do it, only if you can spend enough to get past the bottom rung of quality. The cheapest ones on the market will harm your signal more than they will help, while the best mic preamp will unlock the full potential of your mic.
Remember earlier, too, when I said that most microphones have a range of ability to provide you with a quality recording. You can force a microphone to sound like crap by pairing it with a horrible preamp, or you can help it show its full potential by hooking it up to an awesome preamp. This is not the place to skimp out on and be cheap. Do this step right!
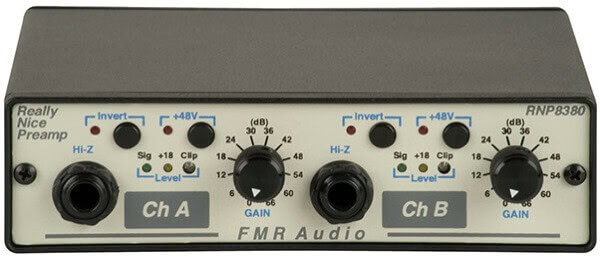
Budget: FMR RNP - "The Really Nice Preamp"
I can't sing this pre's praises enough. FMR cut the cost by offering a plain plastic casing in a desktop format, but the electronics are a masterpiece. You can rack them with various kits out there. Check out the Funklogic options, which is how I racked my RNP and RNC together.Favorite: Great River MP-2NV - "The I'll Never Need Another Preamp Again"
This is on my wishlist ever since I was able to play with one of these. They say at the level of perfection, you have various flavors to appeal to preferences. This is my flavor. It's pristine and adds nothing to the signal, whereas some top-level pre's might add warmth or coloring.
Preamplifiers are my second most favorite piece of studio gear after acoustic treatment. That's because it's the second most important, after acoustic treatment. That's a hint. Get the RNP if you can!
Interface - Analog-to-Digital Conversion Before the Computer
What most people who are new to the concept of recording don't understand is how your audio signal is moved into the computer. This is what an interface does.
Many beginners will attempt to use their computer's sound card, but not only does it not feature all of the components you need, but the ones they do have don't cut it. You need an interface, which is like a glorified outboard sound card with additional features.
An interface combines several elements of the signal chain. Remember, most will include at least one if not two channels that include a preamplifier.
It will include analog-to-digital converters and digital-to-analog converters so you can move the signal into the computer and back out so you can hear it through your monitors. That's the basic concept.

Let me say up front. If this is the spot you try to save money on, you're going to doom yourself. Don't buy some kind of $50 dollar cheap audio interface and expect any of the components inside of it to be worth a crap.
Another heads up is that a lot of interfaces will come bundled with installation disks for a DAW, which we will talk about next. Make sure you know what you're getting so you don't buy twice!
Lastly, you'll find several options for how the interface connects to the computer. You'll see USB, Firewire, Optical TOSlink (Lightpipe), Thunderbolt, Ethernet, and more. Concern yourself at this point with only USB or Firewire.
Both are fast enough at this point and have been for at least a decade for this level of recording (one to ten tracks at a time or so). It's just a matter of preference. I use Firewire right now.
Budget: Focusrite Scarlett Solo - "The One-Man One-Channel Option"
Focusrite is known for having quality preamps in their interfaces. If you're only recording one voice at a time, you can slide by with this money-saving option.Favorite: Focusrite Saffire Pro 40 - "I'm Ready to Record a Whole Band"
This bad boy gives you so many inputs and outputs that you'll be ready to record an entire band, including a million drum mics, but you'll need to add some preamps into the mix. Focusrite offers expansions that can daisy-chain to this main interface though. I love Focusrite.
There are tons of interfaces out there and I've only tried a handful, partially because once you buy you don't need any others unless they fry their electronics over time.
Mark of the Unicorn, or MOTU, makes some solid stuff. I enjoyed my two that I went through, but I'm currently using the Saffire Pro 40 mentioned above and don't see myself leaving Focusrite in the future.
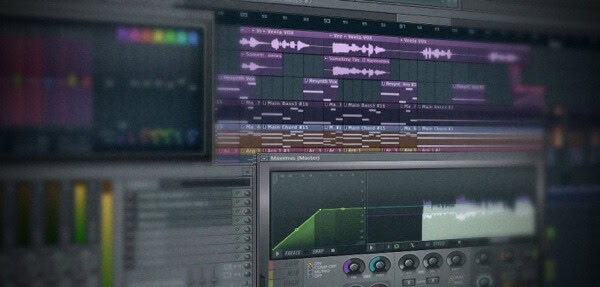
DAW Software - Recording & Editing Audio
Again, before you purchase a DAW, or digital audio workstation, make sure your interface isn't coming with one first! When it comes to the best DAW's, there are a ton of options that will all get the job done.
Let me list a ton just for example: Avid Pro Tools, Apple Logic Pro, Ableton Live, Image-Line Fruity Loops Studio, Cakewalk Sonar, Steinberg Cubase, Sony Acid Pro, Propellerhead Reason, Presonus Studio One, MOTU Digital Performer, Cockos Reaper, and on and on.
If you want to simplify the decision, consider either Pro Tools or Logic Pro (if you're on a Mac with OSX, this is killer and my favorite). Those are the leaders, and if you learn them, you've learned them all.
A DAW is a digital audio workstation. It's a piece of software that communicates to all of the hardware we've been talking about.
It will take the recordings and lay them out for you on a multi-track where you can then proceed to signal processing and making your vocals sound even better. It's not an option if you want to produce the kind of results everyone expects in this modern age.
Windows: Go for Pro Tools. You can get it for Mac too but Avid doesn't keep their update cycle as on point for Macs right now. You will either need an Avid interface or buy a USB dongle to be able to use Pro Tools. It's how they keep people from stealing their software, which is smart.
Apple Mac: Go for Logic Pro. It's beautiful, intuitive, and keeps getting better. And since it's made by Apple, you know it will always work for your Mac and be up-to-date with their constant operating system upgrades.
Home Vocal Recording Mixing Tips
It'd be real crappy of me to tell you about all of these tools you need to record but then leave you hanging. What I can't do in this article is explain how to install your DAW and sync it up to your interface, tell the multi-track mixer which inputs to use, or give you the complete run down on mixing.
You need to take the time to experience the learning curve of a DAW. Everyone has to, but only once. Then you're good to go for life.
I want to share some vocal mixing techniques for post-processing your vocals. I can't go in super depth here. If you'd like more details, please check out our beginner's article on basic audio mixing tips.
Here, I'm going to point you in the right direction. You'll understand it all and can revisit it after you've become familiar with your DAW and it's plugins. The most important parts are knowing how to EQ vocals and understanding how to compress vocals.
Equalization - Making Vocals Sound Clear
When dealing with vocals, you'll want to vary these values depending on if you're doing something where it's vocals only such as a podcast, or if you're mixing vocals into a song. The principals will remain the same. In your DAW, find a parametric EQ plugin and apply it to the track.
Open it and you'll have you have five nodes that you can move around to affect the frequency spectrum of the vocals, from the lowest portions to the left and up to the highest on the right. You should be able to play the track and see it's signal appear on the plugin.

On the leftmost side, apply a low-end roll off. You'll want to start it anywhere from 60 to 100 Hz, where the slightest impact occurs. It will veer deeply off to the left, removing more and more of the sub-bass frequencies out of your vocals.
This won't impact your voice, but it will remove any low frequency noises that crept into your recording. For mixing over kick drum and bass, you may choose to push this value as high as 150 Hz. You can change the rate of the roll off as well so that it descends more sharply.
You can do the same at the high end or even the inverse where you boost the high end. Use your ears, not your eyes, to make the proper decisions.
Now use another node and set up a medium width Q curve and subtract anywhere from 2-6 db of amplitude and begin sweeping it from around 200 Hz up to 500 Hz.
You'll find the sweet spot where a sense of muddiness is removed and clarity occurs. This is removing the boomy sensation your room is creating due to lack of complete acoustic treatment.
Do the same as above but use a wide width Q curve (boost wide and cut thin!) and add anywhere from 1-3 db of boost around 2.5-6 kHz. Sweep it around and play with the width of the curve to find the sweet spot.
This is the range where the human voice has definition. It will help your words be understood. The value will be lower for females and higher for males.
Compression - Reducing Dynamic Range
Once you've EQ'd your vocals, you've removed the "nasty" frequencies, or at least turned them down to where they aren't recognizable. Now you're ready for compression. You don't want to compress your vocals before you've done this preliminary EQ-ing or you'll just be compounding the problem.
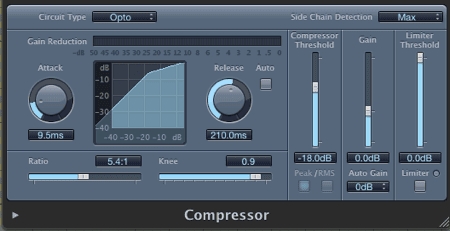
Compression has four variables associated with it: Ratio, Threshold, Attack, Decay. For vocals, you can usually get away with a very fast attack and decay. These have to do with how quickly compression is applied and released after the amplitude surpasses and dips back below the threshold you set.
The threshold is set in decibels and is the level you choose to start apply compression. The ratio then is like an inverse gain knob.
For vocals, you could use a 2:1 and as high as a 5:1, depending on the style of vocals and genre of music. Rap and Pop will take more to duplicate the feeling you're used to hearing.
What this means is that if your vocals go over the threshold by 5 decibels, it will reduce it down to 1 decibel in volume, assuming a 5:1 ratio. If it goes over by 10 db, it will be reduced to 2 db. This evens out the volumes of your vocals so the spikes and dips are less extreme.
When done, you may find you want to add an additional EQ plugin after the compression and do a little bit more work with it. It should be minor. If you find yourself doing a lot of EQ work after compression, that means you didn't do it right the first time before compression.
Effects - Sweetening Up Your Vocals
This is the fun part. Play around with panning, delays, flangers, reverbs, pitch shifters, and more to get an idea of what the possibilities are.
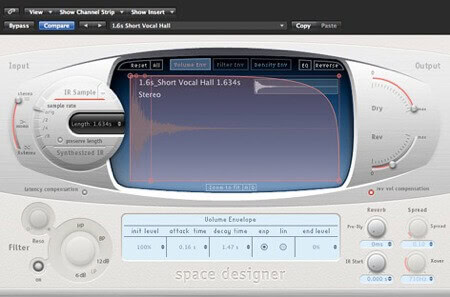
Certain effects will be more appropriate for some songs or applications than others, but largely this boils down to the creative control of the mixer. You can also independently apply compression and EQ to the effects as well by sending them to another track via a bus.
Perfect Quality Home Vocal Recording Example
I can't leave you to the task without providing an example of something to aim at. Here's Paul McCartney singing Golden Slumbers from the Beatles' album Abbey Road, recorded at the amazing Abbey Road studio!
(Edit: That one got yanked off of YouTube. Here's an equally good example from Boyz II Men singing The Beatles tune Yesterday!)
Notice the clarity due to the reduction of extreme low-end and the muddy area, along with the compression that keeps the overall average volume consistent across segments.
Then listen for the subtle reverb tail. You can produce these results at home with the proper studio gear and practice. Keep hope and work hard!
Recording Vocals At Home is a Piece of Cake!
That's it, my friends. Really. There are three aspects to recording vocals at home that follow chronologically along the audio signal chain.
You start with your hardware which sends the signal to the computer and DAW software and then you apply some post-processing. It's a piece of cake once you've done it a couple of times. If you're hunting for even more info, we've got 13 vocal recording tips for you here!
Take your time to experiment. Once you've familiarized yourself and become comfortable with the technical aspects of recording, you'll brain will be ready to get into the creative part, and that's where your world will open up to an endless realm of possibility.
Be patient and studious and you'll get there in no time. These skills are horizontally applicable to recording instruments too! You're on your way to becoming a professional studio engineer!
Jared H.
 Jared has surpassed his 20th year in the music industry. He acts as owner, editor, lead author, and web designer of LedgerNote, as well as co-author on all articles. He has released 4 independent albums and merchandise to global sales. He has also mixed, mastered, & recorded for countless independent artists. Learn more about Jared & The LN Team here.