Whether you're trying to monitor your bass sound and levels while making music or an audiophile wanting to get the most out of their favorite albums and movies, the best studio subwoofers are the solution you're looking for. They are designed with accuracy in mind.
Bass is a huge part of audio for the audience and the studio engineers. They work with the best studio subwoofers in order to produce the tightest, most well-balanced low-end frequencies possible.
This way, every time that movie monster destroys another building or the dubstep producer drops the bass, you get the maximum emotional impact.
Except when you don't, because you either don't own a subwoofer or you have a cruddy consumer level sub worthy of the trashcan.
You know how all of the fancy home stereo and studio monitoring set-ups are always at least called 2.1, if not 3.1 or 5.1 and even higher?
You know what the "point one" means? That "one" is the subwoofer, and it's non-negotiable.
INCLUDED IN THIS GUIDE:
| POLK AUDIO PSW10 | Best Entry Level Sub | Buy on Amazon |
| PIONEER SW8-MK2 | Best Down-Firing Subwoofer | Buy on Amazon |
| MACKIE MR10S MK3 | Best for Tight Spaces | Buy on Amazon |
| KLIPSCH R12SW | Best for Profound and Smooth Bass Sounds | Buy on Amazon |
| KRK K10S | Best Budget Pick | Buy on Amazon |
| ADAM SUB8 | Best of the Best | Buy on Amazon |
| YAMAHA HS8S | Best Bang for the Buck | Buy on Amazon |
| M-AUDIO SBX10 | Best Home Studio Solution | Buy on Amazon |
The Best Cheap Subwoofers
Not all of us have a huge budget to blow, but we still have work to get done. These are the two best cheap studio subwoofers I can comfortably recommend to you. It doesn't hurt that they are pretty either!
Unlike consumer products, these still focus on accurately representing the bass of your audio so you can pump out professional results. They're big enough for any sized room except for giant auditorium sized workspaces.
POLK AUDIO PSW10
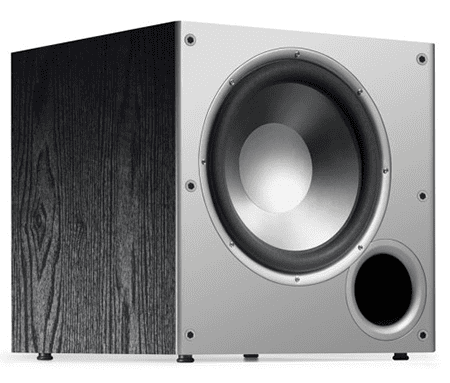
The Polk Audio PSW10 is the cheapest option you should explore. Nobody else is attempting to bring professional results at this cost due to the research and development expenses at this level. What you're looking at is a powered 10" driver pulling 50 Watts so you can reach as low as 35 Hz.
The frequency response is reported as 35 Hz - 200Hz, but you can reach a bit higher and lower, but with a less reliable response (this goes for every sub out there). The crossover on this one can range from 80 Hz to 160 Hz. It uses speaker cable for its connections and features a composite polymer cone.
Part of the way they've kept it cheap for you is to use MDF (medium-density fiberboard) for the box itself. This is good in the sense that they're able to design the response on the woofer itself without taking chamber resonance into affect.
Other companies use it to great effect, but in this case it gets you in the game at a lower cost. Ten inches is no joke for this price. Note the isolation pegs on the bottom as well, keeping your bass insulated and unaffected by the ground or stand.
Specs:
- Product Dimensions: 16.2 x 14 x 14.4 inches
- Item Weight: 26 pounds
- Connectivity Technology: RCA
Pros:
- Reasonable price and great value for money.
- Perfect size for tiny to medium-sized rooms.
Cons:
- Struggles to offer a robust bass for bigger rooms
PIONEER SW8-MK2
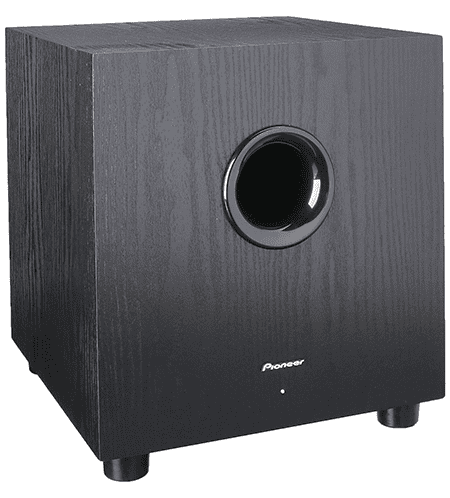
The Pioneer SW8 is a breakaway option from what I said above. It's down-firing, and I'm cool with that on this model. Here's why: For an 8" woofer at 100 Watts it can reach as low as 38 Hz and as high as 150 Hz.
It's a cost saver option for someone mixing almost any type of music or audio minus the sub-bass rap stuff. The crossover frequency can be set anywhere in its 40 Hz - 150 Hz range.
Part of the reason I'm okay with the down-firing here is due to the immovable MDF cabinet, so that's one less variable the engineers had to deal with to ensure we got as flat of a response as possible at this price. It comes with every other bell and whistle you'd need minus a foot pedal or remote control (those are reserved for the options below).
You can use an RCA or speaker cable input but your output is restricted to speaker cable, so consider your monitors before you commit. You'll need a converter otherwise to XLR or TRS.
Specs:
- Product Dimensions: 12.2 x 12.2 x 14.2 inches
- Item Weight: 20.2 pounds
- Connectivity Technology: RCA
Pros:
- Controls provide seamless connectivity
Cons:
- Vibrate loudly, even without load and without connecting to the receiver
The Best Budget Subwoofers
Now we move into the most popular options. These are the best of the budget subwoofers, but that doesn't meant they're cheap. Above we were working with the $100-$150 range, but below we're looking at the $200-500 range. That affords you a classier chassis made out of firmer materials and a flatter frequency response.
MACKIE MR10S MK3
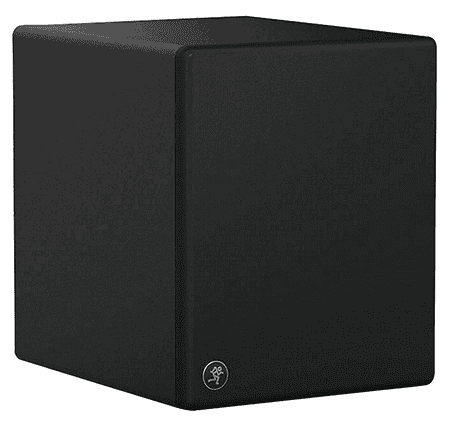
The Mackie MR10S is now "mark 3" meaning it's been successful enough to produce three revisions, getting better each time. The driver is 10" in diameter with an all-wood cabinet. It's not pictured but this beast does have rubber feet to isolate the vibrations from the ground, keeping the 40 Hz - 180 Hz frequency response together.
On this bad boy, you can input with XLR or TRS cables, and the output is TRS to the monitors. The crossover range is from 40 Hz to 180 Hz. The cone is a glass aramid composite.
Now, you'd might expect a bit of a deeper response from ten inches and a 120 Watt power demand, but what you're really getting is less distortion throughout the frequency response. This means you can trust what you're hearing without nulls and peaks or harmonics being added.
Like many others you see in this list, there is no grill covering the woofer other than the soft-mesh cloth, so don't kick it! Mackie is trusted in the monitoring community. You'd be happy with this sub as much as any other in this section.
Specs:
- Product Dimensions: 18 x 15.5 x 18.7 inches
- Item Weight: 31.1 pounds
- Connectivity Technology: TRS, XLR
Pros:
- Good price for the performance
- Comfortable to work with for long periods
Cons:
- Bass end suffers from a degree of port ‘overhang’
KLIPSCH R12SW
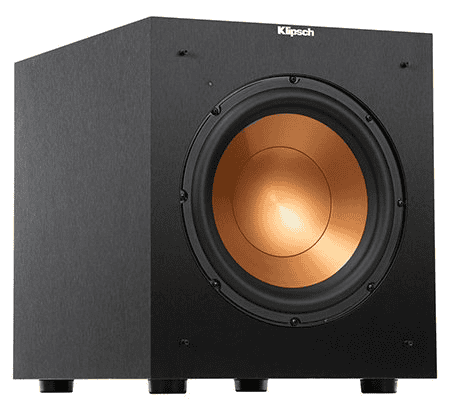
I'm partial to the Klipsch R12SW. It's so pretty. But it's not just that. They offer a wireless version of their subs as well (but I recommend wired for actual work and it's cheaper). Unlike all of the others on this list with their absolutely perfect polymer cones, this bad boy has what Klipsch is calling an IMG cone, or Injection Molded Graphite.
I'm usually skeptical about that stuff but my Adam A7 monitors have special tweeters that are next level. What it does here is create a more rigid cone which minimizes breakup and distortion, especially at higher volumes.
Okay, back to the specs. The 12" woofer (largest listed here but they have a 10" option too if you want to cut the cost a bit) can reliably hit as low as 29 Hz and up to 120 Hz with its 200 Watt power demand. It has a bass port on the back, phase switch, low-passes, and the works.
There's a removable (as pictured) cloth grill you can snap on too. You can see the pegs for that in the image above. I'd use it to keep dust off of the cone.
Here's my one gripe but it might be perfect for you. It features only RCA inputs and no outputs. That means you need a receiver or interface that can separate the signal and handle the crossover for you. That's not a crazy expectation and I actually can do that with my interface, but I prefer to route the entire signal through the sub.
I don't have a good reason for that other than being picky. It wouldn't stop me from choosing this sub as one of my "forever" subs if I wasn't in love with the Adam Sub8 below.
Specs:
- Product Dimensions: 14 x 18.5 x 16 inches
- Item Weight: 33 pounds
- Connectivity Technology: RCA
Pros:
- Great and clean bass sound
- Excellent sound and control
Cons:
- No wireless connectivity
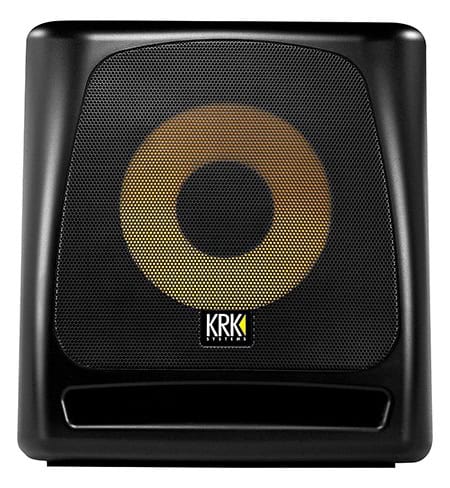
KRK K10S
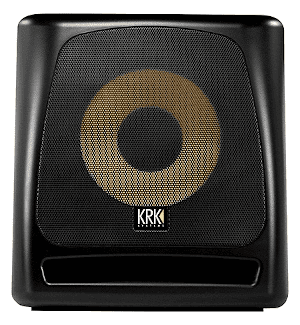
The KRK K10S is their subwoofer to go with their immensely popular studio monitors. This is a very tasty option for several reasons. The first is, even if you don't need a 10" driver, it's there for the cost of even smaller ones. With its 225 Watt power draw, you're reliably hitting 40 Hz and can reach down to 34 Hz for some extra rumble.
What I like is it has a built in steel grill to protect the glass aramid composite cone. Now, the one thing (there's always one) is that the highest reliable frequency is 130 Hz, which means you'll want your crossover set there or a bit below (which is typical really).
I find these to be handsome as well. The bass port looks better than a circle and allows for a smaller cabinet. It features a handful of input options, including RCA, TRS, and XLR. On the monitor outputs you can use RCA or TRS.
Here's what's dope, though. It has an insert for a bypass foot pedal switch. So as you're mixing and you want to focus on the middle and top frequencies you can kill the sub. This also lets you see how a non-subwoofer system handles the mix so you can make minor adjustments from there. That's worth its weight in gold.
Specs:
- Product Dimensions: 20.08 x 18.9 x 17.72 inches
- Item Weight: 41.5 pounds
- Connectivity Technology: XLR
Pros:
- Balanced and unbalanced inputs
- Good bass extension
Cons:
- Reasonably large enclosure
The Best Studio Subwoofers
I've chosen three subs as the best options for studio subwoofers. You can find bigger options at higher prices, by the same companies, but that's all they are: bigger models that perform the same but louder with a bit wider reach in frequency response.
Let's start with my favorite, which I firmly and confidently recommend (as well as its big brothers), and then a couple other options with impeccable performances as well.
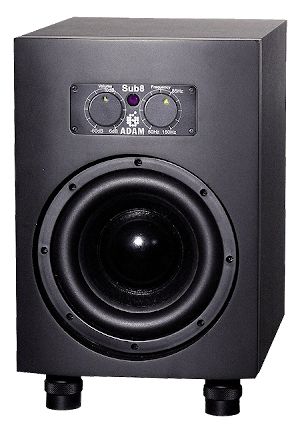
ADAM SUB8
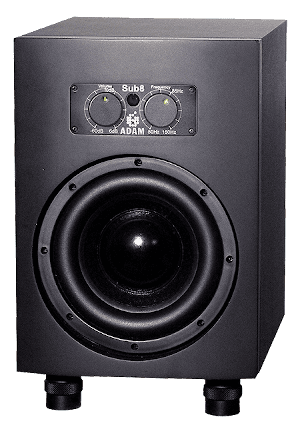
The Adam Sub8 is the light of my life. Nobody is doing it like Adam Audio in this price range. They have the "outrageous cost" level of quality at sane prices. My search for a subwoofer went the same as my search for monitors. I tried a ton and settled on Adam. They go the extra mile.
It's the little things. For instance, no other sub in this article has the volume and crossover knobs on the front where you can reach them. None other has a remote control to handle all of that for you without leaving your mix position. But let me stop gushing on those things. They matter, but what really matters is performance.
The 8.5" woofer draws 160 Watts to produce a frequency response of 28 Hz - 150 Hz. You read that right. Very low and very high, all flat and trusted. You can set the crossover anywhere from 50 Hz to 150 Hz and can input and output with XLR or RCA. It's got a high pass filter you can engage at 85 Hz to ensure you're only hearing the sub's bass and not your monitors.
Please take the time to investigate this one further. You find it and its brothers in pro studios all over the planet for a reason, and it's in mine! That counts for something...
Specs:
- Product Dimensions: 15 x 10.2 x 16.1 inches
- Item Weight: 26.4 pounds
- Connectivity Technology: XLR and RCA
Pros:
- Powerful lows & transparent highs
- Great sound
Cons:
- No power indicator LED
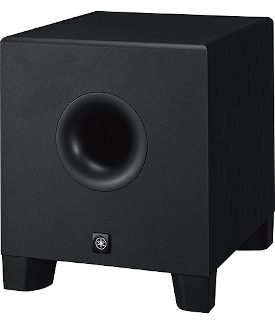
YAMAHA HS8S
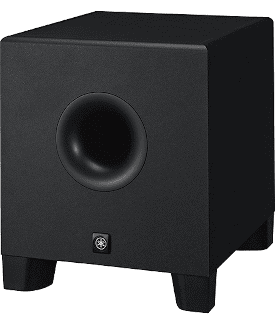
The Yamaha HS8S is the match to their HS line of studio monitors (which I wholly can recommend, I bought some for my brother actually). This beast breaks the mold at an 8" driver with 150 Watts of power but still reaches down to 22 Hz and up to 150 Hz. 22 Hz is literally 2 cycles away from the bottom of the human hearing spectrum.
The other way this sub breaks the mold is that it's the only one in this range I recommend that is down-firing, which is why it can reach such a low frequency. Normally I don't trust these types of "tricks" but I trust Yamaha when it comes to monitoring.
Their engineers will have taken everything into account. The one thing I'd say, and this is just me, is to not place it on carpet. The wavelengths are long enough to not matter but I want it as pure as it can be, the way it was meant to be.
The crossover can be set from 80 Hz to 120 Hz, maybe a bit lower on the top end than you'd expect but right in the perfect range if you have decent studio monitors that can reach that "low." I know this doesn't matter when it comes to working but to me this is one of the most handsome options in the list.
Specs:
- Product Dimensions: 16 x 18 x 18.5 inches
- Item Weight: 33.6 pounds
- Connectivity Technology: XLR and TRS
Pros:
- Powerful and excellent sound
Cons:
- Most expensive in the lineup
M-AUDIO SBX10
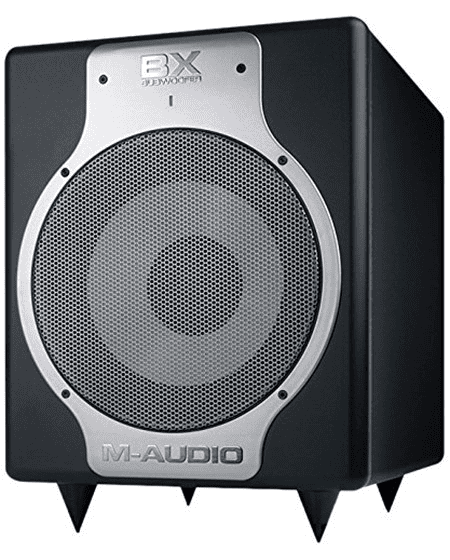
The M-Audio SBX10 is surprising to me. I like M-Audio. They make killer interfaces, but they don't pop out in my mind as the top in monitoring. That's why this subwoofer surprises me, because it's in league with the best in terms of monitoring and a flat frequency response.
It's response reaches from 50 Hz - 200 Hz thanks to it's 10" woofer and 240 Watts of power. That's a lot of power that ensures no distortion at any volume.
As you'd expect from a top of the line sub (even though this one comes in under $500 smackers), you get a bypass foot pedal (a god-send for mixing), a removable grill, and removable feet. Those feet are great though. They isolate the sub's vibrations from the ground so that you're getting the pure frequency response out of the front (which is why the grill can come off too if you want).
I really like this option although it's not what I ultimately went with. I could have and would have been a happy camper. There is the option of having a black faceplate as opposed to that metallic grey if you choose. This is one to consider if you want to keep your expenses in check while still having a ton of features and quality.
Specs:
- Product Dimensions: 17.32 x 12.99 x 15.75 inches
- Item Weight: 41.7 pounds
- Connectivity Technology: XLR and TRS
Pros:
- Compact and stylish design
- Ported design provides useful bass extension
Cons:
- Lacks the scale of larger nearfield monitors
FAQs
In this section, we're going to quickly cover all you need to know before committing to the purchase of a sub to match the rest of your setup. We'll make sure we understand the difference between the type of subwoofer that professionals and audiophiles use versus the ones "Random Joe" will buy on a whim at "Mediocre Electronics Store."
What is a Studio Monitor Subwoofer?
Your satisfaction hinges on making sure you're scoring a sub that is designed for audio professionals. The pro's don't use decent speakers, they use the best studio monitors on the market. On the surface they appear to be the same but there is a critical difference.
Speakers are designed for consumers and are meant to sound pleasurable. Monitors are designed for professionals and are meant to sound accurate.
What "pleasurable" really means is that the manufacturers take the liberty of messing with the EQ curve to make you think it sounds better than a competitor speaker.
"Okay, you take the part of the market that likes piercing high-end and we'll take the part that likes too much bass and cares about what it looks like over how it sounds."
Accurate, on the other hand, means that you're hearing exactly what the mixer of the music or movies intended for you to hear. And that's what you want as well if you're the mixer and creator. You want the most natural, balanced, tightest, and pure sound possible.
And that's what a studio monitor subwoofer provides in the bass region.
Considerations Before Making a Purchase
The first thing people ask is whether they need to match the subwoofer's brand to that of their stereo monitors. No, that's the beauty of studio gear. They all aim to be accurate with a flat frequency response. That means you can freely mix and match, because accurate is accurate, no matter the brand.
But there are some other issues you want to think about, which are entirely based on the size of your room. The larger the room, the more power and larger driver you'll want, especially if you're seated further from the sub versus having it under your desk, for example. Let's look at these issues.
Crossover Frequency
The entire point of a subwoofer is to take the bass load off of your monitors, which are ill-equipped to handle it. This frees them up to concentrate on the middle and high frequencies while your dedicated sub pumps out the bass.
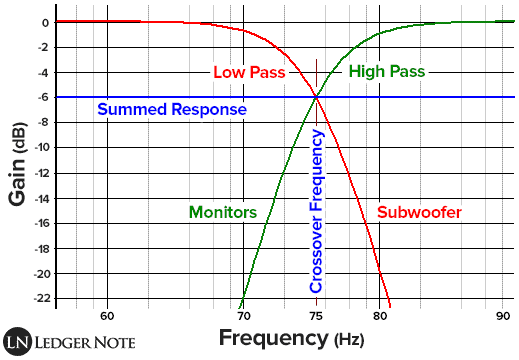
The question becomes "at which frequency should the subwoofer take over?" That's called the crossover frequency and you can choose. If you set it too high the music will be too boomy because you're bass-boosting the mids. Set it too low and you won't be boosting the upper-lows and it will sound weak.
We explain how to set this up properly in a section further down in this article. Most monitors will give you a suggested setting or you can refer to their spec sheets to see their frequency response.
Frequency Response
Speaking of frequency responses, your subwoofer will have one too. This is a measure of how low and how high in frequency it can produce sound. No subwoofer is going to produce sound at 24 kHz, the highest frequency a human can hear, up in the region that drives a dog nuts. But it will dominate the low end.
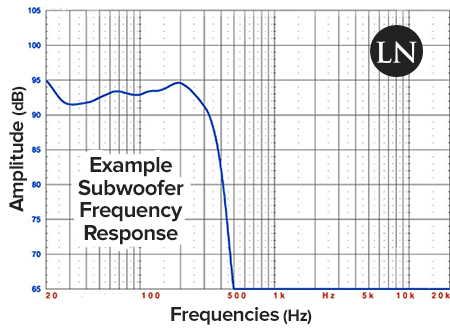
Human's can hear as low as 20 Hz, although you really feel that more than hear it. You'll feel the thumping and vibrating in your chest cavity, for instance. It takes a larger woofer and driver to pull that off and requires very special care to balance it just right.
So if you want to reach that low, make sure you're buying a larger and capable subwoofer. This will matter if you're mixing for movie theaters but less so for typical music.
Speaker Size & Power Rating
As we just mentioned, the woofer size will increase with the driver which will increase the power rating. All of this is so the subwoofer can become louder and reach deeper frequencies of bass.
Although there are subwoofers as low as 6 inches, I'd recommend at least 8 inches if you want to reach the deep booms of bass. Ten and 12 inches will suit any home studio or home stereo, but as an audio mixer for movies you'll want to be mixing in a comparable space as a theatre with a much larger subwoofer.

Besides the bass frequencies you need to work with, you want to consider the volume you'll be listening at. If you need high volumes but not so deep frequencies, you'll still want to purchase a larger subwoofer because you'll need the power rating. If you turn up a weakly powered sub too loud it will distort and ruin your experience.
What Else You Should Know About the Best Studio Subwoofers
There's some extraneous details you may encounter in your subwoofer search that we can clear up real quick.
Front-Firing Versus Down-Firing
You might see these subwoofers that are down-firing, meaning the cone points towards the ground. I'm going to flat out recommend you avoid these. Yes, the engineers can do the math and make it balanced, but you're reflecting the sound waves right back on themselves, which creates destructive interference and phase issues.
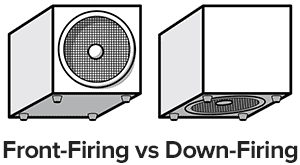
It's really a way to let the case itself create a reverberation that makes the sub seem capable of being louder than it really is. You want a front-firing sub that blasts the bass straight into your ear. Pro subs do take advantage of this reverberation but it's not for volume's sake. We'll talk about that in the next section.
If you really want more volume and a deeper frequency response, you need a larger driver and woofer, not some manufacturing trick. I've never seen a professional subwoofer be down-firing. That should give you a clue as to how that's accepted by the pro's.
Bass Port Versus Sealed Box
On a lot monitors you'll see a round and smooth hole that reaches into the depths of the case. That's called a bass port. It does several things that can be equally calculated and commanded with a sealed off box with no open port. Neither is superior than the other, they are both methods of achieving the same result.
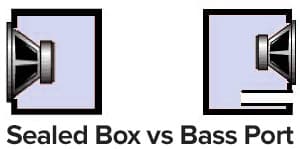
One reason is it allows oxygen to flow in and out of the speaker casing, which can carry reverberations in the case out of it and into your ear. This allows the engineers to craft the case in a way to extend the reach of the sub lower into the frequency spectrum without forcing it to draw more power or use a larger driver than necessary.
In the same manner, it carries on its task without introducing distortion in other bass frequencies. They also exist to give the subwoofer access to more air to push so its not creating a vacuum in the case.
The Phase Switch
Most professional subwoofers will come with a phase switch on the back. This is getting a little technical, but let's cover it as simply as we can. Sound waves in the bass spectrum have longer wavelengths and can take longer to reach you than middle and upper frequency sounds.
Combine this with the placement of your subwoofer and you can unintentionally get out of phase, meaning that the bass waves are recombining with the other sound waves in the air and changing each other in a way that doesn't sound good. The phase switch will basically let you adjust the timing of the sub by a matter of milliseconds.

The phase switch may only have an "invert" setting or it may have settings between 0 and 180 degrees. It's worth at least testing the difference between 0 and 180 (which is an inversion) and ignoring the in-between settings. You'll know from that if you have a phase issue or not, and one or the other will sound much better.
Do I Need An Amplifier?
This entirely hinges on whether the subwoofer you've chosen is passive or powered. Passive subwoofers need an external amplifier while powered subs already include the amp built in internally.
If you've already got an amplifier or receiver powering your stereo monitors it will likely have an output for a subwoofer. Double check that before you buy anything extra you don't need!
NOTE: All of the suggestions below are powered, so you don't need any kind of amp at all!
If you're working in a recording studio then your main audio interface or mixer board will take care of this for you.
Installing the Best Studio Subwoofer
This is not tricky at all, so please don't feel intimidated. Most of the time the audio will feed into the subwoofer and then out to the monitors or speakers. The subwoofer will have the crossover frequency control and the other settings.
If not, you'll have a receiver or external amplifier that does the exact same things. It's a piece of cake. You run the audio from the amp, receiver, or interface into the subwoofer input and then out to the monitors and you're off to the races.
Connecting Your New Sub
Like we said above, it's literally as easy as connecting the subwoofer input from the audio source's output and then out to the monitors. But you'll need to check which kind of cable you'll need. You might even need a cable converter, which is fine.
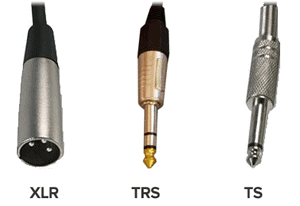
This could be 1/4 inch TRS, RCA jacks, or even speaker cable. You're most likely to see 1/4 inch TRS or XLR cables with professional studio gear. The sub will also most likely come with the cables you need (but you still may need a converter, which are dirt cheap).
Here's a heads up. If you buy a powered subwoofer, make sure you plug the power jack into the same outlet or strip as your other speakers. Otherwise you may end up with a ground loop that creates a 60 Hz hum. You might not notice it since it's in the bass region, but you'll notice its absence once you fix it.
Studio Monitor Subwoofer Placement
The placement of your sub comes with blessings and curses. The blessing is that our ear's can't localize deep bass in space, so in that sense it doesn't have to be centered between your monitors. It can be wherever.
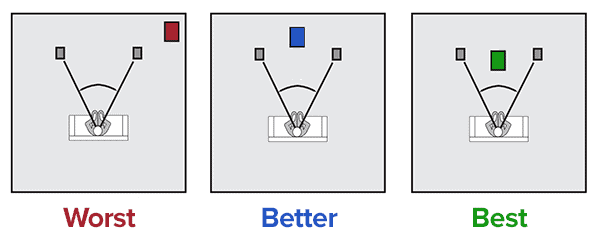
The curses are that your room will have nulls and peaks in them that affect different frequencies. The worst spots for bass are the corners of the room and against walls so definitely avoid those as a placement choice.
Honestly, beyond the corners, your sub will sound great wherever you choose. It's really out of your control unless you want to dive into the world of acoustic treatment. That should come later once you have your subwoofer and are familiar with it.
How to Adjust Your Subwoofer
Once you've installed and chosen a spot for your sub to live in the room, you'll need to set it up. This refers to two things:
- Volume
- Crossover Frequency
You want to match the volume of the subwoofer to the monitors it is accompanying. You'll control this either on the subwoofer itself or the amplifier. If you're using an amp then set the subwoofer's volume at about halfway to max and leave it there and fine-tune your adjustments on the amp.
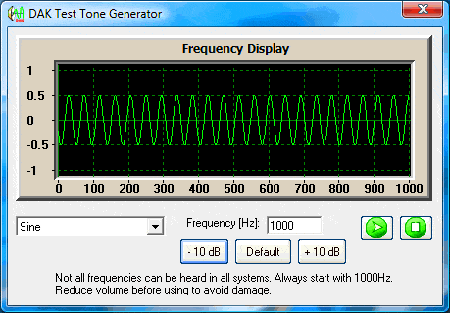
If you want to go all out you can download and play test tones and measure the volumes with a digital meter, or you can do it by ear. There's no other way, unfortunately.
Some of this forces you into the realm of getting nerdy and technical if you want perfection. As a fan and audiophile, close enough by ear will do. As a pro, you need to get your hands dirty.
As for the crossover frequency, you're monitors will likely have a suggested setting you can find online. If not, look at their frequency response charts and find the point where they begin to be incapable of producing steady and accurate sound.
This may be anywhere as low as 50 Hz (doubtful) and as high as 150 Hz for tiny monitors. Usually, you'll want to come in around 80 Hz to 115 Hz. The sweet spot tends to fall in there for most subwoofer buyers that already have nice monitors or home entertainment speakers. Generally you want to set it about 10 Hz higher than the lowest frequency your monitors can reliably handle.
Isolation Pads & Isolation Feet
If you want to preserve the flat frequency response of your subwoofer as best as possible, you need to obviously have your acoustic treatment situation together, but you need to also decouple the sub from the ground. Otherwise the chassis won't resonate like it should and the vibrations exiting and entering the subwoofer from the floor will have a huge effect as well.
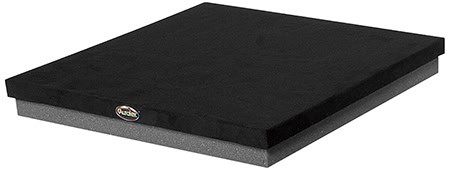
There's two ways to achieve decoupling. The first way is through a subwoofer isolation pad. The cheapest, but still high-quality method is the Auralex SubDude-II. It's a specially engineered block of foam designed to distribute vibrations throughout it and then absorb them.
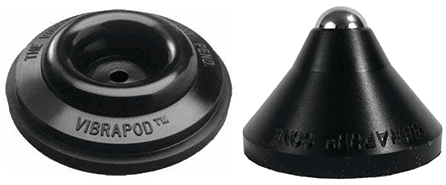
If you want the cooler looking and more effective option, you can look into what are called isolation feet (versus a pad). What these do is minimize the surface area of the subwoofer that touches anything touching the ground and then decouples it through rubber instead of foam.
The rubber absorbs the little bit of vibration allowed through. If you float the subwoofer on cones over isolation feet, you can decrease the surface area touching anything to an absurdly small amount. My favorite method of doing this is through the Vibrapod Isolators and the Vibrapod Cones, together.
This isn't just some audiophile fantasy. You definitely want to decouple your subwoofer and studio monitors. Now, decoupling your preamps and even your cables from the ground is nonsense.
Jared H.
 Jared has surpassed his 20th year in the music industry. He acts as owner, editor, lead author, and web designer of LedgerNote, as well as co-author on all articles. He has released 4 independent albums and merchandise to global sales. He has also mixed, mastered, & recorded for countless independent artists. Learn more about Jared & The LN Team here.