Do you ever listen to professional mixes and wonder how in the world they have so many lush reverbs flowing throughout the soundscape, yet everything still sounds crystal clear? How come you can't achieve the same? The answers are here.
Most of the time we jump in, grab a reverb that has a sound we like, dial it in to a certain volume on varying instruments, and then bounce the mix. There's so much wrong with that process... largely with what you are doing but mainly with the thousand things you aren't doing.
Let's take the time to cover the fundamental basics of what reverb is and the types available and then we'll get right into the methods the pros use to blow minds and set the emotional feel of a song.
That's the true power of reverb, but if you aren't doing it right then you're better off not using it. Fear not, everything you need is right here.
Once you're privy to the secrets, your mixes are going to enter an entire new world. Resist the temptation to revisit all of your old mixes!
That's how exciting this is... but keep forward momentum. We have a lot more mixing tips concerning every type of effect, but for now let's look at mixing with reverb.
Of all of the various effects at our disposal, the most misunderstood and dismissed is the reverb effect. People throw that word out there like it's a piece of jargon that shows they are "in the know" and leave it at that.
"Just throw some reverb on it to smooth it out."
Okay but... what kind? How much? Is there a primary goal here? Can we pull it off in a way that makes the song better than it currently is? These are the questions that will receive answers in this guide.
What is Reverb?
Dig up any old dictionary or do an internet search and you're going to the basic definition (and understanding that most people have) of reverb:
Reverb Definition - an electronically produced echo effect in recorded music. Short for "reverberation."
Reverberation Definition - a sound that echoes.
That gets us nowhere fast. To paraphrase, reverb is an electronic reproduction of an echo... The problem with this is that in the music industry, especially for a mixing engineer, there's a huge difference between an echo and reverb.
Echo has a long delay in between repetitions, like calling your name out into the Grand Canyon and waiting to here it bounce back.
Reverb is thousands upon thousands of repetitions occurring so fast that you hear it more as a smear of sound based on the original. We're talking around less than 0.1 seconds versus several full seconds.
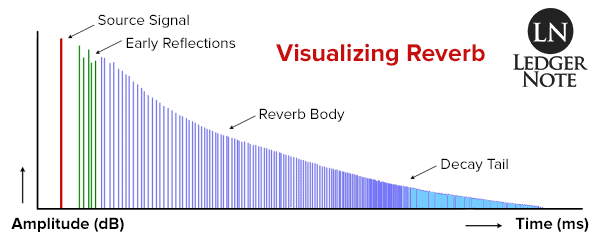
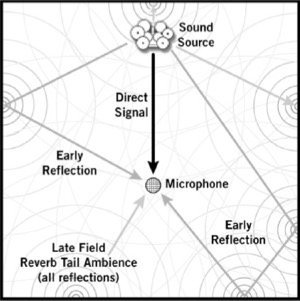
If only reverb was that simple. Before we can use it effectively, we need to understand the three aspects of reverb:
- Early Reflections - Anywhere around 1 to 30 milliseconds
- Body - From around 30 milliseconds to forever depending on your choices
- Decay - The final tail end of the reverb sound as it drops below about 60dB in amplitude
These are three of the main four qualities of reverb that you will be controlling to create the sound you're after. The other is the size, shape, and material of the virtual room you're creating.
You can already imagine the difference in the dimensions of a room having an effect on reverb. Imagine a concert hall versus your tiled bathroom. Imagine a small wooden box versus a large metal box. The size effects the length of the reverb while the material effects the frequency response.
Types of Reverb
Fortunately we don't need to design rooms (even in a simple plugin) every time we want to use a reverb. We can run to a certain preset we know has the sound we need and use it as a starting point.
This is possible because reverbs typically behave in one of five ways, which represent the five categories of reverb:
You can dig in and find more styles, sub-categorize them, etc. But those are your main five types.
The first three are based on rooms. These are the types of reverb you hear out in the physical world as you walk through buildings. The last two are types that mankind invented based on the vibration of either a spring or metal plate. I love me a good plate reverb!
We could go into a lengthy discussion trying to use words to explain how each one sounds. But really if you aren't aware, you can fire up your DAW and listen to each one or just wait until you're mixing again and run through them.
Being able to identify the sound of each type of reverb helps you decide which sound you want to impart onto your mixes. Let's get to the good stuff now and talk about how to make specific decisions about reverb.
How to Choose the Right Reverb
Before we even talk about the tricks of making reverb sit perfectly within your mixes, it helps if we're making the right choices from the start. Some reverbs are more appropriate than others to create certain moods. Some aspects of reverb work better with various types of arrangements.
Your main concern is choosing the right emotional quality for your mix. As an example, does the song call for something warm and natural or something metallic and dark?
Your secondary concern is to make sure you're emphasizing qualities of the reverb that don't contribute to a harsh, muddy, or spacey mix.
These two concerns are critical to achieving that professional sounding mix. If you screw this up, it's not the end of the world but your'e limiting yourself. The tips and tricks we're going to introduce later can't hide bad decisions.

When choosing a reverb, there's a series of questions that are helpful in guiding your choices...
"Do I want a natural, reality based sound to emulate listening in a real room? What size and kind of room? Or do I want to use reverb more as a noticeable effect and ear candy for the listener?
If you want to emulate a specific type of space, such as a smoky bar or concert hall, then obviously you want to choose a room, hall, or chamber (based on size first). Then you want to consider the material of the walls, which is how a lot of plugins will label their presets.
For instance, you might decide to mix a five-piece bluegrass band's song using a "Small Room - Wooden Verb" preset. That might sound like your listeners are gathered around the front porch of a log cabin as the band plays from their rocking chairs.
If you're going for more of an effect then a spring or plate reverb is going to supply you with what you want better than the more natural room-based reverbs.
The Basic Reverb Mixing Techniques
Now that you know which reverb you're going to use, it's time to slap that sucker on the tracks and start tweaking!
Levels - How Loud Should the Reverb Be?
Generally, you're going to want to place your reverb on individual instruments versus the master output. This is how it works in reality. Each individual sound being created in a room generates its own reverb. Typically, the louder a reverb is the further back in the soundscape an instrument sounds like it is.
This is how you create a sensation of depth. Mentally visualize how you're designing the stereo field and where you want each specific instrument to sit, not only with left-to-right panning but front-to-back depth as designed by volume and reverb.
The first mistake of amateur mixers is to increase the volume of the reverb itself far too high. You must remember that all of your reverbs are going to combine into a louder overall reverb effect. Always set your reverb volumes with the full song playing, not with each instrument in solo.
The golden rule of almost every signal processing effect is to increase the volume to where you want it, and then turn it back down some. Less is more.
Dropping the volume of the reverb back by about 2 dB to 4 dB under where you like it is a nice safe spot. Subtlety is the name of the game.
Here are some general tips for each type of instrument based on their frequency response and importance to a mix:
- Your Kick Drum and Bass Guitar should be 100% dry
- Use more reverb on the toms and cymbals than the snare
- Use enough to push guitars and keyboard behind the vocals and near the snare in depth
- Lightly sprinkle the vocals with reverb, less than the other instruments to keep it up front and clear
If you visualize your soundscape as if you're standing in front of a band set up like it would be on stage, this can help guide you to making decisions about how much volume your reverb should have on each instrument (and it helps with panning!).
Time - Balancing Depth Through Room Size
Remember the discussion about early reflections, body, and decay? This is how you can change the perception of how large the space is that your music is emanating from.
Early reflections, the first audible part of the reverb, are going to hit your ear faster if it's a small room or slower if you're designing a larger room. The body of your reverb is the main time variable.
The longer it lasts, the larger the room will feel and the more distant the instrument will seem from the listener. The decay can occur fast, making the reverb stop more suddenly, or can trail off with a long tail.
A lot of times you can't simply choose based on the size of the room you want. If your arrangement is very complex with many instruments then a large room is going to become a washed out mess.
If your arrangement is sparse, you can get away with longer reverbs. Take care to consider your arrangement as well as your desire for room size.
Because we are artificially and electronically altering each of these, we can end up creating virtual spaces that simply couldn't occur in reality. You'll know if something is absolutely whacky in your reverb or not.
Experiment with these variables to produce a pleasing and realistic sound. Getting this wrong can be worse than a completely dry mix, so take your time!
Separation - Mono or Stereo Reverb?
This is an easy place to create disaster for your mix. Stereo reverbs can sound so lush and full that it's tempting to use them every time on every instrument.
Once you're done setting your levels and balance, you play the full mix ready to sit in amazement at your work and realize you have a washed out, mushy mess on your hands.
So maybe you try to turn down the volumes and all you do is turn down the mush, and it's still mushy. What went wrong?
Most of the time (not all of the time) you're going to want your reverb to emanate from the same center of gravity that your instrument is coming from. So if your guitar is panned 33% to the left, you want the guitar's reverb to also be be panned 33% to the left. We're keeping things reality based here.
If you're using your DAW's mixer like most of us are, this will happen for you because the reverb insert is coming in after the track's panning. Or you're sending the signal post-pan to a bus that has the reverb on it. A mono reverb will sound like it's right behind the instrument creating it.
A panned stereo reverb will have it's center of mass panned, but the echoes will fan out across the entire stereo field. And that's your mush problem.
The question needs to be "Should I use mono or stereo reverbs?" and the answer, like above with the balance, should be based on the arrangement. For instance, if I was mixing a small band I might employ LCR mixing.
I'd pan the guitar all the way left, the synthesizer all the way right, and leave the drums, bass, and vocals up the center. And then I'd slap a stereo reverb on all of them and let that wash through the empty space in the stereo field. This would sound lush and still have tons of separation.

If you have tons of instruments panned all throughout the stereo field, you can't get away with a ton of stereo reverb and should use mono reverbs to help maintain isolation and clarity.
How to Add Reverb: Warnings for Newbie Mixers
There are three boo-boo's all of us make when we first start mixing, and when it comes to reverb they can be very problematic. They are:
- Mixing your reverb in headphones versus monitors.
- Slapping separate reverbs on every single track.
- Not using sends to control your reverb.
Here's the problem and solution to each of these scenarios...
1) Control your acoustics, don't let them control you.
Most of us don't start with mixing rooms chock full of a primary set of monitors, a secondary set, and acoustic treatment on the walls. We typically start with our basic computer speakers, a set of normal headphones, and a room that produces reverb on its own.
We tend to mix in headphones because our rooms are harming our ability to hear clearly more than helping. Regardless, mix your reverbs with your monitors or speakers so you're setting realistic levels.
With headphones, the clarity provided by the best studio headphones can cause you to use far too little. At the same time, using monitors in a poor acoustic environment can cause you to use too much. Start with your best monitors and double check in your headphones until you find the right balance.
2) Another scenario is that amateur mixers want to mix.
They don't want to learn how the software works and most have never worked on a real hardware mixing board. This results in not even knowing about auxiliary sends and buses, let alone actually using them. So we end up copy and pasting our reverb plugin settings onto each track.
Reverb is a very demanding process to calculate for your computer. With too many instances of the plugin running, you risk your software freezing and losing all of your work. Plus it's a very inefficient way of working with reverb, which leads us to the next point.
3) Learn how to create sends to specific buses.
A bus is an extra track in your multitrack that takes an input from other tracks. It can take as many signals as you'd like to throw at it at any volume you choose. This is the best way to manage your main reverb.
You won't always use only one, but there will almost always be a main and it should be controlled from a master reverb bus. There's a lot of reasons why, that we'll cover in the advanced tips and tricks coming up next.
Here's the goal. We're going to take your reverb from the left-side amateur style to the right-side professional style as visualized below:

Notice that on the pro's side, the reverb never gets in the way of any of the instruments. It's in the background at a reasonable volume, EQ'd out of the way, compressed and controlled... Here's how you do it.
Advanced Reverb Settings, Tips & Tricks the Professionals Use
At this point, if you've been working along with a mix as you've read this, you're probably sitting on a better sounding reverb than you've ever produced. But it still doesn't compare to the professionals. The levels are right, the balance feels good, there's depth and separation, but the clarity isn't there.
It's still mushy, washed out, and hard to make out each sound individually. You've lost intelligibility in your mix and we're about to get it back!
Pre-Delay - the Reverb Godsend
There's an old mixing trick to increase intelligibility in an instrument or vocals by introducing it with a louder volume before dropping it down to the proper volume for the rest of the song.
It helps the listener's brain latch on to it. I don't suggest doing that, but there's a similar trick regarding reverb that involves a feature called pre-delay.
Pre-Delay is a time based setting in milliseconds. So let's say you chose 50ms as your setting. What this does is tells your plugin to not start producing reverb for the first 50ms you'd expect it to. It waits that long before it fires.
If you set this length just past the longest attack of the guitar pluck or vocalists words, it keeps the signal completely dry long enough for your listener's brain and ears to hear clearly what's coming.

With pre-delay, the listener can then anticipate the rest without having to pick the nuances out of the wet signal. You want this, and usually 15ms to 75ms will get the job done.
Equalization - EQ the Reverb Bus
While the pre-delay will return intelligibility to starting phrases, applying an EQ to your reverb buses is what will return full clarity to your mix. This is of utmost importance that amateurs miss because they aren't even using sends. You can apply any and every effect to a bus just like any other track on your mixer.
Nothing is more important to a song than the instruments themselves. This means the reverb should never get in the way of anything.
It should sit in the background, filling spaces in the frequency spectrum that are left open by the instruments and being much quieter in the spaces that the instruments need to remain clear and focused.
You can pull this off however you want. A great start that will blow your mind is to use a high pass filter or apply a steep low-end roll-off in your parametric EQ.
Go ahead and chop out all of the frequencies in your reverb from 450 Hz and below, rolling up at about 500 Hz give or take. Immediately tons of clarity returns to your mix, especially in regards to the bass and kick drum.
Do the same on the high-end around 10 kHz and up. Suddenly your cymbals and other crystalline sounds are clear again, yet the track still has enough reverb!
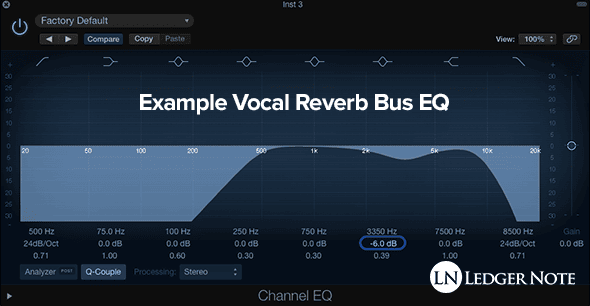
Finally, you can notch out space for each instrument in the buses. As a vague example, let's say that your vocals have the most presence and intelligibility from 1.5 kHz up to 5.5 kHz. Don't hesitate to apply a wide cut of anywhere from 3dB to 6dB in that range.
The same goes for other grouped instrument buses (although I'll typically only ever use one). Remember, the reverb is welcome to shine through anywhere else but where the instruments need to. There, it needs to be much quieter.
Compression - Straight and Side-Chained
Yes, you read that right! Compressing your reverb can help a ton if you're having clarity issues. The opposite works too... it all depends on each different mix.
Say that you have an independent reverb set up for your vocals. Instead of EQing the amplitude of specific frequencies down, you can set up a compressor for the reverb that's side-chained to the vocals. We wrote more about sidechain compression if you need a brush up.
What this will do is quieten the reverb to some degree as your vocals are playing and then return to the original volume when the vocals aren't playing. This achieves a similar result as EQing but leaves the frequency response intact.
Alternately, you can compress your vocals (and any other instrument) but send the pre-compressed signal to the reverb.
This way the reverb will pump naturally with the amplitude of the original take, creating a sense of dynamics, breathing, and realism in the mix that otherwise wouldn't exist if you based your reverb off of the compressed signal.
You can even combine this breathing version with a compressed version as a form of parallel reverb.
Lastly, you can compress your reverbs straight so that they ride a steady amplitude that doesn't distract or get in the way. If you do this, you'll want to use EQ on it as mentioned above.
In general I don't find myself needing to straight compress reverb because I apply reverb to the compressed source signals anyways and never have it loud enough that it's a problem.
Your mileage may vary. Definitely experiment and develop your own style. Watch out though, depending on your compression settings you'll start to affect the feel of the decay tail.
Automation - Manual Precision of Reverb Volumes
The last pro-tip is to apply an automation track to your reverb's volume. This may be the wet/dry knob, which does the same thing.
What you can do is manually draw in your automation parameters with your computer mouse to selectively drop or raise the volume of the reverb at specific parts of the mix that are giving you trouble.

This also provides a way to use it as ear candy to accentuate certain vocal phrases, for instance.
Other Fun Experiments - Reverse Reverb, Gating, Etc.
Now that you have a full handle on using reverb in a professional manner, you can start to break the rules and play around. Try bouncing the reverb send, reversing it, and allowing the decay tail to become the early reflections.
This can be a neat effect on drums (especially snare) and can be used for more spooky genres and songs. You can gate your reverbs as well so that they suddenly cut off, making a drastic impact on your listener as it is unnatural and will catch them off guard.
Reverbs, delays, echoes, and other time-based effects are the key elements to what I call "ear candy", creating special moments in songs that really stand out. Go as far as to place flangers on your reverb! Experiment!
And That's How to Use Reverb...
Reverb is a must in 95% of mixes, I would guess. You can't escape it, and your choices are to do it wrong or do it right. You might produce the world's most perfect mix ever and move on to reverb and destroy it. You might know how to mix vocals like a god and then butcher it with reverb.
Knowing which reverbs to use, how to design the virtual rooms, and then how to apply a pre-delay and EQ are the three aspects of reverb that separates the amateurs from the professionals.
You've either got a muddy mess or a clear and beautiful mix. You can't escape mixing with reverb, so make sure you know how to use reverb properly or you're doomed before you begin.
Jared H.
 Jared has surpassed his 20th year in the music industry. He acts as owner, editor, lead author, and web designer of LedgerNote, as well as co-author on all articles. He has released 4 independent albums and merchandise to global sales. He has also mixed, mastered, & recorded for countless independent artists. Learn more about Jared & The LN Team here.