Go ahead and freak out if you want to, but it's totally unnecessary. This easy guide will have you becoming a studio tech wizard in ten minutes flat.
No longer will you look at a piece of gear and experience your brain slowly shutting down under the sheer anxiety of wondering what you're going to break.
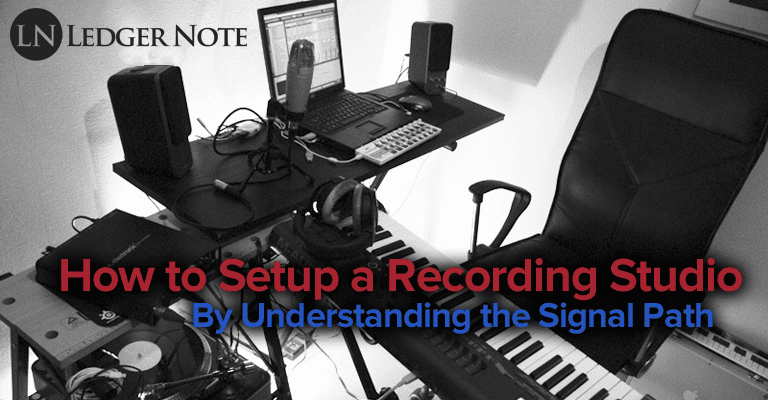
Learning how to setup a home recording studio at home is as simple as understanding the signal path of a sound as it leaves your mouth or instrument, flows down a cable, passes through various pieces of signal processing gear, and enters the computer.
The ordering and the cabling will become very obvious and logical once someone explains it to you. There's a rhyme and reason for everything. It'll all make clear and perfect sense as soon as you're done flying through this easy to understand tutorial.
We're going to take you through a sophisticated recording signal chain from microphone to computer, explain to you each type of cable, and the reasoning behind every step and the specific order. By grasping this one recording chain, you'll understand them all.
Mastery of the recording studio setup is simple. Using it properly is another story and what separates amateurs from professionals. We'll take you to the top level, don't worry, but first let's start with the basics. Let's learn how to set up a bedroom recording studio, the right way.
We all intuitively love and know how to produce some form of rhythmic and melodic music. It's a part of our basic psychology of pleasure. We all know to sing with our vocal cords, pick up a stringed instrument and strum or bow it, or pound away on some drums or a keyboard. We are all artists at heart from birth.
However, we are not all scientists, electricians, and engineers. It can be intimidating trying to figure out how to build a home recording studio... until you someone shows you. Then it all just clicks into place. That's about to happen for you.
By the end of this short guide, you'll know how to record any instrument through a microphone, plug in a keyboard and plink out some MIDI notes to program in the computer, and much more.
Yes, I remember my first time trying to figure out how to overdub fake announcer voiceovers on my homemade wrestling tapes. We had our own neighborhood federation on the trampoline!
Of course, once I figured that out, I naturally ventured into producing music, because it was that easy even for a 13 year old. You can nail this process in one go. All you need to understand is one concept: the signal path.
It's all about the signal path, which can be thought of in three ways:
- The direction of the signal through the recording chain
- The studio gear that changes the signal to suit your needs
- And the cables that connect the various pieces of recording equipment
That's it. It's all sequential and easy to deal with when the air of mystery is removed. Let's get to it!
Bonus: Along the way I'll make some suggestions for my favorite entry-level but professional quality studio gear. Just click the pictures to be taken over to Amazon for more details!
Home Recording Studio Wiring Diagram
The overarching concept that needs to guide all of your actions, whether you're setting up a small home recording studio or a big one, no matter what you're trying to accomplish with which instrument or piece of rack equipment... it always comes down to the same concept: being able to mentally trace the signal path.
Although the signal itself is a sound wave traveling through the medium of air, vibrating the diaphragm of a microphone and producing an electric impulse, and eventually being converted to digital binary code... Whoa, wait a second. That does sound complicated!
Just think of the signal as a little ping pong ball or marble rolling through your gear and cables. It doesn't even matter how you envision it. Just think of it as a physical thing that moves in one direction through all of your gear and cables and ultimately into your computer.
Now let's break this unidirectional flow down into pieces...
Home Recording Studio Signal Flow
Okay, so the signal leaves an instrument or a person's mouth and travels in a straight line through the recording chain. For the sake of simplicity, let's discuss the rest of this from the point of view of a vocalist sending one take into a microphone and down through the recording chain.
Yes, there can be more than one signal path at a time, such as recording an entire band at once with 16 microphones or direct injection points. Yes, the signal can move in loops in and out of a mixer or patchbay. Let's get all of those disclaimers out of the way. You don't need to worry about that yet.
We're keeping it simple and talking about one signal chain recording and processing one instrument or voice. Understand how this works and patchbays, ins and outs, busses, mono versus stereo, and the rest will explain themselves to you.
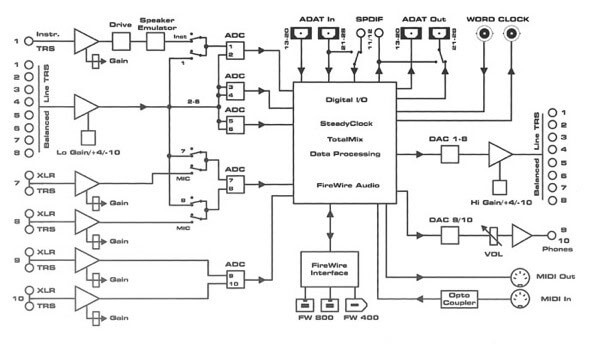
Take a look at this recording studio setup diagram just to get an overview first, then we'll break it down:

Of course, depending on the application, the signal path may be the same, more complex, or far simpler than what's pictured above. However, this is the quintessential signal path. Most home recording studio setups won't include an equalizer or compressor in the chain.
They'll typically use software versions. But you need to know how they work so you can manipulate the direction of the chain within the computer's software mixer too. Grasp this and you'll have the freedom of flexibility to record anything because you'll understand the logic behind it and be able to reason through any setup.
Following the above diagram, we'll start with...
Vocals & Instruments
Again, we are talking about any instrument that produces a sound. That could be the human voice singing, a beatboxer making noise, a stringed instrument like a guitar, a reed instrument like a flute, a woodwind, a brass instrument, etc. If it makes noise and you want to record it, it counts.

This is the beginning of your signal path in the sense that this is the signal creator. Whatever sound is coming out of your instrument is creating sound waves in the air.
The only way to accurately convert these instrument-based sound waves into an electrical impulse is through the use of a microphone.
That's the only, so logically, without question, the next piece of your recording chain is...
Microphone
If a sound isn't already in a cable like it might be with an electric bass or synthesizer keyboard, then you have to convert the sound waves into electricity by using a microphone.
The key component of a mic that performs this task is the diaphragm, which may be large or small depending on the type of microphone. The technical magic behind the conversion may be different such as a piezo contact or a tube, but the goal and end result is the same.
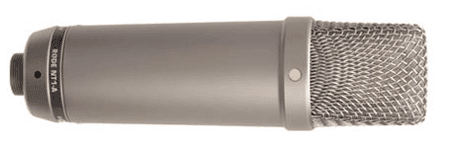
At this point, your signal is no longer an analogue sound wave. It's an electrical signal. The best recording microphones will create and pass this signal as cleanly as possible while the worst will introduce noise and transients, worsening your quality.
But either way, you now have an electrical signal you need to pass along. This means that for the signal to leave the microphone and move into the next component, you will have to use a cable. Any mic worth it's weight is going to be using an XLR cable.
We'll quickly discuss the types of cables later, just take not for now. All professional microphones use XLR cables.
I've seen cruddy hobbyist mic's that have cables built into them that use TRS jacks. I hope to all that is good and holy that you aren't using a USB mic. Burn it in your brain: XLR.
Microphone's record at mic-level, which is very quiet in the grand scheme of things. You have to boost that to line-level, and do it cleanly. You can't just turn up the gain or volume knob.
So that's your current dilemma. You know you're coming out of an XLR cable and you know you have to have a piece of gear that boosts the mic-level without introducing a ton of noise. The piece of studio gear that does that is the...
Preamplifier
Electric guitars and the like come in at line-level and don't need preamps. But every microphone has to run through a preamplifier to boost the signal up to line-level. I remember when I first started at 13 years of age, I didn't know about preamps and I'd just crank up the volume as loud as I could and run a noise filter plugin.
The noise was so loud that when it was removed good, it took out huge chunks of the vocals waveform as well.
You have to boost cleanly with a preamp if you're recording with a mic. It's not optional. A mediocre preamp won't do much for you while the best preamps will show you what your mic is truly capable of!
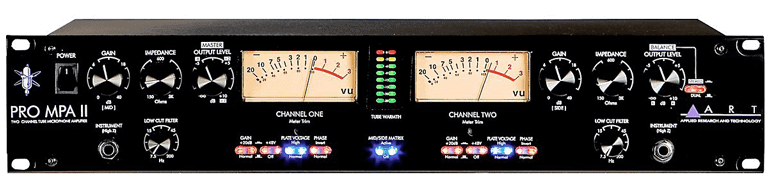
So obviously preamplifiers are built to accept XLR cables since that's what all microphones are outputting with. Preamps aren't quite as standardized. The studio standard is to output with a TS cable, since you're boosting a mono signal.
If you're running two microphones in stereo, you'll likely use two TS cables in tandem. Some might give you the option to output the left and right channel together in a TRS cable. Some might even give you an XLR option.
But 90% of the time you'll be outputting your single-chain, mono signal from your preamp using a TS cable (again, we'll clear up confusion about cables later, don't worry!). Because we're teaching the old school method so that you can visualize the signal path, we're going to stay in the hardware realm and do this out of the box.
Pretend we're recording to tape in not a digital file, so it needs to sound perfect before it hits the tape reel or we're wasting gobs of money. So what's the next step in making our signal sound clean and ready for the big time release?
The two main dynamic effects you will use to make your audio take presentable is equalization and compression. You don't want to compress before you EQ or you might trigger the compressor with a frequency that you'll end up removing later. In that scenario, your compressor will be reacting to amplitudes in frequencies you never intended it to. So EQ comes first!
Logic has dictated that our mono signal is going to leave the preamplifier through a TS cable and into an equalizer.
Equalizer
The goal here is to clean up your sound so that only the frequencies you want to exist do and the others are playing at a volume that is pleasing to the ear and sits in the mix relative to the other instruments being recorded.
Because all other dynamic effects and time-based effects like reverb and delays are either triggered or reproduce exactly what sound you feed them, you want to equalize them before hand.
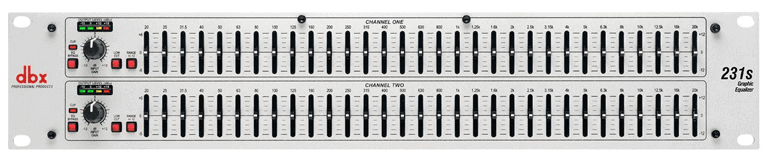
There's not much to say here. You're coming into the best EQ unit you have with a TS cable and leaving it with a TS cable.
While it's not always true, due to advanced techniques like parallel compression, typically you're going to want to tame your volume and make it more consistent across the frequency spectrum before you start applying time-based and spatial effects.
Otherwise, you'll have them creating an even worse mess for your mix. So logic is dictating that the next step of the recording studio signal chain is...
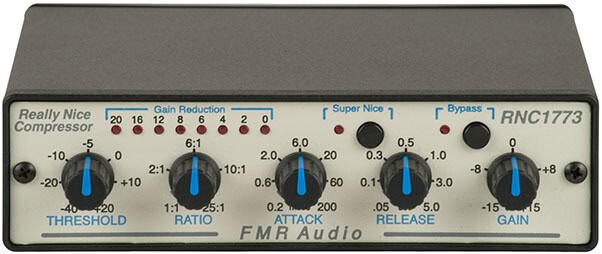
Compressor
Your signal will vary in amplitude for a lot of reasons. Your vocalist may waver closer and further away from the mic, the acoustic guitar player might start strumming harder later in the take, you may not be using acoustic treatment so you're getting crazy peaks and dips depending on where the mic is set up, etc.
You need to smooth all of this out and now is the time before you begin to apply reverbs, delays, and other time and amplitude-based effects. This is the job of the compressor.
Again, you're likely still using TS cables for your connectors based on the standard of the industry. Even if you're given the choice of using XLR this far in the path, just go with TS cables. The reasoning is that you'll eventually have a boatload of compressors, EQs, and preamps.
While some here and there may give you the option of XLR cables, what you can be assured of is they will all accommodate TS cables, as will the patchbays that you'll be buying and using eventually.
At this point, you could send your signal through an outboard reverb or any other set of effects. With modern day recording capabilities and software plugins, I'd recommend keeping these effects in-the-box, meaning you apply them after moving into the computer.
Doing so will open up an entire new world of options to you (and the ability to undo mistakes you didn't catch at first here where they can be most devastating to a mix).
You're almost there! Your signal has been boosted, balanced, and smoothed. The logical next step is getting it into the computer, which will be performed by...
Interface / Converters
Nothing moves from the analog realm into the digital realm without first going through A/D converters. This is typically the job of a sound card, but studio professionals need the highest quality converters.
You can purchase a standalone converter or trust those that have been included in your interface. A studio interface essentially functions like a glorified sound card. It may come in the form of a mixer or a racked piece of gear. I prefer the racked variety and use the digital mixer in my DAW.

Following the logic of our recording chain, you'll be entering the interface using TS cables. However, even a cheap audio interface will allow you to direct-inject a line-level instrument and also will feature at least one pre-amp itself. You should understand by now what steps are being skipped and which you'd want to add back into the chain if you don't want to EQ or compress digitally.
The converters are taking your analog signal, the electrical impulse, and converting it into a digital signal that your computer can understand and manipulate. That means you'll be leaving the interface and entering the computer with a typical digital cable, such as Firewire, USB, or even Optical TOS-link cables. It will entirely depend upon your converters or interface which you use. Make sure when you purchase that you're aware of what your computer can accept as well.
You're at the finish line, my friend. Your signal has finally arrived in the...
Computer
When I talk about the computer here (knowing how to set up a recording studio is 50% about the computer), I'm using it as a catch-all term for your hard drive and software. Some folks will just store their files on the internal hard drive of their desktop or laptop computer.
Some buy external hard drives that connect with USB to store and read the files so they don't run out of room or for higher performance. I prefer to keep a RAID set-up racked in with the rest of my studio gear.
The software you're using is what's called a DAW or digital audio workstation. This includes the ever-popular Pro Tools, Logic Pro, and the other bucket-full of competitors that equally get the job done.
The best DAW's will include default plugins for equalization, compression, and the time-based effects like reverb and delays as well. Or you can install more that you purchase on the side.
This is where you're placing all of the final touches on your recordings. Maybe you're punching in and fixing spots. Maybe you're going in and adding MIDI pads or orchestral sounds to thicken out your songs and mixes. You're definitely mixing and mastering here.
There's one more step to the chain that's non-intuitive but important to point out. The signal has to come back out of the computer and into your ears somehow, which means that it has to become analog again before it runs up your headphones or out of your studio monitors.
What this means is that the signal is running back through your converters, but this time in reverse. It's going through the D/A converters, from digital to analog. If you're going to mix with headphones versus monitors then you'll just be outputting with a stereo TRS cable, usually through a 1/4" jack instead of the tiny 1/16" jack you might plug into your portable MP3 player. But if you're using the real deal...
Monitors
This is the final step of getting that processed signal back into your ears. Again, you can use headphones and probably should if you don't own a nice, flat-frequency set of monitors and are seated in a room without acoustic treatment.
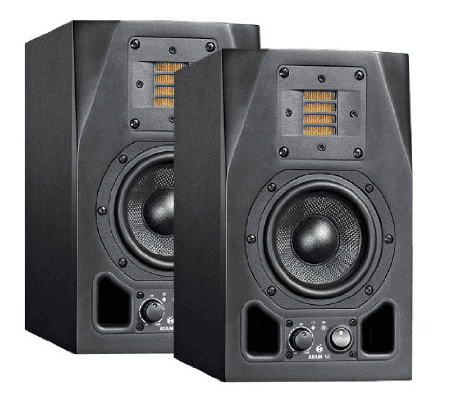
If you're using professional studio monitors or high-grade consumer monitors, you'll nine-times-out-of-ten be outputting from your interface using XLR cables again. Some monitors can accept TS and RCA cables, but more often than not it's XLR. Just check what type of input jacks your monitors have and you'll know!
Before we jump into the discussion about cables, let me share another perspective on building a home recording studio. Reading another set of gear suggestions will help you get a better frame of reference so you start to feel more confident in your choices and the recommendations of others.
Types of Home Recording Studio Cables
Here's the main thing about studio cables... once you've wired in your gear it generally never gets re-wired. Sure, at first you'll want to reorganize your rack and play around.
But at the end when the novelty is over, you'll have all of your cables running and everything patched into the patchbay and you'll only be changing the cables on the front of your patchbay for the most part, minus breaking down mics and mic stands.
There are two ways you need to think about cables in your head and it'll all click into place:
- Analog versus Digital
- Balanced versus Unbalanced
That's it. Digital cables never deal with the balanced and unbalanced issue, only analog. So let's start there...
Analog versus Digital
This should explain itself by now but for the sake of completion.. Analog cables are the ones that carry your electric signal before the analog-to-digital converter. Digital cables carry your signal in the form of binary code (bits of 0's and 1's that your computer can understand).
Knowing this fact, you can now compartmentalize the types of cables mentally.
Types of Analog Cables
While there are more types, let's not bog ourselves down with it. You can read our more complete discussion about studio cables here. The three main types of analog cables you'll encounter and ever use in the studio are:
- XLR (X-series Latching Rubber)
- TRS (Tip Ring Sleeve)
- TS (Tip Sleeve)
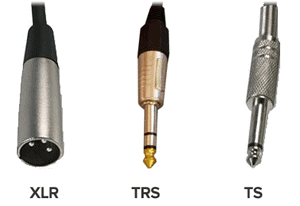
XLR cables are three pronged on the male side and sometimes called Cannon jacks, named for the company that invented them. Most you will use will feature three pins, although they work their way up sequentially all the way to seven pin.
They are almost always used for microphones to preamplifiers. The higher pin versions can carry low-voltage power for tube microphones that might need phantom power, provided by the preamp. If your mic needs this, it will likely come with the proper cable when you purchase it.
TRS cables are Tip-Ring-Sleeve cables that are capable of carrying stereo signals. Instead of three pins like XLR, TRS cables have three surfaces for which they are named after. The tip carries the positive signal, the ring carries the negative signal, and the ground is carried by the sleeve. The end result is a balanced signal, which I'll explain shortly.
The analog cable that carries an unbalanced signal is the TS cable, or Tip-Sleeve. It doesn't carry a negative inverted version of the signal and therefore has no way to cancel out noise, which is the difference between balanced and unbalanced cables.
TRS and TS cables can be thought of as stereo cables and mono cables, respectively.
Types of Digital Cables
These bad boys are many. Companies attempt to create proprietary cables so every other company and consumer has to use them and thus they collect a ton of money on the sales. Some fade into darkness from whence they came, while others pop out as winners in the market.
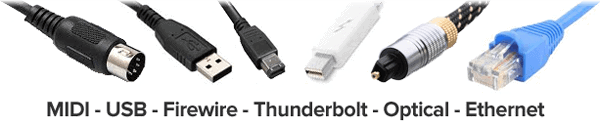
Your main types of interface cables these days are:
- USB
- Firewire
- Thunderbolt
- Optical
- Ethernet (Cat5e)
It used to be that Firewire was faster than USB until USB 2.0 came out, then Firewire 2 spanked it, then USB 3.0 came out. All of them were good enough from the start, but the clear winner is Thunderbolt right now.
They can carry countless channels of audio and also video all at the same time. You won't lose with any of them. Don't make your purchasing decision based on the type of cable that's being used. They can all be converted to one another.
Optical cables are another option out there that aren't as prevalent these days. There are two types. ADAT cables can carry 8 channels at 48 kHz sample rate or 4 channels at 96 kHz. Toslink cables (also known as S/PDIF cables) can carry two channels of audio.
There's a 99% chance you won't have to worry about these, and if you do, just plug them in and rock hard! The same goes for ethernet cables, also called Cat5e's, which can carry up to 40 channels of audio per cable.
You'll also want to know about:
- MIDI
MIDI stands for Musical Instrument Digital Interface. They were invented in 1983 and were responsible for the crazy amounts of computerized sounds coming out since the late 80's once it caught on. Virtually all pop music you've heard since then have been created using MIDI cables.
They don't carry audio signals themselves but only characteristics of what the audio should sound like. For instance, let's say you're using a keyboard or MIDI controller that makes no noise by itself. You hook it up to the computer and record the MIDI data which will include the velocity of how hard you hit the keys, how long you held the keys, when you hit the keys, etc.
Then you can view this data on the piano roll in your DAW and try out different instruments and edit the data manually. It's very cool, even though I'm talking smack about it.
It's worth mentioning RCA cables and HDMI cables. You'll encounter them but won't find any reason to use them in the recording chain. But they might show up in terms of connecting computer monitors (HDMI) or a 1983 Nintendo Entertainment System (RCA... I gots jokes).
Now that we're done talking about digital cables, lets get back to the most confusing issue for people concerning analog cables.
Balanced Versus Unbalanced
This is the bane of all studio newbies. It confuses them, makes them become anal-retentive, compulsive, and spend more money than they should. More myths surround this issue than should, so let's just clear the air now.
An unbalanced signal being carried through a TS cable will pick up noise, especially the dreaded 60 Hz hum. This is because there's only one version of the signal being carried (plus the ground) and can be slightly altered by electrical interference.
Here's the reality. This addition of noise only becomes a problem when you're running some crazy length of cabling that you shouldn't be doing, such as a 25 foot guitar cable.
There are only two times you'll run into issue. This is with the TS cables used between your studio gear components, which should be one to two feet in length anyways and not a problem. The only legit time this can be an issue is with instrument cables (which are TS cables). The solution is to keep the cable short (six to ten feet) and run immediately into a DI box.
These direct injection boxes exist for one purpose and that is to convert unbalanced signals into balanced signals. If you're playing live and need a 25 foot cable to run around stage and act the fool, don't worry about it. It's only enough noise for recording engineers and mixers to freak out about, and barely even a legit issue then.
The way that balanced cables keep from picking up noise is that in the TRS cables, the ring carries an inverted version of the signal. So what happens is the normal and the inverted (or negative) signal both pick up the same noise from electrical interference.
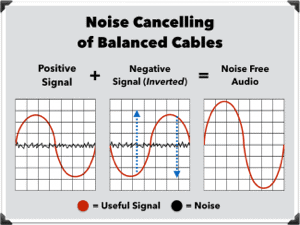
But at the end of the cable run, the inverted signal is flipped back to normal and recombined. In this way, the noise literally cancels itself out without destructively interfering with your main signal.
That's How to Setup a Home Recording Studio
That's it! You've graduated with your master's degree in setting up a recording studio! You now know all you need to know to confront any unique situation based on the common and basic linear signal path described above.
If a keyboardist wants to record MIDI, you'll skip everything and go straight to the interface. If a bassist wants to DI and then EQ and compress in-the-box, you'll skip the preamp everything else. No microphone? Skip the preamp.
It all makes logical sense based on the source of the signal and what you want to do with it. Then just refer to the cabling portion of this article to determine which type of cable to use (or just look at the jack, you silly goose) and connect it all together.
It's a piece of cake now that you've seen it laid out. Know that you know how to set up a home recording studio, go forth and record, my precious.
Jared H.
 Jared has surpassed his 20th year in the music industry. He acts as owner, editor, lead author, and web designer of LedgerNote, as well as co-author on all articles. He has released 4 independent albums and merchandise to global sales. He has also mixed, mastered, & recorded for countless independent artists. Learn more about Jared & The LN Team here.