"No, no! Not the Cat-5, bring me the XLR. No, that's the TRS to TS! No, not the optical... Nevermind, I'll get it myself."
It's easy to get frustrated and have zero tolerance for audio cable confusion, but that was all of us at one time or another. You have to start at the beginning, but that doesn't mean you can't take the accelerated course here at LedgerNote so you can get on with your life.
There's nothing more annoying than being in the artistic, left-brained flow and having to stop what you're doing and get into science, right-brained mode and lose your inspiration and motivation.
That's the main reason to learn about what all these various cables are about. In the end it's all about pumping out the music and nothing should stand in the way of that ultimate goal.
So here's what we're going to do. We'll separate the cables into the two main types so you can categorize them in your mind that way, and then we'll talk about the sub-types and what each one is designed for.
If you read this one good time and pay attention, you'll never have any confusion about which end of which cable goes where!
The problem with audio cables is that those of us who do have to learn about them learn all there is to know, set up our studios, and never really need to touch the cables after that (for the most part, thanks to patchbays).
Otherwise, a guitar or keyboard player will have their one cable they deal with, or two tops. There's not a lot to talk about once you know.
But what about the rest of us who don't know?!?
No fear, we've got you covered. The first method of assimilating these concepts into your organizational framework is to separate the two main types...
Analog Cables vs Digital Cables
These are your two main types of recording cables. Of course this begs the question of "Well, what's the difference between a digital cable and an analog one?"
The answer is related to the type of audio signal they carry. One carries an analog signal and the other a digital signal. Those two are converted from one type to the other at your A/D and D/A converters.
This stands for Analog-to-Digital and Digital-to-Analog (this happens at your recording interface, computer sound card, or standalone converters if you have them).
Let's look at each separately and quickly to drive the point home one good time.
Analog Signals
Traditionally, music and sound is created in one way... something vibrates at a certain frequency which creates waveforms of pressure pulsing through the air. Our ears have little hairs and ear drums that pick up these waves and our brain converts that into music.
This is how vocal cords, trumpets, guitar strings, piano strings, drums, and everything else works. It's how your speakers play back sound as well. The cones pulsate to replicate the waves during playback.
What we learned in our studies of electricity is that you can pass a magnet over a coil of wire to generate an electrical current. This is how microphones work, guitar pickups, etc.
The diaphragm of the mic vibrates differently based on the air waves coming at it and creates an electrical signal. The guitar string wavers through the magnetic field the pickup is emitting and does the same.
So that's what analog cables are for. They carry the analog signal, which is entirely made up of electricity.
This electrical signal can be passed through analog cables to the next piece of analog gear and ultimately to monitors or speakers, the best of which can vibrate their cones to faithfully reproduce the sound hidden in that signal by pushing air at your ears. Or the signal can be passed to a converter to turn it into a digital signal.
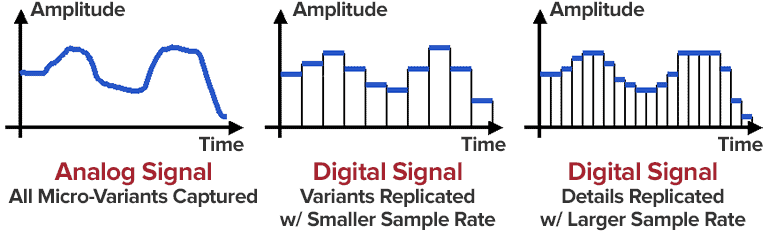
Digital Signals
Nowadays a lot of our music is generated by computer and almost all of it is recorded by computer, whether that's in a digital audio workstation or an electronic keyboard or digital synthesizer for instance.
Digital signals aren't based on voltage and current like electrical ones are. These consist entirely of binary code, which is a string of 0's and 1's known as machine language.
This is what digital cables are for. They carry a digital signal, which is entirely made up of binary code understood by computers.
A digital signal can be manipulated in a thousand ways and you can use the undo button, etc. Ultimately you pass it through converters again to your speakers so you can hear what you're mixing or what you've just recorded.
Now, because these two signal types are fundamentally based on two different phenomena the cables are constructed differently. We'll cover all of that as we continue through the discussion.
All About Analog Recording Studio Cables
This is the main source of confusion when it comes to cabling your home or professional studio. Here's why...
The electrical analog signal can be carried in two ways:
- Unbalanced
- Balanced
There are three levels of amplitude transmitted through these cables:
- Mic Level
- Instrument Level
- Line Level
And there are tons of connector types as well of both the male and female variety. The three main types used in the recording industry are:
- XLR
- TRS
- TS
Why can't we just get standardized here? I'll say that there are a lot more types of connectors than the ones we'll mention, but the chances of you encountering them in your studio or needing them for your recording equipment is almost zero.
You won't use speaker cable, RCA jacks, etc. We're going to discuss studio cables only, not consumer audio entertainment equipment.
Let's talk about each of these main points. You'll see they aren't nearly as complicated or intimidating as they look on the surface.
Balanced vs Unbalanced
These are two terms people throw around and half of them don't even know what they're talking about, which further confuses newcomers to the industry. There's a lot of advice about never going unbalanced, how to do this and that, blah blah. Here's the real deal:
Balanced Signals: These flow through cables that have a positive signal and an inverted negative version of the signal. The two balance each other out and end up cancelling noise.
Unbalanced Signals: These flow through cables that only carry the positive version of the signal. Unbalanced cables can allow unwanted noise to be introduced to your signal.
That last sentence is the cause for so much unneeded weeping and gnashing of teeth. It's not a big deal if you aren't running ridiculously long cables with no shielding and are doing proper gain staging.
So here's how it works. Unbalanced cables only carry the normal positive signal (the actual signal you're passing through it). Most unbalanced cables will feature shielding that blocks out most of this.
Obviously the longer the cable, the more surface area is exposed to other ambient electrical signals and the more noise it might pick up, especially if you're running it next to power boxes and wall warts.
That's the dreaded "60 Hertz Hum" people talk about (which you'll EQ out of 90% of your source material anyways).
There's a solution to using unbalanced signals. This is important because sometimes you won't have a choice. Some of the most prestigious gear will force you to use an unbalanced cable (which goes to show you that it's truly not that big of a deal).
- Keep your unbalanced cables as short as possible (One to three feet unless it's an instrument cable).
- Use ones with proper shielding. Don't buy the cheapest crap you can find.
- Don't run it right next to power sources and other electrical devices. Keep a foot or so separation at least.
- Use proper gain staging, especially at your source, so your signal is far louder than any noise.
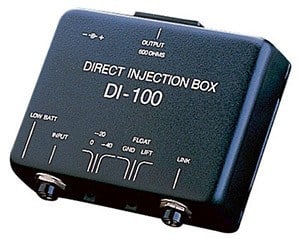
Any noise you pick up should be in the range of the noise floor of your signal anyways and unnoticeable unless you're running a 25 foot long guitar cable on stage. In which case you can run into a D.I. (direct injection) box and convert to balanced for the rest of the distance..
Balanced cables handle this problem in a very genius-level way. These manufacturers go ahead and wrap their cables in shielding and everything else you'd expect, but they also allow for a complete phase-inverted version of the signal to be passed along with the normal version.
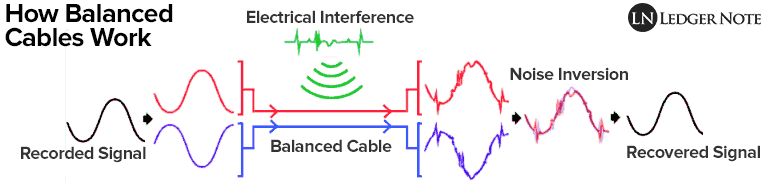
What happens is that noise is picked up all the same along the positive signal and the negative signal. The clever part is that when the negative version of the signal is inverted again to match the positive, the noise from any electrical interference is inverted itself.
When the inverted signal is un-inverted and recombined with the positive signal, the noise becomes inverted and cancels itself out! This is called phase cancellation and is good in cables but bad when accidentally created through stereo recording.
Mic / Instrument / Line - Different Levels
Let's get this disclaimer out of the way. There are always exceptions to the common place. So don't be surprised if you see the random variation here or there.
But in general you can bet your bottom dollar on what I'm saying in terms of signal levels being associated with specific cable connector types.
Recommendation: If you're looking to purchase analog cables for any purpose, we recommend Mogami Cables, which represent the balance between superb build and affordable prices. There's a lot of myth and flat out marketing lies concerning cables that can inflate prices to absurd levels. Don't be fooled. No cable performs magic, but some do fall apart on you. Mogami won't.
These bullet points show the signal level typically associated with type of connector used along with whether it's balanced or unbalanced:
- Mic-Level - XLR - Balanced
- Instrument-Level - TS - Unbalanced
- Line-Level - TRS - Balanced
You have three different levels of signal which directly related to the amplitude of the electrical signal (which is the same as volume).
Mic-level signals come out of microphones and are very quiet. They require preamplifiers to boost their levels up to line-level, the best of which keep the noise floor quiet and don't alter the signal. Most of the noise is already canceled thanks to the mic's balanced output. Ninety-nine percent of the time you will use an XLR cable.
Instrument-level signals come out of electric guitars, basses, violins, etc. These signals are stronger and louder than mic-level signals but still not line-level. They need amplifiers or direct injection boxes to raise them to line-level. These are most often unbalanced mono connections using a TS cable due to the added expense of creating a balanced output on the instrument.
Line-level signals are those using up most of allowed amplitude of a cable, which keeps the signal-to-noise ratio high. When converted to digital signals, these also use up more of the allowed bits.
This basically means you're packing more quality and detail into the signal. Most studio gear including mixers and interfaces expect line-level signals. These use TRS cables which are balanced and can accommodate stereo signals.
Here's what each of these three connector types look like:
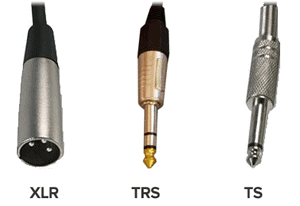
There are male and female connectors of each type. Here's what they stand for...
- XLR - Cannon's X-Series Latching Rubber
- TRS - Tip / Ring / Sleeve
- TS - Tip / Sleeve
Cannon is the company that invented the XLR cable. Some people just call them "Cannon jacks." They had XLP (plastic instead of rubber latches) but they didn't catch on like XLR's did. These have 3 pins for your positive, negative, and ground.
If you look at the image above, you'll see that TRS's do indeed have a tip and then a ring separated by black plastic, and then a sleeve separated by black plastic. The tip carries the positive signal, the ring carries the negative, and the sleeve is the ground.
These are mainly used for stereo and balanced connections. TS cables only feature a tip and a sleeve and can only carry an unbalanced mono signal.
That's all you need to know about analog. On to...
All About Digital Recording Studio Cables
The fortunate thing at this point is you're used to digital cables. You've already used most of them and they are generally plug-and-play, meaning you plug them in and they just work. If there's an issue then it's typically a software issue.
Remember, these all pass a binary code signal through them. This is information instead of electricity and isn't subject to degradation issues.
So when you see companies trying to sell you a $1,000 HDMI cable instead of the $25 one, you know everything they are saying is a lie. They only need one sale to one gullible person to make up for all the lost sales.
Anyways, take a look at this picture and then we'll talk about each type:
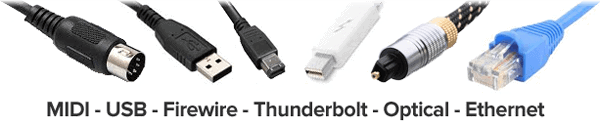
Let's work our way from the left to right.
MIDI
MIDI cables are stand for and are a Musical Instrument Digital Interface. They don't carry any sound information, only information about how the music should sound. These are used with digital keyboards mainly.
What happens is the keyboard doesn't play any sounds, only transmits data about how the keys are played. Then you can feed that data to a sound bank or into the computer and choose a sound there. This is how drum machines, MIDI keyboards, and MIDI guitars work, for instance.
The information it sends is related to when the note is played and the velocity, the pitch, and the length of the note. Only after this information is received is a sound attached to this meta-data.
USB / Firewire / Thunderbolt
It's easier to mention these together and have them thought of as "interface cables." They are high bandwidth cables capable of transmitting data about a lot of channels all at once.
If you encounter one of these in your studio, it's going to be from your interface or digital mixer to your computer. The interface or mixer will already have converted the analog signals to digital so you can shoot all of the channels over to your computer in one shot.
USB went from version 1.0 to 2.0 and now 3.1, each time improving their bandwidth and transfer speeds. Firewire (the name Apple gave the IEEE 1394 cable) was competing with USB, stair-stepping up their quality each time USB did from the 400 model to 800 and more.
But now, Apple has introduced the Thunderbolt cable which puts both to shame but isn't universally used outside of Apple computer products.
Any interface you use will likely feature the newest version of USB or Firewire. You won't need to worry about which has the better transfer rates. They both worked fine in versions 1.0 and work even better now. However I'm sure some of you are curious so I'll list it the current progress here:
- USB 3.1 - 1.25 GB/s bandwidth
- Firewire 800 - 800 MB/s bandwidth
- Thunderbolt 3 - 5 GB/s bandwidth
These all get the job done perfectly. Most companies have USB or Firewire versions too for those who only have certain plugs on their computers.
Optical
These are interesting because they create and transmit binary using pulses of light. That's why you'll hear people refer to them as lightpipe cables. Like the interface cables above, optical cables also can carry several channels of audio but use older technology that's not used for interfaces.
For instance, Optical cables can be used for TOSlink (Toshiba Link), S/PDIF (Sony/Philips Digital Interface Format), and ADAT (Alesis Digital Audio Tape). They all use the same cables and connectors.
ADAT is for digital multi-track recorders, the progression from the old physical multi-track tape recorders. It'll spit over 8 tracks at once at 48kHz or 4 tracks at 96kHz sample rate.
There are preamp strips that will still use this tech to push 4 or 8 channels over to the interface. Some are used to bounce tracks over to a summing box from an interface.
There are lots of various uses but it's not as common these days on gear you might use at home versus in a professional studio. It's largely for studios handling 8 and on up to 32 or 64 channels at a time.
Ethernet
Ethernet cables are everywhere. They are the classic Cat5 (category 5) cables that we still use to connect our routers to modems, computers to routers, landline telephones, etc. There are some very high-end interfaces that allow each other to be daisy chained to each other and then all of the channels transmitted at once through an ethernet cable.
This is because ethernet can carry power, travel a long ways with no noticeable latency, and can carry up to 40 channels of audio in one cable. A lot of studios will run these cables all through the floors and walls during construction to route audio to headphone systems in the booth or mixing room or from a gear closet to the computer.
BNC
One last one that wasn't pictured but should be mentioned quickly is the BNC cable. It looks just like a coaxial cable, the kind used to connect your TV to your cable box. These don't send audio but they do send a digital timing signal between pieces of digital studio gear.
All digital studio gear has to count time, because music occurs within time. What BNC cables are for is to connect all of this gear to one "master clock" that syncs them all to the same timer.
If your clocks are out of sync your samples won't line up perfectly and you end up with weird clicks and pops in your digital signal. This solves it but its highly likely most of us will never use one.
Recording Studio Cables - Confusion Cleared!
As you can see, once you have the full picture laid out in front of you it's not remotely as big of a deal as it seems. Just remember, you have analog and digital cables.
Within analog you really only need to know about XLR and TRS/TS. XLR is for mics and is balanced. TRS is balanced and stereo-capable while TS is unbalanced and mono.
You can transform an unbalanced signal to balanced through a D.I. box. For digital cables, the large majority of people will only ever use interface cables of either USB or Firewire and maybe a MIDI cable but probably not. That's really all you need to know about recording studio cables!
Jared H.
 Jared has surpassed his 20th year in the music industry. He acts as owner, editor, lead author, and web designer of LedgerNote, as well as co-author on all articles. He has released 4 independent albums and merchandise to global sales. He has also mixed, mastered, & recorded for countless independent artists. Learn more about Jared & The LN Team here.