

With skillful mixing, a horribly recorded song can be made reasonably listenable. A terribly written tune can be polished into a less embarrassing effort. A run-of-the-mill song can be coaxed into greatness by the ears of an experienced mixer.
And most importantly, a fantastic song, when refined by the masterful precision of elite mixer, can become a global sensation responsible for launching careers, altering artist's lives and professional trajectories, and touching the hearts of countless listeners.
We all hear polished pieces of audio daily on the radio and television and know how music should sound. But recognizing and creating are two different ballgames. The process of massaging a song to achieve a perfect soundscape that's universally pleasing is certainly no simple task.
The mix engineer must draw from both a technical skill set to operate the machinery and software and must listen to the muse to derive a vision and sense of direction for the song.
While mixing is in no way an effortless and uncomplicated task, there are fundamental guidelines you can follow that will place you on the path of conventional expectation and get you most of the way home. This article will explain the six basic elements of an aural composition and provide mixing tips related to each.
If you tackle these essentials in the specifically presented order, your individual tracks will accommodate one another while taking on the glue that binds them into a unified, pleasing experience.
Apply the additional tips and avoid the mistakes mentioned below and your mixes and opportunities will never be lacking.
Don't worry, mixing is a game of diminishing returns. You can get most of the way to a superb mix with far less effort than it takes to get to perfection (which is just a matter of taste and preference at that point).
Core Audio Mixing Techniques
The fundamental audio mixing techniques to be dealt with in order are:
- Volume
- Panning
- Frequency
- Imaging
- Dynamics
- Effects
Let’s deal with each one in isolation to understand how they combine and contribute to an overall mix.
Volume
It's tempting to jump right to the fun stuff, but before any decent clarity in vision and hearing can be had, you need to bring the amplitudes of each track into balance. This means twisting the volume knob until every instrument is sitting at a relatively close level of loudness that you would expect in the final product.
Of course you can't and won't get it perfect due to the variances in dynamics. Your goal is to simply create a canvas that's ready to be panned, EQ'd, and compressed.
Beginners will cry from the mountain tops that they should pan first. They say its too hard to hear each track in the mix when they are all lined up the center.
Some of the most respected mixes ever came out of a time when mono mixing was the only option. The Beach Boys, The Beatles, Pink Floyd, and many more released masterpieces all mono and up the center with crystal clear clarity. So quit your whining and get to it!
Pro Audio Mixing Tips: Your mixing board, whether digital or physical, will feature a toggle button to collapse your mix from stereo to mono. Checking your mix at every step of the way in one channel is a great way to ensure you're producing a balanced and clear mix.
If problems stand out in mono, they are present in stereo whether you notice them or not. Don't ignore them because radio stations will still broadcast in mono and listeners positioned off-axis will pick out what have become glaring issues.
Panning
Now, Mr. Ancy Pants, you're ready to begin panning. When fleshing out your stereo field, there are a few expectations that you should follow for very good reasons. Of course, rules are meant to be broken, but this really isn't the place to surprise your listeners.
Most schools of thought, for instance, suggest keeping your kick drum, bass, and vocals centered. These encompass the dominant frequency ranges and will provide an anchored balance for the listener and allow both speakers to share the burden of thumping them out.
Remember, mixing is a science and an art. Stay too far from the trends of the day and most listeners will express dislike, but most certainly express yourself how you will. Listen how other mix engineers pan instruments around as you enjoy your favorite albums.
Some pan the drum kit as if they are sitting directly behind it or in front of it. Others push everything but the snare and kick completely to the left and right channels. Whether you spread your tracks throughout the stereo field or stick to clusters, remember that you're designing for clarity, not preference or ego.
Pro-Tip: Since you started in mono (right!?), you need to know about the Pan Rule and adjust accordingly. As you pan tracks left or right, they gradually decrease in amplitude by up to 3db at the extremes. You will want to boost your volumes to make up for this as you go.
Frequency
At this point, your sounds are at comparatively decent volumes and are spread around the sound stage, but things still aren't clear. That's because sounds panned close to each other may still be butting heads in certain frequency ranges. You solve this with equalization (or EQ).
Play each track solo'd and clean up any obvious problems such as hum, noise, and sibilance. Highlight interesting and unique aspects of each track while keeping in mind that the main goal is to carve away, like a sculptor, so that only the best remains while other sounds can breathe around it, co-existing in clarity.
Don’t feel like your stuck dealing with only a graphic or parametric EQ. Use a low or high-pass filter to silence entire portions of the frequency response range in one fell swoop.
As you do this, treat each track separately, sweeping the EQ's up and down to spot and fix problems in their fundamental and harmonic ranges. Getting them all sounding great in solo is the first step having them jive in unison.
Pro-Tip: Don't focus on what to add when EQing. Always cut instead of boosting, focusing on what to remove. When boosting, it’s common to push tracks too hot or uncover unwanted sonic footprints. Cut and compensate with volume if needed.
Imaging
Each instrument now sounds great alone and occupies its own space horizontally. Now you're ready to deal with the vertical aspect by considering each instruments frequency range in relation to all of the others. Start by bringing clarity to tracks panned near each other.
Once each cluster of panned tracks sound good together, you can compare each cluster by using the mono trick mentioned above. This will ensure that clarity occurs in sub-optimal listening positions and environments.
In the future, you'll begin anticipating this stage as you make panning choices (and hopefully the songwriter did as well when orchestrating).
At the point, you shouldn't be using tight Q's any more. You've already refined the specifics of each track. Now you want to use broad Q's to deal with wider bands of the spectrum. With wider Q's and smaller cuts, you won't disrupt your previous work.
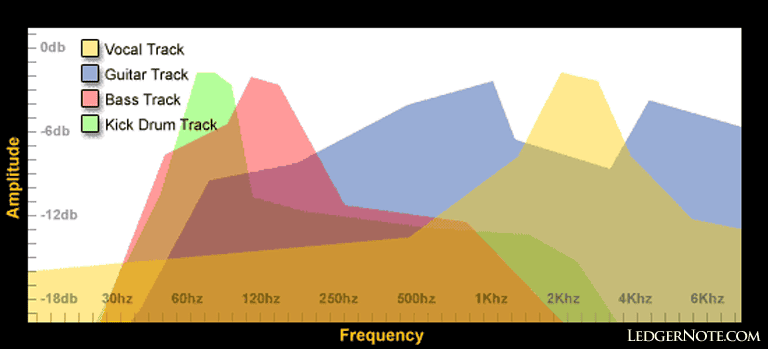
Don't fall into the trap of mixing visually. Sounds can share portions of the frequency spectrum and still sound crystal clear. Listen, don't look (except at the image above to help drive home the point of dominance and sharing of frequency ranges, related to the tip below).
Pro-Tip: Voices and instruments all have a dominant frequency range that represents the noticeable signature of the sound. You can sweep a medium width Q with a temporary slight boost to identify this portion of each track. Then, you can perform a permanent minor cut to the same frequencies on instruments competing for the same aural space.
Dynamics
I bet your mix is starting to sound like it knows what it's doing, but something is missing. This "something" is compression. As times have continued, listeners have begun to accept and expect higher ratios of compression, largely influenced by radio stations competing for volume.
It is what it is. High compression with low thresholds is very appropriate for pop music but would butcher a classical performance. Choose wisely.
The goal of compression is to dynamically tame the amplitude of each track's waveform. This produces a consistency in the volume, removing fast attacking spikes or dips.
Sometimes a singer's body will waver in front of the mic stand, producing inconsistent volume in an otherwise amazing performance. Maybe the bassist plucked that one string a little too hard in the second verse. Your job is to fix it.
For very obvious problems, give them personal attention by dealing with using automation. Then tame the broader feel of each track using compressor. There are other audio mixing tips related to compression such as side-chaining to an EQ.
Using this method, you could, say, duck the bass out of the way by a couple of decibels every time the kick drum hits to increase clarity where they otherwise need to share the same frequency range and panning space.
You can set the attack and release to highlight the pluck of a guitar string or make it sound more smooth. A lot can be done with compression, but remember, less is often more. A rule of thumb is to get it where you like it, and then back off just a tad.
Pro-Tip: Always, I repeat, always EQ before you compress. The reason is that your compressor is running across the full frequency range. If an unwanted sound crosses the threshold first, it will trigger compression on itself and all other frequencies, often when you don't want. Clean up your tracks using EQ first to avoid this.
Effects
You are now sitting on the world's most clear, but dry and boring song ever to be made. This is because you haven't used any spacial effects to produce what is called a sense of wetness.
This is where you can shine with your artistic, yet subtle choices. Often, untrained listeners won't even know why they prefer a certain mix (at this stage) over another, but it's entirely due to the choices made here.
This is your chance to surprise the listener with some ear-candy. Whether through the addition or removal of an effect, you can draw attention where you like during certain segments of a song.
Some mixers like to create walls of sound, work in a drier soundscape and bring out an effect to imply or highlight an emotion, or even attempt to reproduce certain listening environments.
Great examples are using warmer, shorter reverbs with heavier compression to create intimacy, or using longer, metallic reverbs and delays to create a sense of depth and impersonal coldness.
Choose what fits the song, the lyrics, and the emotion the songwriter and performers are attempting to achieve, not what you prefer (especially if you want to be hired again).
Pro-Tip: Reverbs and delays applied after compression can sound lifeless and unrealistic since in real life they vary based on dynamics. Breathe life back into your mix while keeping the core clear by using a bus to route an uncompressed version of the track into a dedicated effects channel. This way, the reverb will swell and deflate along with the natural character of the performance.
In this fashion you can return realism and charisma to the song while maintaining a consistent and clear experience. Learn all of our other reverb mixing tricks here.
Quick Audio Mixing Tips
If you're new to the game, the following list of quick mixing tips can serve as a great springboard of techniques to try and practice. Experienced veterans may used and forgotten many of these methods, and a fast reminder never hurt anyone.
Take your time and try these out 10 tips in your next mix and see which you like:
1) If you're using a DAW (Digital Audio Workstation), take the time to learn all of the various shortcuts. Go as far as to label your keyboard if needed. Less time fiddling with software means less distraction and more focus on the art.
2) Many effects plugins today have wet/dry ratio's, saving you time from routing buses around. Use them!
3) Save mix templates with general settings and plugins applied to labeled tracks to speed up your launch time when dealing with new songs.
4) Familiarize yourself with a set of high quality monitors in your control room, a set of the best mixing headphones, and one other system in a non-ideal environment such as your car. This will allow for consistent and trustworthy cross-referencing. Check your mix at varying volumes as well.
5) When in doubt, track in stereo. Throw in a room mic, an overhead, and anything else. Now that we aren't limited to 8-track recorders, you might as well splurge and have options when it comes to mix time.
6) Mix with at least 3db of headroom, if not more, on a 24-bit system. It's okay for your final mix to not be normalized and squashed. Let the mastering engineer have space to work too.
7) Bounce Vocal Up & Down versions and a set of Gang of Four stems when you're finished with the mix. This keeps your promotional and leasing options open.
8) Subgroup tracks, such as all of your drums, once they are in relative balance with each other. You can then change the volume of the entire kit in unison without disrupting the relationship, all with one fader.
9) Don't ship your mix off as soon as you finish with it. Sit on it for a day or two and then return and listen with fresh ears. This will save your mix (and career) more times than you would guess.
10) Learn the mixing jargon so you can communicate with other musicians. Terms like warmth, fullness, punch, mud, crunch, tinny, and air are subjective but still refer to specific frequency ranges in general.
Mistakes to Avoid: Bad Audio Mixing Techniques
There are some common rookie mixing mistakes that we see far too often that can easily be avoided. These are related to the acoustic environment, frequency response of the monitors, and being overly aggressive in an attempt to fix or coerce the tracks.
Too Much Low-End
Low frequency bass literally feels good. We feel it as much as we hear it as the long waveforms pass through our bodies and vibrate us soothingly.
Newbies want to replicate this in their own music, not knowing that the bottom end is the most sensitive and difficult region to get perfect. The two main issues are simply a bottom that is undefined and too loud, and a muddiness clouding up the mix like murky water.
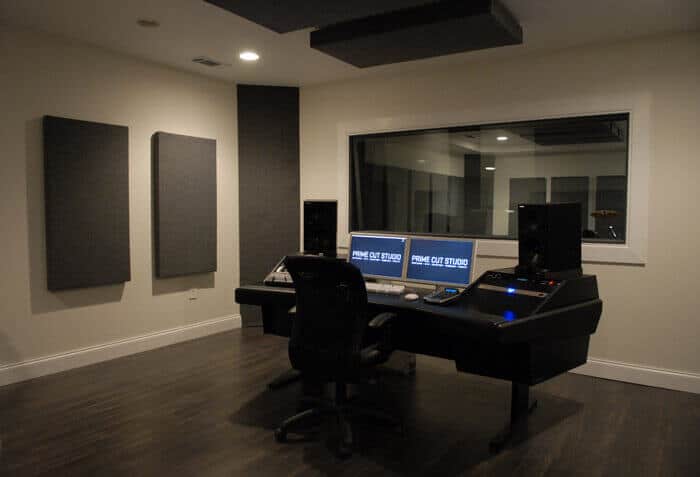
How To Fix: Acoustically treat your control room with bass traps, especially in the corners. The photo above, courtesy of Prime Cut Studio in Nashville, TN, effectively uses bass traps, reflection panels, and clouds to tame unwanted constructive and deconstructive interference problems.
Also, use monitors with the flattest frequency response you can obtain. Make sure your monitors and your head are set up properly in an equilateral triangle with sides at least 3 foot in length, pointing down the long direction of the room, with your head situated at the 38% mark.
Painful Treble
As tasty as a large low-end is, a succulent, crispy high-end can seduce young mixers as well. It's easy to confuse brightness with clarity, leading many novices to use exciters and high-pass filters across the entire mix.
Some mixers may have damaged the high-end of their hearing as well, doubly leading to the sizzle and sharpness that is literally discomforting to hear. This problem can render entire albums unlistenable.
How To Fix: Don't abuse high-pass filters and don't succumb to marketing about exciters. Use a de-esser on your vocals and high-hats, too, if needed. Sibilance is unbearable for many people and a complete distraction from the art. Nip that at the bud or risk it all.
Peaking & Distortion
Those of you involved in the studio culture know that the lack of dynamics and the overall root-mean-square loudness of today's music is frowned upon.
Professionals are able to create songs under such demands, but novices attempting to replicate it often track, boost, and bounce far too hot, leaving the listener with a distorted, flat, dead mix.
How To Fix: Use a limiter if you're not sending the mix off for mastering. Otherwise, leave plenty of headroom and the mastering engineer will provide you with the result you're hoping for. In a 24-bit environment you can leave as much as 10db or more of space. Loudness can come later. Mix first.
Track Misalignment
This problem slips through even on the highest budget albums. When cutting and pasting choruses, bouncing a mix, and other situations, sometimes you simply end up with a misplaced sample.
This sample may start milliseconds early or late and isn't noticed by those familiar with the song, but all of the new listeners notice it immediately. This can be caused by human-error or a software problem.
How To Fix: The leading cause is sending tracks around for collaboration without producing full-length stems. Even if a vocal file may not produce a sound until the minute-and-a-half mark, leave that much blank space at the start of the file. This stops any placement errors. Always double check the final mix, listening closely for slight errors and even muted tracks.
These Audio Mixing Tips Will Take You Far
Follow and the above fundamental sequence and apply the relevant tips, massaging your soundscape as you deal with each of the six basic aspects of a mix, and any piece of audio you touch will be improved drastically.
No band or artist performs and records a song that sounds as good as you hear it on the album without a mixer putting his or her touch to it first.
If they bounced the song without concerning themselves with the six elements above, they'd have no fans. That's why mixing, and mixing well, is important.
You, as the mixer, will literally make or break the song while inserting your own creative influence. Master these audio mixing tips and you'll be pumping out the hits, getting paid, and collecting on-going royalties all day, every day. Best of luck!
Jared H.
 Jared has surpassed his 20th year in the music industry. He acts as owner, editor, lead author, and web designer of LedgerNote, as well as co-author on all articles. He has released 4 independent albums and merchandise to global sales. He has also mixed, mastered, & recorded for countless independent artists. Learn more about Jared & The LN Team here.