Even if you're familiar with recording and using DAW software, stepping into mixing can be daunting if not downright confusing. There's a lot to take in. It's honestly easiest to start with EQing vocals because it's easiest to hear and understand the changes being made.
There's a learning curve with each plugin, and that's not even talking about how they affect each other and beginning to understand the general order of operations. Don't worry, I'm going to break it all down and make it extremely simple.
This step-by-step guide will not only tell you what to do, but how to do it. And every bit of it is useful when you step further out into tasks like compression, limiting, adding reverb and delay, etc.
The 6 Vocal EQ Steps
I'd like to point out, before we jump in, that your results are limited by the quality of your recording. The better the microphone, preamplifier, and converters you have in your audio interface, the clearer result you'l get out of your equalization.
And equally important are the acoustics of your room. You must take care of that to some level, whether using acoustic treatment or a DIY vocal booth. It's a fairly simple problem to fix, and one that you can't avoid if you want professional equalization results.
The one, indispensable tool you'll want for EQing vocals is a parametric equalizer. Since you found this article, I'm assuming you know your way around a DAW and know what that is (your recording software). The best DAWs will have a parametric EQ plugin. Find that and place it on your vocal track in the mixer.
Note: I'm going to give you specific frequency bands to work in, but you'll have to narrow those down or shift them slightly depending on if you're working on male or female vocals. And also, it depends on how dense or sparse the mix will be. A full song will require more equalization on the vocals than would that of an audiobook narration.
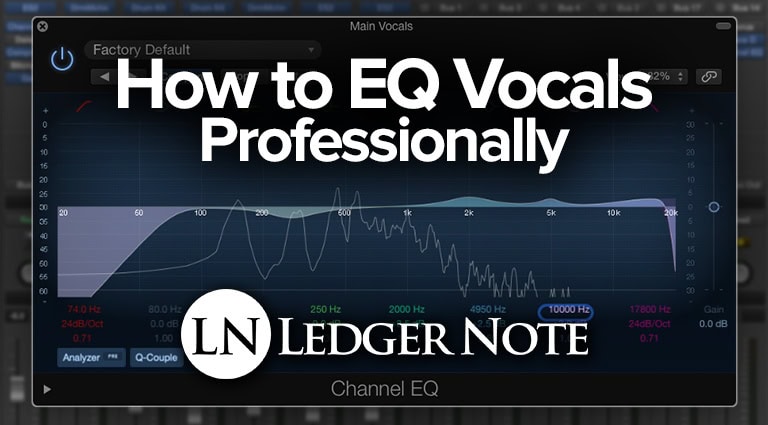
An additional note is you can have a visual analysis of your vocal's frequency wave on the screen of the EQ plugin as seen in the image above. An Logic Pro it's called the Analyzer and is found in the bottom left. This can help you as a beginner but you should abandon it once you're comfortable. The risk is you'll start to mix with your eyes instead of your ears.
1) Roll Off the Low-End Bass Frequencies
The first thing you'll do an any vocal track is to roll off the low-end bass frequencies. This is where a lot of noise resides, like electrical static, 60 Hz hum, rumblings from the mic stand or desk, self-generated microphone noise, and air conditioner sounds.
Male and female vocals will reach this low but contribute nothing to an overall song, podcast, audiobook, etc. And if you record too closely to the mic this bass in your voice will be exaggerated by the proximity effect. So let's get rid of it.
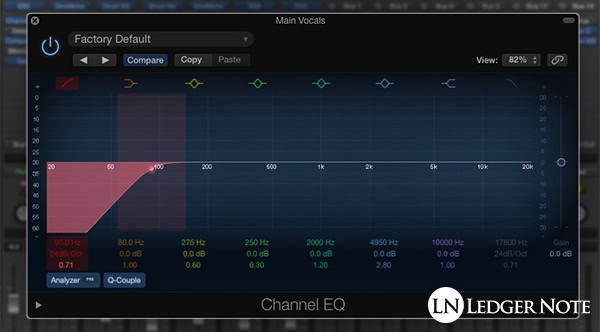
On your parametric EQ, the left-most band will already be designed as a low-end roll off. Make sure it's a roll off and not a low shelf or high pass filter (it won't be, but check and learn about those). You want a smooth lowering of the volume as you move deeper into the bass frequencies.
Starting Settings: Set the main frequency to 90 Hz with a 24 dB per octave roll off. A 0.71 Q creates a smooth asymptote so you don't end up with a boost to the frequencies above 90 Hz. Sweep the main frequency up and down while listening to find the best setting.
2) Reduce Muddiness & Boominess
Without a doubt, no matter how good your room's acoustic environment is, you'll accumulate some "mud" in the 200 Hz to 500 Hz frequency range. It may not be noticeable as you listen to your vocals in solo mode, but with as few as 5 and up to 30+ tracks, it will become obvious.
Mud occurs because you're recording indoors in a small room and sounds are bouncing around off the walls. Small rooms always build up louder and louder in this range. We want to reduce it slightly, and the actual middle frequency for your Q setting will shift depending on the room and your location in it.
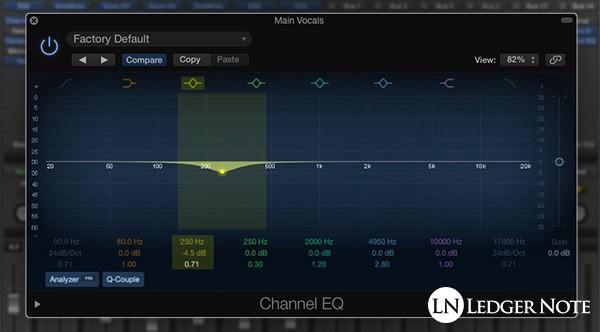
We're going to cut volume in this range, but we want to use a wide Q so it's a smooth transition and not obvious to the listener. It's also important to mention that you shouldn't be cutting or boosting more than 6 dB unless it's a roll off.
Things will sound very unnatural if you boost or cut more than that. If you need more than 6 dB, then you need to correct your acoustic problem and/or use a better mic. That may not be an option for you, but I just want you to be aware.
Starting Settings: I've yet to find a room the size of a standard bedroom up to a living room where 250 Hz wasn't the main problem. It's not just 250 Hz but the frequencies around it. Start with around a 0.70 Q width. If you can narrow down the problem frequencies tighter, try up to a 1.20 Q, but don't go much tighter. Use a cut of around -3 dB to 5 dB.
3) Brighten the Vocals for Air & Sparkle
Next let's target the high frequency range with two goals in mind. First we want to add some air and sparkle, which is mixing jargon to describe the sound of the air leaving the vocalist's mouth as well as bringing out some high-pitched character. Second we want to cut out the highest frequencies entirely.
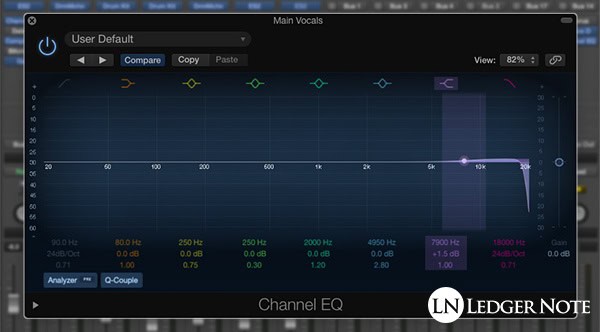
In the image above, the rightmost frequency band is a high-end roll off, and the one to the left of it a high shelf filter. We'll use both. We'll use the shelf to boost all of the upper frequencies and then the roll off to cut out the extreme piercing frequencies.
You want to be very subtle here. Too much of a boost and you'll add too much sharpness which can actually hurt the listener's ears on certain sound systems. Car speakers often are too bright due to how small the "room" of the car is.
Starting Settings: Try starting around 8 kHz for the high shelf and only boost 1 dB to 1.5 dB. For the high roll off, around 18 kHz is a good main frequency at 24 dB of reduction per octave with a 0.70 Q width. The goal is to stop all piercing frequencies that may slip through and to make room for cymbals in the mix.
4) Add Presence to the Vocals
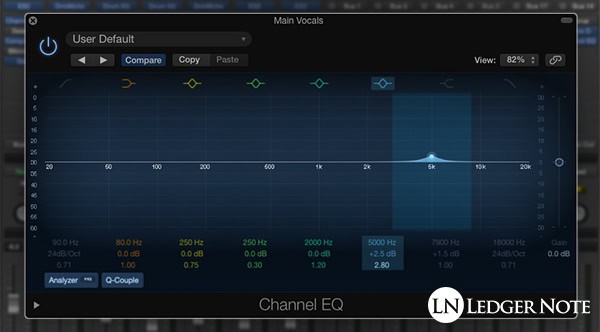
For most vocalists, around 4 kHz to 5 kHz is where "presence" resides, which adds a sense of firmness or solidness to the vocals. This makes the words being sung or spoken more intelligible and easier to understand.
This is a harmonic frequency, meaning it's above the core, fundamental frequency of the vocals which we'll deal with next. You can target it fairly tightly (but not surgically tight) with a thinner Q width. You'll hear when you go too far. Find the setting you like best and then back off half of a decibel or a full decibel.
When you EQ other instruments in the mix, this is a good candidate to slightly cut out of other instruments like rhythm guitar or keyboard / synthesizer. It will make more room for the vocals and keep them intelligible.
Starting Settings: Start at 5 kHz. It'll probably be fine, but you may need to sweep up or down between 4 kHz to 5.5 kHz to find the sweet spot. A 2.80 Q width and a 2.5 dB boost should get the job done. Definitely tweak it to taste based on your own recording.
5) Boost the Core Vocal Frequencies
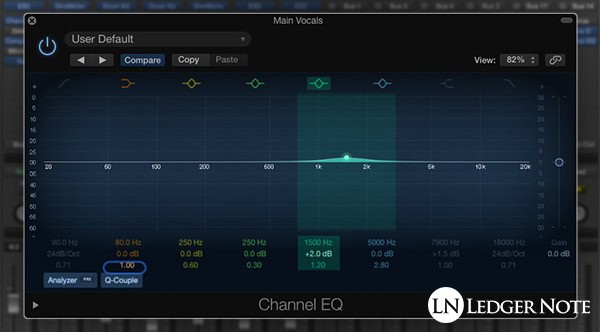
You may or may not need this, which is why it's almost last in the list. Sometimes boosting (or even cutting) the core frequencies can smooth out the quality of the vocals. This will change depending on if it's a female or male vocal take, but the range is always the same.
We'll discuss the main differences for males and females below, but for now know you'll be hunting in the 1 kHz to 2 kHz frequency range to find this core frequency. Boosting it should add some clarity to the words being spoken, making it easier for the listener's ear to grasp on and hold on to the vocals.
Starting Settings: Use a fairly wide Q width of around 1.20 so you get a smooth boost. Sweep between 1 kHz and 2 kHz to find the best center frequency for your voice. I'd keep the boost or cut below or equal 2 dB max. You don't need much here and less is more.
6) Use a De-Esser to Reduce Sibilance
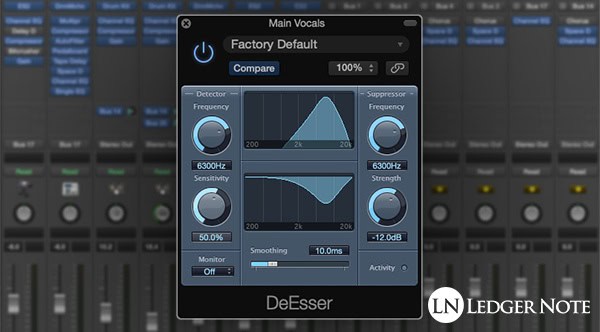
The final step is to remove instances of sibilance, which are the high pitched, piercing sounds you may (or may not) be hearing when the vocalist makes "S" and "T" sounds. It's a fast burst of air that our sensitive microphones pick up more than our ears do.
You can EQ these sounds out with an equalizer, but the problem with that is you're reducing these problematic frequencies for the whole take. Your better move is to use a de-esser, which is a compressor sidechained to an equalizer. It will only reduce the frequencies when they get too loud.
You'll typically locate these frequencies in the 5 kHz to 8 kHz range, and it will change depending on the gender of the vocalist. Sweep a tight boost on your EQ to locate them, then use that info in the de-esser.
Starting Settings: Once you locate the problematic frequencies, set them as the target and reduction frequencies in the de-esser. You'll have to set the threshold (try around -25 dB to -30 dB) and then set a volume reduction value. Try around -10 dB to -15 dB there. Too much will sound unnatural.
Best EQ Settings for Vocals
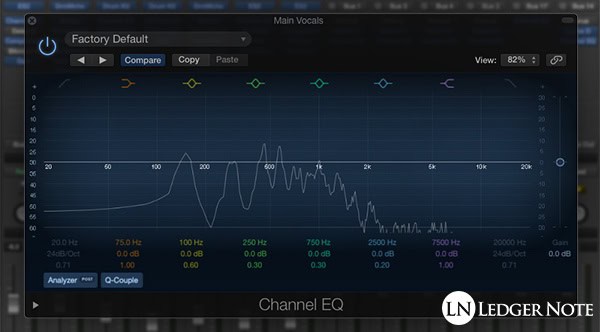
Now I want to show you the accumulative work you've done. You don't need a separate parametric EQ plugin for each step. The first 5 steps can all be done on one single plugin, which will look like the image below. You can take this as the best EQ settings for vocals like a template to start with.
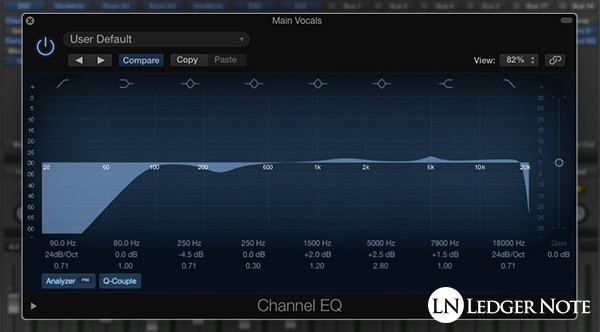
To re-cap, the general steps and round about values look like this:
- Roll off the low-end starting around 90 Hz.
- Reduce the mud around 250 Hz.
- Add a high shelf around 9 kHz & a high roll off around 18 kHz.
- Add a presence boost around 5 kHz.
- Boost the core around 1 kHz to 2 kHz.
- Reduce sibilance around 5 kHz to 8 kHz.
That's a roundabout tutorial you can always follow once you understand the basics of using the Q and how much or little to boost or cut. Even if you did exactly that on every vocal track you'd still end up with pretty good results. The specifics will vary on each track though.
EQ Frequency Range Characteristics
When vocal EQ, you can think of the frequency spectrum as six different segments with their own characteristics. While there is some blur between them, you'll find most problems fall right into the ranges provided below:
- Low-End Noise - 20 Hz to 80 Hz
- Boominess - 80 Hz to 300 Hz
- Muddiness - 250 Hz to 500 Hz
- Nasal Honk - 800 Hz to 1.5 kHz
- Presence - 4.5 kHz to 9 kHz
- Breathiness - 10 kHz to 15 kHz
You'll find other words that describe these characteristics too and can adopt whichever you like. But you want to be familiar with them all because other professionals may use differing terminology. So "Breathiness" may be called "Air" and "Presence" may be called "Clarity." Mud is often called "Boxiness."
How to EQ Vocals Professionally: Conclusion
It's all really this easy. While, of course, there's some decisions to be made within each step about how much to boost or cut and which frequencies to target, this six step guide gives you parameters to work within and start from.
With the info above, even if you don't get it 100% perfect, you'll still get to around 80% and that's a lot better than nothing at all. And in time, with practice, you'll master the art. And these steps that every professional uses is the outline on how to EQ vocals.
Jared H.
 Jared has surpassed his 20th year in the music industry. He acts as owner, editor, lead author, and web designer of LedgerNote, as well as co-author on all articles. He has released 4 independent albums and merchandise to global sales. He has also mixed, mastered, & recorded for countless independent artists. Learn more about Jared & The LN Team here.