How Should I Use This Alternative Acoustic Treatment Insulation?
Today's question-giver has found a great local source for rigid fiberglass for acoustic treatment. But will it meet the needs for producing professional quality music? Let's find out.

Special thanks goes to Eric for correcting us on some details about the LA-2A compressor, one of the best and historically important important compressors out there. It's important to get it right, so thanks again to Eric. Let's jump into today's question:
How Should I Use This Alternative Acoustic Treatment Insulation?
Question:
Dear Ledger Team! After reading your column "Acoustic Treatment Guide" I now want my room treated as soon as possible. I am living in Europe and found an alternative product to the Owens-Corning fiberglass you mention.
It is called Isover AP and is available in different thicknesses. May you have a look at the data sheet (it is unfortunately in German but I think you can read the different specs concerning the absorption at the frequencies mentioned) to help me with the following questions:
Which one of the panel thicknesses would you recommend for the wall panels. Should I take the AP 100 Panels for wall panels and bass traps? Furthermore would you take two of the AP 100 panels for bass traps if enough space is available or just one of the panels.
Of course I will mount every panel with the recommended air gaps. In the data sheet there are details for mounting with air gaps as well. What do you think of the AP 100 Panel, mounted about 2 inches from the wall for wall panels?
Would you use one panel-thickness for ceiling clouds as well or should I use two panels of the AP 100 panels? Thank you very much!
Kind Regards,
Michael
Answer:
Michael, nice find!
Yeah, interpreting the German is rough. It looks like each sheet is 100mm thick on the AP100, just under 4 inches. Which is "thick." Most reflection panels are 2 inches thick. These could be considered bass panels. Which is good.
You're going to get great results regardless with this based on the absorption spec's listed. They're thick but not so dense to reflect high frequencies and will be able to suck up bass big time.

I'm assuming you have a typically sized room. So if you mounted 4 inch panels with 4 inch gaps on both sides of a wall, you'll be losing 16 inches of workable room space. The air gap just makes sure sound waves with longer wave lengths (and high enough amplitudes) can bounce back and be attacked twice by the panel. Which is why the absorption on the low end increases with a larger air gap.
The Three Acoustic Treatment Variables
You have three variables for the most part and you can compensate for a loss in any of them by an increase in another. Think about it in terms of:
- Wall Surface Area Covered
- Density & Thickness of the Insulation
- Width of the Air Gap
I'd make my life easy here. What I'd do is buy a ton of the same AP 100 panels at 100mm (4 inches) and build my wooden frames, wrap them in fabric, and mount them with 50mm (2 inch) air gap. This is for your reflection panels.
Yes, you'll absorb less bass but it won't matter in these positions so much. I'd mount as many as I could along my side walls while keeping it as attractive as possible (that matters too!). Leave space between them too, you don't want to kill ALL reflections, just tame them.
Cloud Panels & Wall Bass Traps
For clouds, I'd do the same in terms of build but use a 100mm (4 inch) gap. I'd mount 2 or 3 of these for the same reason, we're just taming reflections, not killing them all. And most of the sound will be bouncing around horizontally, not vertically.
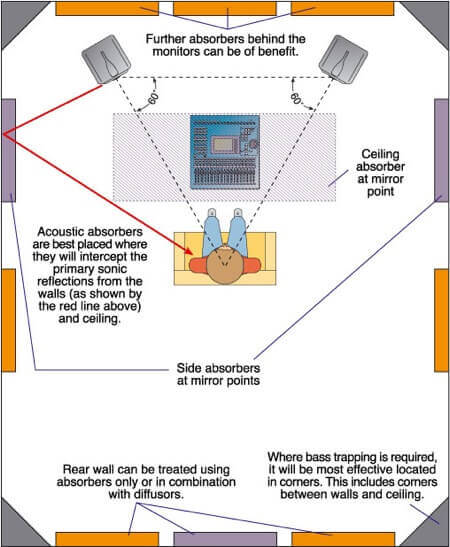
No need to overkill on the clouds. Just make sure you position one in the 1st Reflection zone for mixing to get as clear of a stereo image as possible. The rest is mainly for recording.
To maximize your bass absorption, I'd two things. I'd mount two of these 100mm panels side by side next to each other on the back wall and two more on the front wall, with 4 inch gaps. If you can't afford that configuration, I'd put one on the back wall centered and one on the front.
Super Chunk Bass Traps
But the most important spot is in the corners. You can orient panels over the four corners of the wall caddy-cornered, but what I would do is create "Super Chunks".
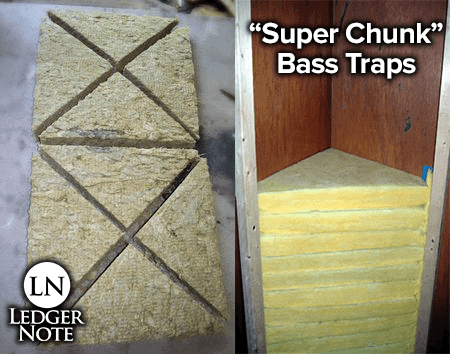
What you'd do here is cut each of the 1200mm x 600mm panels in half so you have two panels at 600mm x 600mm. Then I'd cut each of those into diagonals so you're left with 4 identical triangles.
It will take a lot of panels to do this but the goal is to stack all 4 corners from floor to ceiling with these triangles with the corner opposite of the long hypotenuse pushed all the way into the corner with no air gap. This is where the bass "accumulates" and this density and thickness will help zap out the unruly bass.
You have a great plan here. If I had to prioritize positions based on cost at first before I could add more absorption, I'd hit the 1st Reflection positions, the front corners, and then the back wall. After that I'd add more side wall absorption, and then the front wall. Finally, I'd finish the back corner Super Chunks, then add in the clouds.
P.S. If you, the reader, have any questions about anything related to music (like all of these), please don't hesitate to email us. We'll be happy to help you out, and if we can't answer the question we can put you in touch with someone who can! Over and out.
Great question. Good luck with it. Let us know how it goes!rnJared
Jared H.
 Jared has surpassed his 20th year in the music industry. He acts as owner, editor, lead author, and web designer of LedgerNote, as well as co-author on all articles. He has released 4 independent albums and merchandise to global sales. He has also mixed, mastered, & recorded for countless independent artists. Learn more about Jared & The LN Team here.