My goal here is to cut through the fog and give it to you plain. We're going to define dither, talk about what it actually is in the context of digital audio (as opposed to printing images or processing video, though we'll mention this), and tell you when and how to use it.
What's funny is we've all seen and heard this technique applied in music, movies, and most noticeably in comic books, especially old ones, but when you try to find out more about it you get a bunch of convoluted information.
It's really simple, and here's a preview. We can never blast out the highest quality versions of audio, video, or images. Not only is it not necessary but it's too much data for normal consumer equipment to process live.
So we have to make that data simpler and take up less bandwidth, but when we down-convert like that we not only lose detail but we introduce errors. Dithering is a process to smooth out those errors.
It's not easy to hear in audio form so my examples will be with images and you can translate that analogy mentally to digital audio and you'll understand it nearly immediately. Let's look at some definitions of this term and we'll see why people are confused.
Dither Definition
Dither is an intentionally applied form of noise used to randomize quantization error.
That's not helpful at all, from Wikipedia. Merriam Webster doesn't even get the context right, defining it as, and I paraphrase, "to shiver, tremble, act nervously, or indecisively."
That second definition does make sense though, because that's what our audio signals end up doing.
The errors we get when converting our recordings to lower quality bit rates causes the waveform to shiver, and the algorithms used to do the conversion can be indecisive. And that's the key to this mystery.
What is Dithering?
Dithering involves algorithms (coded directions given to a computer) that have to make decisions about how to handle the missing data (errors) from dropping out data in order to make the file sizes smaller.
That's the basic gist of the whole thing. Now, many websites will tell you that you're adding random noise that cancels out quantization error. That's not true.
You're adding "noise" at specific places to try to smooth out gaps in data. This means that waveform analysis is occurring so particular choices can be made. There's nothing random about it.
Why Do We Need Dithering?
Let me explain exactly what's happening before we get deeper. If you're being a good studio engineer, you're recording in the highest bit rate you can, because this allows you to store more information about the sound waves you're capturing. More information means more details which means higher quality.
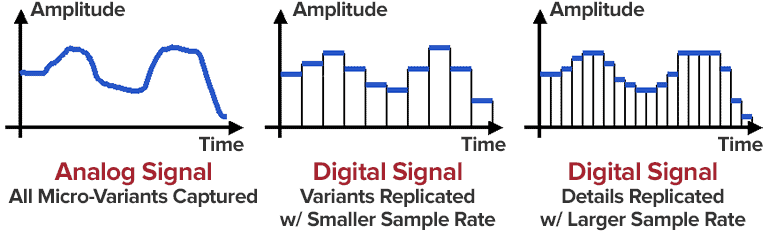
The picture above illustrates a real sound wave on the left. Every detail is included as it hits our ear drums. The challenge when converting analog sound waves to digital ones is to decide when we have enough data.
The more precise we get, the more "expensive" it is in terms of processing power and hard drive space. So we've had to make decisions about where to stop based on the limitations of computers and the limitations of human hearing.
Turns out most everyone is just fine at a 16 bit resolution, as seen in the middle image above. The one on the right is 24 bit resolution, and can tell there's more samples being taken. The more samples we take, like up to a 32 bit resolution, the closer we get to emulating reality.
As you can tell, the lower the bit rate, the worse the approximation to the true wave form we get. You get a lot of "flat parts" rather than true curves along the wave form. The more flat parts you use (samples), the more it looks and sounds like a wave than a bunch of flat parts.
So here's the issue. I record everything in 24 bit resolution because I want more detail. This is so that when I'm mixing I can make the most informed decisions about what to change.
I'll then send the final mix down to a mastering engineer in 24 bit resolution with no data compression so that he or she can also make the best decisions. Then, they will drop the bit rate to a 16 bit resolution and apply dithering.
The reason the final master copy of our audio files are 16 bit is because it's less data to pass around, most people won't hear the difference, and all of our CD players, MP3 players, and other digital audio playback systems are all created to be used with 16 bit audio.
Otherwise file sizes would be too big, you'd only fit half as many songs in an album, and you'd need actual buffering time, which nobody would tolerate.
Quantization Errors
Let's finally explain this pesky term. Think about a 24 bit recording having to drop out data in order to become 16 bit in resolution. Our samples (like in the image above) are discrete steps describing amplitude and frequency.
"This chunk is -13 dB and 4 cents above natural C." That's basically how samples work, and when you string a ton of them together and play them quickly, they recreate a wave form.
When you drop down in quality from 24 bit to 16 bit, each sample is quantized to another discrete step. Some are dropped out and others have to be truncated to the closest number allowed in the lower resolution.
To explain truncation, take this made up example. If we have a number that is originally 8, but after lowering our quality it's now a 6.7, then by a truncation algorithm we'd simply chop off the decimal and call it a 6. If we used a rounding algorithm we'd call it a 7.
With rounding we're closer to the original 8 by a full discrete step than we would be with truncating, but neither are the original value of 8. Rounding is better because you at least get a bit closer 50% of the time, but it's still off. This is a quantization error and what dithering seeks to fix.
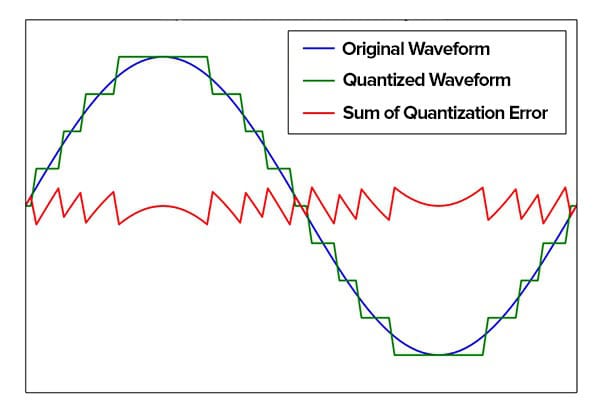
In the image above you can see how, when an analog waveform is digitized (through a process called analog-to-digital conversion), it is quantized and a certain amount of error is necessarily introduced, which can be measured.
In audio you can hear this as slight distortions in the notes, a very slight warbling or trembling.
When normalization has already occurred before before dropping the quality it won't hardly be noticeable (not that we're going to allow that to slip through, even though some people like noise like tape saturation), but if the volume is cranked up it'll become more and more obvious.
We have to fix that, and that's where dithering comes in.
How Does Dithering Work?
Tons of industries use digital signal processing, which is what we're doing when we mix songs. Common industries like digital photography and digital video use it, as well as stuff as far-ranged as weather forecasting, seismology, and radar systems. And this means they all need to dither.
This will all be far more obvious to you if I show you an analogy using images:
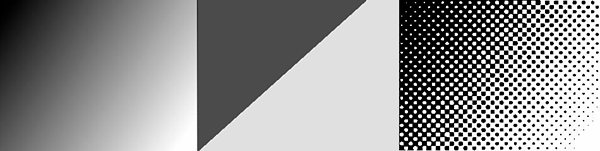
Think about old 1950's comic books, for example, or even the printing on your tube of toothpaste, and let's make it even simpler. On the left in the image above we have a full-fledged gradient moving from black to white, all in greyscale.
We artists painstakingly created that, but our printing company will only allow us a handful of colors due to the expense of having more. So we converted this image down to just two colors. The middle picture shows a giant quantization error (color banding) right up the middle as it had to choose the line in which to switch colors.
To make matters worse, our publisher yanked our budget and said we can only go to press in black and white, meaning we really only get one color against a white background.
Thankfully dithering can help us smooth out the quantization error and help up fake out the gradient, making it appear as if we're transitioning from black, through greyscale, to white.
That's what's happening in the picture on the right using a halftone algorithm. There's all kinds of algorithms (the halftone one is old but still used by printers today) that can aid in creating color depth out of a limited (or in our case, very limited) color palette.
There's ordered dithering, blue noise / white noise, gaussian noise, triangular probability density functions, Floyd-Steinberg dithering, minimized average error dithering, and more. The idea is always the same... to try to restore quality where it was lost to avoid issues like distortion and bleed.
So what happens, just like in our image analogy above, is we can analyze the quantization errors before actually converting to a lower quality. We can use these errors, since they're correlated to the actual waveform, and then apply an algorithm to kind of "scatter" the error.
Because the human ear functions like a Fourier transform in which it can detect individual frequencies, if we add a "blur" where the error occurs around the original frequency, we won't be able to detect the error because our ears don't handle this kind of noise as well.
Noise masks the problem by filling in the gaps, but not random noise... noise scattered specifically around the original frequency that kind of sums up and becomes the frequency. No, you aren't trading distortion for noise, like some say. It's noise that's contained and aimed.
When Do We Apply Dithering in Audio?
As mentioned before, you're hopefully working with the highest sample rate and bit rate you can in order to do the best mixing and mastering job possible without collecting distortion artifacts along the way. You're doing this with each and every track, all the tracks summed together on buses, and on the final mastering mix.
But during the process, if you're moving a one-shot or sample down from 32 bit floating point to 24 bit, you'll want to use dithering, because you'll be truncating the decimal and losing quality. Then you'll do it again when you drop the entire song down from 24 bit to 16 bit (or you'll let the mastering engineer do it).
In my mind, you should:
- Work in 24 bit unless made to use 32 bit
- Choose a basic triangular dithering algorithm
- Always use dither when importing one-shots and samples, if needed
- Always dither after mastering (but not before) when converting to 16 bit
- If you're already in 16 bit resolution, don't dither, there's no need
- Don't dither twice. Know your bit rates and only do one down-conversion
If you do that, you don't even need to understand how it works. It'll get done for you and always sound good.
How to Dither
Of course, the real question at hand is "How do I dither?" Sometimes you'll see plugins like mastering limiters include a dithering option. I don't recommend using those.
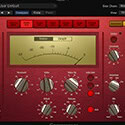
You're in the modern age in one of the best digital audio workstations like Ableton, Logic Pro, or Pro Tools. Each of those will give you the option to dither when bouncing your final mix down. In Logic Pro it looks like this:
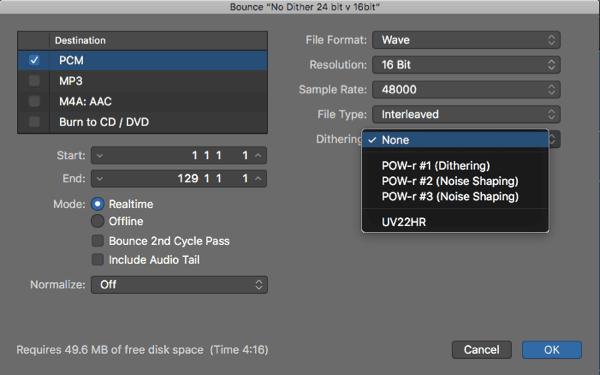
You can choose an algorithm here too. In this image you have three POW-r (Psychoacoustically Optimized Wordlength Reduction) options, and probably more on your own installation. This is how you'll do it and when you'll do it, at the very last stage before you bounce the final mix down.
Conclusion: Dithering Rocks
Hopefully this discussion demystified the entire concept to you. What you'll be happy to know is that in the near future dithering won't even be necessary.
CD's are going the way of cassette tapes. MP3 players are toast since we all carry smart phones, which are becoming incredibly powerful with larger and faster storage capacities. Even streaming services like Spotify are talking about high-fidelity streaming of 24 bit files.
But this is the present, and if you're working in the industry you still need to understand this concept and how to use it. And it will remain relevant in other industries for ages. So until then, keep calm and dither on.
Jared H.
 Jared has surpassed his 20th year in the music industry. He acts as owner, editor, lead author, and web designer of LedgerNote, as well as co-author on all articles. He has released 4 independent albums and merchandise to global sales. He has also mixed, mastered, & recorded for countless independent artists. Learn more about Jared & The LN Team here.