There’s nothing that can match the mind-bending power of deep bass. Its sheer might is a big reason why we still shell out absurd amounts of money to see an action movie in the theater (which is crazy expensive now even if you don’t shell out the cash for popcorn and a soda!).
It also manages to make any car ride infinitely cooler when the bass is cranked to window-rattling levels. Even when you're just chilling at home, its resonation can blow you to the back wall of whatever room you're enjoying the tunes in.
For the uninitiated, this may pose an important question. Namely, how's that mighty sound accomplished?
The answer to this inquiry is the subwoofer.
Even the average person knows that your run-of-the-mill speakers are incapable of emitting such mind-melting bass drops. They may not know that they lack the power to pull it off, but they’ll probably be hip to knowing the size of the average speaker won’t cut it.
And even though they may have heard the word subwoofer bandied about here and there in their neighborhood electronics store, that may be the extent of their knowledge.
Essentially, the subwoofer is the piece of gear that ties those fancy home stereo and studio setups together. They’re the “point one” in the collective units that are defined by numbers, such as 2.1, 3.1, 5.1, and more.
While that number in front of the decimal may change based on the number of other speakers, the number behind it is unchanging. That’s because, simply put, you don’t have a worthy home stereo unit or mixing setup without a subwoofer.
If the importance of the subwoofer is a mystery, don’t worry. We’ll go over the ins and outs of the subwoofer, from how they work to how to set them up correctly.
Ultimately, the goal here is to make sure you’re properly blown away by that almighty bass tone by making sure you understand why you'd want a professional sub and explaining how to properly set one up for your work and enjoyment.
What is a Studio Subwoofer?
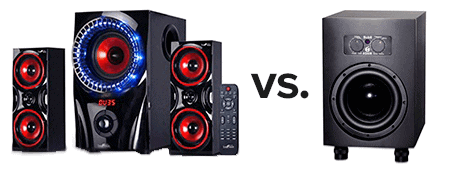
The first thing you need to know about subwoofers is that they come in two different classifications: Studio subwoofers and commercial subwoofers.
As you may guess, the studio subs are the equipment that audio professionals use, while the commercial types are geared for the average joe that’s looking for a cool (but inaccurate) sound experience.
If you're here, you're interested in professional work or accurate listening, so we'll confine our talk to the pro sound style.
Studio vs. Commercial
For the novice, these subwoofer types may look like they’re the same piece of equipment. However, there’s one crucial difference that totally separates the two.
The commercial-grade stuff is designed to give you a pleasurable sound experience (and look). The studio-grade products are designed to give you the most accurate sound possible.
The key element that draws the fine line between mere pleasure and spot-on accuracy is the frequency response. In a commercial product, you’ll be able to manipulate the “curve” of the EQ to adjust various sound qualities. This allows the sound to match your perception of good quality.
With a studio subwoofer, what you hear is what you get. Whatever mix the music or movie intended you to hear in the recording is what comes through the speaker.
It’s the most balanced, tightest, and pure sound you can achieve. You can make tweaks to frequency response on these, but it's designed to compensate for problems in the acoustic environment, not for subjective pleasure.
Regardless of what style you’re looking at, you should know that a subwoofer is all about that bass. It is wholly dedicated to reproducing the low-frequency sounds or musical notes, thus providing a more complete sound experience and better sound quality.
In other words, this piece of equipment will give you that booty-shaking bump to your music or a little extra gooseflesh when that slam-bang cinematic action sequence takes place... the kind normal speakers and monitors can't provide.
Studio Monitor Subwoofer Features
Because subwoofers have one essential function, it’s a basic and straightforward component with few bells and whistles. With that being said, it is worth noting that they do have a handful of key features that manipulate aspects that may be foreign to novices. These components are:
- Frequency Response
- Crossover Frequency
- Speaker Size
- Phase Shift
Let's take a look at each individually.
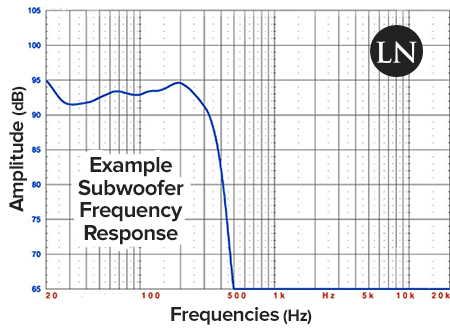
Frequency Response
The range of human hearing stretches from 20 Hz to 20 kHz. The high end of this range will reach the realm of sound that will cause your dog to freak out. The low end is reserved for the bass lines and kick drums that can rattle your walls.
While a subwoofer won’t produce any high notes – its peak frequency tops out anywhere between 100 Hz and 300 Hz depending on the subwoofer quality – a proper one that can hit those low hertz waves will help you achieve those deep, dark bass lines and maximize those guttural sound effects.
One thing to bear in mind: If you have a subwoofer with that can accurately emit notes in the 20 Hz to 30 Hz range, you’re not going to hear them as much as you’re going to feel them.
The frequency that causes rattling in your home theater or car will also penetrate through you so that you can feel the resonation in your chest cavity. That's a thrilling experience to behold; one that can only be achieved through a larger subwoofer that's handled and calibrated with extreme care.
This is especially crucial if you're planning to mix your music or sound tracks at home to achieve proper theater sounds for you customers. Mistakes here can actually damage lesser sound systems and cause your mixes to be unlistenable in general.
This is mainly why professional subs cost a bit more. A lot of research and development goes into a system that can provide an accurate frequency response. Accurate tends to mean the frequency response graph is as flat as possible without nulls and peaks throughout.
The closer a manufacturer gets to "flat," the more diminishing returns they get for their precision work. That means incremental advancements in flatness cost them (and thus you) and increasingly higher amount of money.
But it's critical if you intend to work in these sub-bass regions. Because you either leave them out entirely or get it done perfectly. Anything else is either disappointing or damaging to the listener and their sound system.
Crossover Frequency
While the basic premise of owning a subwoofer is to deliver the bass notes that rattle your bones, the other important element that the device achieves is to alleviate pressure from speakers or monitors that would otherwise be ill-equipped to handle such power.
This off-loaded power helps those speakers invest their energy into producing the middle and high frequencies, thus leading to a more accurate, complete sound experience.
There’s one tactic to achieving this alleviation correctly, and that is determining the proper crossover frequency. As the term may suggest, crossover frequency alludes to establishing the frequency point at which the subwoofer takes over the bass production.
It’s a delicate point that leaves surprisingly little wiggle room. Set it too high, and mid-range notes will take on booming bass tendencies. Set it too low, and the higher bass notes will lack their needed power, leaving them sounding weak and anemic.
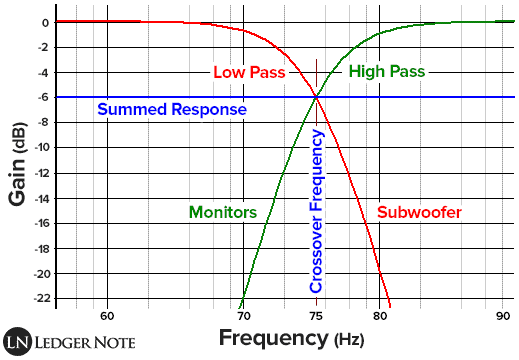
Take note that this is not some hard line cut-off point. The response of the subwoofer slowly rolls off as the response of the monitors grows equally. There is a point where these two lines on the graph "crossover," and that's what gives the defining frequency its name.
This does require a bit of fine tuning on your end to get it right, but don’t sweat this too much. Most monitors will provide you with a suggested setting and/or detailed notes in their spec sheets to help you get a narrowed range in which to work with.
Otherwise you can use a full tone sine wave to actually measure the sound output to find the right setting. Usually you can just refer to the documentation.
Speaker Size
We’ve all seen ads for tiny speakers that can produce impressive amounts of sounds. While those cutesy toys are pretty cool, it may lull you into thinking that you don’t need to consider speaker size universally.
They'll sound great at low volumes, but as soon as you crank up the volume you'll find they can't handle the bass and distortion is introduced in the mid-range and upper frequencies.
This is not the mindset you want to have when you’re talking about subwoofers. You don't want a tiny sub. If you want powerful, deep notes, size does matter.
The reason for this is not exclusively based on the dimensions of the woofer itself. Rather, it’s due to the correlation that typically exists between size and power.
When it comes to subwoofers, the larger the speaker, the higher its power rating. If you’re truly serious about creating a professional environment within your home studio, stereo, or theater, this correlation will most likely be the core element that drives your search.
If you pick up a smaller subwoofer that carries a low power rating, you can expect to experience a measure of distortion at lower volumes. The same goes for over and under powering woofers... it has to be properly matched or you'll introduce distortion.
Subwoofers can have a diameter as low as 6 inches, but that’s probably not going to satisfy the needs of anyone beyond the pseudo-audiophile. You could get away with 8 inches if you want a subwoofer for your home studio or stereo, although it’s optimal to go for a subwoofer that’s at least 10 to 12 inches.
That's if your room is larger than an average bedroom. If you’re in the market for a home theater subwoofer in a big living room, you’ll want that size or possibly higher (if you don't have any neighbors in the near vicinity!).

Volume also plays a huge role in this correlation. Even if you aren’t interested in having your subwoofer hit those low, deep frequencies, you’re still going to need a larger subwoofer with a big power rating if you’re planning on cranking things up.
If you don’t, you’re going to experience sound distortion over a certain level, and therefore ruin your sound experience and hard work.
Phase Shift
The final key component of a subwoofer, phase shift, is its most technical and “geeky.” Most professional subwoofers will have a phase switch, and this may strike you as curious as to its function.
While diving headlong into what it’s all about can be quite intimidating at first, if you compartmentalize things, it’s not too bad of a concept to digest. To properly wrap your head around the concept, you need to initially consider sound waves.
When you’re talking about the bass spectrum, sound waves will have longer wavelengths than higher frequencies. As such, they take longer to reach you compared to the waves emitted by the middle and upper frequency sounds.
Next, you’ll need to consider the placement of your subwoofer. At first you may simply be seeking a spot on the floor that looks good where the sub is out of the way so nobody trips on it. What you really want to consider is where it sounds the best.
That's vague and I'll explain, but let me say that the sub does not need to be centered between your other speakers. Human ears can't physically locate the source of deep bass sounds, so it can definitely be placed off to the side if needed.
These days, with the addition of the phase switch, you can place the sub where you like it and if things sound "weird" it's likely because the longer bass waves are constructively or destructively interfering with other sound waves.
You need to shift the response so that these two sets of waves are no longer out of phase. This is done by introducing a tiny amount of delay in the timing of the subwoofer, and this is done with the phase switch.

The phase switch will act as a course correction of sorts for your phase shift issue. It can adjust the timing of a subwoofer's sound emissions by a matter of milliseconds. It doesn't seem like a lot as far as time goes, but in this case, just that slight nudge can make a world of difference in sound quality.
One thing you want to keep in mind that there are different kinds of phase switches to help you deal with this issue. Some may be as simple as an “invert” setting that will give you a basic inversion.
Others may have settings that go from 0 to 180 degrees and in between, which can help you fine-tune your settings on a more intricate level – something that may come in handy if you’re planning on working on professional mixing.
Types of Subwoofers
The concept of "professional versus consumer" pushes beyond the realm of size and power rating. Indeed, there are a couple types of subs in the commercial realm you'll want to avoid. Then there is the issue of powering the sub through an amplifier or not.
These opposing types are:
- Front-Firing vs. Down-Firing
- Sealed Box vs. Bass Port
- Passive vs. Powered
Let's break it down and you'll see how the options narrow themselves down for the professional fairly quickly.
Front-Firing vs. Down-Firing
We’ve all heard the concept of sound “blasting from your speakers.” It’s a cool-sounding concept, and it’s one that’s surprisingly technical when converted into the professional lingo.
There’s only one change that must be made for it to enter the technical realm: That is, replace the term “blasting” with “firing.” They refer to the same concept but firing also implies a direction.
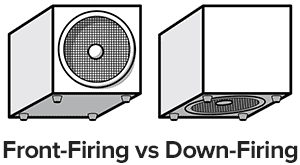
Front-firing means the sound is pushed out from the front of the sub like a normal speaker. However, there are also subwoofers that are designed to emit sound when their speaker is facing the floor.
The manufacturer's goal here is to use the reverberation that’s created to reach deeper frequencies with less power. The latter style is significantly trickier to get an accurate sound from than the former, for a professional user and the manufacturer alike.
Using down-firing subs properly requires painstaking measurement and mathematics to get the precise frequency response desired. Your best bet is to stick with a front-firing unit.
Sealed Box vs. Bass Port
On the surface, there doesn't seem to be much of a difference between a sealed box subwoofer and a one with a bass port. In fact, you may be inclined to just write off the difference as aesthetic if you don't know any better.
After all, the difference in play with these units boils down to the speaker casing. Some casings are solid, while others have round openings. These rounded openings are known as bass ports and do serve a purpose, though.

These bass ports bring about a different, admittedly slight, change in sound quality. In the case of a ported box, the openings allow the sound to resonate around inside of the box.
This resonation enables the speakers to emit deeper frequencies. In theory, this is the same principles in play as you’d see with a down-firing subwoofer, albeit not as extreme nor inaccurate.
Because it’s not as extreme as a down-firing subwoofer, there’s really no hard, fast preference between the two units. That said, it’s important that you know that there is a difference between a sealed box and a bass port unit, just so you know that there is an element that separates them beyond their look.
The openings also allow for better access to air, which keeps less of a vacuum forming behind the woofer and cools the driver and internal amplifier as well (not that this matters, heat isn't an issue with a sub). Speaking of amplifiers, let's look at how we power these beasts.
Passive vs. Active
Amplification is one of the most important parts of any speaker system, and subwoofers aren’t any exception.
However, it must be noted that there are two distinct amplification styles that you can consider when in the market for a subwoofer. Both get the job done fine, but in the passive case you don't have to worry about matching your amp to your sub.
The first style is known as a passive unit. This describes a subwoofer that needs an external amplifier to deliver it the proper amount of power for it to perform correctly. If you're hooking up this unit to a home entertainment unit, this passive style would need to hook into a receiver or standalone amp.
The second style is known as an active, or powered, unit and doesn't need any external help to work. It has its own amp built inside; a feature that makes it more convenient to use, especially because it includes the exact amplifier it needs as opposed to you having to worry about whether yours features the right jacks and power ratings.
These days, you'll notice that a majority of the subwoofers on the market are of the active variety. This is particularly the case if you're buying them in a set with an entertainment center sound system. You'll also see that passive units are increasingly rare in music situations as well.
This doesn't mean that a passive subwoofer is inferior by any means. You can still get deep, powerful bass notes from these units with no drop-off in quality. It's simply easier for everyone if the amp is included.
Using Your Subwoofer
Once you buy a subwoofer, using it is not as simple as bringing it home and plugging it in. You have to set it up properly beyond the settings we mentioned above like crossover frequencies and what not.
If you don’t take the time to do this right, you’re not going to experience the optimal performance you want. While the act of getting setting up is a multi-step process, it's a procedure that’s relatively easy, just as long as you follow directions and use some common sense.
Cabling Your Sub
Hooking up your subwoofer is not an intimidating process, just as long as you pay attention to the manufacturers’ directions. For instance, when the time comes to cable your sub, it will likely come with the right cables if you buy it as one cohesive set.
If it doesn’t come with cables, or if you find out that the cables you already have on hand won’t work without an adapter, don’t fret. The manufacturer won’t make it a guessing game for you and adaptors cost nothing.
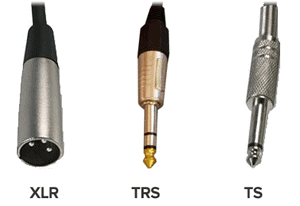
If you have to pick up cables or adapter, it’s not going to break the bank – you’ll find what you need for a couple bucks each at the most. The cables that you do come across will be quantified by technical jargon, but this stuff can be parsed rather simply.
For studio monitor setups you'll find that you already have the XLR cables needed to connect your monitors to the sub. You'll just need another set to connect to your interface or mixer, which sends the signal to your sub which then outputs it to the monitors.
If you’re in the market for professional studio gear, you’ll likely encounter things like ¼ inch TRS or XLR cables. If you’re looking for cables on the consumer side, you’ll encounter RCA or speaker cable.
And remember - the subwoofer manufacturer’s materials will help you guide through this jungle. It's easy and you'll only have to deal with it once, and maybe again if you move to a new house or studio.
Where to Place the Sub in Your Room
Putting your subwoofer in the right place is important, but it’s placement is not necessarily something that’s concrete. Because our ears aren’t able to localize deep bass notes, it doesn’t necessarily have to be perfectly centered between your monitors.
That said, it may help if it is centered in certain situations, like a home entertainment unit, because you’ll have the “oomph” of the explosion or loud noise rumbling through your space evenly.
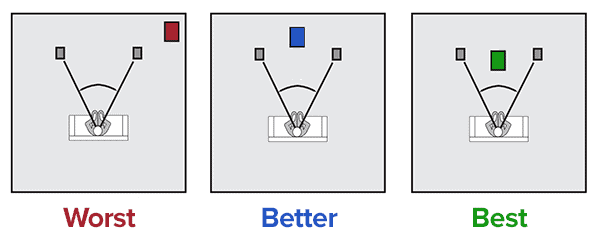
The reason that “centered in between the two monitors” isn’t set in stone is because there are a few variables to consider; variables that vary from room to room. You may have a piece of furniture that’s flush against a wall. You may have an acoustic “dead spot” (null) in your room caused by a vaulted ceiling.
Pro-Tip: Don't place your sub in a corner or directly against a wall. This will destroy the accurate frequency response you're looking for by massively boosting some areas of the bass region and reducing it in others.
Where you place the sub may cause your calibration to be a little different than someone else’s. Consumers can play it by ear, and professionals can measure the response and adjust as needed. With that being said, you shouldn’t fret too much over the placement of the subwoofer.
As long as you don’t have it socked in a corner well away from the rest of your unit, it’s going to sound just fine. Your friends will be dually impressed. Frankly, so will you.
Setting the Volume & Crossover
So you’ve found the right cables needed to bring your subwoofer to life. You picked out the perfect place in your room to put the unit. You just have one thing left to do: calibrate it so it gives you the sound you want it to produce.
This may be easier said than done for some people. After all, achieving the perfect sound is the endgame here, and even the slightest variation of this may be perceived by you to be an egregious imperfection. Relax! – it’s not that terrible.
It’s also not that tough to achieve perfection. To do so, you should look at this calibration on two fronts:
- Volume
- Crossover Frequency
When you’re setting a subwoofer’s volume, you need to make sure it matches the output of the accompanying monitors. You’ll make this adjustment through either your subwoofer or through an amplifier if you’re dealing with a passive unit.
If you are dealing with the latter, you’ll need to set the subwoofer’s volume up around halfway to its maximum and keep it there. After you’ve done this, you can fiddle around on the amp until you fine tune things to your liking.
There is a word of warning here: You are going to have to get your geek on if you really want to get that perfect sound. You’re either going to have to calibrate things by ear or download and play test tones to measure volumes with a digital meter.
There are different “by the ear” strategies you can deploy here – for instance, testing your sound by playing a high-octane action sequence from a movie may do the trick – and unless you’re a pro or the hardest of hardcore audiophiles, testing in this method will be perfectly fine for enjoyment and not work.
When it comes to crossover frequency, keep in mind that most subwoofers will have a suggested setting in the booklet that comes with it. If it doesn’t, you should be able to find the suggestion online relatively quickly, either in a forum or on the manufacturer's site.
If you’d rather go rogue and do it yourself, you can find frequency response charts and hone in on a range in which the integrity isn’t compromised in comparison to where it does get a little crappy on your monitor's chart.
This range can typically swing from 50 Hz to 150 Hz depending on the unit size, although usually anything between 80 and 115 Hz will be right in your wheelhouse. Indeed, this range is where you’ll most likely find if you see a home entertainment unit or professional sub that’s already been calibrated and established.
In general, you’ll want things set about 10 Hz higher than the lowest frequency your monitors can handle on a reliable basis.
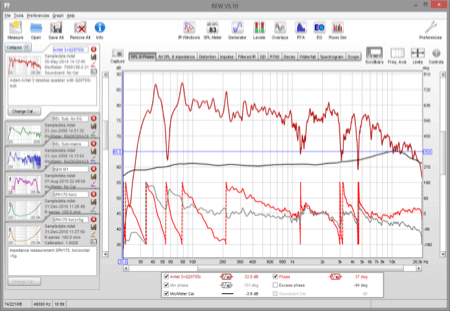
There are ways to perform the volume and crossover calibration very scientifically but it requires some software, a good bit of hardware, and knowledge.
If you don't want to deal with it but do care, you can likely find a local acoustician to come in and take a room reading. He or she can probably be in and out in an hour if you're already cabled in and rocking.
Conclusion: Mixing With a Subwoofer is Critical
You can get a commercial subwoofer if you must. However, if you want to enjoy your music and movies the way that the artist intended you to – and really, why wouldn’t you? – then getting a studio subwoofer is truly the only way to go. This is especially essential if you have any inkling of using it for projects beyond making an action movie sound super cool.
If you want to record or mix music, for instance, there really is no other option. As a professional of hobbyist, do yourself the favor of using the right gear for the job.
You can find all of the information you need to get the ball rolling in the sections posted above. What’s more, when you’re ready to pull the trigger, you can take a look at our suggestions on the u003ca href=u0022https://ledgernote.com/reviews/best-studio-subwoofers/u0022u003ebest studio subwoofersu003c/au003e for various budgets. There's something for everyone!
Jared H.
 Jared has surpassed his 20th year in the music industry. He acts as owner, editor, lead author, and web designer of LedgerNote, as well as co-author on all articles. He has released 4 independent albums and merchandise to global sales. He has also mixed, mastered, & recorded for countless independent artists. Learn more about Jared & The LN Team here.