The most basic explanation of a limiter would be that it's a device that stops all audio (whether digital or an electrical signal) from exceeding a certain volume. Though it can operate at any volume level, it's mainly used at the maximum allowed amplitude to avoid the phenomenon of peaking.
Before we dive in much further, let me lay out the game plan here. We're going to define what an audio limiter is, talk about it's brother the compressor, and then explain when you would want to apply limiting and how to go about doing it.
When we're done, you'll know everything you need to know plus a little bit more, all without too much technical jargon and complicated language. Let's dive right in.
What is a Limiter?
A limiter is a tool for signal processing (like mixing music) that applies a type of dynamic range compression. That means that it can take an input signal, evaluate its amplitude (volume), and attenuate (lower) the peaks of the waveform if those peaks reach and exceed a threshold value.
In other words, if we set the limiter's threshold to -5 dB, it will not allow any audio to be louder than -5 dB. The audio may seem to grow louder as it slams into the threshold and the average volume of the audio increases, but the maximum amplitude is blocked from climbing any higher.
Typically, we set the threshold to 0 dBFS (decibels Full Scale, the digital scale) when mixing in the box. When using analog metrics, we set it around +24 dBu (decibels unloaded). Both of these points are the equivalent maximum allowed amplitude and anything above it is considered 'peaking.'
Unintentional peaking is referred to as audio clipping, which at best leads to distortion and ruining recordings or broadcasts and at worst leads to heat damage and blown speakers. We'll explain clipping more below, because a limiter actually applies clipping purposefully but tastefully.
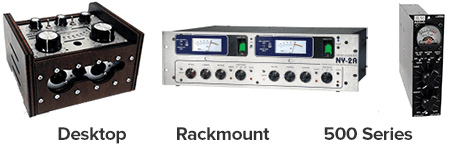
You find these tools in two forms: hardware and software. The hardware units deal with actual electricity. You'll see these in rack mount units in music studios or radio stations. The other type are VST plugins for digital audio workstations that act upon digital signals.
The Difference Between a Limiter & Compressor
A compressor is the main tool for applying dynamic range compression. It has a threshold value that is set at a certain decibel level and any audio that exceeds that level is then reduced in volume by a ratio you are allowed to control.
So if the threshold is set to -10 dB and the ratio is set to 3:1 (three-to-one), then for every 3 dB that go over -10 dB, only 1 dB actually pops out of the other side. An example would be the amplitude reaching -1 dB, which is 9 dB over -10 dB. The compressor would reduce the peak at -1 dB down to -7 dB (9 dB went in and only 3 dB came out, due to the 3:1 ratio).
That can get complicated. You can read our article What is a Compressor? for more details if you care. The main point is that a compressor still lets some audio volume past the threshold while reducing that volume by some ratio. A limiter lets no audio past it's threshold.
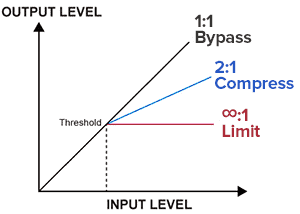
All you really need to understand concerning the difference between a limiter and compressor is that a limiter (a sub-type of compressor) is like a compressor who's ratio is turned up to infinity. It applies a hard stop at the threshold and does not allow any waveform peaks to exceed that value, period.
If you really want to get confused, think about this: All limiters are compressors, but not all compressors are limiters.
When to Use a Limiter
We could just have easily called this section "Why do we use a limiter?" There's really three main cases:
- To protect our equipment in live settings
- To save any live recordings from accidental peaking
- For maximizing the volume of audio during mastering
In live sound reinforcement systems with expensive power amplifiers and mixing boards, the last thing you want is a bad electrical spike zapping its way through your gear. Even worse is some musician cranking their guitar up to the highest volume and causing loudspeaker damage (and hearing damage for the listeners).
When recording in a music studio, you may have the perfect take ever but a few parts peaked and sound horribly distorted. This can cause you to have to delete that take and try again, but you never get the perfect performance out of your vocalist or musician again. A limiter would have stopped that peaking from occurring.
Mastering engineers use limiters to increase the average volume of an audio track (like a song). If you can push loud parts like snare drums up against a limiter's threshold without causing noticeable distortion, you can turn the entire song up another 5 dB with make-up gain for example.
These days, the normal amount of loudness is very high (there's a fight going on in the music industry called the Loudness War if you want to learn more) because dumb major label executives and TV commercial creators thought destroying your ear drums would get your attention in a positive way, and now everyone competes to be as loud as possible.
This is all made possible, good and bad, by the limiter. To rephrase, you should consider using one of these any time you need to defend expensive equipment from electrical spikes or extreme volumes or to preserve quality in a recording or live broadcast from occasional peaking.
How to Use a Limiter
In general, you'll get a handful of settings on these but you'll only use a a few of them:
- Input Gain
- Release Time
- Lookahead Time
- Soft or Hard Knee
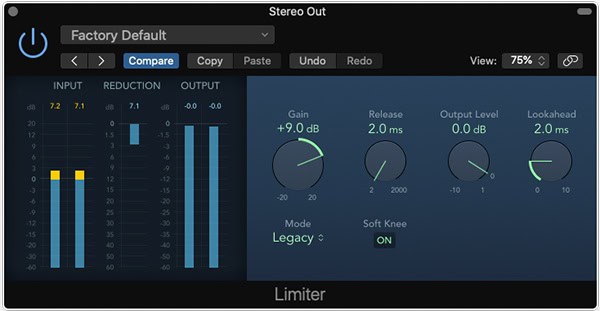
Threshold - As mentioned above, you'll typically set the limiter's threshold to 0 dBFS (the maximum value for amplitude). This is the case so often that mine don't even offer the ability to reduce the threshold lower than that.
Input Gain - The input gain won't be used unless you're limiting during the mastering process. This is basically a volume control for all of the audio before it goes through the plugin or hardware
Release Time - This is how long the gain reduction continues after the amplitude dips below the threshold again. If set too long you'll get an audible pumping sound, but too short and it becomes jarring. Note that there's no attack setting because you always want it reacting as quickly as possible when the audio jumps over the threshold.
Lookahead Time - This time only exists digitally and allows the plugin to look forward in time. It helps it anticipate when it will need to begin reacting and increases precision. It's set between zero and 10 milliseconds usually, an incredibly low amount of time.
Knee - The knee determines how gradual the gain reduction starts. A soft knee is more gradual, less noticeable, and more musical. A hard knee is abrupt and can sound jarring. A soft knee is preferable in all cases except for loud sound reinforcement systems.
That's all there is to it. Your goal, unless mastering, is to never need this tool, but setting it up before your analog-to-digital converter is always a good idea when recording live. Having one on your master output during live performances is a great idea as described above.
You can use them during mixing if you really know what you're doing, but the general rule is to not need it. You want to know when you're peaking so you can back off a bit in volume so you offer enough headroom to the mastering engineer.
Soft Clipping vs. Hard Clipping
I lied, there's one more thing. As we said, we want to void unintentional peaking. This cuts off the waveform, called clipping, which leads to bad distortion. If it's real atrocious it can damage guitar and bass amplifiers, the drivers in your speakers, tear your speaker cones, and more.
Sometimes we apply clipping on purpose, like with distortion pedals or overdriving a tube in an amplifier. Limiters apply clipping in order to stop real peaking from occurring with its detrimental effects.
It does this either with soft clipping, which has rounded edges when it "cuts off" the top of the waveforms, or with hard clipping where it creates a shelf like a plateau. This happens on the peaks and the troughs.
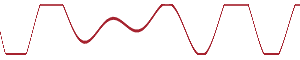
Relatively, soft clipping is new and a much preferred method because it's less abrupt and noticeable to the listener.
Audio Limiters Demystified!
That's all she wrote! These tools are basically a last ditch defense mechanism in signal processing to save us time and money. They can be placed in various segments of your signal chain depending on why you're using it, mainly right before your converters or before your amplifier.
Now you have an answer to the question, u0022What is a limiter?u0022 As you can see, they're not only useful tools in sneaking out a lot more volume, but they also salvage important recordings and save us disasters with expensive loudspeaker equipment and amplifiers. All that's left is for you to incorporate them into your workflow.
Jared H.
 Jared has surpassed his 20th year in the music industry. He acts as owner, editor, lead author, and web designer of LedgerNote, as well as co-author on all articles. He has released 4 independent albums and merchandise to global sales. He has also mixed, mastered, & recorded for countless independent artists. Learn more about Jared & The LN Team here.