There's a ton of advice out there being spewed every time someone asks "How do I program realistic drums?" "Drum programming isn't hard, dummy," they say. The answers are always the same...
- Learn how a real drummer drums
- Use real drum samples instead of synth-based
- Layer your sounds on top of each other
Yeah yeah yeah. Here's the problem with that nonsense. Knowing how a real drummer swings his sticks tells you nothing of how to transport that magic into the computer. Using samples of real live drums only helps to a degree.
It'll be the exact same hits over and over again and no drummer hits the hi-hat at the same perfect timing at the same spot on the hat with the same force a million times in a single song. And how many real life snares trigger more than one sound each time it's hit? That's the least realistic thing ever.
The problem is that the human ear and brain can distinguish very minute differences in sound. This means the lack of those minute differences makes even the world's most unique and complex drum pattern boring after 30 seconds.
So here's what we're going to do. I'm going to share the tips and tricks that the pro's use to keep you from getting bored before the first verse is over. You'll be like, "Why didn't I think of that!?!?"
Before we jump straight into the 5 tips, let's cover some basics that may have slipped past you. This entire discussion assumes that you know how to work within a digital audio workstation and can at least click in drum patterns on a MIDI piano roll or beat sequencer.
You may not always want to use one-shot samples from real drum kits. If you're programming metal or rock drums, sure. But for pop, rap, EDM, and anything electronic-based that's rarely ideal.
But the suggestion is still sensible to a degree. If you're using the stock Fruity Loop sounds, even in the new FL Studio... your beats are going to sound amateur just by association.
You need to find some sounds you like that set you apart from everyone else that just launched their DAW for the first time. If you can't afford this, then layering sounds can work for you, especially if you have the mixing skills to EQ and compress them into a cohesive whole. Another trick is to switch snares, as an example, between specific song segments.
It also helps to understand basic song structures and how they help the song breathe and move to tell an emotional story. Adding in complex drum breaks at the right moments or perhaps removing drums can help accentuate these transitions.
These are the small items that help your drum patterns not become boring. If you're building 2-bar loops, go for 4-bars. Better yet go for 8-bars, but don't get too crazy with it.
Your beat needs to be predictable and steady yet offer non-stop novelty for the listener. It's paradoxical and difficult to achieve, but that's where these 5 tricks will breathe fire and energy into your drum programming.
5 MIDI Drum Programming Tips
I'm going to apply each of these tricks to a simple four measure drum loop I made as we go along. It's more rap oriented, but I'll mention how these tricks should be applied in all genres as we go. At the end I'll give you a before and after example of the loop all combined.
1) Realistic Drum Flams & Breaks
We all use flams when we program drums because we've heard it enough times that it's intuitive. I'm not talking about complicated paradiddles and all this other stuff.
I'm talking about the basic double snare hit or double kick drum, two that happen in quick succession. They create a "thicker" sensation for the secondary hit and add a sense of syncopation to the rhythm.
The Problem: When you click in a drum flam in your sequencer without using a velocity sensitive MIDI controller, the software is going to apply the default settings. No human drummer could nail the exact same velocity twice during a flam even if he practiced for years. Nor would he want to, because it defeats the purpose.
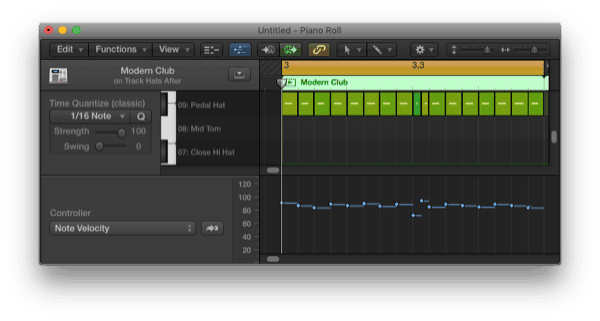
To solve this issue of complete unrealism, you need to find within your software the view or window that allows you to edit the velocity of each MIDI note. I'm using Logic Pro X for this article. Here's how it the controller works that goes along with the piano roll.
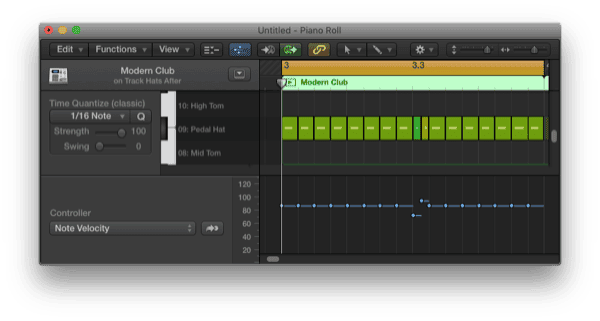
In this case, you're looking at the hi-hats. Now, this isn't necessarily a purposeful flam, but it functions the same way. I've also applied this to the kick drum where it hits twice quickly.
The top right half shows each hi-hat note color-coded by velocity. I opened the "controller" below to allow me to edit each of these velocities individually. You see that all of the notes except the two 1/32nd notes are equal in velocity.
I took the second to consider how this would work in reality. The drummer would purposefully hit the first note (the flam) lighter than the main note, because that's the point. It's almost like a reverse delay.
But then I figured he would mentally anticipate returning to the normal velocity and over-compensate slightly. So I dropped the velocity of the flam and increased the main hit over the average. I've done the same for the kick drum.
You can apply this anywhere, for snare rolls, complex breaks, a run down the toms, etc. This is one of the few places you can quickly get out of robot-land and back into the realm of humanity, because these are the pieces of "ear candy" that the listener really grabs on to.
Convince them here and half of your battle to create realistic and interesting drum programming is won. You want to use distraction in some cases and draw attention in others when masking the fact that this is actually a computer playing out the patterns.
2) Randomize Drum Hit Velocities
So we already dealt with the purposeful velocities surrounding flams and breaks. But what happens during the rest of the drum performance? In general, it's randomized!
Remember, our goal is to create micro-changes. They don't have to be outrageous and obvious. It might even be sub-conscious but these are the small things that separate humans from robots.
The Problem: Any drummer that's tapping out a steady rhythm is going to produce slight variations in the velocity of their sticks. Only a robot can be absolutely consistent and humans hear this and are turned off from it.
I'm going to once again use the hi-hats as the example because this is where it's most obvious for the listener and where you'll receive your greatest gains. As a drummer is steady railing on the hi-hats, all kinds of muscle twitches and variations are going to happen. Let's simulate that by again tweaking the velocities of the hi-hats.
You'll see that the rest of the hits we didn't manipulate before now hit random velocities instead of the steady average. The variation has less of a change in velocity than the purposeful changes we made in the flam.
Note that I made the first hit more powerful than the others, as the downbeats usually are since this is how we keep time. That's it, very simple. You can do this with your snares, kicks, and any other drum you're using.
When the drums go through the mixing phase, compression will be applied that will make these changes even more subtle, so don't under-do it, but don't go crazy with it. The rule of thumb is always to set it where you like it and then back off just a tad.
3) De-Quantize with Micro-Movements
We've changed up the velocities to feel more realistic and energetic, but that's not the only aspect of drumming that varies with real live drummers. A drummer may keep the most steady tempo on the planet, but when you dig down to the smallest units of time you'll find discrepancies.
Just like in human-made music, you want the strong beats to stay in time, but it's the slight differences in the sub-divisions that bring it to life. But drum programming is so square compared to how real humans play.
The Problem: No drummer can keep perfect time at the sub-divisions of 16th and 32nd notes. We need to create fluctuations in time to mimic real drummers as well.
Now, in this currently over-produced industry, you'll want to be careful and consider your genre. Most pop-oriented genres aren't going to want to waver much more than the hi-hats. You want extremely tight timing with the tiniest of micro-variants.
In rock or heavy metal you'll want to tweak the timing of everything. For pop, EDM, hip-hop, etc. you need to keep the kick and the snare dead on with their timing. With that in mind, we'll use the hi-hats again for the example.
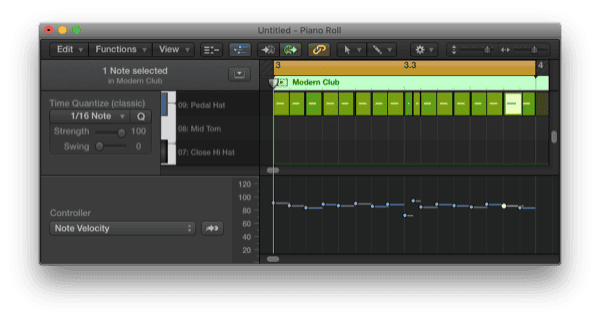
You'll see (and it's hard, I know the pics are small) that there are tiny variations in time placement now for each note. I left about 1/3rd of them dead on and moved the others forward or backward on the order of milliseconds. Maybe about 10ms... micro-movements. Now we're starting to feel the humanity!
4) Simulate Frequency Fluctuations
Now we're getting into a more complex part of your beat sequencing software. You'll need to enable automation for this one. Automation is just like the Controller above to change MIDI data, except it's used for actual recorded clips and to change plugin parameters on the fly.
This means that you can move the fader to change volume, change the amount of reverb being added, etc. Any setting or knob a plugin has can be changed with automation.
The Problem: No drummer hits a drum at the exact same place or speed every time. That means that there will be slight changes in frequency each time a real drum is hit.
We can't discuss exactly how to do this for every single DAW out there, but the idea is the same. You'll need two automation lines, one set to one of a parametric equalizer's peak's frequency and one set to the same peak's gain.
What we'll do is bounce a tight Q-curve around the core frequencies of the hi-hat or other drum and at the same time randomize a boost or cut in the volume. Some DAW's have "randomize pencils," like in Pro-Tools where you can just drag and draw a random line.
Other's, like Logic Pro X have a lot of hoops to jump through to set a lot of automation points, select them as events, and then randomize them in the transform window.
You'll have to figure out how it's done, or do it like me and take the time to draw it in manually. It's worth the time and quick, especially if you're using shorter loops and know how to copy and paste automation data from track to track.
In this case I'm going to use a 2.00 Q for the curve and try to bounce around from 4 kHz up to 7 kHz with a gain variation of +/- 2 dB or so. If you sweep over too much of the spectrum with too much gain it's going to sound like some kind of alien electronics. Here's how it looks on the automation tracks.
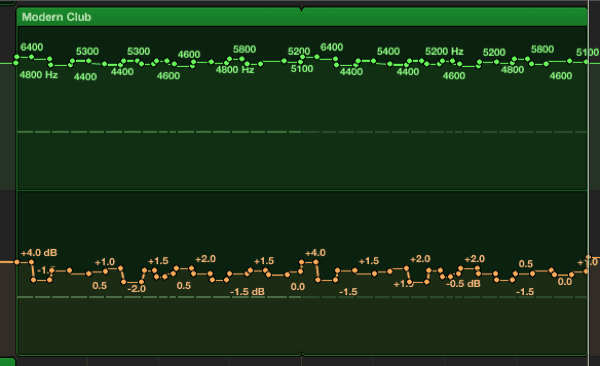
That's the frequency on top and the gain on bottom. Here's how it looks on the EQ plugin:
Now that's fancy! At this point, you should notice a massive difference in the excitability of your instrumental that you've been working on, following through these tips. It's the exact same beat from before with that human touch added to it.
Your listeners will never hear the "before" version and may not display the same excitement you will while listening to the "after," but that's only because ignorance is bliss. Their minds and ears and hearts will love your drums much more than your previous releases, but they won't know why. Subtle and subconscious is the key!
5) Human Drummers Only Have Two Arms!
The final tip is one that people just don't seem to consider. When we are sitting in front of our computers or MIDI controllers, it's so easy to keep layering rhythms and creating uniquely complex sequences... but is it realistic? Does it match the expectation we all have of a man that only has two arms and two legs?
Less is always more, because music itself is the breath and life between notes. It's the contrast of sound and silence. The juxtaposition is what allows rhythm to exist at all.
If you catch yourself designing drum programming patterns that no human could possibly deploy, then you've gone overboard and your listeners will know it. They may not put their finger on the reason, but they'll know something is off. Keep it realistic.
Psychological incongruence and cognitive dissonance will turn your listeners off faster than your unbelievable drum beat is triggering! Combine these tips with some of our MIDI bass tips and your tracks will have an entirely new level of energy to them.
Before & After Drum Programming Example
And finally we've made it. The proof is in the pudding. Here is the before and after audio example of the original loop followed by the version with our tweaks, then repeated.
The first time around is hi-hats only so you can listen in closely onto those changes. I marked them with myself saying "Before" and "After" at the start of each switch. It's subtle so listen closely!
These are the kind of changes, the kind of attention to detail, that are easy to skip because they are time consuming. But they all add up, along with the other tips and tricks we discuss across Ledger Note, that add up and separate professionals from hobbyists.
And That's How to Program Drums!
If you're serious about your music, make sure to check out the rest of the Beat Production column and take a look at the Mixing u0026 Mastering column as well, where the real magic comes out. In the meantime, happy drum programming!
Jared H.
 Jared has surpassed his 20th year in the music industry. He acts as owner, editor, lead author, and web designer of LedgerNote, as well as co-author on all articles. He has released 4 independent albums and merchandise to global sales. He has also mixed, mastered, & recorded for countless independent artists. Learn more about Jared & The LN Team here.