Bass programming is my second favorite part of making beats right after the drums. Laying down the initial, fundamental groove of the song helps the rest of the process move along without any problems.
And that needs to be the order of operations:
Bass then drums or drums then bass.
The problem is most of us are going to have a real hard time dealing with the bass. The melodies are usually pretty weird because they rarely sound like a lead melody. How do the pro's write these crazy basslines? I'll tell you.
Another issue is in the balance between the kick drum and bass as well as the mixing of anything in the lower end of the frequency spectrum.
Without the proper gear to be able to hear these well, you'll almost always have a nightmare of a mix in the end.
We also end up with an awesome bass riff only to find that it's not very intelligible to the listener's ear once we've arranged and orchestrated the rest of the song. We can fix that too!
7 Bass Programming Tips
Let's waste no time. Apply these bass programming tips to your workflow and you can dodge most of the issues that ultimately scream "amateur" to your listeners.
1) Let the Bassline Write Itself From the Chords
Before you sit down to write the bassline, you've at least mapped out a key and a chord progression, right?
If you have chords then you can lay them out with their basic rhythm in the piano roll of your DAW or MIDI software. Now take your time and choose chord inversions or play them straight. At this point you have a stack of notes for each chord...
And one is on the bottom. That's your bass note! Drop those or duplicate them into a lower octave on a different lane or track for your synth or MIDI bass sound.
If you listen you already have something that resembles bassline.
These notes are hitting on most of your downbeats. You can fill in the gaps if you like a busy bassline (I love those crazy 80's pop basslines, myself) with passing tones and neighbor tones.
Basically, these are embellishment notes that don't necessarily reside in the chords (but they do follow your key signature!) but occur in between them on upbeats to provide a more complete melody and sense of syncopation.
2) Use Portamento Glides If Needed
Sometimes you want to really accentuate the attack of each bass note. But sometimes that's not appropriate for the song and you need a sexier glide between notes instead of a clean cut.
This is the difference between plucking a note, releasing and moving your fingers to another fret on the neck, and then playing a different note versus sliding your fingers up or down the neck to the next note. It's a sliding glide through the pitches between the two main notes.
The best DAW or MIDI software worth it's weight will have a simple button to turn or set of options to use portamento, which accomplishes this effect.
Now, on some piano rolls you can simply overlap the notes to achieve this effect too, which is a nice shortcut that offers visual cues as well. You can choose which notes to use portamento as well without digging into automation as well.
3) Don't Make the Bass & Kick Drum Compete
The core method to get around most of your bass problems in terms of mixing and balance is to choose the right sounds for your bass synth and your kick drum. Yes, they both reside in the bass region of the frequency spectrum, but their fundamentals need to be separated or you'll end up with a blur.
Choose for each song if your kick or your bass should be deeper than the other.
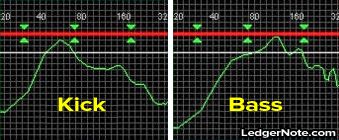
For instance, your kick drum can be banging in the sub-bass region around 40-60 Hz while the fundamentals of the bassline live in the 60-90 Hz range. Now you have a lot less work to do when it comes time to EQ and compress the two since they already dodge each other for the most part.
- You can explore this tip and the one below in more depth in our article Mixing Bass & Kick For Low-End Balance.
4) Use a Side-Chain Compressor To Duck the Bass
Another issue that can be a huge problem for intelligibility of the kick drum is when the kick and bass hit at the same time. Even if their separated as described above it can still confuse the ears since they occur at the same point in time.
Don't feel like you have to create these insanely syncopated beats so the kick and bass never land at the same time. There's a better way of dealing with this.
What you can do is add a compressor to your bass and set up the side-chain to the kick drum. Now, the compressor will only be engaged based on the volume of the kick drum instead of the bass, but it will compress the bass!
This is called ducking, because the bass will quickly reduce its volume so the attack of the kick can be heard better and then return to full volume. It "ducks" out of the way.
Use your ears though. You don't need a lot of volume reduction on the bass nor do you want that. Use just enough to bring clarity to the kick without creating a pumping sensation in the bass. Use a faster attack but test out a slower release if you're still having pumping issues.
5) Saturation & Distortion Boosts the Harmonics
Bass is called bass for a reason. It's in the bass frequencies. The lower sounds move, the harder of a time the human ear has in making out the notes, especially without a good subwoofer. If it gets low enough we don't even hear them, only feel them!
You've probably noticed this and choose kick drums with a snap to them in the higher frequencies. If the bass sound you're using can't be detected real well after you've layered up the rest of the song, then you can use a couple of tricks to help it pop back out.
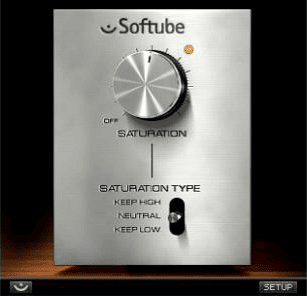
Saturation and distortion are essentially the same thing. It all depends on how you set up the plugin but what you're looking for is to make the harmonic frequencies of the fundamental notes pop out several octaves above. This gives the ear something to latch on to as it tries to follow along with the bassline.
- We wrote an article previously describing saturation and listing the best plugins for the job (many being free!). Check that saturation article out here.
One more trick is to use a slow attack when you compress the bass so that it has a louder volume pop at the start of each note.
6) Don't Over Quantize when programming bass
We've come a long way since MIDI was invented in the 80's. We explored it and ran it into the ground, then it slipped out of the public eye a bit as the New Age and Hip Hop genres kept improving upon it.
What we've come to realize is that humans don't want a completely perfect (also known as robotic) sound. It's not the synthetic sounds that's the problem.
It's the impeccable, impossible timing of the rhythm and consistency of every drum hit and pick pluck on the bass string. No human can pluck a bass string right on time with the same force on the same spot to produce the same frequencies every time.
Allow for some variation. If you programmed in your bass notes by mouse, then shift them around a few milliseconds here and there. Automate a parametric equalizer to slightly detune notes randomly.
Do the same with the note velocity as well. This sense of humanity is what allows listeners to connect emotionally.
If you played the bassline in on a MIDI controller of some type, then don't quantize it! Just fix the timing of any single note that is too far off. Otherwise leave it alone and let it live!
7) Use a Chorus Effect for a Stereo Spread
Sometimes you hear tracks by artists and are mind blown at how they sound like they are in stereo even though we know to only ever mix our bass in mono right up the center.
It's correct that you should leave all of the bass energy in the center. Human ears can't localize bass that well and it's better to spread that energy equally between both speakers.
But you can spread the upper frequencies and harmonics across the stereo field to gain a sense of width. We talk more about this tactic at length in this post: Can We Mix the Kick Drum & Bass in Stereo? Definitely investigate that, but the short of it is that you can create an auxiliary track and send a copy of the bass to it.
Then, you'll use a high-pass filter to EQ out the bass, leaving only the upper frequencies, perhaps above 150 Hz (tweak it to taste, don't go too low). From there, add a chorus effect (you can try a flanger or phaser too) to force these upper frequencies to smear across the stereo field. It sounds incredible and is a secret weapon to a lot of EDM and hip hop production.
Bring Your Bass Programming to Life
The bass programming tricks above are going to solve all of the problems your listeners will have in really hearing the details and peculiarities of your basslines.
But there are still some issues, such as mixing in too much bass or not being able to hear the details yourself. No tricks can solve these for you, but some better gear can. If you're on a budget, score a pair of the best closed-back studio headphones you can so you can isolate yourself from the environment.
If you've already bought some great studio monitors and are determined to get the most out of them then you may consider adding a subwoofer, but what's really going to help more than anything is to explore adding some acoustic treatment to your room.
Dealing with bass programming is the most fun but most challenging part of writing, recording, and mixing. But the tips above should help you sort all that out quickly.
Jared H.
 Jared has surpassed his 20th year in the music industry. He acts as owner, editor, lead author, and web designer of LedgerNote, as well as co-author on all articles. He has released 4 independent albums and merchandise to global sales. He has also mixed, mastered, & recorded for countless independent artists. Learn more about Jared & The LN Team here.